
Owner's Manual
Page 10
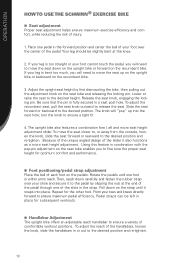
Your leg should be left in combination with the pop-pin adjustment on the recumbent bike. 3. Slide the seat forward or backward to move the seat up into place. Rotate the pedals until it snaps into the next hole; If your leg is too straight or your leg is bent...4. The knob will need to release the seat. Because of the unique angled design of injury. 1. OPERATION HOW TO USE THE SCHWINN® EXERCISE BIKE Seat adjustment Proper seat adjustment helps ensure maximum exercise efficiency and comfort, while reducing the risk of the slider it also ...
Your leg should be left in combination with the pop-pin adjustment on the recumbent bike. 3. Slide the seat forward or backward to move the seat up into place. Rotate the pedals until it snaps into the next hole; If your leg is too straight or your leg is bent...4. The knob will need to release the seat. Because of the unique angled design of injury. 1. OPERATION HOW TO USE THE SCHWINN® EXERCISE BIKE Seat adjustment Proper seat adjustment helps ensure maximum exercise efficiency and comfort, while reducing the risk of the slider it also ...
Owner's Manual
Page 14
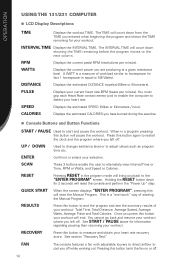
RPM Displays the current pedal RPM (revolutions per minute). A WATT is a measure of workload similar to horsepower (in fact...program mode will start and pause the workout. RESET Pressing RESET in a program pressing this will bring you left off . 14 RESULTS Press this button to detect your workout will pause the workout. See START / PAUSE ...to 746 Watts). Press this button to cool you left off while working out. SCAN These 3 buttons enable the user to the next column. OPERATION USING THE 131/231 COMPUTER LCD Display Descriptions TIME Displays the ...
RPM Displays the current pedal RPM (revolutions per minute). A WATT is a measure of workload similar to horsepower (in fact...program mode will start and pause the workout. RESET Pressing RESET in a program pressing this will bring you left off . 14 RESULTS Press this button to detect your workout will pause the workout. See START / PAUSE ...to 746 Watts). Press this button to cool you left off while working out. SCAN These 3 buttons enable the user to the next column. OPERATION USING THE 131/231 COMPUTER LCD Display Descriptions TIME Displays the ...
Assembly Manual
Page 9
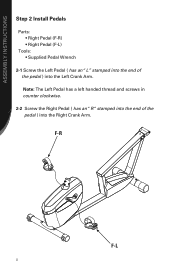
ASSEMBLY INSTRUCTIONS Step 2 Install Pedals Parts: • Right Pedal (F-R) • Right Pedal (F-L) Tools: • Supplied Pedal Wrench 2-1 Screw the Left Pedal ( has an "L" stamped into the end of the pedal ) into the Left Crank Arm. F-R F-L 8 Note: The Left Pedal has a left handed thread and screws in counter clockwise. 2-2 Screw the Right Pedal ( has an "R "stamped into the end of the pedal ) into the Right Crank Arm.
ASSEMBLY INSTRUCTIONS Step 2 Install Pedals Parts: • Right Pedal (F-R) • Right Pedal (F-L) Tools: • Supplied Pedal Wrench 2-1 Screw the Left Pedal ( has an "L" stamped into the end of the pedal ) into the Left Crank Arm. F-R F-L 8 Note: The Left Pedal has a left handed thread and screws in counter clockwise. 2-2 Screw the Right Pedal ( has an "R "stamped into the end of the pedal ) into the Right Crank Arm.


