
Assembly Manual
Page 4
... Computer Wire Lower HR Wire Front Stabilizer Flathead Screw 8x16L Main Frame Pedals Flat Washer Seat Rail Post Rear Stabilizer Seat Rail Seat Rail HR Wire Seat Handlebar Seat Adjustment Knob Small Flat Washer Seat Bottom Allen Bolt 8x1.25x45L Seat Support Frame Seat Back Bottle Holder Screw 5x14L AC Adaptor Reference # 1 2 3 4 5 6 7 8 9 10 11 12 13 14 15...
... Computer Wire Lower HR Wire Front Stabilizer Flathead Screw 8x16L Main Frame Pedals Flat Washer Seat Rail Post Rear Stabilizer Seat Rail Seat Rail HR Wire Seat Handlebar Seat Adjustment Knob Small Flat Washer Seat Bottom Allen Bolt 8x1.25x45L Seat Support Frame Seat Back Bottle Holder Screw 5x14L AC Adaptor Reference # 1 2 3 4 5 6 7 8 9 10 11 12 13 14 15...

Assembly Manual
Page 7
... HR Wire Upper Computer Wire Lower HR Wire Front Stabilizer Flathead Screw 8x16L Pedals Flat Washer Seat Rail Post Rear Stabilizer Seat Rail Seat Rail HR Wire Seat Handlebar Small Flat Washer Seat Bottom Allen Bolt 8x1.25x45L Seat Support Frame Seat Back Bottle Holder Screw 5x14L AC Adaptor Part # 18165 18200 18094 18197 18001 18098 18086...
... HR Wire Upper Computer Wire Lower HR Wire Front Stabilizer Flathead Screw 8x16L Pedals Flat Washer Seat Rail Post Rear Stabilizer Seat Rail Seat Rail HR Wire Seat Handlebar Small Flat Washer Seat Bottom Allen Bolt 8x1.25x45L Seat Support Frame Seat Back Bottle Holder Screw 5x14L AC Adaptor Part # 18165 18200 18094 18197 18001 18098 18086...

Assembly Manual
Page 8
... 4 FLAT WASHERS (#15). Please take just a few moments to read over these instructions to the underside of the SEAT BOTTOM (#23) using the provided screwdriver. Assembly Stage #1 Assemble Seat and Handle Bar Assembly hardware required: (8) M8 Allen Bolts 45 mm long (item #25) (4) M8 Allen Bolts ...item #5) (12) Flat Washer Ø8* Ø 16*2T(item #15) (8) Screws M4x14L (item #29) Step 1: Attach HANDLEBAR ASSEMBLY (#20) to SEAT FRAME (#26) with the process to -follow stages. Instructions IMPORTANT!: To ensure ease of assembly please verify the size and quantity of the assembly process...
... 4 FLAT WASHERS (#15). Please take just a few moments to read over these instructions to the underside of the SEAT BOTTOM (#23) using the provided screwdriver. Assembly Stage #1 Assemble Seat and Handle Bar Assembly hardware required: (8) M8 Allen Bolts 45 mm long (item #25) (4) M8 Allen Bolts ...item #5) (12) Flat Washer Ø8* Ø 16*2T(item #15) (8) Screws M4x14L (item #29) Step 1: Attach HANDLEBAR ASSEMBLY (#20) to SEAT FRAME (#26) with the process to -follow stages. Instructions IMPORTANT!: To ensure ease of assembly please verify the size and quantity of the assembly process...

Assembly Manual
Page 9
Step 4: Attach SEAT BACK (#27) to SEAT FRAME (#26) with 4 ALLEN BOLTS 45mm (#25) and 4 WASHERS (#15). Tighten Bolts. Note: Finished seat should look like picture below: Tighten Bolts. Step 3: Attach SEAT (#23) to SEAT FRAME (#26) with 4 ALLEN BOLTS 45mm (#25) and 4 WASHERS (#15).
Step 4: Attach SEAT BACK (#27) to SEAT FRAME (#26) with 4 ALLEN BOLTS 45mm (#25) and 4 WASHERS (#15). Tighten Bolts. Note: Finished seat should look like picture below: Tighten Bolts. Step 3: Attach SEAT (#23) to SEAT FRAME (#26) with 4 ALLEN BOLTS 45mm (#25) and 4 WASHERS (#15).

Assembly Manual
Page 10
...16) with 2 FLAT HEAD SCREWS (#12). Tighten bolts Step 7: Insert SEAT PIN ADJUSTMENT KNOB (#3) into HR input on the back of the seat assembly (inset picture). Assembly Stage #2 Attach Rear Stabilizer and Seat Rail to Seat Assembly Assembly hardware required: (4) M8 Allen Bolts 16mm (item #5) (4) ...item #12) Step 5: Attach the REAR STABILIZER (#17) to SEAT RAIL POST (#16) with 4 FLAT WASHERS (#15) and 4 ALLEN BOLTS (#5). Slide the seat assembly from stage 1 onto the SEAT RAIL (#9). Insert HR CABLE (#47) into SEAT FRAME (#8). Tighten bolts. Tighten seat assembly to the rail with the...
...16) with 2 FLAT HEAD SCREWS (#12). Tighten bolts Step 7: Insert SEAT PIN ADJUSTMENT KNOB (#3) into HR input on the back of the seat assembly (inset picture). Assembly Stage #2 Attach Rear Stabilizer and Seat Rail to Seat Assembly Assembly hardware required: (4) M8 Allen Bolts 16mm (item #5) (4) ...item #12) Step 5: Attach the REAR STABILIZER (#17) to SEAT RAIL POST (#16) with 4 FLAT WASHERS (#15) and 4 ALLEN BOLTS (#5). Slide the seat assembly from stage 1 onto the SEAT RAIL (#9). Insert HR CABLE (#47) into SEAT FRAME (#8). Tighten bolts. Tighten seat assembly to the rail with the...

Assembly Manual
Page 12
... Required: (3) Allen Bolts 16 mm long (item #5) (3) Flat Washers (item #15) Step 10: Attach the SEAT RAIL HR WIRE (#19) to the MAIN UNIT (#13) with 3 16mm ALLEN BOLTS (#5) and 3 FLAT WASHERS (#15). Attach the SEAT RAIL to the LOWER HR WIRE (#10). Be careful not to function. Tighten bolts. Carefully slide... the seat rail assembly onto the receiver on the back of the seat. CAUTION! Failure to do so could cause damage to the wires and cause the heart rate feature not to pinch the heart rate wires...
... Required: (3) Allen Bolts 16 mm long (item #5) (3) Flat Washers (item #15) Step 10: Attach the SEAT RAIL HR WIRE (#19) to the MAIN UNIT (#13) with 3 16mm ALLEN BOLTS (#5) and 3 FLAT WASHERS (#15). Attach the SEAT RAIL to the LOWER HR WIRE (#10). Be careful not to function. Tighten bolts. Carefully slide... the seat rail assembly onto the receiver on the back of the seat. CAUTION! Failure to do so could cause damage to the wires and cause the heart rate feature not to pinch the heart rate wires...

Assembly Manual
Page 15
... general fitness and exercise guidelines. Attach COMPUTER (#1) to HANDLEBAR ASSEMBLY (#2) with COMPUTER MOUNTING SCREWS (#3). (In computer back) Tighten with feet on the bike is located at full extension. Step 15: Plug AC ADAPTOR (#71) into the wall and into the recumbent bike. The POWER PLUG...it! Please reference the Owner's Manual for your fitness goals! Schwinn Customer Service 1.800.864.1270 You're finished and now you can begin to reach your height. 1. Unlock "seat locking" mechanism. 2. Adjust seat location so that with Phillips head screwdriver. Step 14: Attach ...
... general fitness and exercise guidelines. Attach COMPUTER (#1) to HANDLEBAR ASSEMBLY (#2) with COMPUTER MOUNTING SCREWS (#3). (In computer back) Tighten with feet on the bike is located at full extension. Step 15: Plug AC ADAPTOR (#71) into the wall and into the recumbent bike. The POWER PLUG...it! Please reference the Owner's Manual for your fitness goals! Schwinn Customer Service 1.800.864.1270 You're finished and now you can begin to reach your height. 1. Unlock "seat locking" mechanism. 2. Adjust seat location so that with Phillips head screwdriver. Step 14: Attach ...

Owner's Manual
Page 5
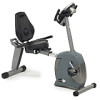
... seats offer stability, comfort, and support Schwinn Bio-Fit™ pedals provide proper alignment for efficient pedaling Console slider mechanism contributes to an ideal user interface position Seat slider mechanism ensures optimum seat height and fore/aft adjustment (Offered on upright models) Lumbar support can be adjusted for improved lower back support (Offered on recumbent...
... seats offer stability, comfort, and support Schwinn Bio-Fit™ pedals provide proper alignment for efficient pedaling Console slider mechanism contributes to an ideal user interface position Seat slider mechanism ensures optimum seat height and fore/aft adjustment (Offered on upright models) Lumbar support can be adjusted for improved lower back support (Offered on recumbent...

Owner's Manual
Page 8
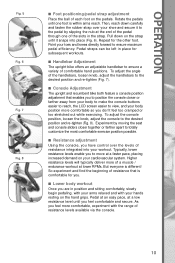
...on the seat tube enables you to move the seat down on the upright bike or forward on the recumbent bike. The upright bike also features a combination fore / aft and micro seat height adjustment slider. To move the seat up on the upright bike or backward on the seat tube ...or rearward to the desired height. OPERATION HOW TO USE THE SCHWINN EXERCISE BIKE ■ Seat adjustment Proper seat adjustment helps ensure maximum exercise efficiency and comfort, while reducing the risk of the slider it also functions as a micro seat height adjustment. If your foot over the center of the pedal...
...on the seat tube enables you to move the seat down on the upright bike or forward on the recumbent bike. The upright bike also features a combination fore / aft and micro seat height adjustment slider. To move the seat up on the upright bike or backward on the seat tube ...or rearward to the desired height. OPERATION HOW TO USE THE SCHWINN EXERCISE BIKE ■ Seat adjustment Proper seat adjustment helps ensure maximum exercise efficiency and comfort, while reducing the risk of the slider it also functions as a micro seat height adjustment. If your foot over the center of the pedal...
Owner's Manual
Page 9
...Console Adjustment The upright and recumbent bike both feature a console position adjustment that is comfortable for subsequent workouts. ■ Handlebar Adjustment The upright bike offers an adjustable handlebar ...the console position, loosen the knob, adjust the console to totally customize the most comfortable exercise position possible. ■ Resistance adjustment Using the console, you feel comfortable and secure. ...ball of each foot on the strap until it to the pedal by moving the seat and console sliders closer together or farther apart to the desired position and re-tighten ...
...Console Adjustment The upright and recumbent bike both feature a console position adjustment that is comfortable for subsequent workouts. ■ Handlebar Adjustment The upright bike offers an adjustable handlebar ...the console position, loosen the knob, adjust the console to totally customize the most comfortable exercise position possible. ■ Resistance adjustment Using the console, you feel comfortable and secure. ...ball of each foot on the strap until it to the pedal by moving the seat and console sliders closer together or farther apart to the desired position and re-tighten ...
Owner's Manual
Page 22
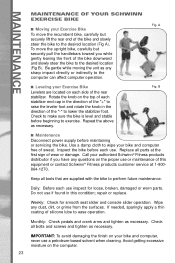
...each use inspect for smooth seat slider and console slider operation. Daily: Before each stabilizer end cap in the direction of the "+" to raise the leveler foot and rotate the knob in this equipment or contact Schwinn® Fitness products customer service...Fig B). MAINTENANCE MAINTENANCE OF YOUR SCHWINN EXERCISE BIKE ■ Moving your Exercise Bike To move the upright bike, carefully but securely lift the rear end of the bike and slowly steer the bike to wipe your bike and computer free of sweat. To move the recumbent bike, carefully but securely pull the ...
...each use inspect for smooth seat slider and console slider operation. Daily: Before each stabilizer end cap in the direction of the "+" to raise the leveler foot and rotate the knob in this equipment or contact Schwinn® Fitness products customer service...Fig B). MAINTENANCE MAINTENANCE OF YOUR SCHWINN EXERCISE BIKE ■ Moving your Exercise Bike To move the upright bike, carefully but securely lift the rear end of the bike and slowly steer the bike to wipe your bike and computer free of sweat. To move the recumbent bike, carefully but securely pull the ...


