
Print Specs
Page 1
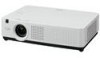
4000 LUMENS z XGA z ULTRAPORTABLE PROJECTOR PLC-XU4000 XGA ULTRAPORTABLE PROJECTOR 3LCD Built-in Network Closed Caption HIGH BRIGHTNESS AND COMPACT BODY The PLC-XU4000 weighs less ...LOWER POWER CONSUMPTION Thanks to check the projectors operating time of newly developed lamp control and color shift correction technology, Sanyo improves contrast ratio and reduces power consumption...PC/Video Input Audio PC/Video Output Audio Other Feature Included Accessories Optional Accessories XGA (1024 x 768) 4000 Lm 2000:1 40"-300" 4:3 245W H:15-100kHz, V:50-100Hz 29 dBA (Eco) 100-240V AC...
4000 LUMENS z XGA z ULTRAPORTABLE PROJECTOR PLC-XU4000 XGA ULTRAPORTABLE PROJECTOR 3LCD Built-in Network Closed Caption HIGH BRIGHTNESS AND COMPACT BODY The PLC-XU4000 weighs less ...LOWER POWER CONSUMPTION Thanks to check the projectors operating time of newly developed lamp control and color shift correction technology, Sanyo improves contrast ratio and reduces power consumption...PC/Video Input Audio PC/Video Output Audio Other Feature Included Accessories Optional Accessories XGA (1024 x 768) 4000 Lm 2000:1 40"-300" 4:3 245W H:15-100kHz, V:50-100Hz 29 dBA (Eco) 100-240V AC...
Owner's Manual
Page 1
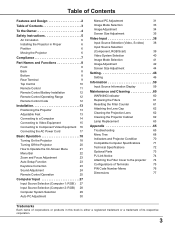
Multimedia Projector MODEL PLC-XU4000 Network Supported Wired LAN Refer to the Owner's Manual below for details about network function. Network Set-up and Operation Owner's Manual
Multimedia Projector MODEL PLC-XU4000 Network Supported Wired LAN Refer to the Owner's Manual below for details about network function. Network Set-up and Operation Owner's Manual
Owner's Manual
Page 2
... is designed compact in this manual are subject to Helpful Maintenance Functions almost all computer output signals quickly (p.29). This projector utilizes built-in 21 languages: English, German, French, Italian, Spanish, Portuguese, Dutch, Swedish, Finnish, Polish, Hungarian, Romanian,... Czech, Russian, Turkish, Kazakh, Vietnamese, Chinese, Korean, Japanese and Thai (p.46). The projector has the Multi-scan system to conform to change without notice. 2 between presentations. Closed caption Multilanguage Menu ...
... is designed compact in this manual are subject to Helpful Maintenance Functions almost all computer output signals quickly (p.29). This projector utilizes built-in 21 languages: English, German, French, Italian, Spanish, Portuguese, Dutch, Swedish, Finnish, Polish, Hungarian, Romanian,... Czech, Russian, Turkish, Kazakh, Vietnamese, Chinese, Korean, Japanese and Thai (p.46). The projector has the Multi-scan system to conform to change without notice. 2 between presentations. Closed caption Multilanguage Menu ...
Owner's Manual
Page 3
...Control 10 Remote Control 11 Remote Control Battery Installation 12 Remote Control Operating Range 12 Remote Control Code 12 Installation 13 Positioning the Projector 13 Adjustable Feet 13 Connecting to a Computer 14 Connecting to Video Equipment 15 Connecting to Component Video Equipment 16 Connecting the ...AC Power Cord 17 Basic Operation 18 Turning On the Projector 18 Turning Off the Projector 20 How to Operate the On-Screen Menu 21 Menu Bar 22 Zoom and Focus Adjustment 23 Auto Setup ...
...Control 10 Remote Control 11 Remote Control Battery Installation 12 Remote Control Operating Range 12 Remote Control Code 12 Installation 13 Positioning the Projector 13 Adjustable Feet 13 Connecting to a Computer 14 Connecting to Video Equipment 15 Connecting to Component Video Equipment 16 Connecting the ...AC Power Cord 17 Basic Operation 18 Turning On the Projector 18 Turning Off the Projector 20 How to Operate the On-Screen Menu 21 Menu Bar 22 Zoom and Focus Adjustment 23 Auto Setup ...
Owner's Manual
Page 4
...lens, otherwise eye damage could result. Heat bui2l0dcm-up can shorten the service life of your local community waste collection/recycling centre. If The PROJECTor comes in a proper position. READ AND KEEP THIS OWNER'S MANUAL FOR LATER USE. 4 CAUTION RISK OF ELECTRIC SHOCK DO NOT OPEN CAUTION...BE EARTHED. TO REDUCE THE RISK OF FIRE OR ELECTRIC SHOCK, DO NOT EXPOSE THIS APPLIANCE TO RAIN OR MOISTURE. -This projector produces intense light from the power outlet. -Do not pr5o0cjmect the same1immage for proper air circulation and cooling of the world. Be especially ...
...lens, otherwise eye damage could result. Heat bui2l0dcm-up can shorten the service life of your local community waste collection/recycling centre. If The PROJECTor comes in a proper position. READ AND KEEP THIS OWNER'S MANUAL FOR LATER USE. 4 CAUTION RISK OF ELECTRIC SHOCK DO NOT OPEN CAUTION...BE EARTHED. TO REDUCE THE RISK OF FIRE OR ELECTRIC SHOCK, DO NOT EXPOSE THIS APPLIANCE TO RAIN OR MOISTURE. -This projector produces intense light from the power outlet. -Do not pr5o0cjmect the same1immage for proper air circulation and cooling of the world. Be especially ...

Owner's Manual
Page 5
...stand recommended by the manufacturer as they may be damaged by persons walking on the power cord. Use only with the projector. Do not locate this projector from the wall outlet. e. When replacement parts are covered by following conditions: a. NOTE FOR CUSTOMERS IN THE US Hg... combination to persons. Upon completion of power supplied, consult your authorized dealer or local power company. air-conditioning equipment. This projector should never be moved with cloth or other similar surface. Slots and openings in installation such as the original part. If ...
...stand recommended by the manufacturer as they may be damaged by persons walking on the power cord. Use only with the projector. Do not locate this projector from the wall outlet. e. When replacement parts are covered by following conditions: a. NOTE FOR CUSTOMERS IN THE US Hg... combination to persons. Upon completion of power supplied, consult your authorized dealer or local power company. air-conditioning equipment. This projector should never be moved with cloth or other similar surface. Slots and openings in installation such as the original part. If ...

Owner's Manual
Page 6
... screws and metallic parts. CAUTION Hot air is not designed to protect an appliance from above and below. 40° Do not point the projector up . Do not touch a peripheral part of the cabinet, and it to strong forces, or put any other transport service with the lens... Air intake Vent Exhaust Vent (Hot air exhaust) Air intake Vent Air Intake Vent Exhaust Vent (Hot air exhaust) 6 Installing the Projector in Proper Position Install the projector properly. Safety Instructions Air Circulation Openings in the cabinet are provided to cool down to project an image. When handling the...
... screws and metallic parts. CAUTION Hot air is not designed to protect an appliance from above and below. 40° Do not point the projector up . Do not touch a peripheral part of the cabinet, and it to strong forces, or put any other transport service with the lens... Air intake Vent Exhaust Vent (Hot air exhaust) Air intake Vent Air Intake Vent Exhaust Vent (Hot air exhaust) 6 Installing the Projector in Proper Position Install the projector properly. Safety Instructions Air Circulation Openings in the cabinet are provided to cool down to project an image. When handling the...

Owner's Manual
Page 7
... to try to Part 15 of FCC Rules. Model Number : PLC-XU4000 Trade Name : Sanyo Responsible party : SANYO NORTH AMERICA CORPORATION Address : 21605 Plummer Street, Chatsworth, California 91311 Telephone No. : (818)998-7322 AC Power Cord Requirement The AC Power Cord supplied with this projector meets the requirement for use the plug with a moulded plug...
... to try to Part 15 of FCC Rules. Model Number : PLC-XU4000 Trade Name : Sanyo Responsible party : SANYO NORTH AMERICA CORPORATION Address : 21605 Plummer Street, Chatsworth, California 91311 Telephone No. : (818)998-7322 AC Power Cord Requirement The AC Power Cord supplied with this projector meets the requirement for use the plug with a moulded plug...
Owner's Manual
Page 8
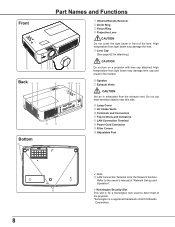
... "Network Set-up and Operation". Kensington Security Slot This slot is for a Kensington lock used to deter theft of the projector. *Kensington is for attaching.) CAUTION Do not turn on a projector with lens cap attached. Part Names and Functions Front ⑨ ⑤⑨ Back ⑦ ⑧ ⑨ Bottom ⑭ ⑥ ⑬...
... "Network Set-up and Operation". Kensington Security Slot This slot is for a Kensington lock used to deter theft of the projector. *Kensington is for attaching.) CAUTION Do not turn on a projector with lens cap attached. Part Names and Functions Front ⑨ ⑤⑨ Back ⑦ ⑧ ⑨ Bottom ⑭ ⑥ ⑬...
Owner's Manual
Page 9
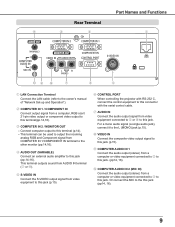
... terminal (⑦ or ⑨). ⑤ S-VIDEO IN Connect the S-VIDEO output signal from video equipment to this jack (p.15). ⑥ CONTROL PORT When controlling the projector with RS-232 C, connect the control equipment to this connector with the serial control cable. ⑦ AUDIO IN Connect the audio output signal from video...
... terminal (⑦ or ⑨). ⑤ S-VIDEO IN Connect the S-VIDEO output signal from video equipment to this jack (p.15). ⑥ CONTROL PORT When controlling the projector with RS-232 C, connect the control equipment to this connector with the serial control cable. ⑦ AUDIO IN Connect the audio output signal from video...

Owner's Manual
Page 10
...-Pan the image in the setting menu. (pp.23, 47). ⑧ WARNING indicator -Lights red when the projector detects an abnormal condition. -Blinks red when the internal temperature of the projector exceeds the operating range (pp.60, 70). ⑨ LAMP REPLACE indicator Lights yellow when the projection lamp reaches ...INPUT button Select an input source (pp.27-28, 38-39). ④ ON/STAND-BY button Turn the projector on or off (pp.18-20). ⑤ POWER indicator -Lights red when the projector is in stand-by mode. -Lights green during operations. -Blinks green in the Power management mode (p.51). ...
...-Pan the image in the setting menu. (pp.23, 47). ⑧ WARNING indicator -Lights red when the projector detects an abnormal condition. -Blinks red when the internal temperature of the projector exceeds the operating range (pp.60, 70). ⑨ LAMP REPLACE indicator Lights yellow when the projection lamp reaches ...INPUT button Select an input source (pp.27-28, 38-39). ④ ON/STAND-BY button Turn the projector on or off (pp.18-20). ⑤ POWER indicator -Lights red when the projector is in stand-by mode. -Lights green during operations. -Blinks green in the Power management mode (p.51). ...

Owner's Manual
Page 11
.... (p.21) - Do not apply benzene, thinner, spray, or any chemical material. 11 Part Names and Functions Remote Control ① ON/STAND-BY button Turn the projector on the screen. (p.26) ⑮ ⑩ ⑭ ⑪ D.ZOOM ▲▼ buttons ⑪ Zoom in and out the images. (pp.25, 36) ⑬ ⑫ VOLUME...
.... (p.21) - Do not apply benzene, thinner, spray, or any chemical material. 11 Part Names and Functions Remote Control ① ON/STAND-BY button Turn the projector on the screen. (p.26) ⑮ ⑩ ⑭ ⑪ D.ZOOM ▲▼ buttons ⑪ Zoom in and out the images. (pp.25, 36) ⑬ ⑫ VOLUME...

Owner's Manual
Page 12
...guidelines. The initial code is replaced by an incorrect type. Dispose of an explosion if battery is set to this projector. Two AAA size batteries For correct polarity (+ and -), be sure battery terminals are assigned to Code 1. 12 MENU button IMAGE... button Maximum operating range for the remote control. Switching the remote control codes prevents interference from other remote controls when several projectors or video equipment next to switch between the Code 1 and Code 2. Remote Control Battery Installation 2 Install new batteries into the ...
...guidelines. The initial code is replaced by an incorrect type. Dispose of an explosion if battery is set to this projector. Two AAA size batteries For correct polarity (+ and -), be sure battery terminals are assigned to Code 1. 12 MENU button IMAGE... button Maximum operating range for the remote control. Switching the remote control codes prevents interference from other remote controls when several projectors or video equipment next to switch between the Code 1 and Code 2. Remote Control Battery Installation 2 Install new batteries into the ...
Owner's Manual
Page 13
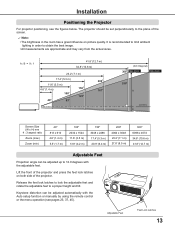
...in order to the plane of the screen. Note: • The brightness in the room has a great influence on both side of the projector and press the feet lock latches on picture quality. Adjustable Feet Feet Lock Latches 13 Lift the front of the...Auto setup function or manually by using the remote control or the menu operation (see the figures below. Installation Positioning the Projector For projector positioning, see pages 23, 37, 45). The projector should be set perpendicularly to obtain the best image. • All measurements are approximate and may vary from the actual ...
...in order to the plane of the screen. Note: • The brightness in the room has a great influence on both side of the projector and press the feet lock latches on picture quality. Adjustable Feet Feet Lock Latches 13 Lift the front of the...Auto setup function or manually by using the remote control or the menu operation (see the figures below. Installation Positioning the Projector For projector positioning, see pages 23, 37, 45). The projector should be set perpendicularly to obtain the best image. • All measurements are approximate and may vary from the actual ...

Owner's Manual
Page 14
other cables are not supplied with the projector.) External Audio Equipment Monitor Output Monitor Input Monitor Output Audio Output Audio Input VGA cable VGA cable VGA cable Audio cable (stereo) This terminal is ..., it is switchable. Set up the terminal as input. • When the AUDIO OUT is plugged-in, the projector's built-in speaker is not available. • When the cable is of both the projector and external equipment from the AC outlet before connecting cables. 14 Installation Connecting to a Computer Cables used for...
other cables are not supplied with the projector.) External Audio Equipment Monitor Output Monitor Input Monitor Output Audio Output Audio Input VGA cable VGA cable VGA cable Audio cable (stereo) This terminal is ..., it is switchable. Set up the terminal as input. • When the AUDIO OUT is plugged-in, the projector's built-in speaker is not available. • When the cable is of both the projector and external equipment from the AC outlet before connecting cables. 14 Installation Connecting to a Computer Cables used for...

Owner's Manual
Page 15
... used for connection • Video and Audio Cable (RCA x 3) • S-VIDEO Cable • Audio Cable (Cables are not supplied with the projector. ) External Audio Equipment Installation Audio Input Video and Audio Output (Video) (L) (R) S-Video Output Audio cable (stereo) Video and audio cable AUDIO OUT (...stereo) VIDEO AUDIO IN S-Video cable S-VIDEO Note: When the AUDIO OUT is plugged-in, the projector's builtin speaker is not available. Unplug the power cords of both the projector and external equipment from the AC outlet before connecting cables. 15
... used for connection • Video and Audio Cable (RCA x 3) • S-VIDEO Cable • Audio Cable (Cables are not supplied with the projector. ) External Audio Equipment Installation Audio Input Video and Audio Output (Video) (L) (R) S-Video Output Audio cable (stereo) Video and audio cable AUDIO OUT (...stereo) VIDEO AUDIO IN S-Video cable S-VIDEO Note: When the AUDIO OUT is plugged-in, the projector's builtin speaker is not available. Unplug the power cords of both the projector and external equipment from the AC outlet before connecting cables. 15

Owner's Manual
Page 16
...8226; Audio Cables • Scart-VGA Cable • VGA Cable • Component Cable • Component-VGA Cable (Cables are not supplied with this projector.) External Audio Equipment Audio Input Audio cable (stereo) Audio Output Monitor Input RGB Scart 21-pin Output Component Video Output (Y, Pb/Cb, Pr/Cr) Audio...1 COMPUTER IN 2 / MONITOR OUTPUT COMPUTER IN 1/ COMPONENT IN AUDIO OUT (stereo) Note: • When the AUDIO OUT is plugged-in, the projector's built-in speaker is not available. • See page 73 for ordering optional cables. 16 Unplug the power cords of both the...
...8226; Audio Cables • Scart-VGA Cable • VGA Cable • Component Cable • Component-VGA Cable (Cables are not supplied with this projector.) External Audio Equipment Audio Input Audio cable (stereo) Audio Output Monitor Input RGB Scart 21-pin Output Component Video Output (Y, Pb/Cb, Pr/Cr) Audio...1 COMPUTER IN 2 / MONITOR OUTPUT COMPUTER IN 1/ COMPONENT IN AUDIO OUT (stereo) Note: • When the AUDIO OUT is plugged-in, the projector's built-in speaker is not available. • See page 73 for ordering optional cables. 16 Unplug the power cords of both the...

Owner's Manual
Page 17
... . Confirm the AC plug type with the AC power cord, it automatically selects the correct input voltage. Ground To power cord connector on . Connect the projector with single-phase power systems having a grounded neutral conductor. and Canada Ground For Continental Europe For the U.K. To the AC outlet. (120 V AC)... you are not sure of the type of 100-240 V AC and it is designed to the projector. NOTE ON THE POWER CORD AC power cord must meet requirement of power system. Projector side AC outlet side For the U.S.A. Connect the AC power cord (supplied) to work with all ...
... . Confirm the AC plug type with the AC power cord, it automatically selects the correct input voltage. Ground To power cord connector on . Connect the projector with single-phase power systems having a grounded neutral conductor. and Canada Ground For Continental Europe For the U.K. To the AC outlet. (120 V AC)... you are not sure of the type of 100-240 V AC and it is designed to the projector. NOTE ON THE POWER CORD AC power cord must meet requirement of power system. Projector side AC outlet side For the U.S.A. Connect the AC power cord (supplied) to work with all ...

Owner's Manual
Page 18
...Point ▲▼ buttons and press the SELECT button. The POWER indicator lights green and the cooling fans start on the projector, or the current signal is selected in the Display function, the countdown will disappear after 30 seconds. The preparation display ...control or on the screen. (p.48) Video Selection PPrroojjeeccttVViiddeeoo Cancel Project Computer Guidance for Video Input 18 Basic Operation Turning On the Projector 1 Complete peripheral connections (with a PIN code, PIN code input dialog box will appear. Selected Input Source and Lamp Control Video ...
...Point ▲▼ buttons and press the SELECT button. The POWER indicator lights green and the cooling fans start on the projector, or the current signal is selected in the Display function, the countdown will disappear after 30 seconds. The preparation display ...control or on the screen. (p.48) Video Selection PPrroojjeeccttVViiddeeoo Cancel Project Computer Guidance for Video Input 18 Basic Operation Turning On the Projector 1 Complete peripheral connections (with a PIN code, PIN code input dialog box will appear. Selected Input Source and Lamp Control Video ...
Owner's Manual
Page 19
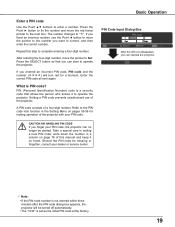
...? Setting a PIN code prevents unauthorized use the Point ◄ button to move the pointer to the number you can start to operate the projector. A PIN code consists of the projector. Enter a PIN code Use the Point ▲▼ buttons to complete entering a four-digit number. After entering the four-digit number,...CODE If you can no longer be missing or forgotten, consult your PIN code. write down the number in a column on page 76 of the projector with your dealer or service center. What is set as the initial PIN code at the factory. 19 Refer to Set. If you fixed an...
...? Setting a PIN code prevents unauthorized use the Point ◄ button to move the pointer to the number you can start to operate the projector. A PIN code consists of the projector. Enter a PIN code Use the Point ▲▼ buttons to complete entering a four-digit number. After entering the four-digit number,...CODE If you can no longer be missing or forgotten, consult your PIN code. write down the number in a column on page 76 of the projector with your dealer or service center. What is set as the initial PIN code at the factory. 19 Refer to Set. If you fixed an...


