Brochure
Page 2
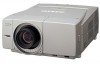
...are described in Appendix 2. *2 In 2 lamp mode, with the industry's most advanced optical engine to deliver classleading brightness of 6500 lumens. * 5800 lumens for the PLC-EF60A 1300:1 Contrast Ratio The new mechanical shutter system helps SANYO's high-performance optical system achieve its horizontal ...axis in either direction-for more reason for the PLC-XF60A/ EF60A's crisp, high-quality images. *In High Contrast...
...are described in Appendix 2. *2 In 2 lamp mode, with the industry's most advanced optical engine to deliver classleading brightness of 6500 lumens. * 5800 lumens for the PLC-EF60A 1300:1 Contrast Ratio The new mechanical shutter system helps SANYO's high-performance optical system achieve its horizontal ...axis in either direction-for more reason for the PLC-XF60A/ EF60A's crisp, high-quality images. *In High Contrast...
User Manual
Page 3
... Setting 49 Special 57 Special 57 Information 59 Maintenance and Cleaning 60 Warning Temp Indicator 60 Air Filter Replacement 61 Lamp Replacement 62 Cleaning the Projection Lens 64 Cleaning the Projector Cabinet 64 Attaching the Cord Cover Strap 64 Indicators and ...Projector Condition 65 Main Indicators 65 Shutter Indicator 66 Warning Filter Indicator 66 Lamp Replace Indicators 67 Appendix 68 Troubleshooting 68 Compatible Computer Specifications 70 Technical Specifications 72 Optional Parts 73 Menu Tree 74 ...
... Setting 49 Special 57 Special 57 Information 59 Maintenance and Cleaning 60 Warning Temp Indicator 60 Air Filter Replacement 61 Lamp Replacement 62 Cleaning the Projection Lens 64 Cleaning the Projector Cabinet 64 Attaching the Cord Cover Strap 64 Indicators and ...Projector Condition 65 Main Indicators 65 Shutter Indicator 66 Warning Filter Indicator 66 Lamp Replace Indicators 67 Appendix 68 Troubleshooting 68 Compatible Computer Specifications 70 Technical Specifications 72 Optional Parts 73 Menu Tree 74 ...

User Manual
Page 4
...quality materials and components which can also be maintained. Improper operation may result in a proper position. NO USER-SERVICEABLE PARTS INSIDE EXCEPT LAMP REPLACEMENT. Minimum clearances must be recycled and reused. DO NOT SET THE PROJECTOR IN GREASY, WET, OR SMOKY CONDITIONS SUCH AS ...electronic products. If you purchased the projector or the service center. CAUTION Not for use in a computer room as possible. Your SANYO product is to operate improperly, read this manual again, check operations and cable connections and try the solutions in the "Troubleshooting" ...
...quality materials and components which can also be maintained. Improper operation may result in a proper position. NO USER-SERVICEABLE PARTS INSIDE EXCEPT LAMP REPLACEMENT. Minimum clearances must be recycled and reused. DO NOT SET THE PROJECTOR IN GREASY, WET, OR SMOKY CONDITIONS SUCH AS ...electronic products. If you purchased the projector or the service center. CAUTION Not for use in a computer room as possible. Your SANYO product is to operate improperly, read this manual again, check operations and cable connections and try the solutions in the "Troubleshooting" ...

User Manual
Page 6
... not tilt the projector more than 20 degrees from any position of the exhaust vent, especially screws and metallic part. Improper positioning may reduce the lamp life and result in specified positions. This projector is exhausted from ventilation holes. - In downward projection, do not tilt the projector over 20 degrees right...
... not tilt the projector more than 20 degrees from any position of the exhaust vent, especially screws and metallic part. Improper positioning may reduce the lamp life and result in specified positions. This projector is exhausted from ventilation holes. - In downward projection, do not tilt the projector over 20 degrees right...

User Manual
Page 9
... heat-sensitive objects near this side. Preparation Preparation Parts Name Front qw e Back y uy rt io !0 Bottom !1 q Remote Receiver w Projection Lens (Option) e Front Cover (inside ) !0 Lamp Cover !1 Adjustable Feet !1 9 CAUTION This projector is exhausted from overheating.
... heat-sensitive objects near this side. Preparation Preparation Parts Name Front qw e Back y uy rt io !0 Bottom !1 q Remote Receiver w Projection Lens (Option) e Front Cover (inside ) !0 Lamp Cover !1 Adjustable Feet !1 9 CAUTION This projector is exhausted from overheating.

User Manual
Page 10
...Lights green when the projector is ready to a power failure. (p.65~67) y SHUTTER indicator Lights blue when the shutter is closed. (p.66) u LAMP 2 REPLACE indicator Turns orange when the life of the projector is abnormally high. (p.60, 65) e WARNING FILTER indicator Lights orange when the projector's filter... is clogged with dust. (p.61, 66) r LAMP indicator - Turns a dim lighting when the projector is shutdown due to be turned on . (p.65~67) t READY indicator - Lights red when the...
...Lights green when the projector is ready to a power failure. (p.65~67) y SHUTTER indicator Lights blue when the shutter is closed. (p.66) u LAMP 2 REPLACE indicator Turns orange when the life of the projector is abnormally high. (p.60, 65) e WARNING FILTER indicator Lights orange when the projector's filter... is clogged with dust. (p.61, 66) r LAMP indicator - Turns a dim lighting when the projector is shutdown due to be turned on . (p.65~67) t READY indicator - Lights red when the...

User Manual
Page 27
..." once, then enter the correct number. After the OK icon disappears, you fixed a wrong number, move the yellow frame pointer to operate the projector. The LAMP indicator lights red, and the READY indicator lights green. 3 Press the POWER ON-OFF button on the MAIN On/Off switch of a four-digit number.... The LAMP indicator dims, and the cooling fans start to "Ent". Selected Input and Source (See pages 36~37 for Input) Enter a PJ PIN code Select a ...
..." once, then enter the correct number. After the OK icon disappears, you fixed a wrong number, move the yellow frame pointer to operate the projector. The LAMP indicator lights red, and the READY indicator lights green. 3 Press the POWER ON-OFF button on the MAIN On/Off switch of a four-digit number.... The LAMP indicator dims, and the cooling fans start to "Ent". Selected Input and Source (See pages 36~37 for Input) Enter a PJ PIN code Select a ...

User Manual
Page 28
... and automatically controls the running speed of the cooling fans. • If the WARNING TEMP indicator blinks red or all the indicators except the LAMP indicator are blinking, see "Warning Temp Indicator" on page 60. • When "Power management" mode is turned off . appears on the...; Do not operate the projector continuously without rest. The message disappears after the READY indicator lights green. OTHERWISE IT WILL RESULT IN SHORTENING LAMP LIFE. ✔Note: • The projector cannot be turned on by connecting the AC power cord to "Power management" on automatically ...
... and automatically controls the running speed of the cooling fans. • If the WARNING TEMP indicator blinks red or all the indicators except the LAMP indicator are blinking, see "Warning Temp Indicator" on page 60. • When "Power management" mode is turned off . appears on the...; Do not operate the projector continuously without rest. The message disappears after the READY indicator lights green. OTHERWISE IT WILL RESULT IN SHORTENING LAMP LIFE. ✔Note: • The projector cannot be turned on by connecting the AC power cord to "Power management" on automatically ...

User Manual
Page 49
... yellow frame pointer with the My menu setting. • When selecting Default on the screen. Setting Setting Setting changes various settings: Language, Menu, Logo, Background, Lamp, Remote control, Display, Input search, Power management, On start, Analog out, Lens memory, Shutter, Security, and Factory default. 1 Press the MENU button to display. Menu...
... yellow frame pointer with the My menu setting. • When selecting Default on the screen. Setting Setting Setting changes various settings: Language, Menu, Logo, Background, Lamp, Remote control, Display, Input search, Power management, On start, Analog out, Lens memory, Shutter, Security, and Factory default. 1 Press the MENU button to display. Menu...

User Manual
Page 51
... from the connected equipment: Blue . . . . . .blue colored background My logo . . .the image you captured Black . . . . .black colored background Lamp Control This feature allows you to switch using them at Remote control, the remote control CH and ID menu appears. Select CH and ID respectively...the remote control; The PIN code input dialog box will light the other equipment and mutual interference between projectors when using one (1) lamp or two (2) lamps. 2-Lamp . . . .light both the projector and the remote control must be changed to change CH and ID for the projector; Be...
... from the connected equipment: Blue . . . . . .blue colored background My logo . . .the image you captured Black . . . . .black colored background Lamp Control This feature allows you to switch using them at Remote control, the remote control CH and ID menu appears. Select CH and ID respectively...the remote control; The PIN code input dialog box will light the other equipment and mutual interference between projectors when using one (1) lamp or two (2) lamps. 2-Lamp . . . .light both the projector and the remote control must be changed to change CH and ID for the projector; Be...

User Manual
Page 52
...The timer window disappears and then choose "Ready" or "Shutdown" to enable the timer setting. The LAMP indicator dims during this box appears. In this condition, the projection lamp is turned on if the input signal is reconnected or any button on the top control or remote control...● On-Screen Menu ● "Power off to Input 5 when turning on the setting as maintaining the lamp life, the Power Management function starts the count down time has been elapsed, the lamp is turned off period. message ● P-TIMER ● "No signal" message ● "Please wait..." The...
...The timer window disappears and then choose "Ready" or "Shutdown" to enable the timer setting. The LAMP indicator dims during this box appears. In this condition, the projection lamp is turned on if the input signal is reconnected or any button on the top control or remote control...● On-Screen Menu ● "Power off to Input 5 when turning on the setting as maintaining the lamp life, the Power Management function starts the count down time has been elapsed, the lamp is turned off period. message ● P-TIMER ● "No signal" message ● "Please wait..." The...

User Manual
Page 54
...down the SELECT button and reinsert the AC power cord. To unlock, use the remote control. To release lock, select this condition, the projection lamp is turned on .) Delete deletes the registered USB keys. This will cancel the top control lock. Refer to page 73 for the optional USB ... either of the Power management is invalid. To unlock, use the top control. Setting Shutter Management The Shutter Management function turns off the projection lamp when the projector is left with the shutter closed , timer setting of USB lock or PJ lock is set, the other USB keys commarcially ...
...down the SELECT button and reinsert the AC power cord. To unlock, use the remote control. To release lock, select this condition, the projection lamp is turned on .) Delete deletes the registered USB keys. This will cancel the top control lock. Refer to page 73 for the optional USB ... either of the Power management is invalid. To unlock, use the top control. Setting Shutter Management The Shutter Management function turns off the projection lamp when the projector is left with the shutter closed , timer setting of USB lock or PJ lock is set, the other USB keys commarcially ...

User Manual
Page 56
Factory default Select Factory default and this box appears. Quit Exits the Setting menu. Select [Yes], and the next box appears. Select [Yes] to the factory default settings except for those including: User logo, PJ PIN code, Logo PIN code, Security setting, Lamp time, Filter time, and PJ time. Setting Factory default This function returns all setting values to activate it. 56
Factory default Select Factory default and this box appears. Quit Exits the Setting menu. Select [Yes], and the next box appears. Select [Yes] to the factory default settings except for those including: User logo, PJ PIN code, Logo PIN code, Security setting, Lamp time, Filter time, and PJ time. Setting Factory default This function returns all setting values to activate it. 56

User Manual
Page 57
... the pointer to "Reset" and then press the SELECT button. The setting selected. Select [Yes] to show each lamp wattage and time. Select Lamp 1 or Lamp 2 to activate it . The message "Lamp time reset?" A confirmation box appears. Special 1 Press the MENU button to [Yes] and then press the SELECT... pointer to activate it is not mounted on the projector and the Option box (Smoke Resist Box) being used . Special Menu (Lamp) Special icon Lamp This feature displays the total time of the projector and the Option box (Smoke Resist Box ) separately provided. Select [Yes] to...
... the pointer to "Reset" and then press the SELECT button. The setting selected. Select [Yes] to show each lamp wattage and time. Select Lamp 1 or Lamp 2 to activate it . The message "Lamp time reset?" A confirmation box appears. Special 1 Press the MENU button to [Yes] and then press the SELECT... pointer to activate it is not mounted on the projector and the Option box (Smoke Resist Box) being used . Special Menu (Lamp) Special icon Lamp This feature displays the total time of the projector and the Option box (Smoke Resist Box ) separately provided. Select [Yes] to...

User Manual
Page 59
...the INFORMATION icon comes right in front. 2 The Information window appears. C error External temp. displays current setting information: Input, System, Signal, Screen, Language, Lamp mode, Lamp status, Power management, Shutter management, Smoke resist, Option filter time, Security, and Remote control. 1 Press the MENU button to activate it. The confirmation box ... the past warning history of the projector. Up to store the data and then press the SELECT button. Log contents are as follows: Lamp-1 failure Lamp-2 failure Lamp-1 timeover Lamp-2 timeover Power failure Inside temp.
...the INFORMATION icon comes right in front. 2 The Information window appears. C error External temp. displays current setting information: Input, System, Signal, Screen, Language, Lamp mode, Lamp status, Power management, Shutter management, Smoke resist, Option filter time, Security, and Remote control. 1 Press the MENU button to activate it. The confirmation box ... the past warning history of the projector. Up to store the data and then press the SELECT button. Log contents are as follows: Lamp-1 failure Lamp-2 failure Lamp-1 timeover Lamp-2 timeover Power failure Inside temp.

User Manual
Page 60
...normal, the READY indicator lights green and then the projector can be turned on again. Are the air filter clean? All indicators except the LAMP indicator are not blocked. - CAUTION DO NOT LEAVE THE PROJECTOR WITH THE AC POWER CORD CONNECTED UNDER THE ABNORMAL CONDITION. IT MAY RESULT ...projector detects an abnormal condition, it , and then turn the projector on , disconnect the AC power cord and contact service station for check. LAMP lighting red 60 If the projector cannot be ventilated? The projector is shut down to protect the inside the projector returns to normal, the WARNING...
...normal, the READY indicator lights green and then the projector can be turned on again. Are the air filter clean? All indicators except the LAMP indicator are not blocked. - CAUTION DO NOT LEAVE THE PROJECTOR WITH THE AC POWER CORD CONNECTED UNDER THE ABNORMAL CONDITION. IT MAY RESULT ...projector detects an abnormal condition, it , and then turn the projector on , disconnect the AC power cord and contact service station for check. LAMP lighting red 60 If the projector cannot be ventilated? The projector is shut down to protect the inside the projector returns to normal, the WARNING...

User Manual
Page 62
... least 45 minutes. 2 Loosen each screw on the lamp covers with a screwdriver, and remove the lamp covers. 3 Loosen two (2) screws of each lamp with a screwdriver and pull out one lamp and another with grasping the handle. 4 Replace each lamp with a new one promptly. Follow these indicators lights ...the projector can shatter and may cause injury. See Lamp on page 57. The glass can become very hot. Lamp covers Screws (Unremovable) Lamp 1 Handle Lamp 2 CAUTION : DO NOT OPERATE A PROJECTOR WHILE ANY OF LAMPS IS REMOVED. Replace the lamp covers and tighten the screws. 5 Connect the AC...
... least 45 minutes. 2 Loosen each screw on the lamp covers with a screwdriver, and remove the lamp covers. 3 Loosen two (2) screws of each lamp with a screwdriver and pull out one lamp and another with grasping the handle. 4 Replace each lamp with a new one promptly. Follow these indicators lights ...the projector can shatter and may cause injury. See Lamp on page 57. The glass can become very hot. Lamp covers Screws (Unremovable) Lamp 1 Handle Lamp 2 CAUTION : DO NOT OPERATE A PROJECTOR WHILE ANY OF LAMPS IS REMOVED. Replace the lamp covers and tighten the screws. 5 Connect the AC...

User Manual
Page 63
... manual.) Continuous use of the lamp with the LAMP REPLACE INDICATOR lighted may increase the risk of lamp explosion. ● A Lamp may differ from lamp to lamp and according to the dealer. ● Model No. Maintenance and Cleaning ORDER REPLACEMENT LAMP Replacement Lamp can be ordered through your projector : ● Replacement Lamp Type No. : PLC-XF60A / PLC-EF60A POA-LMP80 (Service Parts...
... manual.) Continuous use of the lamp with the LAMP REPLACE INDICATOR lighted may increase the risk of lamp explosion. ● A Lamp may differ from lamp to lamp and according to the dealer. ● Model No. Maintenance and Cleaning ORDER REPLACEMENT LAMP Replacement Lamp can be ordered through your projector : ● Replacement Lamp Type No. : PLC-XF60A / PLC-EF60A POA-LMP80 (Service Parts...

User Manual
Page 65
... operating normally. The projector cannot be turned on . It may cause electric shock or a fire hazard. The projector is ready to normal, the LAMP indicator lights red and the projector can be turned on . The projector has been cooled down enough and the temperature returns to be turned on... the projector is turned off again, disconnect the AC power cord and contact the dealer or the service center for stand-by or the projection lamp is being cooled down. Maintenance & Cleaning The projector is in the Power management mode. Do not leave the projector on the projector. Check...
... operating normally. The projector cannot be turned on . It may cause electric shock or a fire hazard. The projector is ready to normal, the LAMP indicator lights red and the projector can be turned on . The projector has been cooled down enough and the temperature returns to be turned on... the projector is turned off again, disconnect the AC power cord and contact the dealer or the service center for stand-by or the projection lamp is being cooled down. Maintenance & Cleaning The projector is in the Power management mode. Do not leave the projector on the projector. Check...

User Manual
Page 66
... projector is in the cooling mode.) In this case, contact the service station immediately. Maintenance and Cleaning Shutter Indicator Indicators READY Green LAMP Red SHUTTER Blue Projector Condition The shutter is closed. (The projector is On.) Slow Slow Fast In the Shutter management mode. (...this case, contact the service station immediately. Fast The air filter has been used overtime. Warning Filter Indicator Indicators READY Green LAMP Red WARNING FILTER Orange Projector Condition Slow The air filter is clogged with dust or has been used overtime. 66 The air ...
... projector is in the cooling mode.) In this case, contact the service station immediately. Maintenance and Cleaning Shutter Indicator Indicators READY Green LAMP Red SHUTTER Blue Projector Condition The shutter is closed. (The projector is On.) Slow Slow Fast In the Shutter management mode. (...this case, contact the service station immediately. Fast The air filter has been used overtime. Warning Filter Indicator Indicators READY Green LAMP Red WARNING FILTER Orange Projector Condition Slow The air filter is clogged with dust or has been used overtime. 66 The air ...


