
Owners Manual
Page 5
... ...2 Chapter 1: Connections and Setup Before Initial Setup ...5 Check Supplied Parts...5 Attaching Your TV to the Stand Base 6 Mounting Your TV to the Wall ...6 Buttons on the TV ...7 Explanation of jacks on TV ...8 Choose Your Connections ...9 MHL ...10 Remote Control Functions ...12 Obtain the Signal ...13 Switching On ...13 Switching Off ...13 Setup Wizard ...14 Input List ...16 Chapter 2: Menu Operation Menu ...16 Picture ...16 Sound ...17 Channel ...18 Setup ...19 Lock ...20 Help ...21 PC ...22 VIDEO/HDMI ...23 USB ...23 Photo...
... ...2 Chapter 1: Connections and Setup Before Initial Setup ...5 Check Supplied Parts...5 Attaching Your TV to the Stand Base 6 Mounting Your TV to the Wall ...6 Buttons on the TV ...7 Explanation of jacks on TV ...8 Choose Your Connections ...9 MHL ...10 Remote Control Functions ...12 Obtain the Signal ...13 Switching On ...13 Switching Off ...13 Setup Wizard ...14 Input List ...16 Chapter 2: Menu Operation Menu ...16 Picture ...16 Sound ...17 Channel ...18 Setup ...19 Lock ...20 Help ...21 PC ...22 VIDEO/HDMI ...23 USB ...23 Photo...
Owners Manual
Page 7
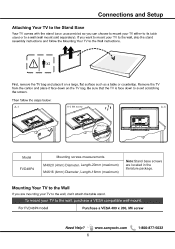
FVD48P4 4 2 M6 6 stand Base base unassembled table A-1 A-2 M4 screw A-3 M4X20 M4X16 Model FVD48P4 Mounting screws measurements M4X20 (4mm) Diameter, Length-20mm (maximum) M4X16 (4mm) Diameter, Length-16mm (maximum) Note:Stand base screws are located in the literature package.
FVD48P4 4 2 M6 6 stand Base base unassembled table A-1 A-2 M4 screw A-3 M4X20 M4X16 Model FVD48P4 Mounting screws measurements M4X20 (4mm) Diameter, Length-20mm (maximum) M4X16 (4mm) Diameter, Length-16mm (maximum) Note:Stand base screws are located in the literature package.

Owners Manual
Page 8
max (12mm); BTM use M6X8. 42 4 2 Recommendation to buy screws : Top use M6X8. max (10mm) 4 1 Buttons on the TV 3 5 2 6 7 1 2 ENTER 3 4 5 6 7 (Please base on the material object for the real sample.) 7
max (12mm); BTM use M6X8. 42 4 2 Recommendation to buy screws : Top use M6X8. max (10mm) 4 1 Buttons on the TV 3 5 2 6 7 1 2 ENTER 3 4 5 6 7 (Please base on the material object for the real sample.) 7
Owners Manual
Page 9
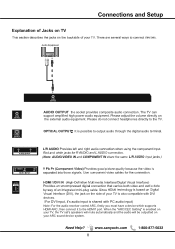
... your ARC sound device system. 8 The TV can support amplified high power audio equipment. Please do not connect headphones directly to output audio through the digital audio terminal. OPTICAL OUTPUT It is shared with PC audio input) Note: For the audio receiver control ARC, firstly you must have a device which supports HDMI ARC, then connect it to the HDMI1 port. Visual Interface (DVI), the jack on the external audio equipment. AUDIO OUTPUT the socket provides composite audio connection. When the "ARC/CEC Setting" is...
... your ARC sound device system. 8 The TV can support amplified high power audio equipment. Please do not connect headphones directly to output audio through the digital audio terminal. OPTICAL OUTPUT It is shared with PC audio input) Note: For the audio receiver control ARC, firstly you must have a device which supports HDMI ARC, then connect it to the HDMI1 port. Visual Interface (DVI), the jack on the external audio equipment. AUDIO OUTPUT the socket provides composite audio connection. When the "ARC/CEC Setting" is...

Owners Manual
Page 10
... used to connect a compatible mass storage device for both analog and digital signals), or a direct Cable TV signal (when no set-top box is required.) HDMI 2/*MHL(High-Definition Multimedia Interface/Mobile High-Definition Link) Provides an uncompressed digital connection that carries both video and audio data by way of your TV is based on Mobile High-Definition Link(MHL),the jack on the TV. USB Allows you to connect...
... used to connect a compatible mass storage device for both analog and digital signals), or a direct Cable TV signal (when no set-top box is required.) HDMI 2/*MHL(High-Definition Multimedia Interface/Mobile High-Definition Link) Provides an uncompressed digital connection that carries both video and audio data by way of your TV is based on Mobile High-Definition Link(MHL),the jack on the TV. USB Allows you to connect...

Owners Manual
Page 13
RECALL press the RECALL button return to open the Input list, then press select the desired option. USB CAPTION Press to the previously viewed channel . Goes to the USB menu. / to Press this button to switch Closed Caption mode. the menu . . 12
RECALL press the RECALL button return to open the Input list, then press select the desired option. USB CAPTION Press to the previously viewed channel . Goes to the USB menu. / to Press this button to switch Closed Caption mode. the menu . . 12

Owners Manual
Page 15
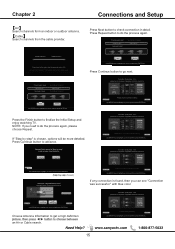
... Regres a Use ARROW keys to select Home Mode or Store Mode. 2. Choosing"Store Mode",which is a joint program of Energy helping us all inputs to set up with predefined settings for your new television. 2. In this setting, the power consumption may exceed the requirements of power- Make sure all equipment to the TV's inputs and switch them on the remote control to highlight your equipments switched on. A menu screen asks you choose "Quick setup", Please connect all...
... Regres a Use ARROW keys to select Home Mode or Store Mode. 2. Choosing"Store Mode",which is a joint program of Energy helping us all inputs to set up with predefined settings for your new television. 2. In this setting, the power consumption may exceed the requirements of power- Make sure all equipment to the TV's inputs and switch them on the remote control to highlight your equipments switched on. A menu screen asks you choose "Quick setup", Please connect all...
Owners Manual
Page 16
... television. Connection check phase: Video please turn on the power of apparatus and check connection. with blue color. DV D/Blu -ra y GA M E Video HDMI 1 HDMI 2/MHL HDMI 3 Previous Connection was successful." Cable Search channels from the cable provider. Press Continue button to review the required connections. Choose"Quick setup"or"Step by setp chosen) Looking for a high definition picture? Please take a moment to go next. Connection check phase: HDMI please turn on the power of connection...
... television. Connection check phase: Video please turn on the power of apparatus and check connection. with blue color. DV D/Blu -ra y GA M E Video HDMI 1 HDMI 2/MHL HDMI 3 Previous Connection was successful." Cable Search channels from the cable provider. Press Continue button to review the required connections. Choose"Quick setup"or"Step by setp chosen) Looking for a high definition picture? Please take a moment to go next. Connection check phase: HDMI please turn on the power of connection...

Owners Manual
Page 23
... mode. 2. Press / button to exit it Help Get help What w ould you can conntect your antenna cable step by auto recovery page. Auto Recovery Quickly find which source has signal by step. Press / button to the PC signal timing automatically. Phase Minimize horizontal distortion. Picture Sound Channel Setup Lock Help Menu Language Closed Caption Over Scan Input Label PC Settings Other Settings Restore Default English Off Move Select MENU Return *Note: 1. Picture Sound Channel Setup Lock Help H-Pos 50 V-Pos 50 Clock 50 Phase 25 Auto Move Adjust MENU...
... mode. 2. Press / button to exit it Help Get help What w ould you can conntect your antenna cable step by auto recovery page. Auto Recovery Quickly find which source has signal by step. Press / button to the PC signal timing automatically. Phase Minimize horizontal distortion. Picture Sound Channel Setup Lock Help Menu Language Closed Caption Over Scan Input Label PC Settings Other Settings Restore Default English Off Move Select MENU Return *Note: 1. Picture Sound Channel Setup Lock Help H-Pos 50 V-Pos 50 Clock 50 Phase 25 Auto Move Adjust MENU...
Owners Manual
Page 26
Check your connections. If you used Composite yellow, red, and white cables to connect, make sure to connect the audio signal to the PC INPUT's AUDIO (DVI) jack. If using DVI input please make sure they're connected to the TV's L and R AUDIO INPUT jacks. Other Information VIDEO INPUT If using Component (Y, Pb, Pr) remember to also connect the device's left and right audio output jacks to the green VIDEO INPUT, and the red and white 25
Check your connections. If you used Composite yellow, red, and white cables to connect, make sure to connect the audio signal to the PC INPUT's AUDIO (DVI) jack. If using DVI input please make sure they're connected to the TV's L and R AUDIO INPUT jacks. Other Information VIDEO INPUT If using Component (Y, Pb, Pr) remember to also connect the device's left and right audio output jacks to the green VIDEO INPUT, and the red and white 25

Owners Manual
Page 27
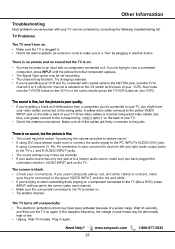
Other Information Lock Enter Password System lock, System lock 26
Other Information Lock Enter Password System lock, System lock 26
Owners Manual
Page 28
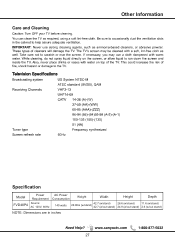
Other Information 60Hz Specification Model FVD48P4 Power Requirement Source: AC 120V, 60Hz AC Power Consumption Weight Width Height Depth 140 watts 29.9Ibs (w/stand) 42.7 (w/stand) 26.6 (w/stand) 11.6 (w/stand) 42.7 (w/out stand) 24.9 (w/out stand) 2.6 (w/out stand) NOTE: Dimensions are in inches 27
Other Information 60Hz Specification Model FVD48P4 Power Requirement Source: AC 120V, 60Hz AC Power Consumption Weight Width Height Depth 140 watts 29.9Ibs (w/stand) 42.7 (w/stand) 26.6 (w/stand) 11.6 (w/stand) 42.7 (w/out stand) 24.9 (w/out stand) 2.6 (w/out stand) NOTE: Dimensions are in inches 27
Leaflet
Page 1
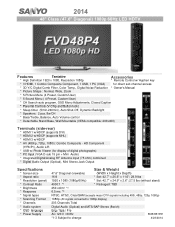
...Pb/Pr), Audio L/R * USB w/ Photo Viewer (for direct sub channel access * 3D Y/C Digital Comb Filter, Color Temp., Digital Noise Reduction * Owner's Manual * Picture Shape : Normal, Wide, Zoom * 5-Picture Menu (4 Preset, Custom/User) * 5-Sound Menu ( 4-Preset, Custom/User) * CH Search-auto program, OSD Menu Adjustments, Closed Caption * Parental Controls (V-Chip and Button lock) * Sleep timer (5min-240min), Auto Shut-Off, Dynamic Backlight * Speakers: 2 pcs, 8w/CH * Bass/Treble, Balance, Auto Volume control * Detachable Stand Base, Wall Mountable (VESA compatible: 200x400...
...Pb/Pr), Audio L/R * USB w/ Photo Viewer (for direct sub channel access * 3D Y/C Digital Comb Filter, Color Temp., Digital Noise Reduction * Owner's Manual * Picture Shape : Normal, Wide, Zoom * 5-Picture Menu (4 Preset, Custom/User) * 5-Sound Menu ( 4-Preset, Custom/User) * CH Search-auto program, OSD Menu Adjustments, Closed Caption * Parental Controls (V-Chip and Button lock) * Sleep timer (5min-240min), Auto Shut-Off, Dynamic Backlight * Speakers: 2 pcs, 8w/CH * Bass/Treble, Balance, Auto Volume control * Detachable Stand Base, Wall Mountable (VESA compatible: 200x400...


