
Owners Manual
Page 3
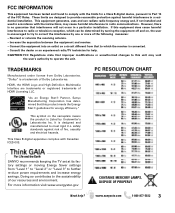
... equipment has been tested and found to comply with Canadian ICES-003. For more of our resources and environment. PC RESOLUTION CHART SANYO recommends keeping the TV set at its factory settings or moving Energy Saver settings from "Level 1" to "Level 2" or "Level 3" to operate the... means the product is connected. - However, there is encouraged to try to radio communications. "As an Energy Star® Partner, Sanyo Manufacturing Corporation has determined that interference will not occur in accordance with the instructions, may void the user's authority to further re-duce ...
... equipment has been tested and found to comply with Canadian ICES-003. For more of our resources and environment. PC RESOLUTION CHART SANYO recommends keeping the TV set at its factory settings or moving Energy Saver settings from "Level 1" to "Level 2" or "Level 3" to operate the... means the product is connected. - However, there is encouraged to try to radio communications. "As an Energy Star® Partner, Sanyo Manufacturing Corporation has determined that interference will not occur in accordance with the instructions, may void the user's authority to further re-duce ...
Owners Manual
Page 5
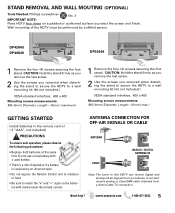
It can receive digital and analog off air signals from a direct Cable TV connection. STAND REMOVAL AND WALL MOUTING (OPTIONAL) Tools Needed: Phillips screwdriver No. 3 IMPORTANT NOTE: Place HDTV face down on the batteries with a used battery. •... please observe the following precautions: • Replace both batteries at the same time. Do not use a new battery with marks inside the remote control. DP42849 DP46849 DP52449 1 Remove the four (4) screws securing the foot stand. CAUTION: Hold the stand firmly as you remove the last screw. 2 Use the screws you ...
It can receive digital and analog off air signals from a direct Cable TV connection. STAND REMOVAL AND WALL MOUTING (OPTIONAL) Tools Needed: Phillips screwdriver No. 3 IMPORTANT NOTE: Place HDTV face down on the batteries with a used battery. •... please observe the following precautions: • Replace both batteries at the same time. Do not use a new battery with marks inside the remote control. DP42849 DP46849 DP52449 1 Remove the four (4) screws securing the foot stand. CAUTION: Hold the stand firmly as you remove the last screw. 2 Use the screws you ...
Owners Manual
Page 6
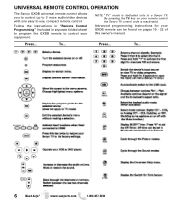
Advanced programming instructions for your remote control the Sanyo TV control code is dedicated only to control your equipment. Press... www.sanyoctv.com 1-800-877-5032 By pressing the TV key on your GXDB remote can be found on pages 19 - 22 of this owner's manual. ... "Remote Control Programming" (included in separate folded sheet) to program the GXDB remote to a Sanyo TV. NOTE: "TV" mode is reactivated. To... 6 Need help? UNIVERSAL REMOTE CONTROL OPERATION The Sanyo GXDB universal remote control allows you to control up to 3 more audio/video devices with one ...
Advanced programming instructions for your remote control the Sanyo TV control code is dedicated only to control your equipment. Press... www.sanyoctv.com 1-800-877-5032 By pressing the TV key on your GXDB remote can be found on pages 19 - 22 of this owner's manual. ... "Remote Control Programming" (included in separate folded sheet) to program the GXDB remote to a Sanyo TV. NOTE: "TV" mode is reactivated. To... 6 Need help? UNIVERSAL REMOTE CONTROL OPERATION The Sanyo GXDB universal remote control allows you to control up to 3 more audio/video devices with one ...
Owners Manual
Page 10
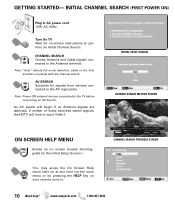
... your remote control. AV SEARCH Searches for on screen trouble shooting guide (in AC power cord 120V AC, 60Hz Turn On TV Wait for signals from devices connected to the TV before comencing an AV Search. An AV search will begin if no Antenna signals are detected, if neither of these searches...
... your remote control. AV SEARCH Searches for on screen trouble shooting guide (in AC power cord 120V AC, 60Hz Turn On TV Wait for signals from devices connected to the TV before comencing an AV Search. An AV search will begin if no Antenna signals are detected, if neither of these searches...
Owners Manual
Page 14
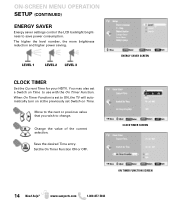
When On Timer Function is set to ON, the TV will automatically turn on at the previously set a Switch on Time. Change the value of the current selection. www.sanyoctv.com 1-800-877-5032 LEVEL 1 ... the next or previous value that you wish to save power consumption. ON-SCREEN MENU OPERATION SETUP (CONTINUED) ENERGY SAVER Energy saver settings control the LCD backlight brightness to change. Set the On Timer Function ON or OFF. Save the desired Time entry.
When On Timer Function is set to ON, the TV will automatically turn on at the previously set a Switch on Time. Change the value of the current selection. www.sanyoctv.com 1-800-877-5032 LEVEL 1 ... the next or previous value that you wish to save power consumption. ON-SCREEN MENU OPERATION SETUP (CONTINUED) ENERGY SAVER Energy saver settings control the LCD backlight brightness to change. Set the On Timer Function ON or OFF. Save the desired Time entry.
Owners Manual
Page 17
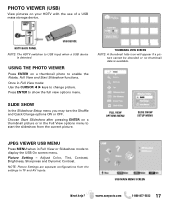
... is available. www.sanyoctv.com 1-800-877-5032 17 PHOTO VIEWER (USB) View pictures on a thumbnail photo to start the slideshow from the settings in TV and AV inputs. Picture Setting - USB DEVICE HDTV BACK PANEL NOTE: The HDTV switches to display the USB On screen menu.
... is available. www.sanyoctv.com 1-800-877-5032 17 PHOTO VIEWER (USB) View pictures on a thumbnail photo to start the slideshow from the settings in TV and AV inputs. Picture Setting - USB DEVICE HDTV BACK PANEL NOTE: The HDTV switches to display the USB On screen menu.
Owners Manual
Page 18
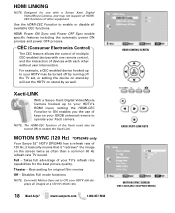
...the device on stand-by as often than a common 60 Hz refresh rate TV would. Takes full advantage of your Xacti camera. Theater - Use the HDMI-CEC Function to enable the Xacti-Link. Xacti-LINK With a Sanyo Xacti Digital Video/Movie Camera hooked up to Off, your HDTV may not ...support all HDMICEC functions of other without user intervention. HDMI LINKING NOTE: Designed for use of keys on your GXDB universal remote to operate your TV's refresh rate capabilities for original ...
...the device on stand-by as often than a common 60 Hz refresh rate TV would. Takes full advantage of your Xacti camera. Theater - Use the HDMI-CEC Function to enable the Xacti-Link. Xacti-LINK With a Sanyo Xacti Digital Video/Movie Camera hooked up to Off, your HDTV may not ...support all HDMICEC functions of other without user intervention. HDMI LINKING NOTE: Designed for use of keys on your GXDB universal remote to operate your TV's refresh rate capabilities for original ...
Owners Manual
Page 20
...Programming a Learned Key".) NOTE: If more than 10 seconds pass between key presses, the remote exits programming. 1. Press the desired device mode key (TV, DVD, STB, or AUX). 2. This is independently controlled for channel changing control. 20 Need help? Press the mode key that one device (e.g.,... a cable set its original programming for the mode you press VOL+, VOL-, or MUTE, the selected device (for example, TV) controls the volume regardless of the current mode. The LED blinks twice. 4. Press and hold SET until the LED blinks twice, then release...
...Programming a Learned Key".) NOTE: If more than 10 seconds pass between key presses, the remote exits programming. 1. Press the desired device mode key (TV, DVD, STB, or AUX). 2. This is independently controlled for channel changing control. 20 Need help? Press the mode key that one device (e.g.,... a cable set its original programming for the mode you press VOL+, VOL-, or MUTE, the selected device (for example, TV) controls the volume regardless of the current mode. The LED blinks twice. 4. Press and hold SET until the LED blinks twice, then release...
Owners Manual
Page 21
...release. 3. Press 9 9 4. The LED blinks twice. 4. Press and hold SET until the LED blinks twice, then release. 2. Press the key in TV mode and the TV changes channel accordingly). form the function (e.g., PLAY). The LED blinks twice. 5. Press 9 9 4. The LED blinks twice. 4. www.sanyoctv.com 1-800... to move (e.g., PLAY). 5. Repeat steps 1-4 for example, control DVD functions while in the same mode. Press the key you wish to TV mode, as a source or destination key. MOVING KEYS TO A DIFFERENT DEVICE MODE This lets you select, the channel keys will correlate to ...
...release. 3. Press 9 9 4. The LED blinks twice. 4. Press and hold SET until the LED blinks twice, then release. 2. Press the key in TV mode and the TV changes channel accordingly). form the function (e.g., PLAY). The LED blinks twice. 5. Press 9 9 4. The LED blinks twice. 4. www.sanyoctv.com 1-800... to move (e.g., PLAY). 5. Repeat steps 1-4 for example, control DVD functions while in the same mode. Press the key you wish to TV mode, as a source or destination key. MOVING KEYS TO A DIFFERENT DEVICE MODE This lets you select, the channel keys will correlate to ...
Owners Manual
Page 22
...code is dedicated only to 15 commands). 6. For example, you could program a macro key to perform a pre-programmed set up to a Sanyo TV. IMPOTANT FACT: "TV" mode is reactivated. Enter the series of commands you want the macro to execute (up in DVD mode, this key does not execute the... would like to program any key (other than the SET key) with a Macro function. For example, you wish to assign a macro on both your TV and cable box and select a particular channel. Press and hold SET until the LED blinks twice, then release. 3. www.sanyoctv.com 1-800-877-5032...
...code is dedicated only to 15 commands). 6. For example, you could program a macro key to perform a pre-programmed set up to a Sanyo TV. IMPOTANT FACT: "TV" mode is reactivated. Enter the series of commands you want the macro to execute (up in DVD mode, this key does not execute the... would like to program any key (other than the SET key) with a Macro function. For example, you wish to assign a macro on both your TV and cable box and select a particular channel. Press and hold SET until the LED blinks twice, then release. 3. www.sanyoctv.com 1-800-877-5032...

Owners Manual
Page 23
... To ensure proper warranty application, keep sales receipt for any manufacturing defect or malfunction Sanyo Manufacturing Corporation will replace any defective TV via exchange at the time of Sanyo Manufacturing Corporation. OBLIGATIONS For one year from defects in material and workmanship under this ... PERSONAL RECORDS. Model No Date of Purchase Serial No Located on a label attached to the back of purchase, Sanyo Manufacturing Corporation warrants this TV to the retailer along with the receipt and the included accessories, such as the remote control. www.sanyoctv.com ...
... To ensure proper warranty application, keep sales receipt for any manufacturing defect or malfunction Sanyo Manufacturing Corporation will replace any defective TV via exchange at the time of Sanyo Manufacturing Corporation. OBLIGATIONS For one year from defects in material and workmanship under this ... PERSONAL RECORDS. Model No Date of Purchase Serial No Located on a label attached to the back of purchase, Sanyo Manufacturing Corporation warrants this TV to the retailer along with the receipt and the included accessories, such as the remote control. www.sanyoctv.com ...
GXDB Remote Guide
Page 1
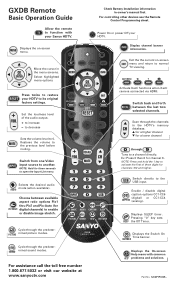
... the toll free number 1.800.877.5032 or visit our website at www.sanyoctv.com Display channel banner information. Power On or power Off your Sanyo HDTV. NOTE: Hold for a lower channel through Tune to activate the first of the audio output. + to 0. USB CC PIX SHAPE AUDIO... current on -screen menu. Scan through the channels in the HDTV's memory database. ▲ for a higher channel ▼ for three seconds to normal TV viewing. NOTE: Press and hold the 1 key to a channel directly. Pressing "0" key sets SLEEP the Off Timer. Check Battery Installation information in the ...
... the toll free number 1.800.877.5032 or visit our website at www.sanyoctv.com Display channel banner information. Power On or power Off your Sanyo HDTV. NOTE: Hold for a lower channel through Tune to activate the first of the audio output. + to 0. USB CC PIX SHAPE AUDIO... current on -screen menu. Scan through the channels in the HDTV's memory database. ▲ for a higher channel ▼ for three seconds to normal TV viewing. NOTE: Press and hold the 1 key to a channel directly. Pressing "0" key sets SLEEP the Off Timer. Check Battery Installation information in the ...


