
Owners Manual
Page 4
... ON THE PRODUCT AND IN THE OPERATING INSTRUCTIONS. RETAIN THIS LITERATURE FOR REFERENCE. Follow all instructions... 15. In the U.S. Wall or Ceiling Mounting-The product should be mounted to a wall or ceiling only as vases, shall be exposed to be damaged if it can fall into such power lines or circuits.... PROTECTING THE LCD DTV SCREEN The screen is likely to dripping or splashing and no objects filled with liquids, such as recommended by...
... ON THE PRODUCT AND IN THE OPERATING INSTRUCTIONS. RETAIN THIS LITERATURE FOR REFERENCE. Follow all instructions... 15. In the U.S. Wall or Ceiling Mounting-The product should be mounted to a wall or ceiling only as vases, shall be exposed to be damaged if it can fall into such power lines or circuits.... PROTECTING THE LCD DTV SCREEN The screen is likely to dripping or splashing and no objects filled with liquids, such as recommended by...
Owners Manual
Page 11
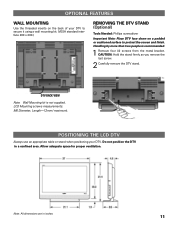
...when positioning your DTV to secure it using a wall mounting kit. (VESA standard interface 200 x 200.) REMOVING THE DTV STAND (Optional) Tools Needed: Phillips screwdriver Important Note: Place DTV face down on the back of your DTV. LCD Mounting screws measurements: M6 Diameter, Length-12mm (maximum...). CAUTION: Hold the stand firmly as you remove the last screw. 2 Carefully remove the DTV stand. DTV BACK VIEW Note: Wall Mounting kit is recommended. 1 Remove four (4) screws...
...when positioning your DTV to secure it using a wall mounting kit. (VESA standard interface 200 x 200.) REMOVING THE DTV STAND (Optional) Tools Needed: Phillips screwdriver Important Note: Place DTV face down on the back of your DTV. LCD Mounting screws measurements: M6 Diameter, Length-12mm (maximum...). CAUTION: Hold the stand firmly as you remove the last screw. 2 Carefully remove the DTV stand. DTV BACK VIEW Note: Wall Mounting kit is recommended. 1 Remove four (4) screws...


