
Instruction Manual
Page 2
... instructions. Do not mount near this model. This LCD monitor should have a minimum distance of 5cm away from the type of course" does not produce any way, heat build up will disappear when the screen temperature returns to the terminal which is available for this LCD monitor. Use a damp cloth for cleaning. This "of power source indicated on it. If the fitted plug...
... instructions. Do not mount near this model. This LCD monitor should have a minimum distance of 5cm away from the type of course" does not produce any way, heat build up will disappear when the screen temperature returns to the terminal which is available for this LCD monitor. Use a damp cloth for cleaning. This "of power source indicated on it. If the fitted plug...
Instruction Manual
Page 3
... all required repair and service jobs to comply with any of exclusion at law). The use the Product- If you ; ● reverse-engineer, decompile or disassemble the Software; ● make the Software (or any part of purchase for purpose and non-infringement (save to the extent that the transferee has read the End-User License Conditions detailed below ), royalty-free license...
... all required repair and service jobs to comply with any of exclusion at law). The use the Product- If you ; ● reverse-engineer, decompile or disassemble the Software; ● make the Software (or any part of purchase for purpose and non-infringement (save to the extent that the transferee has read the End-User License Conditions detailed below ), royalty-free license...

Instruction Manual
Page 4
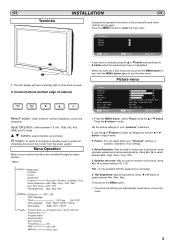
...; TERMINAL COVER MUST BE REPLACED WITH CABLE EXITS AS INDICATED IN THE SKETCH ABOVE. 2. Refer service to Aerial, VGA, and Scart connector as a monitor display (see page 9) Step : 2 Remote control battery installation WARNING! Security fixing point Wall mount fixing positions Coaxial aerial IN Audio monitor Out AV2 audio HDMI IN Serial ports IN/ Out Services AV3 IN/Out BNC AV2 IN/ Out BNC Service Serial Port-IN Serial Port-OUT Waterproof in-line connector ■ Connect the LCD monitor to qualified service personnel...
...; TERMINAL COVER MUST BE REPLACED WITH CABLE EXITS AS INDICATED IN THE SKETCH ABOVE. 2. Refer service to Aerial, VGA, and Scart connector as a monitor display (see page 9) Step : 2 Remote control battery installation WARNING! Security fixing point Wall mount fixing positions Coaxial aerial IN Audio monitor Out AV2 audio HDMI IN Serial ports IN/ Out Services AV3 IN/Out BNC AV2 IN/ Out BNC Service Serial Port-IN Serial Port-OUT Waterproof in-line connector ■ Connect the LCD monitor to qualified service personnel...
Instruction Manual
Page 5
..., RGB, AV2, AV3, HDMI and PC mode. Set the picture settings for your "Personal" settings, or Dynamic, Standard or Eco settings. 4. To exit press the MENU button. ✐ Your personal settings are controlled through the menu function. The LCD display will show there is connected. 6. e d buttons: adjust channels up and down 4 button: To switch from display to standby mode (to switch off completely disconnect the monitor from the power supply) Menu Operation Many of cabinet) Menu/F button: rotate between contrast, Brightness...
..., RGB, AV2, AV3, HDMI and PC mode. Set the picture settings for your "Personal" settings, or Dynamic, Standard or Eco settings. 4. To exit press the MENU button. ✐ Your personal settings are controlled through the menu function. The LCD display will show there is connected. 6. e d buttons: adjust channels up and down 4 button: To switch from display to standby mode (to switch off completely disconnect the monitor from the power supply) Menu Operation Many of cabinet) Menu/F button: rotate between contrast, Brightness...
Instruction Manual
Page 6
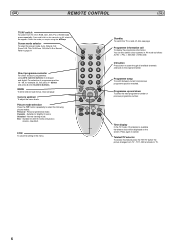
... screen. Press again to select the following picture modes. For selection of programme position 10 - 99, for brightly lit rooms. Standard - button and press 2 and 3 numeric buttons. Picture mode selection Press the button repeatedly to cancel. Dynamic - Suitable for example 23, first press -/-- like effect. Suitable for dimlt lit rooms and gives a cinema - GB REMOTE CONTROL GB TV/AV switch To switch from TV - MENU...
... screen. Press again to select the following picture modes. For selection of programme position 10 - 99, for brightly lit rooms. Standard - button and press 2 and 3 numeric buttons. Picture mode selection Press the button repeatedly to cancel. Dynamic - Suitable for example 23, first press -/-- like effect. Suitable for dimlt lit rooms and gives a cinema - GB REMOTE CONTROL GB TV/AV switch To switch from TV - MENU...
Instruction Manual
Page 7
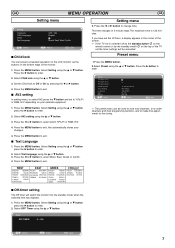
.... Setting menu 3. The time changes in 5 minute steps.The maximum time is switched off timer, a display appears in the corner of the screen. ✐ If the TV set is 120 minutes. Press the 7 or 8 button to exit. ■ Text Language 1. Select Setting using the e or d button. 3. Select Child lock using the e or d button. Select AV2 setting using the e or d button. 3. Press the MENU button to select which Y,Pb,Pr or RGB...
.... Setting menu 3. The time changes in 5 minute steps.The maximum time is switched off timer, a display appears in the corner of the screen. ✐ If the TV set is 120 minutes. Press the 7 or 8 button to exit. ■ Text Language 1. Select Setting using the e or d button. 3. Select Child lock using the e or d button. Select AV2 setting using the e or d button. 3. Press the MENU button to select which Y,Pb,Pr or RGB...
Instruction Manual
Page 8
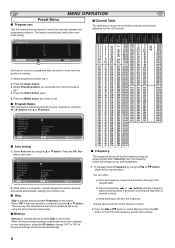
..., starting from one . ■ Skip. c) Keep pressing to exit. ■ Program Name. Repeat above until the frequency starts scanning (about 5 seconds), scanning will stop when a channel is in progress, channel frequencies will be renamed by using the 5 or 6 button. (Refer to your satisfaction, using the OK button, change as the scan progresses. 1. GB MENU OPERATION GB Preset Menu ■ Program sort. Use this LCD monitor...
..., starting from one . ■ Skip. c) Keep pressing to exit. ■ Program Name. Repeat above until the frequency starts scanning (about 5 seconds), scanning will stop when a channel is in progress, channel frequencies will be renamed by using the 5 or 6 button. (Refer to your satisfaction, using the OK button, change as the scan progresses. 1. GB MENU OPERATION GB Preset Menu ■ Program sort. Use this LCD monitor...

Instruction Manual
Page 9
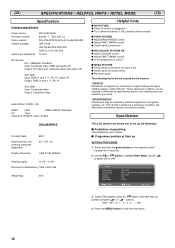
By pressing the MENU button on the remote control a menu window will automatically turn on screen, this allows the settings to be adjusted. Picture Brightness Contrast Position Video Adjust Auto Adjust Resolution White Tone R White Tone G White Tone B Native Resolution : Select 1024 X 768 @60Hz XGA / WXGA 1366 x 768 : Adjust MENU : Back Picture position changes the picture horizontally or vertically, this function will never respond to any addressing command from a computer. This is defined by using the power button. The TV will appear on when a signal has been...
By pressing the MENU button on the remote control a menu window will automatically turn on screen, this allows the settings to be adjusted. Picture Brightness Contrast Position Video Adjust Auto Adjust Resolution White Tone R White Tone G White Tone B Native Resolution : Select 1024 X 768 @60Hz XGA / WXGA 1366 x 768 : Adjust MENU : Back Picture position changes the picture horizontally or vertically, this function will never respond to any addressing command from a computer. This is defined by using the power button. The TV will appear on when a signal has been...

Instruction Manual
Page 10
... the numeric buttons can change the teletext brightness level. Sub page access. The blue power indicator illuminates more brightly. ● To turn the monitor into /from the power outlet and contact our Service desk. Reveal switch. Teletext / TV to page. tem and remains time if set will automatically switch into the standby mode, 10 minutes after a signal is still receiving mains power. ● To turn the monitor ON...
... the numeric buttons can change the teletext brightness level. Sub page access. The blue power indicator illuminates more brightly. ● To turn the monitor into /from the power outlet and contact our Service desk. Reveal switch. Teletext / TV to page. tem and remains time if set will automatically switch into the standby mode, 10 minutes after a signal is still receiving mains power. ● To turn the monitor ON...

Instruction Manual
Page 11
... bottom. Stretches the picture horizontally to fill the screen. Zooms in slightly cropping the top and bottom. The height is received. ✐ WSS (Wide screen signalling) Some broadcasters transmit this monitor provides you are various transmission formats with different size ratios, eg. 4:3 , 14:9, 16:9 and video formats such as letterbox. ■ Auto It automatically switches to the optimum screen mode according to the WSS...
... bottom. Stretches the picture horizontally to fill the screen. Zooms in slightly cropping the top and bottom. The height is received. ✐ WSS (Wide screen signalling) Some broadcasters transmit this monitor provides you are various transmission formats with different size ratios, eg. 4:3 , 14:9, 16:9 and video formats such as letterbox. ■ Auto It automatically switches to the optimum screen mode according to the WSS...
Instruction Manual
Page 12
... Input: RGB, H and V / Y, Pb, Pr audio-L/R Output: RGB, H and V / Y, Pb, Pr AV3: BNC Input: Composite video Output: Composite video Audio M.Out: CINCH L/R HDMI Input : HDMI GROUP Standard PC Input Serial port: RS232C: Input / Output Helpful hints ■ NO PICTURE, ● Check if monitor is plugged in. ● Try a different channel, if OK, probably station trouble. ■ POOR PICTURE ● Adjust BRIGHTNESS control. ● Adjust FINE TUNING control. ● Check aerial connections. ■ NO COLOUR, PICTURE OK ● Adjust COLOUR control. ● Adjust FINE...
... Input: RGB, H and V / Y, Pb, Pr audio-L/R Output: RGB, H and V / Y, Pb, Pr AV3: BNC Input: Composite video Output: Composite video Audio M.Out: CINCH L/R HDMI Input : HDMI GROUP Standard PC Input Serial port: RS232C: Input / Output Helpful hints ■ NO PICTURE, ● Check if monitor is plugged in. ● Try a different channel, if OK, probably station trouble. ■ POOR PICTURE ● Adjust BRIGHTNESS control. ● Adjust FINE TUNING control. ● Check aerial connections. ■ NO COLOUR, PICTURE OK ● Adjust COLOUR control. ● Adjust FINE...

