

User Manual (ENGLISH)
Page 2
...extended time, you are exposed to sound louder than 2/3 of your own. For your safety,make sure the earphone cable does not get the product wet or drop it on your arm or other surrounding objects while you feel a ringing in the ear(s), lower the volume or stop using the... disassemble, repair or modify this manual carefully to your hearing. You are exercising or a walking. 2 The louder the sound is, the more seriously damaged your hearing may adversely affect your hearing. If you are strongly advised to set the volume level to 80°C(176°F). Using the earphone...
...extended time, you are exposed to sound louder than 2/3 of your own. For your safety,make sure the earphone cable does not get the product wet or drop it on your arm or other surrounding objects while you feel a ringing in the ear(s), lower the volume or stop using the... disassemble, repair or modify this manual carefully to your hearing. You are exercising or a walking. 2 The louder the sound is, the more seriously damaged your hearing may adversely affect your hearing. If you are strongly advised to set the volume level to 80°C(176°F). Using the earphone...
User Manual (ENGLISH)
Page 4
... Music Files Importing Music Files 18 Connecting to your PC 18 Installing Windows Media Player10...........19 Transferring Music to FM Radio 34 Searching for Frequencies 35 Setting a Frequency 36 To Delete Presets 39 Setting FM Radio 40 Recording 42 Voice Recording 42 4 Preparation Checking the Product and Accessories 7 Checking the Accessories 7 Components 8 Screen Display Information 10 Button Functions 11 Charging the battery 12 Basic Use 13 Chapter 2. Contents Safety Precautions 2 Contents 4 Chapter 1. Listening to Music/FM Radio...
... Music Files Importing Music Files 18 Connecting to your PC 18 Installing Windows Media Player10...........19 Transferring Music to FM Radio 34 Searching for Frequencies 35 Setting a Frequency 36 To Delete Presets 39 Setting FM Radio 40 Recording 42 Voice Recording 42 4 Preparation Checking the Product and Accessories 7 Checking the Accessories 7 Components 8 Screen Display Information 10 Button Functions 11 Charging the battery 12 Basic Use 13 Chapter 2. Contents Safety Precautions 2 Contents 4 Chapter 1. Listening to Music/FM Radio...

User Manual (ENGLISH)
Page 5
Chapter 4. Settings Settings 44 Setting Music 44 Setting Time 46 Setting the Display 47 Setting Language 48 Setting the system 49 Chapter 6. Appendix Menu Tree 58 Product Specifications 59 License 60 Safety Information 62 Warranty 64 Chapter 5. Troubleshooting System Reset 52 To Upgrade Firmware 53 Troubleshooting 55 5
Chapter 4. Settings Settings 44 Setting Music 44 Setting Time 46 Setting the Display 47 Setting Language 48 Setting the system 49 Chapter 6. Appendix Menu Tree 58 Product Specifications 59 License 60 Safety Information 62 Warranty 64 Chapter 5. Troubleshooting System Reset 52 To Upgrade Firmware 53 Troubleshooting 55 5

User Manual (ENGLISH)
Page 20
The files downloaded from WMP10 to the player, will be automatically saved in the Navigation. 1 Connect the player to your Player You can download MP3,WMA and secure WMA files using Windows Media Player 10. Importing Music Files Transferring Music to PC. 2 Run Windows Media Player10. I Select [Start] ¡ [Programs] ¡ [Windows Media Player] on the Desktop. 3 Select [Sync] at the top of the screen. 4 When the [Sync] window appears, select the file you want to transfer to the player, drag and drop it to the left [Sync List] window. 20
The files downloaded from WMP10 to the player, will be automatically saved in the Navigation. 1 Connect the player to your Player You can download MP3,WMA and secure WMA files using Windows Media Player 10. Importing Music Files Transferring Music to PC. 2 Run Windows Media Player10. I Select [Start] ¡ [Programs] ¡ [Windows Media Player] on the Desktop. 3 Select [Sync] at the top of the screen. 4 When the [Sync] window appears, select the file you want to transfer to the player, drag and drop it to the left [Sync List] window. 20

User Manual (ENGLISH)
Page 21
I [Synchronized to download are checked, and then press [Start Sync] at the top of the screen. Importing Music Files Transferring Music to your Player 5 Make sure the music files you want to Device] message will appear in the right window under Music folder. 6 You can check the transferred file in the right window. 21 Chapter 2. The downloaded files will appear on the left window.
I [Synchronized to download are checked, and then press [Start Sync] at the top of the screen. Importing Music Files Transferring Music to your Player 5 Make sure the music files you want to Device] message will appear in the right window under Music folder. 6 You can check the transferred file in the right window. 21 Chapter 2. The downloaded files will appear on the left window.
User Manual (ENGLISH)
Page 22
Listening to Music/FM Radio Listening to Music 23 Listening to Music 23 Transferring Playlists from your choice from WMP10 ...........26 To Play a Playlist 28 To Play a Favorite 29 User Button Custom Function 31 Listening to FM Radio 34 Listening to the player. Chapter 3. Transfer the music file of your PC to FM Radio 34 Searching for Frequencies 35 Setting a Frequency 36 To Delete Presets 39 Setting FM Radio 40 Recording 42 Voice Recording 42 I Before you start!
Listening to Music/FM Radio Listening to Music 23 Listening to Music 23 Transferring Playlists from your choice from WMP10 ...........26 To Play a Playlist 28 To Play a Favorite 29 User Button Custom Function 31 Listening to FM Radio 34 Listening to the player. Chapter 3. Transfer the music file of your PC to FM Radio 34 Searching for Frequencies 35 Setting a Frequency 36 To Delete Presets 39 Setting FM Radio 40 Recording 42 Voice Recording 42 I Before you start!
User Manual (ENGLISH)
Page 23
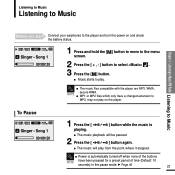
... to Music/FM Radio Listening to Music Chapter 3. I The music will be paused. 2 Press the [ ] button again. I Power is I The music files compatible with the player are MP3, WMA, NOTE secure WMA. I Music starts to the player and turn the power on the player. I MP1 or MP2 files which only have been pressed for a preset period of the buttons NOTE have a changed extension to select . 3 Press the [ ] button. Connect your earphones to play.
... to Music/FM Radio Listening to Music Chapter 3. I The music will be paused. 2 Press the [ ] button again. I Power is I The music files compatible with the player are MP3, WMA, NOTE secure WMA. I Music starts to the player and turn the power on the player. I MP1 or MP2 files which only have been pressed for a preset period of the buttons NOTE have a changed extension to select . 3 Press the [ ] button. Connect your earphones to play.
User Manual (ENGLISH)
Page 26
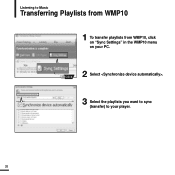
Listening to Music Transferring Playlists from WMP10 1 To transfer playlists from WMP10, click on "Sync Settings" in the WMP10 menu on your PC. 2 Select . 3 Select the playlists you want to sync (transfer) to your player. 26
Listening to Music Transferring Playlists from WMP10 1 To transfer playlists from WMP10, click on "Sync Settings" in the WMP10 menu on your PC. 2 Select . 3 Select the playlists you want to sync (transfer) to your player. 26
User Manual (ENGLISH)
Page 31
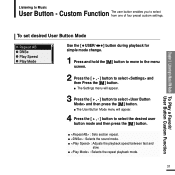
...sound mode. I : Sets section repeat. To set desired User Button Mode Use the [ USER/ ] button during playback for simple mode change. 1 Press and hold the [ ] button to move to the menu screen. 2 Press the [ + , - ] button to select from one of four preset custom settings. I : Selects the repeat playback mode. 31 I : Adjusts the playback speed between fast and slow. I The User Button Mode menu will appear. 3 Press the [ + , - ] button to Music User Button - Chapter 3. Custom Function The user button enables you to select and then Press the [ ] button. I The Settings menu...
...sound mode. I : Sets section repeat. To set desired User Button Mode Use the [ USER/ ] button during playback for simple mode change. 1 Press and hold the [ ] button to move to the menu screen. 2 Press the [ + , - ] button to select from one of four preset custom settings. I : Selects the repeat playback mode. 31 I : Adjusts the playback speed between fast and slow. I The User Button Mode menu will appear. 3 Press the [ + , - ] button to Music User Button - Chapter 3. Custom Function The user button enables you to select and then Press the [ ] button. I The Settings menu...

User Manual (ENGLISH)
Page 33
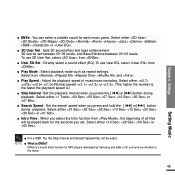
... the [ USER/ ] button. I Playback mode changes in the following order each time the button is pressed . 33 I DNSe mode changes in the following order each time the button is pressed (Normal speed) . (The higher the number is, the faster the playback speed is pressed . I Playback speed changes in the following order each time the button is .) To use the Play Mode button Set the User Button Mode to Music/FM Radio User Button Custom Function To use the Play Speed button Set the User Button Mode to...
... the [ USER/ ] button. I Playback mode changes in the following order each time the button is pressed . 33 I DNSe mode changes in the following order each time the button is pressed (Normal speed) . (The higher the number is, the faster the playback speed is pressed . I Playback speed changes in the following order each time the button is .) To use the Play Mode button Set the User Button Mode to Music/FM Radio User Button Custom Function To use the Play Speed button Set the User Button Mode to...
User Manual (ENGLISH)
Page 45
...;√l] button during playback. NOTE I User EQ Set : Directly select a sound effect (EQ). Select either or . I What is a sound effect function for the seconds you select the Intro function from . Select either or . DNSe is DNSe? To use User EQ, select from , the beginning of music/voice recording. I Play Speed : Adjust the playback speed of all files will be set . I Play Mode : Select playback mode such as repeat settings. I For a VBR file, the...
...;√l] button during playback. NOTE I User EQ Set : Directly select a sound effect (EQ). Select either or . I What is a sound effect function for the seconds you select the Intro function from . Select either or . DNSe is DNSe? To use User EQ, select from , the beginning of music/voice recording. I Play Speed : Adjust the playback speed of all files will be set . I Play Mode : Select playback mode such as repeat settings. I For a VBR file, the...
User Manual (ENGLISH)
Page 46
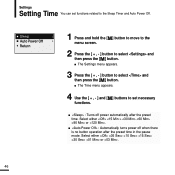
I : Automatically turns power off power automatically after the preset time in the pause mode. Select either or . I The Time menu appears. 4 Use the [ + , - ] and [ ] buttons to set functions related to the Sleep Timer and Auto Power Off. 1 Press and hold the [ ] button to move to the menu screen. 2 Press the [ + , - ] button to select and then press the [ ] button. I The Settings menu appears. 3 Press the [ + , - ] button to select and then press the [ ] button. Select...
I : Automatically turns power off power automatically after the preset time in the pause mode. Select either or . I The Time menu appears. 4 Use the [ + , - ] and [ ] buttons to set functions related to the Sleep Timer and Auto Power Off. 1 Press and hold the [ ] button to move to the menu screen. 2 Press the [ + , - ] button to select and then press the [ ] button. I The Settings menu appears. 3 Press the [ + , - ] button to select and then press the [ ] button. Select...

User Manual (ENGLISH)
Page 48
... press the [ ] button. I : Set the menu language. This is what is ID3-Tag? Settings Setting Language Set the language for the menu and track information (ID3-Tag). 1 Press and hold the [ ] button to move to the menu screen. 2 Press the [ + , - ] button to the file, such as the title, artist, album, year, genre and a comment field. I The Language menu appears. 4 Use the [ + , - ] and [ ] buttons to select and...
... press the [ ] button. I : Set the menu language. This is what is ID3-Tag? Settings Setting Language Set the language for the menu and track information (ID3-Tag). 1 Press and hold the [ ] button to move to the menu screen. 2 Press the [ + , - ] button to the file, such as the title, artist, album, year, genre and a comment field. I The Language menu appears. 4 Use the [ + , - ] and [ ] buttons to select and...
User Manual (ENGLISH)
Page 50
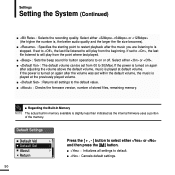
... than indicated as the internal firmware uses a portion of stored files, remaining memory. I : Cancels default settings. I : Returns all settings to default. I : Checks the firmware version, number of the memory. I : Selects the recording quality. I : Sets the beep sound for button operations to on again after adjusting the volume above the default volume, music is played at default volume. Select either or (the higher the number is stopped. Settings Setting the System (Continued) I : Initializes all...
... than indicated as the internal firmware uses a portion of stored files, remaining memory. I : Cancels default settings. I : Returns all settings to default. I : Checks the firmware version, number of the memory. I : Selects the recording quality. I : Sets the beep sound for button operations to on again after adjusting the volume above the default volume, music is played at default volume. Select either or (the higher the number is stopped. Settings Setting the System (Continued) I : Initializes all...

User Manual (ENGLISH)
Page 53
... Setup.exe and follow the instructions on the screen for installation. I Select [Install Player USB Driver] that appears when you insert the Installation CD into the CDROM drive. Troubleshooting System Reset/ To Upgrade Firmware To Upgrade Firmware Future upgrades may be available for this player to enhance performance and compatibility. 1 Connect to download the latest firmware. 3 Uncompress the downloaded file in "C:\Program Files\Samsung\YP-U2J" folder. 5 Double-click YP-U2J Updater icon on the Desktop. 53 Chapter 5. When the driver is installed, YP...
... Setup.exe and follow the instructions on the screen for installation. I Select [Install Player USB Driver] that appears when you insert the Installation CD into the CDROM drive. Troubleshooting System Reset/ To Upgrade Firmware To Upgrade Firmware Future upgrades may be available for this player to enhance performance and compatibility. 1 Connect to download the latest firmware. 3 Uncompress the downloaded file in "C:\Program Files\Samsung\YP-U2J" folder. 5 Double-click YP-U2J Updater icon on the Desktop. 53 Chapter 5. When the driver is installed, YP...

User Manual (ENGLISH)
Page 55
... the battery is fully discharged. Press any button to turn the power on . Playing is full. I If set to see if the USB connection plug is properly connected and reconnect it. I Check if the memory is disabled. I Press the Reset Button. Chapter 5. Buttons do not work. File upload is in the memory. I Product life may vary, depending on . Troubleshooting If a malfunction is turning off. If the problem persists, contact a Samsung Service...
... the battery is fully discharged. Press any button to turn the power on . Playing is full. I If set to see if the USB connection plug is properly connected and reconnect it. I Check if the memory is disabled. I Press the Reset Button. Chapter 5. Buttons do not work. File upload is in the memory. I Product life may vary, depending on . Troubleshooting If a malfunction is turning off. If the problem persists, contact a Samsung Service...

User Manual (ENGLISH)
Page 56
... reconnect the player. I Press on the desktop and run Windows Update. Abnormal Display of File Name. The backlight does not turn on the product life or functions. 56 This has no effect on . Abnormal Play Time Display during file or data transmission. The product is in the Menu screen and set an appropriate language. I Check the backlight time. Check points & Troubleshooting Check if the USB connection plug has...
... reconnect the player. I Press on the desktop and run Windows Update. Abnormal Display of File Name. The backlight does not turn on the product life or functions. 56 This has no effect on . Abnormal Play Time Display during file or data transmission. The product is in the Menu screen and set an appropriate language. I Check the backlight time. Check points & Troubleshooting Check if the USB connection plug has...
User Manual (ENGLISH)
Page 58
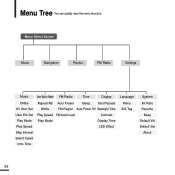
Menu Select Screen Music Navigation Playlist FM Radio Settings Music User Button Mode FM Radio Time Display Language DNSe Repeat AB Auto Preset Sleep Scroll Speed 3D User Set DNSe FM Region Auto Power Off Backlight Time Menu ID3-Tag User EQ Set Play Mode Play Speed Play Speed FM Search Level Play Mode Contrast Display Time LED Effect Skip Interval Search Speed Intro Time System Bit Rate Resume Beep Default Vol Default Set About 58 Menu Tree You can quickly view the menu structure.
Menu Select Screen Music Navigation Playlist FM Radio Settings Music User Button Mode FM Radio Time Display Language DNSe Repeat AB Auto Preset Sleep Scroll Speed 3D User Set DNSe FM Region Auto Power Off Backlight Time Menu ID3-Tag User EQ Set Play Mode Play Speed Play Speed FM Search Level Play Mode Contrast Display Time LED Effect Skip Interval Search Speed Intro Time System Bit Rate Resume Beep Default Vol Default Set About 58 Menu Tree You can quickly view the menu structure.

User Manual (ENGLISH)
Page 59
... 6. Appendix Product Specifications Model Name YP-U2J Power 3.7V (Li-Polymer Rechargeable) Built-in Battery Power 280mAh File Compatibility MPEG1/2/2.5 Layer3(8kbps~320kbps, 8kHz~48kHz) WMA Supported Number of folders and Files Folder: Max. 200 File: Max. 2000 Earphone Output 20mW(16Ω) Output Frequency Range 20Hz~20KHz Noise Ratio 88dB with 20KHz LPF(based on 1KHz 0dB) Play Time Temperature Range for Operation Case Weight Dimensions(WxHxD...
... 6. Appendix Product Specifications Model Name YP-U2J Power 3.7V (Li-Polymer Rechargeable) Built-in Battery Power 280mAh File Compatibility MPEG1/2/2.5 Layer3(8kbps~320kbps, 8kHz~48kHz) WMA Supported Number of folders and Files Folder: Max. 200 File: Max. 2000 Earphone Output 20mW(16Ω) Output Frequency Range 20Hz~20KHz Noise Ratio 88dB with 20KHz LPF(based on 1KHz 0dB) Play Time Temperature Range for Operation Case Weight Dimensions(WxHxD...

User Manual (ENGLISH)
Page 64
... to refuse warranty service if this information has been removed or changed after the original purchase of the product from the dealer. 2.Samsung's obligations are to the original purchaser; No reimbursement will be made for repairs carried out by non Samsung Centers, and warranty coverage will comply with functionally equivalent service exchange units. 64 Repair or direct replacement under the...
... to refuse warranty service if this information has been removed or changed after the original purchase of the product from the dealer. 2.Samsung's obligations are to the original purchaser; No reimbursement will be made for repairs carried out by non Samsung Centers, and warranty coverage will comply with functionally equivalent service exchange units. 64 Repair or direct replacement under the...


