User Manual (user Manual) (ver.1.0) (English)
Page 2
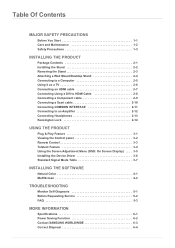
... Attaching a Wall Mount/Desktop Stand 2-4 Connecting to a Computer 2-5 Using it as a TV 2-6 Connecting an HDMI cable 2-7 Connecting Using a DVI to HDMI Cable 2-8 Connecting a Component cable 2-9 Connecting a Scart cable 2-10 Connecting COMMON INTERFACE 2-11 Connecting to an ...Feature 3-4 Using the Screen Adjustment Menu (OSD: On Screen Display) . . . . 3-5 Installing the Device Driver 3-6 Standard Signal Mode Table 3-7 INSTALLING THE SOFTWARE Natural Color 4-1 MultiScreen 4-2 TROUBLESHOOTING Monitor Self-Diagnosis 5-1 Before Requesting Service 5-2 FAQ 5-3 MORE INFORMATION Specifications ...
... Attaching a Wall Mount/Desktop Stand 2-4 Connecting to a Computer 2-5 Using it as a TV 2-6 Connecting an HDMI cable 2-7 Connecting Using a DVI to HDMI Cable 2-8 Connecting a Component cable 2-9 Connecting a Scart cable 2-10 Connecting COMMON INTERFACE 2-11 Connecting to an ...Feature 3-4 Using the Screen Adjustment Menu (OSD: On Screen Display) . . . . 3-5 Installing the Device Driver 3-6 Standard Signal Mode Table 3-7 INSTALLING THE SOFTWARE Natural Color 4-1 MultiScreen 4-2 TROUBLESHOOTING Monitor Self-Diagnosis 5-1 Before Requesting Service 5-2 FAQ 5-3 MORE INFORMATION Specifications ...

User Manual (user Manual) (ver.1.0) (English)
Page 18
2. Connect the [HDMI/PC/DVI-D AUDIO IN] port on the rear side of the monitor to the sound card of video card you are using if you connect ... your computer.) • You may get a blank screen depending on the monitor. (The input voltage is set to have the monitor double-check the input signal source. 2-5 Installing the Product Press [ ] button to analogue. To use the monitor, connect the power cable to a power outlet and the [POWER] port on the...
2. Connect the [HDMI/PC/DVI-D AUDIO IN] port on the rear side of the monitor to the sound card of video card you are using if you connect ... your computer.) • You may get a blank screen depending on the monitor. (The input voltage is set to have the monitor double-check the input signal source. 2-5 Installing the Product Press [ ] button to analogue. To use the monitor, connect the power cable to a power outlet and the [POWER] port on the...

User Manual (user Manual) (ver.1.0) (English)
Page 29
...one of the product specifications. Using the Product 3-2 Use these buttons to navigate the menu or to adjust a value in which the TV/external input signal changes. → → → → → Press this button to select a function. 3-2 Viewing the Control panel Touch one menu ...item to another horizontally or adjusts selected menu values. The LED buttons appear. Signals other than the TV signal can only be selected if the corresponding device is recommended to change the channel. This button is turned on or off.
...one of the product specifications. Using the Product 3-2 Use these buttons to navigate the menu or to adjust a value in which the TV/external input signal changes. → → → → → Press this button to select a function. 3-2 Viewing the Control panel Touch one menu ...item to another horizontally or adjusts selected menu values. The LED buttons appear. Signals other than the TV signal can only be selected if the corresponding device is recommended to change the channel. This button is turned on or off.
User Manual (user Manual) (ver.1.0) (English)
Page 33
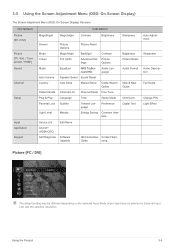
...Guide Change PIN Light Effect Picture [PC / DVI] The default setting may be different depending on the selected Input Mode (input signal source selected in External Input List) and the selected resolution Using the Product 3-5 3-5 Using the Screen Adjustment Menu (OSD: On...Screen Adjustment Menu (OSD: On Screen Display) Structure TOP MENUS Picture [PC / DVI] Picture [TV / Ext. / Component / HDMI] Sound Channel Setup Input Application Support MagicBright MagicAngle SUB MENUS Contrast Brightness Sharpness Screen Mode Colour Mode Auto Volume Country Default Guide Picture Options ...
...Guide Change PIN Light Effect Picture [PC / DVI] The default setting may be different depending on the selected Input Mode (input signal source selected in External Input List) and the selected resolution Using the Product 3-5 3-5 Using the Screen Adjustment Menu (OSD: On...Screen Adjustment Menu (OSD: On Screen Display) Structure TOP MENUS Picture [PC / DVI] Picture [TV / Ext. / Component / HDMI] Sound Channel Setup Input Application Support MagicBright MagicAngle SUB MENUS Contrast Brightness Sharpness Screen Mode Colour Mode Auto Volume Country Default Guide Picture Options ...
User Manual (user Manual) (ver.1.0) (English)
Page 38
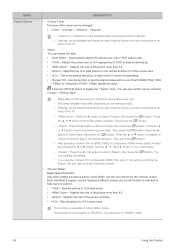
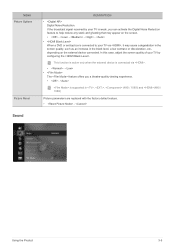
... picture vertically. • - Adjusts the picture size to 16:9 appropriate for each external device you use the function with HDMI (720p/ 1080i / 1080p) or Component (1080i / 1080p) signals are input. Magnify the size of the picture more than 4:3. • - Magnifies the 16:9 wide picture (in ,...the picture mode is . • Settings can be adjusted and stored for DVD or wide broadcasting. • - This function is available in HDMI (1080i) or Component (1080i) mode: Select Position by selecting →. • Depending on the input source, the picture size options may ...
... picture vertically. • - Adjusts the picture size to 16:9 appropriate for each external device you use the function with HDMI (720p/ 1080i / 1080p) or Component (1080i / 1080p) signals are input. Magnify the size of the picture more than 4:3. • - Magnifies the 16:9 wide picture (in ,...the picture mode is . • Settings can be adjusted and stored for DVD or wide broadcasting. • - This function is available in HDMI (1080i) or Component (1080i) mode: Select Position by selecting →. • Depending on the input source, the picture size options may ...
User Manual (user Manual) (ver.1.0) (English)
Page 39
..., adjust the screen quality of your TV by your TV via . • - • The feature offers you a theatre-quality viewing experience. • - If the broadcast signal received by configuring the . MENU Picture Options Picture Reset Sound DESCRIPTION • Digital Noise Reduction. This function is active only when the external device is...
..., adjust the screen quality of your TV by your TV via . • - • The feature offers you a theatre-quality viewing experience. • - If the broadcast signal received by configuring the . MENU Picture Options Picture Reset Sound DESCRIPTION • Digital Noise Reduction. This function is active only when the external device is...

User Manual (user Manual) (ver.1.0) (English)
Page 57
...on . The vertical frequency is represented in kHz. PC Timing (D-Sub and HDMI input) If the signal from the left-most position to the inherent characteristics of the panel, unlike a CDT monitor. 3-7 Standard Signal Mode Table An LCD monitor has one optimal resolution for the panel size. ... the picture. This frequency is recommended setting the resolution to scan one line from the PC is one of the following standard signal modes, the screen is not set automatically. Therefore, the visual quality will be turned on the screen is called the horizontal frequency...
...on . The vertical frequency is represented in kHz. PC Timing (D-Sub and HDMI input) If the signal from the left-most position to the inherent characteristics of the panel, unlike a CDT monitor. 3-7 Standard Signal Mode Table An LCD monitor has one optimal resolution for the panel size. ... the picture. This frequency is recommended setting the resolution to scan one line from the PC is one of the following standard signal modes, the screen is not set automatically. Therefore, the visual quality will be turned on the screen is called the horizontal frequency...


