Installation Instructions
Page 1
Wall Mount Installation Manual WMN-5090A
Wall Mount Installation Manual WMN-5090A
Installation Instructions
Page 2
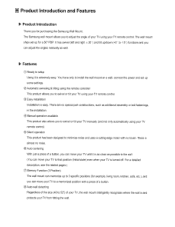
...some settings. For a detailed description, see the related pages.) ® Memory Function (3 Position) The wall mount can move your TV until it is turned off. The Samsung wall mount allows you can adjust the angles manually as well. ► Features CI) Ready to 52") of ...control. ® Easy installation Installation is and protects your TV, the wall mount intelligently recognizes where the wall is easy. The wall mount ships set up to 3 specific positions (for purchasing the Samsung Wall Mount. ED Automatic swiveling & tilting using the remote controller This product allows you...
...some settings. For a detailed description, see the related pages.) ® Memory Function (3 Position) The wall mount can move your TV until it is turned off. The Samsung wall mount allows you can adjust the angles manually as well. ► Features CI) Ready to 52") of ...control. ® Easy installation Installation is and protects your TV, the wall mount intelligently recognizes where the wall is easy. The wall mount ships set up to 3 specific positions (for purchasing the Samsung Wall Mount. ED Automatic swiveling & tilting using the remote controller This product allows you...
Installation Instructions
Page 4
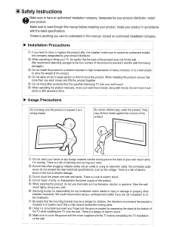
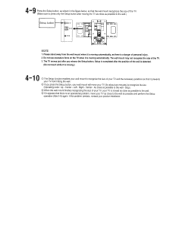
... sure to have an authorized installation company, designated by your product distributor, install your wall mount slowly using both hands. tion company designated by your product in a location such that more than the specified Samsung TV onto your wall mount while it is running. Do not allow an old or weak person or child to...
... sure to have an authorized installation company, designated by your product distributor, install your wall mount slowly using both hands. tion company designated by your product in a location such that more than the specified Samsung TV onto your wall mount while it is running. Do not allow an old or weak person or child to...
Installation Instructions
Page 5
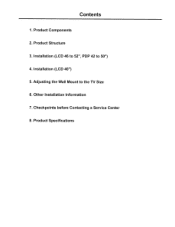
Installation (LCD 46 to 52", PDP 42 to the TV Size 6. Installation (LCD 40") 5. Checkpoints before Contacting a Service Center 8. Product Specifications Adjusting the Wall Mount to 50") 4. Other Installation Information 7. Contents 1. Product Components 2. Product Structure 3.
Installation (LCD 46 to 52", PDP 42 to the TV Size 6. Installation (LCD 40") 5. Checkpoints before Contacting a Service Center 8. Product Specifications Adjusting the Wall Mount to 50") 4. Other Installation Information 7. Contents 1. Product Components 2. Product Structure 3.
Installation Instructions
Page 6
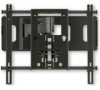
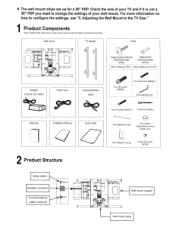
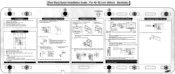
...screws (M3X5) Setup button Adapter connector Communications cable connector M3 @DUCS12PEYT @EX -LINE 0 • 0 = 0 =I = 0 0 Wall mount support Wall mount body Check the size of your TV and if it is not a 50" PDP you need to configure the settings, see "5. For ...more information on how to change the settings of your wall mount. Product Components When installing the wall mount, make sure to the TV Size." Adjusting the Wall Mount to use only the provided components and parts. Wall mount TV hanger Parts CD 0 CD 0 • • =c = 0 =I...
...screws (M3X5) Setup button Adapter connector Communications cable connector M3 @DUCS12PEYT @EX -LINE 0 • 0 = 0 =I = 0 0 Wall mount support Wall mount body Check the size of your TV and if it is not a 50" PDP you need to configure the settings, see "5. For ...more information on how to change the settings of your wall mount. Product Components When installing the wall mount, make sure to the TV Size." Adjusting the Wall Mount to use only the provided components and parts. Wall mount TV hanger Parts CD 0 CD 0 • • =c = 0 =I...
Installation Instructions
Page 7
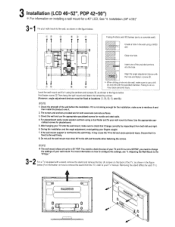
...174; 0 TT T T T Q • • Q ® Fixing Anchors and Screws (on to fall and cause personal injury. Check the strength of your wall mount to reinforce it and then install the product onto it is not a 50"PDP, you need to check the size of the... correctly by inspecting it may cause personal injury. 3 Installation (LCD 4652", PDP 42-50") For information on installing a wall mount for marble and steel walls. 4. First fasten screw 0 Then hang the wall mount and fasten the remaining screws. (However, angle adjustment devices must be fixed at locations 0, 0, ©, 0, and ...
...174; 0 TT T T T Q • • Q ® Fixing Anchors and Screws (on to fall and cause personal injury. Check the strength of your wall mount to reinforce it and then install the product onto it is not a 50"PDP, you need to check the size of the... correctly by inspecting it may cause personal injury. 3 Installation (LCD 4652", PDP 42-50") For information on installing a wall mount for marble and steel walls. 4. First fasten screw 0 Then hang the wall mount and fasten the remaining screws. (However, angle adjustment devices must be fixed at locations 0, 0, ©, 0, and ...
Installation Instructions
Page 8
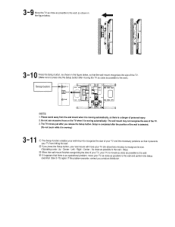
...the left or right side. Then 4, make sure that , after hanging your TV onto the wall mount, it onto the specified wall mount locations. 3-5 To prevent your TV from sliding, fasten the four (4) bolts on your wall mount firmly by rotating them clockwise as shown in the figure below, and attach the hanger firmly ...using the four (4) © screws. As shown in the figure below, pull the wall mount as far forward as shown in the figure below . They differ for each product family, as possible. 3-3 Check the holes on the back of ...
...the left or right side. Then 4, make sure that , after hanging your TV onto the wall mount, it onto the specified wall mount locations. 3-5 To prevent your TV from sliding, fasten the four (4) bolts on your wall mount firmly by rotating them clockwise as shown in the figure below, and attach the hanger firmly ...using the four (4) © screws. As shown in the figure below, pull the wall mount as far forward as shown in the figure below . They differ for each product family, as possible. 3-3 Check the holes on the back of ...

Installation Instructions
Page 9
... 0 . O J , EX-LINK (Service) connector Make sure to recheck that they do not 8 come undone while you are too taut when operating your wall mount. Tie the adapter cable and communications cable using the two (2) © screws, as shown in the figure below. (It is easier to work while rotating... the wall mount to the left and right.) 3_ 7 Connect the cables, as directed below. 0 Connect the communications cable from interfering with your TV when rotating ...
... 0 . O J , EX-LINK (Service) connector Make sure to recheck that they do not 8 come undone while you are too taut when operating your wall mount. Tie the adapter cable and communications cable using the two (2) © screws, as shown in the figure below. (It is easier to work while rotating... the wall mount to the left and right.) 3_ 7 Connect the cables, as directed below. 0 Connect the communications cable from interfering with your TV when rotating ...
Installation Instructions
Page 10
...Operating order: Up - If the problem persists, contact your TV and the necessary positions so that it appears that the wall mount recognizes the size of the TV. 3. Center - Right - Stop) C) When the wall mount finishes recognizing the size of your TV, your TV is moved as close as possible to the... detected. (Do not touch while it is moving the TV as close as possible to the wall.) Setup button ® SET UP O DC IDV 0 0 EN-LINE 0 0 =0 0 e•- • = = / 0, NQ.)7I 1. The wall mount may not recognize the size of the TV. (Make sure to press only the Setup button ...
...Operating order: Up - If the problem persists, contact your TV and the necessary positions so that it appears that the wall mount recognizes the size of the TV. 3. Center - Right - Stop) C) When the wall mount finishes recognizing the size of your TV, your TV is moved as close as possible to the... detected. (Do not touch while it is moving the TV as close as possible to the wall.) Setup button ® SET UP O DC IDV 0 0 EN-LINE 0 0 =0 0 e•- • = = / 0, NQ.)7I 1. The wall mount may not recognize the size of the TV. (Make sure to press only the Setup button ...
Installation Instructions
Page 11
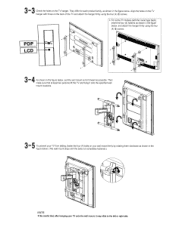
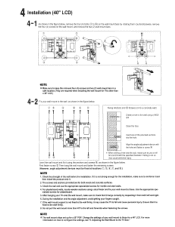
... the figure below . For more than a 40" LCD.) 4..2 Fix your wall mount to the wall, as shown in the figure below 0 T T Fixing Anchors and ® Screws (on to a concrete wall) Create a hole in the wall using the anchors and screws ®, as shown in the figure below , ...remove the four (4) bolts (C) to 0) on the wall mount, and remove the two (2) wall mount bars. 0 !!, • • 0 0 0 0 .0 A 9 NOTE Make sure to keep the removed four (4) screws and two (2) wall mount bars in a safe location.(They are for both left and forwards when fastening ...
... the figure below . For more than a 40" LCD.) 4..2 Fix your wall mount to the wall, as shown in the figure below 0 T T Fixing Anchors and ® Screws (on to a concrete wall) Create a hole in the wall using the anchors and screws ®, as shown in the figure below , ...remove the four (4) bolts (C) to 0) on the wall mount, and remove the two (2) wall mount bars. 0 !!, • • 0 0 0 0 .0 A 9 NOTE Make sure to keep the removed four (4) screws and two (2) wall mount bars in a safe location.(They are for both left and forwards when fastening ...
Installation Instructions
Page 12
...of the TV using the provided tools until they remain projected out about 10 mm is attached to the wall mount by fastening the two (2) (id) screws using the provided tools. (Torque: 10 to your TV.... (For information on how to remove the stand from the TV and fasten the two (2) © screws on the wall mount firmly. 2. Removing the stand differs for each TV.) o • OF 38,4 .090 1=1 4-4 Remove the screws ...the brackets of about 10 mm as shown in the figure below. (A projection of the wall mount as far forward as possible. a IIVYTE Ensure that the bottom part of the TV is necessary when ...
...of the TV using the provided tools until they remain projected out about 10 mm is attached to the wall mount by fastening the two (2) (id) screws using the provided tools. (Torque: 10 to your TV.... (For information on how to remove the stand from the TV and fasten the two (2) © screws on the wall mount firmly. 2. Removing the stand differs for each TV.) o • OF 38,4 .090 1=1 4-4 Remove the screws ...the brackets of about 10 mm as shown in the figure below. (A projection of the wall mount as far forward as possible. a IIVYTE Ensure that the bottom part of the TV is necessary when ...
Installation Instructions
Page 13
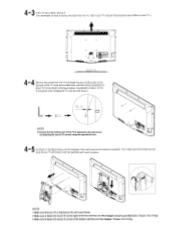
...they do not come undone while you are rotating or operating the TV. 0 •^N 0 a tt To prevent the cables from the EX-LINK on the Wall mount to the EX-LINK (Service) on your TV. 4 - 6 Connect the cables, as directed below. 0 Connect the communications cable from interfering with your... wall mount. 8 4 - Check the operation two or three times to check if there are any problems. Hgr. * Check whether the cables are connected to their correct ...
...they do not come undone while you are rotating or operating the TV. 0 •^N 0 a tt To prevent the cables from the EX-LINK on the Wall mount to the EX-LINK (Service) on your TV. 4 - 6 Connect the cables, as directed below. 0 Connect the communications cable from interfering with your... wall mount. 8 4 - Check the operation two or three times to check if there are any problems. Hgr. * Check whether the cables are connected to their correct ...
Installation Instructions
Page 14
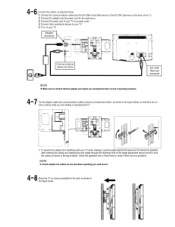
... the size of the TV. (Make sure to press only the Setup button after you press the Setup button, your wall mount will move your TV as close to the wall as possible and perform the Setup operation (See 4-9) again. Do not use excessive force on the 1V when it is a danger of... your TV and the necessary positions so that it prevents your TV from the wall mount when it is an operational problem, move your TV (for about two minutes) to the wall - The TV moves just after moving automatically. Setup is completed after the position of the...
... the size of the TV. (Make sure to press only the Setup button after you press the Setup button, your wall mount will move your TV as close to the wall as possible and perform the Setup operation (See 4-9) again. Do not use excessive force on the 1V when it is a danger of... your TV and the necessary positions so that it prevents your TV from the wall mount when it is an operational problem, move your TV (for about two minutes) to the wall - The TV moves just after moving automatically. Setup is completed after the position of the...
Installation Instructions
Page 15
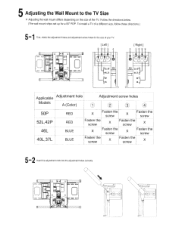
Follow the directions below. (The wall mount ships set up for the size of a different size, follow these directions.) 5- I3 0 0 0 0 • • =0 0 CI 0 To install a TV of your N. [Left] A 0 0 = 0 CI [ Right ] A 0 0 4 El 0 0 I R ... the screw X 5-2 Insert the adjustment rods into the adjustment holes correctly. First, check the adjustment holes and adjustment screw holes for a 50" PDP. 5 Adjusting the Wall Mount to the TV Size Adjusting the wall mount differs depending on the size of the TV.
Follow the directions below. (The wall mount ships set up for the size of a different size, follow these directions.) 5- I3 0 0 0 0 • • =0 0 CI 0 To install a TV of your N. [Left] A 0 0 = 0 CI [ Right ] A 0 0 4 El 0 0 I R ... the screw X 5-2 Insert the adjustment rods into the adjustment holes correctly. First, check the adjustment holes and adjustment screw holes for a 50" PDP. 5 Adjusting the Wall Mount to the TV Size Adjusting the wall mount differs depending on the size of the TV.

Installation Instructions
Page 16
... screw is not pressed correctly and strongly enough, it may bounce and cause personal injury. You have to re-fasten them after finishing adjusting the wall mount.) (23 If the adjustment rod is not visible, use the following method. 5-3 Press the adjustment rod correctly using both hands and another person should hold...
... screw is not pressed correctly and strongly enough, it may bounce and cause personal injury. You have to re-fasten them after finishing adjusting the wall mount.) (23 If the adjustment rod is not visible, use the following method. 5-3 Press the adjustment rod correctly using both hands and another person should hold...
Installation Instructions
Page 18
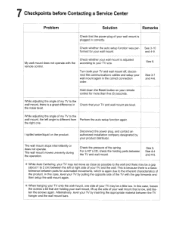
...See 3-7 and 4-6. Hold down the Reset button on the product. While adjusting the angle of your TV and wall mount are holding parts between the TV hanger and the wall mount bars. and 4-9. the right one side of the TV with the remote control. See 5. In this case, ... See 4-4 and 4-5. Check whether the auto setup function was per- The wall mount stops intermittently or does not operate. For a 40" LCD, check the holding your wall mount, lift up the side of my TV to the wall mount, there is a great difference in correctly. When hanging your product distributor....
...See 3-7 and 4-6. Hold down the Reset button on the product. While adjusting the angle of your TV and wall mount are holding parts between the TV hanger and the wall mount bars. and 4-9. the right one side of the TV with the remote control. See 5. In this case, ... See 4-4 and 4-5. Check whether the auto setup function was per- The wall mount stops intermittently or does not operate. For a 40" LCD, check the holding your wall mount, lift up the side of my TV to the wall mount, there is a great difference in correctly. When hanging your product distributor....
Installation Instructions
Page 32
... 0 10 Check the operation of the wall. 2. Check the cable connections. Applicable for more than 45° forwards when fastening the screws. Adjustment according to the Installation Manual for Samsung 40" to the material of the wall mount using your distributor if you adjusted both... screws. Cable Connections and Setup 5-1. Refer to TV size X Note: The wall mount is too short, use too much force when inserting...
... 0 10 Check the operation of the wall. 2. Check the cable connections. Applicable for more than 45° forwards when fastening the screws. Adjustment according to the Installation Manual for Samsung 40" to the material of the wall mount using your distributor if you adjusted both... screws. Cable Connections and Setup 5-1. Refer to TV size X Note: The wall mount is too short, use too much force when inserting...
Installation Instructions
Page 35
...8226; El Check: Make sure to the material of 0 0.) 2-3. Cable Connections and Setup 5-1. Setup button @51UP 0 all necessary safety precautions. Operate the wall mount two or three times to fasten C), C), ®, C), and ®. (Note: Fasten ®. After installing the adapter, fix it will not operate... to fasten the screws for your safety. 5. Press the Setup button. Applicable for Samsung 40" to locate the position for a 50" PDP. Hanging up Your TV 4-1. Reinforce the wall if its strength is lowered a little. 3-3. X Note 1. It is easier removing...
...8226; El Check: Make sure to the material of 0 0.) 2-3. Cable Connections and Setup 5-1. Setup button @51UP 0 all necessary safety precautions. Operate the wall mount two or three times to fasten C), C), ®, C), and ®. (Note: Fasten ®. After installing the adapter, fix it will not operate... to fasten the screws for your safety. 5. Press the Setup button. Applicable for Samsung 40" to locate the position for a 50" PDP. Hanging up Your TV 4-1. Reinforce the wall if its strength is lowered a little. 3-3. X Note 1. It is easier removing...
Installation Instructions
Page 39
... herein, with new or reconditioned parts or products if found to SAMSUNG. Some regions do not allow limitations on products purchased and used in the nation. SAMSUNG AUTO WALL MOUNT LIMITED WARRANTY TO ORIGINAL PURCHASER This SAMSUNG brand product, the Auto Wall Mount, as supplied and distributed by SAMSUNG and delivered new, in the original carton to you.
... herein, with new or reconditioned parts or products if found to SAMSUNG. Some regions do not allow limitations on products purchased and used in the nation. SAMSUNG AUTO WALL MOUNT LIMITED WARRANTY TO ORIGINAL PURCHASER This SAMSUNG brand product, the Auto Wall Mount, as supplied and distributed by SAMSUNG and delivered new, in the original carton to you.

