Installation Instructions
Page 1
Wall Mount Installation Manual WMN-5090A
Wall Mount Installation Manual WMN-5090A
Installation Instructions
Page 2
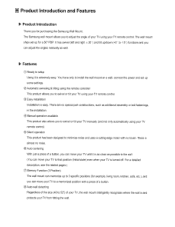
... tilt your TV using your TV remote control. ® Easy installation Installation is and protects your TV remote control). ® Silent operation This product has been designed to setup Using it is as close as additional assembly or bolt fastenings, in the installation. ® Manual operation available This product also allows you to install the wall mount on a wall, connect the power and set...
... tilt your TV using your TV remote control. ® Easy installation Installation is and protects your TV remote control). ® Silent operation This product has been designed to setup Using it is as close as additional assembly or bolt fastenings, in the installation. ® Manual operation available This product also allows you to install the wall mount on a wall, connect the power and set...
Installation Instructions
Page 3
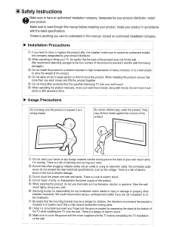
...instructions. 0 Do not use the attachments/accessories specified by the manufacturer. © Use only with a cart, stand, tripod, bracket, or table specified by the manufacturer, or sold with a damp cloth. © Do not block any heat sources such as power supply cord or plug is provided for replacement...provided plug does not fit into the apparatus, the apparatus has been exposed to qualified service personnel. Install in any way, such as radiators, heat registers, stoves, or other . Do not install near water. © Clean only with the apparatus. A polarized plug has two blades...
...instructions. 0 Do not use the attachments/accessories specified by the manufacturer. © Use only with a cart, stand, tripod, bracket, or table specified by the manufacturer, or sold with a damp cloth. © Do not block any heat sources such as power supply cord or plug is provided for replacement...provided plug does not fit into the apparatus, the apparatus has been exposed to qualified service personnel. Install in any way, such as radiators, heat registers, stoves, or other . Do not install near water. © Clean only with the apparatus. A polarized plug has two blades...
Installation Instructions
Page 4
... moving parts. ®. There is a risk of catching and injuring your wall mount slowly using a professional installer if you cannot understand in a location exposed to high temperatures or heavy moisture, or to a wall unable to carry the weight of electric shock. Ensure that the mounting bracket may hit their heads against the corners of the product. Do not repair, modify...
... moving parts. ®. There is a risk of catching and injuring your wall mount slowly using a professional installer if you cannot understand in a location exposed to high temperatures or heavy moisture, or to a wall unable to carry the weight of electric shock. Ensure that the mounting bracket may hit their heads against the corners of the product. Do not repair, modify...
Installation Instructions
Page 5
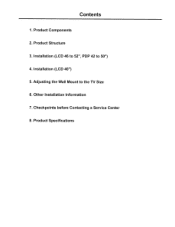
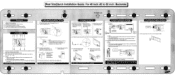
Other Installation Information 7. Installation (LCD 46 to 52", PDP 42 to the TV Size 6. Product Specifications Product Components 2. Checkpoints before Contacting a Service Center 8. Installation (LCD 40") 5. Product Structure 3. Contents 1. Adjusting the Wall Mount to 50") 4.
Other Installation Information 7. Installation (LCD 46 to 52", PDP 42 to the TV Size 6. Product Specifications Product Components 2. Checkpoints before Contacting a Service Center 8. Installation (LCD 40") 5. Product Structure 3. Contents 1. Adjusting the Wall Mount to 50") 4.
Installation Instructions
Page 6
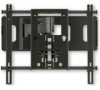
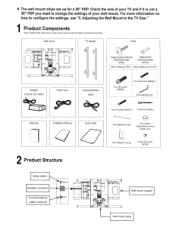
...; screws (M5X15) Three wire holders Two adjustment rods Four holders (Applicable for a 50" PDP. Product Components When installing the wall mount, make sure to configure the settings, see "5. Wall mount TV hanger Parts CD 0 CD 0 • • =c = 0 =I = 0 0 Wall mount support Wall mount body For more information on how to use only the provided components and parts. Adjusting the Wall Mount to change the settings of your wall mount. Check the size...
...; screws (M5X15) Three wire holders Two adjustment rods Four holders (Applicable for a 50" PDP. Product Components When installing the wall mount, make sure to configure the settings, see "5. Wall mount TV hanger Parts CD 0 CD 0 • • =c = 0 =I = 0 0 Wall mount support Wall mount body For more information on how to use only the provided components and parts. Adjusting the Wall Mount to change the settings of your wall mount. Check the size...
Installation Instructions
Page 7
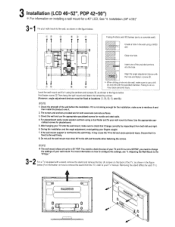
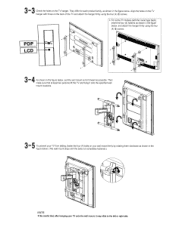
... sure to check the size of your fingers caught. 7. If the wall mount support is fixed to a concrete wall) Create a hole in the figure below . Installation (40" LCD)" 3-1 Fix your TV manual. Clean the hole. After hanging your wall mount to the wall firmly, it . 2. The screws and anchors provided are for plasterboard. 5. For plasterboard walls, locate wooden sections using a 9X50 drill. Removing the...
... sure to check the size of your fingers caught. 7. If the wall mount support is fixed to a concrete wall) Create a hole in the figure below . Installation (40" LCD)" 3-1 Fix your TV manual. Clean the hole. After hanging your wall mount to the wall firmly, it . 2. The screws and anchors provided are for plasterboard. 5. For plasterboard walls, locate wooden sections using a 9X50 drill. Removing the...
Installation Instructions
Page 8
... the hanger firmly using the four (4) © screws PDP LCD 3 - As shown in the figure below . (The wall mount ships with the bolts not completely fastened.) 0 p yE Be careful that at least two persons lift the TV and hang it onto the specified wall mount locations. 3-5 To...hanging your wall mount firmly by rotating them clockwise as shown in the figure below , pull the wall mount as far forward as possible. For some TV models (with those on the TV hanger. They differ for each product family, as shown in the figure below , and attach the hanger firmly using the four (4) © screws...
... the hanger firmly using the four (4) © screws PDP LCD 3 - As shown in the figure below . (The wall mount ships with the bolts not completely fastened.) 0 p yE Be careful that at least two persons lift the TV and hang it onto the specified wall mount locations. 3-5 To...hanging your wall mount firmly by rotating them clockwise as shown in the figure below , pull the wall mount as far forward as possible. For some TV models (with those on the TV hanger. They differ for each product family, as shown in the figure below , and attach the hanger firmly using the four (4) © screws...

Installation Instructions
Page 9
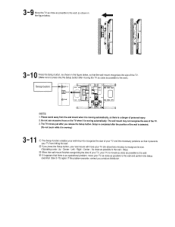
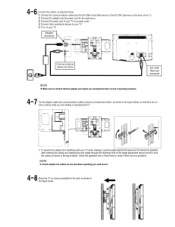
Tie the adapter cable and communications cable using the two (2) © screws, as shown in the figure below. (It is easier to work while rotating the wall mount to the left and right.) 3_ 7 Connect the cables, as directed below. 0 Connect the communications cable from interfering with your TV ... correct connecting locations. 3 - Check the operation two or three times to check if there are any problems. .-14104E * Check whether the cables are rotating or operating the TV. O 0 0 0 s To prevent the cables from the EX-LINK on the Wall mount to the EX-LINK (Service) on your TV.
Tie the adapter cable and communications cable using the two (2) © screws, as shown in the figure below. (It is easier to work while rotating the wall mount to the left and right.) 3_ 7 Connect the cables, as directed below. 0 Connect the communications cable from interfering with your TV ... correct connecting locations. 3 - Check the operation two or three times to check if there are any problems. .-14104E * Check whether the cables are rotating or operating the TV. O 0 0 0 s To prevent the cables from the EX-LINK on the Wall mount to the EX-LINK (Service) on your TV.
Installation Instructions
Page 10
...Setup function enables your wall mount to recognize the size of your TV and the necessary positions so that the wall mount recognizes the size of the TV. (Make sure to press only the Setup button after the position of the wall is detected. (Do not touch while it is an operational problem, move your TV from the wall mount...hitting the wall. ® If you release the Setup button. Center - Do not use excessive force on the TV when it prevents your TV (for about two minutes) to recognize its size. (Operating order: Up - As close as possible to the wall.) Setup button ® SET UP O...
...Setup function enables your wall mount to recognize the size of your TV and the necessary positions so that the wall mount recognizes the size of the TV. (Make sure to press only the Setup button after the position of the wall is detected. (Do not touch while it is an operational problem, move your TV from the wall mount...hitting the wall. ® If you release the Setup button. Center - Do not use excessive force on the TV when it prevents your TV (for about two minutes) to recognize its size. (Operating order: Up - As close as possible to the wall.) Setup button ® SET UP O...
Installation Instructions
Page 11
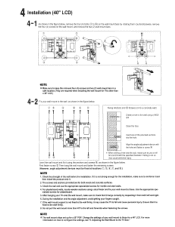
... settings of your TV onto the wall mount, make sure to check that it is not strong enough for the installation, make sure to use the appropriate specialized screws for marble and steel walls. 4. 4 Installation (40" LCD) 4 1 As shown in the figure below, remove the four (4) bolts (C) to 0) on the wall mount bars by inspecting it from both wood and concrete surfaces...
... settings of your TV onto the wall mount, make sure to check that it is not strong enough for the installation, make sure to use the appropriate specialized screws for marble and steel walls. 4. 4 Installation (40" LCD) 4 1 As shown in the figure below, remove the four (4) bolts (C) to 0) on the wall mount bars by inspecting it from both wood and concrete surfaces...
Installation Instructions
Page 12
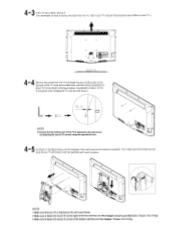
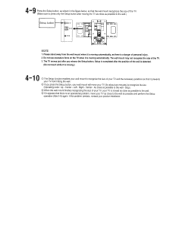
...remain projected out about 10 mm is attached on how to 15 Kg) 3. Make sure that the bottom part of the TV is attached to the wall mount by fastening the two (2) (id) screws using the provided tools. (Torque: 10 to remove the stand from the TV and fasten the two (2) ...screws on the top back of the TV using the provided tools until they are fully engaged using the appropriate tool. 4- 5 As shown in the figure below , pull the brackets of about 10 mm as shown in the figure below . (A projection of the wall mount as far forward as possible. a IIVYTE Ensure that your TV and hang...
...remain projected out about 10 mm is attached on how to 15 Kg) 3. Make sure that the bottom part of the TV is attached to the wall mount by fastening the two (2) (id) screws using the provided tools. (Torque: 10 to remove the stand from the TV and fasten the two (2) ...screws on the top back of the TV using the provided tools until they are fully engaged using the appropriate tool. 4- 5 As shown in the figure below , pull the brackets of about 10 mm as shown in the figure below . (A projection of the wall mount as far forward as possible. a IIVYTE Ensure that your TV and hang...
Installation Instructions
Page 13
...TV. 0 •^N 0 a tt To prevent the cables from the EX-LINK on the Wall mount to the EX-LINK (Service) on the back of your TV to a power outlet. ® Connect other peripheral devices to...Check the operation two or three times to check if there are any problems. Hgr. * Check whether the cables are connected to the wall, as shown in the figure below , so that the adapter and cables...Connect the adapter and the power cord for the wall mount. 0 Connect the power cord of the TV. Tie the adapter cable and communications cable using the provided wire holder, as shown in the figure below...
...TV. 0 •^N 0 a tt To prevent the cables from the EX-LINK on the Wall mount to the EX-LINK (Service) on the back of your TV to a power outlet. ® Connect other peripheral devices to...Check the operation two or three times to check if there are any problems. Hgr. * Check whether the cables are connected to the wall, as shown in the figure below , so that the adapter and cables...Connect the adapter and the power cord for the wall mount. 0 Connect the power cord of the TV. Tie the adapter cable and communications cable using the provided wire holder, as shown in the figure below...
Installation Instructions
Page 14
... figure below, so that the wall mount recognizes the size of the TV. 3. Do not use excessive force on the 1V when it is an operational problem, move your TV (for about two minutes) to the wall - The wall mount may not recognize the size of the TV. (Make sure to press only the Setup button after moving automatically, as...
... figure below, so that the wall mount recognizes the size of the TV. 3. Do not use excessive force on the 1V when it is an operational problem, move your TV (for about two minutes) to the wall - The wall mount may not recognize the size of the TV. (Make sure to press only the Setup button after moving automatically, as...
Installation Instructions
Page 15
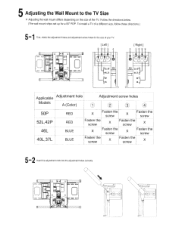
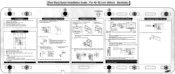
I3 0 0 0 0 • • =0 0 CI 0 To install a TV of the TV. Follow the directions below. (The wall mount ships set up for the size of your N. [Left] A 0 0 = 0 CI [ Right ] A 0 0 4 El 0 0 I R 521 42P C) 8 401 371 R se 8 461 li 0 521 I2p R 40L 37L B 50P R 461 8 Applicable Adjustment hole Models A (Color) Adjustment screw holes 1) 2 CD (4) 50P 52L,42P 46L 40L,37L RED RED...
I3 0 0 0 0 • • =0 0 CI 0 To install a TV of the TV. Follow the directions below. (The wall mount ships set up for the size of your N. [Left] A 0 0 = 0 CI [ Right ] A 0 0 4 El 0 0 I R 521 42P C) 8 401 371 R se 8 461 li 0 521 I2p R 40L 37L B 50P R 461 8 Applicable Adjustment hole Models A (Color) Adjustment screw holes 1) 2 CD (4) 50P 52L,42P 46L 40L,37L RED RED...

Installation Instructions
Page 16
... them after finishing adjusting the wall mount.) (23 If the adjustment rod is not visible, use the following method. 5-3 Press the adjustment rod correctly using both hands and another person should loosen the adjustment screw.) 4( It is easier removing the screws when the adjustment rod is lowered... that the adjustment screw is located at the preset position for the size of your TV. 50" PDP (Adjustment hole: RED / Adjustment screw holes: ®, ®) 52" LCD and 42" PDP (Adjustment hole: RED / Adjustment screw holes: 0,0) 46" LCD (Adjustment hole: BLUE / Adjustment screw holes: 0, ...
... them after finishing adjusting the wall mount.) (23 If the adjustment rod is not visible, use the following method. 5-3 Press the adjustment rod correctly using both hands and another person should loosen the adjustment screw.) 4( It is easier removing the screws when the adjustment rod is lowered... that the adjustment screw is located at the preset position for the size of your TV. 50" PDP (Adjustment hole: RED / Adjustment screw holes: ®, ®) 52" LCD and 42" PDP (Adjustment hole: RED / Adjustment screw holes: 0,0) 46" LCD (Adjustment hole: BLUE / Adjustment screw holes: 0, ...
Installation Instructions
Page 18
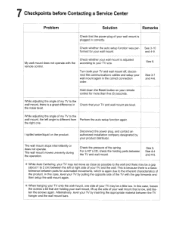
... wall mount, lift up the side of your wall mount. While Auto Centering, your TV size. 7 Checkpoints before Contacting a Service Center Problem Solution Remarks Check that the power plug of my TV to the wall mount, the left or right side of the TV with the remote control. My wall mount does not operate with the gap forwards and then setup the wall mount...
... wall mount, lift up the side of your wall mount. While Auto Centering, your TV size. 7 Checkpoints before Contacting a Service Center Problem Solution Remarks Check that the power plug of my TV to the wall mount, the left or right side of the TV with the remote control. My wall mount does not operate with the gap forwards and then setup the wall mount...
Installation Instructions
Page 32
.... X Note 1. Then hang the wall mount and fasten in the following order: Communications cable Power cable (wall mount) Power cable (TV) 5-2. [Real Size]Quick Installation Guide: For 40 inch (42 to TV size X Note: The wall mount is removed. 2. Fasten both screws. Remove the wall mount holding bar. 1.Remove the four bolts of the TV until approximately 10 mm is too short, use an extension cable...
.... X Note 1. Then hang the wall mount and fasten in the following order: Communications cable Power cable (wall mount) Power cable (TV) 5-2. [Real Size]Quick Installation Guide: For 40 inch (42 to TV size X Note: The wall mount is removed. 2. Fasten both screws. Remove the wall mount holding bar. 1.Remove the four bolts of the TV until approximately 10 mm is too short, use an extension cable...
Installation Instructions
Page 35
... connections. [Real Size] Quick Installation Guide : For 4252 inch (40inch : Backside) 0 TV Center Line 6 coo 1. Then hang the wall mount and fasten in the following order: Communications cable -> Power cable (wall mount) -> Power cable (TV) 5-2. Refer to the Installation Manual and use screws appropriate to the installation wall and check the installation location and check the level using the housing and three screws.(optional) Adapter installation location 0 0 •...
... connections. [Real Size] Quick Installation Guide : For 4252 inch (40inch : Backside) 0 TV Center Line 6 coo 1. Then hang the wall mount and fasten in the following order: Communications cable -> Power cable (wall mount) -> Power cable (TV) 5-2. Refer to the Installation Manual and use screws appropriate to the installation wall and check the installation location and check the level using the housing and three screws.(optional) Adapter installation location 0 0 •...
Installation Instructions
Page 39
... prescribed in the instruction book. This limited warranty covers manufacturing defects in materials and workmanship encountered in normal, and except to the extent otherwise expressly provided for in this statement, noncommercial use of products, equipment, systems, utilities, services, parts, supplies, accessories, applications, installations, repairs, external wiring or connectors not supplied or authorized by SAMSUNG against manufacturing defects...
... prescribed in the instruction book. This limited warranty covers manufacturing defects in materials and workmanship encountered in normal, and except to the extent otherwise expressly provided for in this statement, noncommercial use of products, equipment, systems, utilities, services, parts, supplies, accessories, applications, installations, repairs, external wiring or connectors not supplied or authorized by SAMSUNG against manufacturing defects...


