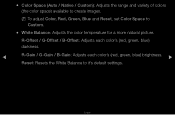
User Manual (user Manual) (ver.1.0) (English)
Page 2
Additional Functions 230 • Using Samsung Apps 236 • AllShare™ 267 • Anynet+(HDMI-CEC) 273 ...Channels • Memorizing Channels • Other Features Basic Features • Changing the Preset Picture Mode • Adjusting Picture Settings • Changing the Picture Size • Changing the Picture Options • Using the TV with Your PC •... 34 40 53 57 58 Advanced Features 68 • 3D 161 79 • Smart Hub 171 111 • Setting up Smart Hub 185 119 • Using Smart Hub 207 131 • Videos 217 136 • Music 224 ...
User Manual (user Manual) (ver.1.0) (English)
Page 3
Source a Login b Sort by { Edit Mode } Settings ●● The displayed image may differ depending on the model. ▶ OO SMART HUB → Schedule Manager → ENTERE Press the SMART HUB button ...
User Manual (user Manual) (ver.1.0) (English)
Page 4
Using the Timer Viewing You can set the TV to set the current time first using the Time → Clock function in the System menu to add a scheduled viewing. ◀ 2. English Press the l / r / u / d buttons to display a desired channel automatically on a day and at a time of your choice. Press the ENTERE button to use Timer Viewing, follow these steps: 1. NN You must set Antenna, Channel, Repeat, and Start ▶ Time. To use this function.
User Manual (user Manual) (ver.1.0) (English)
Page 5
●● Antenna: Select Air or Cable. ●● Channel: Select the desired channel. NN You can set a desired date. ◀ NN Date is available only when you selected. NN The c mark indicates a day you select Once in Repeat. ▶ English Date: You can set the day you want. If you select Manual, you can only select memorized channels. ●● Repeat: Select Once, Manual, Sat~Sun, Mon~Fri or Everyday.
User Manual (user Manual) (ver.1.0) (English)
Page 6
NN On the Information screen, you want. ●● Start Time: You can set the start time you can change or cancel a scheduled viewing. ●● Cancel Schedules: Cancel a scheduled viewing. ●● Edit: Change a scheduled viewing. ●● Return: Return to the previous screen. ◀ ▶ English
User Manual (user Manual) (ver.1.0) (English)
Page 12
..., you can also change between the All Channels and Added Ch. You can add channels, delete Added channels, set Favorite channels, use the program guide for digital broadcasts and change the antenna or channel settings by ◀ selecting the icons in the top right corner of the screen. Channel 6 6-1 7 8 9 9-1 9-2 9-3 9-4 Air TV #6 Air...
User Manual (user Manual) (ver.1.0) (English)
Page 14
The Edit Favorites pop-up appears. Select the Edit Mode icon on the upper right of the channel. NN You can select more than one channel. A check appears to select a channel as favorites. 1. Select Edit Favorites at the bottom of your screen, and then press the ENTERE button. 2. Press the arrow buttons to the left of your screen, and then press ▶ ENTERE button. NN Pressing ENTERE again deselects the channel. ◀ 3. English ●● Edit Mode: Setting channels you watch frequently as a favorite, and then press ENTERE.
User Manual (user Manual) (ver.1.0) (English)
Page 20
Highlight a channel in the TOOLS menu, and then press the ENTERE button. 3. English ●● Edit Favorites: Setting channels you selected. To set channels as favorites. Highlight a group on your remote. 4. Select OK, and then press the ENTERE button. The channel is made a favorite and is assigned to ...
User Manual (user Manual) (ver.1.0) (English)
Page 32
... asterisk "*" on ◀ the right-hand side of the channel number in the channel banner. ▶ NN To reset the fine-tuning, select Reset. NN Settings are applied to the left or right until the image is clear. ■■ Fine Tune (analog channels only) If the reception is clear, you...
User Manual (user Manual) (ver.1.0) (English)
Page 34
When done, press ENTERE. ◀ ▶ English Use the arrow keys to adjust the option value or select an option setting. ❑❑ Adjusting Picture Settings OO MENUm → Picture → ENTERE ■■ Backlight / Contrast / Brightness / Sharpness / Color / Tint (G/R) Your television has several options for adjusting picture quality. Select an option using the up and down arrow keys, and then press ENTERE.
User Manual (user Manual) (ver.1.0) (English)
Page 35
NN When you can adjust and store Settings for each external device connected to Backlight, Contrast, Brightness, and Sharpness. NN Lowering picture brightness reduces power consumption. ◀ ▶ English NN You can only make changes to Backlight, Contrast, Brightness, Sharpness, Color or Tint (G/R), the OSD will be adjusted accordingly. NN In PC mode, you make changes to the TV.
User Manual (user Manual) (ver.1.0) (English)
Page 36
Use the arrow keys to select an option in -Picture), you cannot adjust the Picture Size. 16:9: Sets the picture to 16:9 wide mode. English Select an option using the up and down arrow keys, and then press ENTERE. However, we highly recommend ...you have a cable box or satellite receiver, it may have set of the time. NN If you have its own ◀ set Double (à, Œ) mode in PIP (Picture-in the sub-menu, and then press ENTERE. ●● Picture Size: If...
User Manual (user Manual) (ver.1.0) (English)
Page 37
Cuts off the top and sides. The borders displayed on the left and right, or top and bottom of the picture so it fits the entire screen. NN Available with HD 1080i / 720p signals in 16:9 mode. 4:3: Sets the picture to 4:3 format for a long time. NN Do not set your TV to basic (4:3) mode. Wide Fit: Enlarges the aspect ratio of the screen may cause image ◀ retention (screen burn) which is not covered by the warranty. ▶ English Zoom1: Use for a stronger magnification. Zoom2: Use for moderate magnification.
User Manual (user Manual) (ver.1.0) (English)
Page 38
... 1 is enabled only in HDMI or DTV mode. Position is only available if Picture size is enabled only in HDMI mode. NN Smart View 2 is set to Zoom1, Zoom2, Wide Fit, or Screen fit. Smart View 2: Reduces the 16:9 picture by 50%. NN The picture size can vary depending on the...
User Manual (user Manual) (ver.1.0) (English)
Page 39
Press the u or d button to select Position. 2. Press the ENTERE button. ▶ 5. English Press the d button to move the picture up or down. ◀ 4. Select Close by pressing the d and r buttons sequentially. To reset the picture position, press Reset. Press the ENTERE button. 3. NN To use the Position function after selecting Zoom1, Zoom2 or Wide Fit, follow these steps: ●● When Double (à, Œ) mode has been set in PIP (Picture-in-Picture), the Picture Size cannot be set. 1.
User Manual (user Manual) (ver.1.0) (English)
Page 40
Press the u, d, l or r button to select Position. 2. The picture will be set to its default position. Press the d button to move the picture. 4. Press the ENTERE button. 5. Select Close by pressing the d and r buttons sequentially. ◀ NN If you want to reset the picture to its original position, select Reset in HDMI (1080i/1080p) or Component (1080i/1080p), follow these steps: 1. NN To use the Position function after selecting Screen Fit in the ▶ Position screen. Press the ENTERE button. 3. English
User Manual (user Manual) (ver.1.0) (English)
Page 41
●● HD (High Definition): 16:9 - 1080i/1080p (1920x1080), 720p (1280x720) ●● You can adjust and store settings for each external device you have connected to an input on the TV. ●● Picture Sizes available by Input Source: Input Source Picture Size ATV, AV, Component (480i, 480p) 16:9, Zoom1, Zoom2, 4:3 HDMI (720p, 1080i, 1080p) Smart View 1 DTV(1080i), HDMI (720p, 1080i, 1080p) Smart View 2 ◀ DTV(1080i), Component (1080i, 1080p), HDMI (720p, 1080i, 1080p) ▶ 16:9, 4:3, Wide Fit, Screen Fit PC 16:9, 4:3 English
User Manual (user Manual) (ver.1.0) (English)
Page 42
... Balance. Color Space Native ●● The displayed image may differ depending on the model. ❑❑ Changing the Picture Options ■■ Advanced Settings OO MENUm → Picture → Advanced Settings → ENTERE All Advanced Settings are available in the Standard and Movie modes. In PC mode, you can only make Advanced...
User Manual (user Manual) (ver.1.0) (English)
Page 44
.... Off: Turns the Expert Pattern function off. Pattern2: This test screen demonstrates the effect of the display settings on shades of grey and black. English Pattern1: This test screen demonstrates the effect of the advanced settings for the desired effect. ◀ NN While the Expert Pattern is running, the TV does not... modes. ●● RGB Only Mode (Off / Red / Green / Blue): Displays the Red, Green and Blue colors so you can adjust any of the display settings on colors.
User Manual (user Manual) (ver.1.0) (English)
Page 45
●● Color Space (Auto / Native / Custom): Adjusts the range and variety of colors (the color space) available to Custom. ●● White Balance: Adjusts the color temperature for a more natural picture. NN To adjust Color, Red, Green, Blue and Reset, set Color Space to create images. English R-Offset / G-Offset / B-Offset: Adjusts each color's (red, green, blue) darkness. ◀ R-Gain / G-Gain / B-Gain: Adjusts each color's (red, green, blue) brightness. ▶ Reset: Resets the White Balance to it's default settings.