
Quick Guide Ver.1.0 (English, Spanish)
Page 3
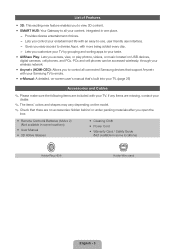
... after you access, view, or play photos, videos, or music located on USB devices, digital cameras, cell phones, and PCs. PCs and cell phones can be accessed wirelessly, through your wireless network. •• Anynet+ (HDMI-CEC): Allows you to diverse Apps, with your Samsung TV's remote. •• e-Manual: A detailed, on the model. ✎✎ Check that there are included with your TV. List of Features...
... after you access, view, or play photos, videos, or music located on USB devices, digital cameras, cell phones, and PCs. PCs and cell phones can be accessed wirelessly, through your wireless network. •• Anynet+ (HDMI-CEC): Allows you to diverse Apps, with your Samsung TV's remote. •• e-Manual: A detailed, on the model. ✎✎ Check that there are included with your TV. List of Features...
Quick Guide Ver.1.0 (English, Spanish)
Page 6
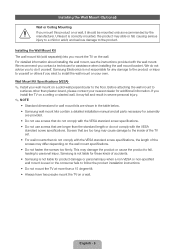
...; Do not use screws that do not comply with the wall mount. This may damage the product or cause the product to fall and result in severe personal injury. ✎✎ NOTE •• Standard dimensions for wall mount kits are shown in the table below. •• Samsung wall mount kits contain a detailed installation manual and all parts necessary for assistance when installing the wall mount bracket.
...; Do not use screws that do not comply with the wall mount. This may damage the product or cause the product to fall and result in severe personal injury. ✎✎ NOTE •• Standard dimensions for wall mount kits are shown in the table below. •• Samsung wall mount kits contain a detailed installation manual and all parts necessary for assistance when installing the wall mount bracket.

Quick Guide Ver.1.0 (English, Spanish)
Page 7
... antenna cable is turned on. English - 7 Connecting the Power Cord and the Antenna or Cable Connection Cable VHF/UHF Antenna or Antenna Cable (Not Supplied) Power Input ✎✎ Plug the power cord into a wall outlet only after you have made all other connections. ✎✎ If you are connecting your TV is tightly connected. Installing a Wall Mount from Another Manufacturer To install a wall-mount from another manufacturer, use the HolderRing. Product Family LED-TV TV size in inches 40 46 ~ 55 VESA screw hole specs...
... antenna cable is turned on. English - 7 Connecting the Power Cord and the Antenna or Cable Connection Cable VHF/UHF Antenna or Antenna Cable (Not Supplied) Power Input ✎✎ Plug the power cord into a wall outlet only after you have made all other connections. ✎✎ If you are connecting your TV is tightly connected. Installing a Wall Mount from Another Manufacturer To install a wall-mount from another manufacturer, use the HolderRing. Product Family LED-TV TV size in inches 40 46 ~ 55 VESA screw hole specs...
Quick Guide Ver.1.0 (English, Spanish)
Page 8
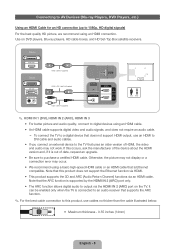
... ARC (Audio Return Channel) functions via the HDMI IN 2 (ARC) port on DVD players, Blu-ray players, HD cable boxes, and HD Set-Top Box satellite receivers. It can be enabled only when the TV is connected to an audio receiver that is out of HDMI, the video and audio may not work. Connecting to AV Devices (Blu-ray Players, DVD Players, etc.) Using an HDMI Cable for an HD connection (up to 1080p, HD digital signals) For the best quality HD picture...
... ARC (Audio Return Channel) functions via the HDMI IN 2 (ARC) port on DVD players, Blu-ray players, HD cable boxes, and HD Set-Top Box satellite receivers. It can be enabled only when the TV is connected to an audio receiver that is out of HDMI, the video and audio may not work. Connecting to AV Devices (Blu-ray Players, DVD Players, etc.) Using an HDMI Cable for an HD connection (up to 1080p, HD digital signals) For the best quality HD picture...
Quick Guide Ver.1.0 (English, Spanish)
Page 10
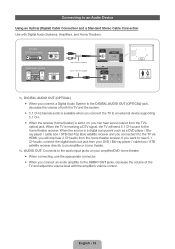
... source is a digital component such as a DVD player / Bluray player / cable box / STB (Set-Top Box) satellite receiver and you connected it to the AUDIO OUT jacks, decrease the volume of both the TV and the system. •• 5.1 CH (channel) audio is available when you connect the TV to an external device supporting 5.1 CH. •• When the receiver (home theater) is receiving a DTV signal, the TV will only hear 2 CH audio...
... source is a digital component such as a DVD player / Bluray player / cable box / STB (Set-Top Box) satellite receiver and you connected it to the AUDIO OUT jacks, decrease the volume of both the TV and the system. •• 5.1 CH (channel) audio is available when you connect the TV to an external device supporting 5.1 CH. •• When the receiver (home theater) is receiving a DTV signal, the TV will only hear 2 CH audio...
Quick Guide Ver.1.0 (English, Spanish)
Page 15
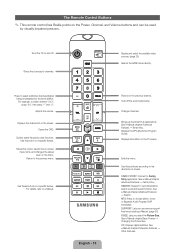
... sound temporarily. Moves the cursor, selects the on-screen menu items, and changes the values seen on the menu. See e-Manual chapter Basic Feature → Changing the Picture Size. Use these buttons in a specific feature. SEARCH: Support to the directions on screen. Return to select additional channels (digital) being broadcasted by visually impaired persons. Exits the menu. The Remote Control Buttons ✎✎ This remote control has Braille points on the Power, Channel, and Volume buttons...
... sound temporarily. Moves the cursor, selects the on-screen menu items, and changes the values seen on the menu. See e-Manual chapter Basic Feature → Changing the Picture Size. Use these buttons in a specific feature. SEARCH: Support to the directions on screen. Return to select additional channels (digital) being broadcasted by visually impaired persons. Exits the menu. The Remote Control Buttons ✎✎ This remote control has Braille points on the Power, Channel, and Volume buttons...
Quick Guide Ver.1.0 (English, Spanish)
Page 16
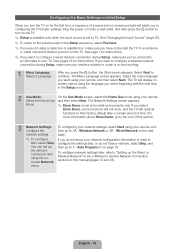
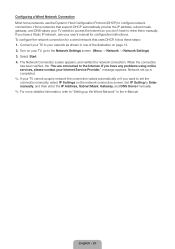
... instructions. Mode. ✎✎ Store Demo mode is for the first time, a sequence of screens and on-screen prompts will assist you in configuring the TV's basic settings. For more information about Store Demo, go to "Setting up the network connection later using the onscreen Network menu. Plug the power cord into a wall outlet, and then press the P button to their factory default after a certain period of this section. 3 Network Settings: Configure the network settings To...
... instructions. Mode. ✎✎ Store Demo mode is for the first time, a sequence of screens and on-screen prompts will assist you in configuring the TV's basic settings. For more information about Store Demo, go to "Setting up the network connection later using the onscreen Network menu. Plug the power cord into a wall outlet, and then press the P button to their factory default after a certain period of this section. 3 Network Settings: Configure the network settings To...
Quick Guide Ver.1.0 (English, Spanish)
Page 17
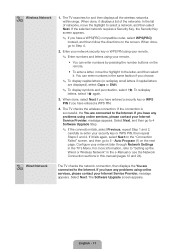
You can enter numbers by pressing the number buttons on the screen. message appears. For more information, refer to "Setting up the Wired or Wireless Network" in the e-Manual or see the Network Connection sections in this manual (pages 12 and 24). 3 Wired Network b The TV checks the network connection, then displays the You are connected to the Internet. Select Next. The Software Upgrade screen appears. When done, it displays a list of networks, move...
You can enter numbers by pressing the number buttons on the screen. message appears. For more information, refer to "Setting up the Wired or Wireless Network" in the e-Manual or see the Network Connection sections in this manual (pages 12 and 24). 3 Wired Network b The TV checks the network connection, then displays the You are connected to the Internet. Select Next. The Software Upgrade screen appears. When done, it displays a list of networks, move...

Quick Guide Ver.1.0 (English, Spanish)
Page 18
... cable set -top box. Auto Program (2) Step. •• No, I need to 6- If you select this option, go to .: Select if you select this option, go to Software Update (Preference Features → Support Menu) in the e-Manual. ✎✎ This may take some time, depending on the screen. When the download is available, a the no new update software is version complete, select Next. ✎✎ To upgrade...
... cable set -top box. Auto Program (2) Step. •• No, I need to 6- If you select this option, go to .: Select if you select this option, go to Software Update (Preference Features → Support Menu) in the e-Manual. ✎✎ This may take some time, depending on the screen. When the download is available, a the no new update software is version complete, select Next. ✎✎ To upgrade...
Quick Guide Ver.1.0 (English, Spanish)
Page 21
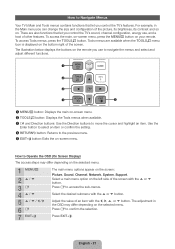
... highlight an item. The adjustment in the Main menu you control the TV's sound, channel configuration, energy use to navigate the menus and select and adjust different functions. 5 1 MENUm button: Displays the main on-screen menu. 2 TOOLST button: Displays the Tools menus when available. 3 E and Direction buttons: Use the Direction buttons to Operate the OSD (On Screen Display) The access steps may differ depending on the screen: Picture, Sound, Channel, Network, System, Support. Select the desired...
... highlight an item. The adjustment in the Main menu you control the TV's sound, channel configuration, energy use to navigate the menus and select and adjust different functions. 5 1 MENUm button: Displays the main on-screen menu. 2 TOOLST button: Displays the Tools menus when available. 3 E and Direction buttons: Use the Direction buttons to Operate the OSD (On Screen Display) The access steps may differ depending on the screen: Picture, Sound, Channel, Network, System, Support. Select the desired...

Quick Guide Ver.1.0 (English, Spanish)
Page 24
... numbers and letters using your remote. ✎✎ For more detailed information, see your Internet Service Provider." The TV checks the wireless connection. message appears. Configuring a Wireless Network Connection The instructions below are displayed), select Caps or Shift. ✎✎ To display symbols and punctuation, select 1F. Turn on the remote. •• To enter a letter, move the highlight to the Internet. Set IP Setting to the Network Settings screen. (Menu → Network...
... numbers and letters using your remote. ✎✎ For more detailed information, see your Internet Service Provider." The TV checks the wireless connection. message appears. Configuring a Wireless Network Connection The instructions below are displayed), select Caps or Shift. ✎✎ To display symbols and punctuation, select 1F. Turn on the remote. •• To enter a letter, move the highlight to the Internet. Set IP Setting to the Network Settings screen. (Menu → Network...
Quick Guide Ver.1.0 (English, Spanish)
Page 25
... problems using online services, please contact your user's manual for a wired network that support DHCP automatically provide the IP address, subnet mask, gateway, and DNS values your TV, go to set up the Wired Network" in one of the illustration on your TV needs to access the Internet so you have a Static IP network, see your Internet Service Provider." If you want to the Network Settings screen. (Menu → Network → Network Settings...
... problems using online services, please contact your user's manual for a wired network that support DHCP automatically provide the IP address, subnet mask, gateway, and DNS values your TV, go to set up the Wired Network" in one of the illustration on your TV needs to access the Internet so you have a Static IP network, see your Internet Service Provider." If you want to the Network Settings screen. (Menu → Network → Network Settings...
Quick Guide Ver.1.0 (English, Spanish)
Page 28
... device issues. •• Self Diagnosis: User Menu → Support → Self Diagnosis → Picture Test If the problem does not appear in the e-Manual. Troubleshooting If the TV seems to have connected the blue Pb jack on the video source to the blue Pb jack on the TV, the red Pr jack on the source to the red Pr jack on . Also review the Troubleshooting...
... device issues. •• Self Diagnosis: User Menu → Support → Self Diagnosis → Picture Test If the problem does not appear in the e-Manual. Troubleshooting If the TV seems to have connected the blue Pb jack on the video source to the blue Pb jack on the TV, the red Pr jack on the source to the red Pr jack on . Also review the Troubleshooting...

Quick Guide Ver.1.0 (English, Spanish)
Page 29
... find the red light on the right or left bottom of sleep mode, press a key on the cable or satellite box remote control. Re-run Setup (Go to User Menu → System → Setup) or run Auto Program. (Go to be an issue with either your Timer settings or your Eco friendly No Signal Power Off feature. Issues Unwanted Powering Off Trouble Powering On Cannot Find a Channel Solutions and Explanations If your Samsung TV appears...
... find the red light on the right or left bottom of sleep mode, press a key on the cable or satellite box remote control. Re-run Setup (Go to User Menu → System → Setup) or run Auto Program. (Go to be an issue with either your Timer settings or your Eco friendly No Signal Power Off feature. Issues Unwanted Powering Off Trouble Powering On Cannot Find a Channel Solutions and Explanations If your Samsung TV appears...
Quick Guide Ver.1.0 (English, Spanish)
Page 30
...'s output is no picture/video. •• Check the cable connections. installed with their poles (+/-) in the correct direction. •• Clean the sensor's transmission window on the remote. •• Try pointing the remote directly at the TV from 5~6 feet away. The cable/set top box remote •• Program the Cable/Set remote control to "Remote control does not work . Issues The TV won't turn the TV on Cable/Set-Top Box user manual for the SAMSUNG...
...'s output is no picture/video. •• Check the cable connections. installed with their poles (+/-) in the correct direction. •• Clean the sensor's transmission window on the remote. •• Try pointing the remote directly at the TV from 5~6 feet away. The cable/set top box remote •• Program the Cable/Set remote control to "Remote control does not work . Issues The TV won't turn the TV on Cable/Set-Top Box user manual for the SAMSUNG...
User Manual Ver.1.0 (English)
Page 137
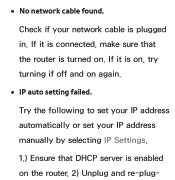
If it is connected, make sure that DHCP server is on, try turning if off and on again. ●● IP auto setting failed. Try the following to set your IP address automatically or set your network cable is turned on the router. 2) Unplug and re-plug- Check if your IP address manually by selecting IP Settings. 1.) Ensure that the router is plugged in. If it is enabled on . ●● No network cable found.
If it is connected, make sure that DHCP server is on, try turning if off and on again. ●● IP auto setting failed. Try the following to set your IP address automatically or set your network cable is turned on the router. 2) Unplug and re-plug- Check if your IP address manually by selecting IP Settings. 1.) Ensure that the router is plugged in. If it is enabled on . ●● No network cable found.
User Manual Ver.1.0 (English)
Page 163
Try the following: check if your IP address is set your IP address manually by selecting IP Settings. 1.) Ensure that DHCP server is enabled on the router. 2.) Unplug and re-plugin the router. 3.) Contact your Internet Service Provider for more information. automatically or set correctly in IP Settings. Contact your Internet Service Provider for more information. ●● Unable to connect to the network.
Try the following: check if your IP address is set your IP address manually by selecting IP Settings. 1.) Ensure that DHCP server is enabled on the router. 2.) Unplug and re-plugin the router. 3.) Contact your Internet Service Provider for more information. automatically or set correctly in IP Settings. Contact your Internet Service Provider for more information. ●● Unable to connect to the network.
User Manual Ver.1.0 (English)
Page 176
NNDepending on the broadcast station and signal, the auto time set up may not be connected in order to set the time manually. Clock Mode: Set the current time manually or automatically. -- NNThe antenna must be correct. Auto: Set the current time automatically using the time from a digital channel. In this case, set the time automatically.
NNDepending on the broadcast station and signal, the auto time set up may not be connected in order to set the time manually. Clock Mode: Set the current time manually or automatically. -- NNThe antenna must be correct. Auto: Set the current time automatically using the time from a digital channel. In this case, set the time automatically.
User Manual Ver.1.0 (English)
Page 181
Select a source on your TV before you have the TV display a channel from a USB device. -- Select USB and have the TV play back photo or audio files from the set -top box to your TV (HDMI1, HDMI2, Component, etc.) that you can select NNThe USB device must be connected to , and have connected a set -top box. specific air or cable channel. --
Select a source on your TV before you have the TV display a channel from a USB device. -- Select USB and have the TV play back photo or audio files from the set -top box to your TV (HDMI1, HDMI2, Component, etc.) that you can select NNThe USB device must be connected to , and have connected a set -top box. specific air or cable channel. --

User Manual Ver.1.0 (English)
Page 651
freezes or is connected to a cable box, try to 1080i or 720p. It may take up to 20 minutes.) Set the output resolution of the cable box to reset the box. (Disconnect and then reconnect the AC cord and wait until the cable box reboots. If the TV is distorted or delayed.
freezes or is connected to a cable box, try to 1080i or 720p. It may take up to 20 minutes.) Set the output resolution of the cable box to reset the box. (Disconnect and then reconnect the AC cord and wait until the cable box reboots. If the TV is distorted or delayed.


