UN46EH5300FXZA Black Friday - Samsung
UN46EH5300FXZA Black Friday
View Results Below
Free Samsung UN46EH5300FXZA manuals!
Problems with Samsung UN46EH5300FXZA?
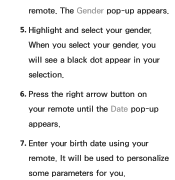
Ask a Question
Free Samsung UN46EH5300FXZA manuals!
Problems with Samsung UN46EH5300FXZA?
Ask a Question
Related Manual Pages

Similar Questions

Ln52a650a1fxza Picture Goes Black
picture and volume work when you first turn on, but after a few minutes the screen goes black and on...
picture and volume work when you first turn on, but after a few minutes the screen goes black and on...
(Posted by dougski7 1 year ago)

Why Can't I Find A Printable Version Of The Samsung E-manual Without A Black Pag
I'm trying to find a E-manual for the Samsung E- manual for Model UN46D6900WF that does not have a b...
I'm trying to find a E-manual for the Samsung E- manual for Model UN46D6900WF that does not have a b...
(Posted by ralphpel 12 years ago)

Black Vertical Bar
A vertical bar appeared on on the screen. It changed colors and then turned black. The bar goes top ...
A vertical bar appeared on on the screen. It changed colors and then turned black. The bar goes top ...
(Posted by Wadehudgens 13 years ago)