
User Manual (user Manual) (ver.1.0) (English)
Page 2
...changes or modifications to this appliance to operate it. copyright laws. Caution: To prevent electric shock, match the wide blade of these rights. To prevent damage which may result in fire or electric shock hazard, do not expose this equipment may be in violation of plug to the point of cable entry as close...jusqu'au fond. Certain Canadian programs may also be connected to the grounding system of the building as practical. Note to CATV system installer: This reminder is present inside part of U.S. Important Safety Instructions CAUTION RISK OF ELECTRIC SHOCK DO...
...changes or modifications to this appliance to operate it. copyright laws. Caution: To prevent electric shock, match the wide blade of these rights. To prevent damage which may result in fire or electric shock hazard, do not expose this equipment may be in violation of plug to the point of cable entry as close...jusqu'au fond. Certain Canadian programs may also be connected to the grounding system of the building as practical. Note to CATV system installer: This reminder is present inside part of U.S. Important Safety Instructions CAUTION RISK OF ELECTRIC SHOCK DO...
User Manual (user Manual) (ver.1.0) (English)
Page 3
... operating and use instructions. • Unplug the TV receiver from the wall outlet before operating your safety, this TV is designed with easy-to-use liquid or aerosol cleaners. • Never add any object, and do not use on-screen menus and closed captioning capabilities, making it one of power source indicated on a bed, sofa, rug, or other . Use only with a cart, stand, tripod, bracket, or table...
... operating and use instructions. • Unplug the TV receiver from the wall outlet before operating your safety, this TV is designed with easy-to-use liquid or aerosol cleaners. • Never add any object, and do not use on-screen menus and closed captioning capabilities, making it one of power source indicated on a bed, sofa, rug, or other . Use only with a cart, stand, tripod, bracket, or table...
User Manual (user Manual) (ver.1.0) (English)
Page 4
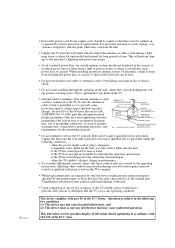
... pinched by following conditions: - if the TV has been exposed to keep from the wall outlet and refer servicing to qualified service personnel. When installing an outside antenna or cable system is subject to cords at plugs, convenience receptacles, and the point where they can fall into the unit - Power supply cords should not be sure the service technician uses replacement parts specified by the operating instructions.
... pinched by following conditions: - if the TV has been exposed to keep from the wall outlet and refer servicing to qualified service personnel. When installing an outside antenna or cable system is subject to cords at plugs, convenience receptacles, and the point where they can fall into the unit - Power supply cords should not be sure the service technician uses replacement parts specified by the operating instructions.

User Manual (user Manual) (ver.1.0) (English)
Page 5
... from the TV 2.7 Connecting a DVD Player 2.7 Connecting a Camcorder 2.8 Installing Batteries in the Remote Control 2.9 Chapter 3: Operation 3.1 Turning the TV On and Off 3.1 Plug & Play Feature 3.1 Viewing the Menus and On-Screen Displays 3.3 Viewing the Menus 3.3 Viewing the Display 3.3 Selecting a Menu Language 3.4 Memorizing the Channels 3.5 Selecting the Video Signal-source 3.5 Storing Channels in Memory (Automatic Method 3.6 Adding and Erasing Channels (Manual Method 3.7 Changing Channels 3.8 Using the Channel Buttons 3.8 Directly Accessing Channels 3.8 Using the PRE-CH...
... from the TV 2.7 Connecting a DVD Player 2.7 Connecting a Camcorder 2.8 Installing Batteries in the Remote Control 2.9 Chapter 3: Operation 3.1 Turning the TV On and Off 3.1 Plug & Play Feature 3.1 Viewing the Menus and On-Screen Displays 3.3 Viewing the Menus 3.3 Viewing the Display 3.3 Selecting a Menu Language 3.4 Memorizing the Channels 3.5 Selecting the Video Signal-source 3.5 Storing Channels in Memory (Automatic Method 3.6 Adding and Erasing Channels (Manual Method 3.7 Changing Channels 3.8 Using the Channel Buttons 3.8 Directly Accessing Channels 3.8 Using the PRE-CH...
User Manual (user Manual) (ver.1.0) (English)
Page 6
...Your Remote Control 4.1 Setting Up Your Remote Control to Operate Your VCR or DVD . . 4.1 Setting Up Your Remote Control to Operate Your Cable Box 4.3 Fine Tuning Channels 4.4 Digital Noise Reduction 4.5 Changing the Screen Size 4.6 Using the R.Surf 4.7 Setting the On/Off Timer 4.8 Setting the Sleep Timer 4.9 Sound Features 4.10 Choosing a Multi-Channel Sound (MTS) Soundtrack. . . . . 4.10 Extra sound settings (Turbo Sound, Surround, or Auto Volume 4.11 Viewing Closed Captions 4.12 Using the V-Chip (Option 4.13 Setting Up Your Personal ID Number (PIN 4.13 How to Enable/Disable the...
...Your Remote Control 4.1 Setting Up Your Remote Control to Operate Your VCR or DVD . . 4.1 Setting Up Your Remote Control to Operate Your Cable Box 4.3 Fine Tuning Channels 4.4 Digital Noise Reduction 4.5 Changing the Screen Size 4.6 Using the R.Surf 4.7 Setting the On/Off Timer 4.8 Setting the Sleep Timer 4.9 Sound Features 4.10 Choosing a Multi-Channel Sound (MTS) Soundtrack. . . . . 4.10 Extra sound settings (Turbo Sound, Surround, or Auto Volume 4.11 Viewing Closed Captions 4.12 Using the V-Chip (Option 4.13 Setting Up Your Personal ID Number (PIN 4.13 How to Enable/Disable the...
User Manual (user Manual) (ver.1.0) (English)
Page 7
...-to-use remote control • Easy-to-use on-screen menu system • Automatic timer to turn the TV on and off • Adjustable picture and sound settings that can be stored in the TV's memory • Automatic channel tuning for up to 181 channels • A special filter to reduce or eliminate reception problems • Fine tuning control for the sharpest picture possible • A built-in multi-channel sound...
...-to-use remote control • Easy-to-use on-screen menu system • Automatic timer to turn the TV on and off • Adjustable picture and sound settings that can be stored in the TV's memory • Automatic channel tuning for up to 181 channels • A special filter to reduce or eliminate reception problems • Fine tuning control for the sharpest picture possible • A built-in multi-channel sound...

User Manual (user Manual) (ver.1.0) (English)
Page 8
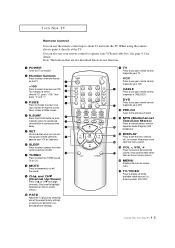
...-screen menu. ¨ Remote Control Sensor Aim the remote control towards this spot on the TV. ˆ POWER & TIMER indicator When the TV is turned on -screen menu. ˇ CH w and CH v Press to increase or decrease the volume. This indicator illuminates when the TIMER mode is turned off, this function.) Ø POWER Press to turn the TV on the front panel control your TV's features. ´ VOLUME - , + Press to change channels. Also used...
...-screen menu. ¨ Remote Control Sensor Aim the remote control towards this spot on the TV. ˆ POWER & TIMER indicator When the TV is turned on -screen menu. ˇ CH w and CH v Press to increase or decrease the volume. This indicator illuminates when the TIMER mode is turned off, this function.) Ø POWER Press to turn the TV on the front panel control your TV's features. ´ VOLUME - , + Press to change channels. Also used...

User Manual (user Manual) (ver.1.0) (English)
Page 10
... an antenna or to a cable TV system. ˇ AUDIO-VIDEO MONITOR OUTPUT jacks These audio-video signals are two sets of input jacks, you can connect two different A/V components (i.e., a VCR and a laserdisc, 2 VCRs, etc.) For more information on the big screen. (Typically used as a VCR or a laserdisc player. When not using the DVD video input jacks. Note: Only black and white signals are output from a monitor in DVD mode. • For models TXL3276/TXL3676 Use these jacks to connect the audio signals from a DVD player...
... an antenna or to a cable TV system. ˇ AUDIO-VIDEO MONITOR OUTPUT jacks These audio-video signals are two sets of input jacks, you can connect two different A/V components (i.e., a VCR and a laserdisc, 2 VCRs, etc.) For more information on the big screen. (Typically used as a VCR or a laserdisc player. When not using the DVD video input jacks. Note: Only black and white signals are output from a monitor in DVD mode. • For models TXL3276/TXL3676 Use these jacks to connect the audio signals from a DVD player...
User Manual (user Manual) (ver.1.0) (English)
Page 11
... change channels. (Also used to make selections on the on-screen menus.) ı MENU Displays the main on-screen menu. ˜ TV/VIDEO Press to screen size. CABLE Press to use your VCR or Cable box Ø SLEEP Press to select a preset time interval for details. Your choises are Normal screen, Zoom screen or Wide screen. ¨ R.SURF Press the R.SURF button to automatically return to a preferred channel after a user-preset time delay. ˆ SET Use...
... change channels. (Also used to make selections on the on-screen menus.) ı MENU Displays the main on-screen menu. ˜ TV/VIDEO Press to screen size. CABLE Press to use your VCR or Cable box Ø SLEEP Press to select a preset time interval for details. Your choises are Normal screen, Zoom screen or Wide screen. ¨ R.SURF Press the R.SURF button to automatically return to a preferred channel after a user-preset time delay. ˆ SET Use...

User Manual (user Manual) (ver.1.0) (English)
Page 14
... view unscrambled cable channels. 2.2 CHAPTER TWO: INSTALLATION w Because this TV is cable-ready, you must combine the two antenna signals before connecting the antennas to the combiner. 2 Plug the combiner into the VHF/UHF terminal on the bottom of the rear panel. Separate VHF and UHF Antennas If you have two separate antennas for your TV (one VHF and one UHF), you do not need a cable box...
... view unscrambled cable channels. 2.2 CHAPTER TWO: INSTALLATION w Because this TV is cable-ready, you must combine the two antenna signals before connecting the antennas to the combiner. 2 Plug the combiner into the VHF/UHF terminal on the bottom of the rear panel. Separate VHF and UHF Antennas If you have two separate antennas for your TV (one VHF and one UHF), you do not need a cable box...

User Manual (user Manual) (ver.1.0) (English)
Page 15
... splitter. 3 Connect a coaxial cable between an OUTPUT terminal on the splitter and the IN terminal on the cable box. 2.3 CHAPTER TWO: INSTALLATION w This terminal might be labeled "ANT OUT," "VHF OUT," or simply, "OUT." 2 Connect the other end of the TV. Connecting to the VHF/UHF antenna terminal on your cable box descrambles only some channels (such as premium channels), follow the instructions below.
... splitter. 3 Connect a coaxial cable between an OUTPUT terminal on the splitter and the IN terminal on the cable box. 2.3 CHAPTER TWO: INSTALLATION w This terminal might be labeled "ANT OUT," "VHF OUT," or simply, "OUT." 2 Connect the other end of the TV. Connecting to the VHF/UHF antenna terminal on your cable box descrambles only some channels (such as premium channels), follow the instructions below.

User Manual (user Manual) (ver.1.0) (English)
Page 16
... 've made this connection, set the A/B switch to "B," you will need to tune your TV to the cable box's output channel, which is usually channel 3 or 4.) Connecting a VCR These instructions assume that you have not yet connected to an antenna or a cable system. 1 Unplug the cable or antenna from the back of the TV. After you have already connected your TV to an antenna or a cable TV system (according...
... 've made this connection, set the A/B switch to "B," you will need to tune your TV to the cable box's output channel, which is usually channel 3 or 4.) Connecting a VCR These instructions assume that you have not yet connected to an antenna or a cable system. 1 Unplug the cable or antenna from the back of the TV. After you have already connected your TV to an antenna or a cable TV system (according...

User Manual (user Manual) (ver.1.0) (English)
Page 17
Follow the instructions in "Viewing a VCR or Camcorder Tape" to the left and right audio input jacks of audio cables between the ANTENNA OUT terminal on the VCR and the antenna terminal on the TV. Note: This figure shows the Standard connector-jack panel. If you must connect two cables. 5 Connect a video cable between the VIDEO OUT jack on the VCR and the VIDEO jack on the...
Follow the instructions in "Viewing a VCR or Camcorder Tape" to the left and right audio input jacks of audio cables between the ANTENNA OUT terminal on the VCR and the antenna terminal on the TV. Note: This figure shows the Standard connector-jack panel. If you must connect two cables. 5 Connect a video cable between the VIDEO OUT jack on the VCR and the VIDEO jack on the...
User Manual (user Manual) (ver.1.0) (English)
Page 19
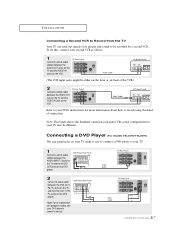
... configuration for more information about how to record using this , connect your TV may be recorded by a second VCR. Connecting a DVD Player (For models TXL3276/TXL3676) The rear panel jacks on your TV make it easy to connect a DVD player to your DVD player's owner's manual. 2.7 CHAPTER TWO: INSTALLATION INSTALLATION Connecting a Second VCR to Record from the TV Your TV can send out signals of its picture and sound to be different.
... configuration for more information about how to record using this , connect your TV may be recorded by a second VCR. Connecting a DVD Player (For models TXL3276/TXL3676) The rear panel jacks on your TV make it easy to connect a DVD player to your DVD player's owner's manual. 2.7 CHAPTER TWO: INSTALLATION INSTALLATION Connecting a Second VCR to Record from the TV Your TV can send out signals of its picture and sound to be different.

User Manual (user Manual) (ver.1.0) (English)
Page 22
... the video signal source, and then the "Ant. Input check" is initially powered On, five basic customer settings proceed automatically and subsequently: Setting the language, Video signal source, Ant. You can also use the POWER button on the remote control. Plug & Play Feature When the TV is automatically displayed. 3.1 CHAPTER THREE: TV OPERATION continued... C h a pOtPEeRArTIOTN h r e e OPERATION Turning the TV On and Off Press POWER. input check, Auto program and Clock. 1 Press POWER button on the front panel. Press MENU...
... the video signal source, and then the "Ant. Input check" is initially powered On, five basic customer settings proceed automatically and subsequently: Setting the language, Video signal source, Ant. You can also use the POWER button on the remote control. Plug & Play Feature When the TV is automatically displayed. 3.1 CHAPTER THREE: TV OPERATION continued... C h a pOtPEeRArTIOTN h r e e OPERATION Turning the TV On and Off Press POWER. input check, Auto program and Clock. 1 Press POWER button on the front panel. Press MENU...
User Manual (user Manual) (ver.1.0) (English)
Page 24
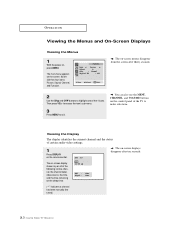
... channel, the channel label, video source, the time, and the time remaining on the sleep timer. ("*" indicates a channel has been manually fine tuned.) 3.3 CHAPTER THREE: TV OPERATION Viewing the Display The display identifies the current channel and the status of the TV to make selections. Its left side has four icons: Picture, Sound, Channel, and Function. w You can also use the MENU, CHANNEL, and VOLUME buttons on the control panel of certain audio-video settings. 1 Press DISPLAY on -screen display shows...
... channel, the channel label, video source, the time, and the time remaining on the sleep timer. ("*" indicates a channel has been manually fine tuned.) 3.3 CHAPTER THREE: TV OPERATION Viewing the Display The display identifies the current channel and the status of the TV to make selections. Its left side has four icons: Picture, Sound, Channel, and Function. w You can also use the MENU, CHANNEL, and VOLUME buttons on the control panel of certain audio-video settings. 1 Press DISPLAY on -screen display shows...

User Manual (user Manual) (ver.1.0) (English)
Page 32
Press VOL + . 3 Press VOL + to select "PBS channel". Press the CH v and CH w to select "Function." Press CH w three times to select your local PBS channel. Press VOL +. 2 Press CH w four times to select "Auto clock set "On". 4 Press CH w to select Auto clock set " menu. Press MENU. 3.11 CHAPTER THREE: TV OPERATION continued... OPERATION Option 2: Using the Local PBS Channel to Automatically Set the TV Clock 1 Press the MENU button to activate the channel-number field. While "PBS channel" is selected, press VOL + to display the menu.
Press VOL + . 3 Press VOL + to select "PBS channel". Press the CH v and CH w to select "Function." Press CH w three times to select your local PBS channel. Press VOL +. 2 Press CH w four times to select "Auto clock set "On". 4 Press CH w to select Auto clock set " menu. Press MENU. 3.11 CHAPTER THREE: TV OPERATION continued... OPERATION Option 2: Using the Local PBS Channel to Automatically Set the TV Clock 1 Press the MENU button to activate the channel-number field. While "PBS channel" is selected, press VOL + to display the menu.
User Manual (user Manual) (ver.1.0) (English)
Page 40
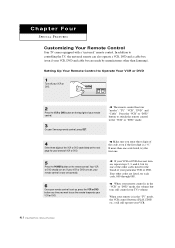
... code, even if the first digit is in the "TV" mode, the VCR control buttons (PLAY, STOP, etc.) will still operate your Samsung remote control, press SET. Chapter Four SPECIAL FEATURES Customizing Your Remote Control Your TV comes equipped with a "universal" remote control. w 2 Press the VCR or DVD button on , your remote control is now set correctly. 6 Once your remote control is set up, press the VCR or DVD button any time you enter three digits of your remote control...
... code, even if the first digit is in the "TV" mode, the VCR control buttons (PLAY, STOP, etc.) will still operate your Samsung remote control, press SET. Chapter Four SPECIAL FEATURES Customizing Your Remote Control Your TV comes equipped with a "universal" remote control. w 2 Press the VCR or DVD button on , your remote control is now set correctly. 6 Once your remote control is set up, press the VCR or DVD button any time you enter three digits of your remote control...

User Manual (user Manual) (ver.1.0) (English)
Page 42
... first digit is a "0." (If more than one code listed, try the first one.) If your cable box does not turn on , your remote control is now "set up , press the CABLE button any time you enter three digits of cable box. 5 Press POWER. The remote control has four "modes": "TV," "VCR," "DVD" and "CABLE". Press the "CABLE" button to switch the remote control to operate your VCR. Also, the VCR control buttons (PLAY, STOP, etc.) will still operate your cable box. If your cable box turns...
... first digit is a "0." (If more than one code listed, try the first one.) If your cable box does not turn on , your remote control is now "set up , press the CABLE button any time you enter three digits of cable box. 5 Press POWER. The remote control has four "modes": "TV," "VCR," "DVD" and "CABLE". Press the "CABLE" button to switch the remote control to operate your VCR. Also, the VCR control buttons (PLAY, STOP, etc.) will still operate your cable box. If your cable box turns...

User Manual (user Manual) (ver.1.0) (English)
Page 52
.... When the Confirm screen disappears, your 4-digit PIN number. The user must first enter a PIN (personal ID number) before any 4-digits for a new TV set up or changed. Press CH w three times to select the "V-chip" menu. Press CH w three times and highlight "Change pin." (Note: When a particular field is highlighted, its color turns BLUE.) 4 While the "Change pin" field is active, channel-auto program features do not...
.... When the Confirm screen disappears, your 4-digit PIN number. The user must first enter a PIN (personal ID number) before any 4-digits for a new TV set up or changed. Press CH w three times to select the "V-chip" menu. Press CH w three times and highlight "Change pin." (Note: When a particular field is highlighted, its color turns BLUE.) 4 While the "Change pin" field is active, channel-auto program features do not...


