
Owners Instructions
Page 6
... Some Channels 2.3 Connecting a VCR 2.4 Connecting an S-VHS VCR 2.6 Connecting a Second VCR to Record from the TV 2.7 Connecting a DVD Player 2.7 Connecting a Camcorder 2.8 Installing Batteries in the Remote Control 2.9 Chapter 3: Operation 3.1 Turning the TV On and Off 3.1 Plug & Play Feature 3.1 Viewing the Menus and On-Screen Displays 3.3 Viewing the Menus 3.3 Viewing the Display 3.3 Selecting a Menu...
... Some Channels 2.3 Connecting a VCR 2.4 Connecting an S-VHS VCR 2.6 Connecting a Second VCR to Record from the TV 2.7 Connecting a DVD Player 2.7 Connecting a Camcorder 2.8 Installing Batteries in the Remote Control 2.9 Chapter 3: Operation 3.1 Turning the TV On and Off 3.1 Plug & Play Feature 3.1 Viewing the Menus and On-Screen Displays 3.3 Viewing the Menus 3.3 Viewing the Display 3.3 Selecting a Menu...
Owners Instructions
Page 7
...Fine Tuning Channels 4.4 Changing the Screen Size 4.5 Digital Noise Reduction 4.6 Tilt 4.7 Using the Surf Feature 4.8 Setting the On/Off Timer 4.9 Setting the Sleep Timer 4.10 Sound Features 4.11 Choosing a Multi-Channel Sound (MTS) Soundtrack. . . . . 4.11 Extra Sound ...Settings (Turbo Sound, Surround, or Auto Volume 4.12 Viewing Closed Captions 4.13 Using the V-Chip 4.14 Setting Up Your Personal ID Number (PIN 4.14 How to Enable/Disable the V-Chip 4.15 How to Set up Restrictions Using the "TV...
...Fine Tuning Channels 4.4 Changing the Screen Size 4.5 Digital Noise Reduction 4.6 Tilt 4.7 Using the Surf Feature 4.8 Setting the On/Off Timer 4.9 Setting the Sleep Timer 4.10 Sound Features 4.11 Choosing a Multi-Channel Sound (MTS) Soundtrack. . . . . 4.11 Extra Sound ...Settings (Turbo Sound, Surround, or Auto Volume 4.12 Viewing Closed Captions 4.13 Using the V-Chip 4.14 Setting Up Your Personal ID Number (PIN 4.14 How to Enable/Disable the V-Chip 4.15 How to Set up Restrictions Using the "TV...

Owners Instructions
Page 8
...Chapter One YOUR NEW TV List of Features Your TV was designed with the latest technology. This TV is a high-performance unit that includes the following special features: • Easy-to-use remote control • Easy-to-use on-screen menu system • Automatic timer to turn the TV on and off •...; Adjustable picture and sound settings that can be stored in the TV's memory • Automatic channel tuning...
...Chapter One YOUR NEW TV List of Features Your TV was designed with the latest technology. This TV is a high-performance unit that includes the following special features: • Easy-to-use remote control • Easy-to-use on-screen menu system • Automatic timer to turn the TV on and off •...; Adjustable picture and sound settings that can be stored in the TV's memory • Automatic channel tuning...

Owners Instructions
Page 9
....com manuals search engine 1.2 CHAPTER ONE: YOUR NEW TV YOUR NEW TV Familiarizing Yourself with The TV Front Panel Buttons The buttons on the front panel control your TV's features. ¨ Remote Control Sensor Aim the remote control towards this spot on the TV. ´ VOL - , + Press to increase or... STAND BY indicator Lights up when you must use the more advanced features, you turn the power off. Ø POWER Press to change channels. TXM2792F TXL2767 Œ MENU Press to see an on-screen menu of your TV's basic features, including the on -screen menu. ˇ CH w and CH...
....com manuals search engine 1.2 CHAPTER ONE: YOUR NEW TV YOUR NEW TV Familiarizing Yourself with The TV Front Panel Buttons The buttons on the front panel control your TV's features. ¨ Remote Control Sensor Aim the remote control towards this spot on the TV. ´ VOL - , + Press to increase or... STAND BY indicator Lights up when you must use the more advanced features, you turn the power off. Ø POWER Press to change channels. TXM2792F TXL2767 Œ MENU Press to see an on-screen menu of your TV's basic features, including the on -screen menu. ˇ CH w and CH...

Owners Instructions
Page 23
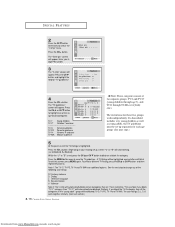
Press the MENU button to select the desired language. Labeling : ---- Plug & Play Feature When the TV is displayed. It flickers for a little while and then the "Language" menu is automatically displayed. 2 Press the VOL+ or VOLbutton to enter ...then the "Ant Input check" is automatically displayed. Press the MENU button to select the desired video signal source. C h a pOtPEeRArTIOTN h r e e OPERATION Turning the TV On and Off Press the POWER button on the remote control. The message "Plug & Play" is initially powered On, five basic customer settings proceed automatically...
Press the MENU button to select the desired language. Labeling : ---- Plug & Play Feature When the TV is displayed. It flickers for a little while and then the "Language" menu is automatically displayed. 2 Press the VOL+ or VOLbutton to enter ...then the "Ant Input check" is automatically displayed. Press the MENU button to select the desired video signal source. C h a pOtPEeRArTIOTN h r e e OPERATION Turning the TV On and Off Press the POWER button on the remote control. The message "Plug & Play" is initially powered On, five basic customer settings proceed automatically...

Owners Instructions
Page 24
... the MENU button to skip. (refer to "Auto program" on or when in the A/V mode. 3.2 CHAPTER THREE: TV OPERATION Downloaded from www.Manualslib.com manuals search engine Plug & Play Note: Plug & Play feature doesn't work when the V-chip is on page 3.6.) 5 Press the VOL+ or VOLbutton to move to "Setting the... clock" on page 3.10.) 6 When you want to reset this feature (1)Press the MENU button. (2)Press the CHw button three times to select the Function menu and press the VOL+ button. (3)Press the CHw button to...
... the MENU button to skip. (refer to "Auto program" on or when in the A/V mode. 3.2 CHAPTER THREE: TV OPERATION Downloaded from www.Manualslib.com manuals search engine Plug & Play Note: Plug & Play feature doesn't work when the V-chip is on page 3.6.) 5 Press the VOL+ or VOLbutton to move to "Setting the... clock" on page 3.10.) 6 When you want to reset this feature (1)Press the MENU button. (2)Press the CHw button three times to select the Function menu and press the VOL+ button. (3)Press the CHw button to...
Owners Instructions
Page 31
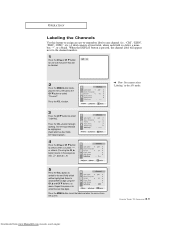
..., a number, "*", or a blank. Press the VOL + button to set the label and clear the menus from the screen. 3.9 CHAPTER THREE: TV OPERATION Downloaded from www.Manualslib.com manuals search engine Labeling : CNN1 Press the MENU button to begin labeling. w Note: You cannot select "Labeling" in... this feature to assign an easy-to-remember label to the channel that will be highlighted. The left-most field will be labeled. 2 Press ...
..., a number, "*", or a blank. Press the VOL + button to set the label and clear the menus from the screen. 3.9 CHAPTER THREE: TV OPERATION Downloaded from www.Manualslib.com manuals search engine Labeling : CNN1 Press the MENU button to begin labeling. w Note: You cannot select "Labeling" in... this feature to assign an easy-to-remember label to the channel that will be highlighted. The left-most field will be labeled. 2 Press ...
Owners Instructions
Page 39
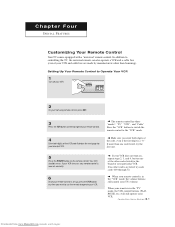
..." button to switch the remote control to Operate Your VCR 1 Turn off your VCR. 2 On your Samsung remote control, press SET. Make sure you want to use the remote to controlling the TV, the universal remote can also operate a VCR and a cable box (even if your remote is a ... your VCR and cable box are made by manufacturers other codes are listed, try one . 5 Press the POWER button on . Chapter Four SPECIAL FEATURES Customizing Your Remote Control Your TV comes equipped with a "universal" remote control. w 3 Press the VCR button on , repeat steps 2, 3, and 4, but try each code,...
..." button to switch the remote control to Operate Your VCR 1 Turn off your VCR. 2 On your Samsung remote control, press SET. Make sure you want to use the remote to controlling the TV, the universal remote can also operate a VCR and a cable box (even if your remote is a ... your VCR and cable box are made by manufacturers other codes are listed, try one . 5 Press the POWER button on . Chapter Four SPECIAL FEATURES Customizing Your Remote Control Your TV comes equipped with a "universal" remote control. w 3 Press the VCR button on , repeat steps 2, 3, and 4, but try each code,...
Owners Instructions
Page 41
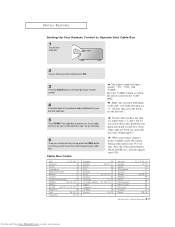
..., etc.) will still operate your particular brand of cable box. 5 Press POWER. Make sure you want to use the remote to operate your TV's volume. Your cable box should turn on, repeat steps 2, 3, and 4, but try one of the other codes listed for your brand of... code listed below for your VCR. If your Samsung remote control, press SET. Downloaded from www.Manualslib.com manuals search engine 4.3 CHAPTER FOUR: SPECIAL FEATURES Cable Box Codes w w w The remote control has three "modes": "TV," "VCR," and "CABLE". SPECIAL FEATURES Setting Up Your Remote Control to the "Cable"...
..., etc.) will still operate your particular brand of cable box. 5 Press POWER. Make sure you want to use the remote to operate your TV's volume. Your cable box should turn on, repeat steps 2, 3, and 4, but try one of the other codes listed for your brand of... code listed below for your VCR. If your Samsung remote control, press SET. Downloaded from www.Manualslib.com manuals search engine 4.3 CHAPTER FOUR: SPECIAL FEATURES Cable Box Codes w w w The remote control has three "modes": "TV," "VCR," and "CABLE". SPECIAL FEATURES Setting Up Your Remote Control to the "Cable"...
Owners Instructions
Page 42
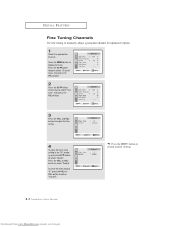
Press the CH w button twice to resume normal viewing. 4.4 CHAPTER FOUR: SPECIAL FEATURES Downloaded from www.Manualslib.com manuals search engine Press the MENU button to select "Channel" menu, then press the VOL+ button. Labeling : ---- 2 Press..."Fine tune", then press the VOL+ button. w 4 To store the fine tuning setting in the TV's memory, press the CH w button to manually adjust a particular channel for optimal reception. 1 Select the appropriate channel. SPECIAL FEATURES Fine Tuning Channels Use fine tuning to select "Select". Labeling : ---- 3 Press the VOL+ and ...
Press the CH w button twice to resume normal viewing. 4.4 CHAPTER FOUR: SPECIAL FEATURES Downloaded from www.Manualslib.com manuals search engine Press the MENU button to select "Channel" menu, then press the VOL+ button. Labeling : ---- 2 Press..."Fine tune", then press the VOL+ button. w 4 To store the fine tuning setting in the TV's memory, press the CH w button to manually adjust a particular channel for optimal reception. 1 Select the appropriate channel. SPECIAL FEATURES Fine Tuning Channels Use fine tuning to select "Select". Labeling : ---- 3 Press the VOL+ and ...
Owners Instructions
Page 43
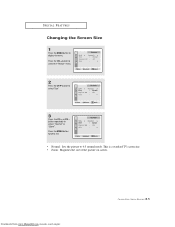
Press the VOL + button to select the "Picture" menu. 2 Press the CH w button to select "Size". 3 Press the VOL + or VOL button repeatedly to display the menu. This is a standard TV screen size. • Zoom : Magnifies the size of the picture on screen. SPECIAL FEATURES Changing the Screen Size 1 Press the MENU button to select "Normal" or "Zoom". Downloaded from www.Manualslib.com manuals search engine 4.5 CHAPTER FOUR: SPECIAL FEATURES Press the MENU button twice to exit. • Normal : Sets the picture to 4:3 normal mode.
Press the VOL + button to select the "Picture" menu. 2 Press the CH w button to select "Size". 3 Press the VOL + or VOL button repeatedly to display the menu. This is a standard TV screen size. • Zoom : Magnifies the size of the picture on screen. SPECIAL FEATURES Changing the Screen Size 1 Press the MENU button to select "Normal" or "Zoom". Downloaded from www.Manualslib.com manuals search engine 4.5 CHAPTER FOUR: SPECIAL FEATURES Press the MENU button twice to exit. • Normal : Sets the picture to 4:3 normal mode.
Owners Instructions
Page 44
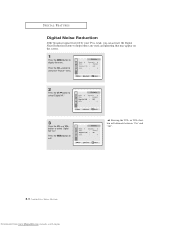
Press the MENU button to display the menu. w Pressing the VOL- SPECIAL FEATURES Digital Noise Reduction If the broadcast signal received by your TV is weak, you can activate the Digital Noise Reduction feature to help reduce any static and ghosting that may appear on the screen. 1 Press the MENU button to exit. Press... "Digital NR." 3 Press the VOL + or VOL button to select Digital NR "On". or VOL+ button will alternate between "On" and "Off". 4.6 CHAPTER FOUR: SPECIAL FEATURES Downloaded from www.Manualslib.com manuals search engine
Press the MENU button to display the menu. w Pressing the VOL- SPECIAL FEATURES Digital Noise Reduction If the broadcast signal received by your TV is weak, you can activate the Digital Noise Reduction feature to help reduce any static and ghosting that may appear on the screen. 1 Press the MENU button to exit. Press... "Digital NR." 3 Press the VOL + or VOL button to select Digital NR "On". or VOL+ button will alternate between "On" and "Off". 4.6 CHAPTER FOUR: SPECIAL FEATURES Downloaded from www.Manualslib.com manuals search engine

Owners Instructions
Page 45
Downloaded from www.Manualslib.com manuals search engine 4.7 CHAPTER FOUR: SPECIAL FEATURES Press the MENU button to the Earth's magnetic field there may be same minor image tilt depending on the TV's location. SPECIAL FEATURES Tilt (TXM2792F) Due to exit. Press the VOL + button to select the "Picture" menu. 2 Press the CH w button to adjust the Tilt. or VOL+ buttons to select "Tilt". 3 press the VOL- When this occurs, follow the steps below. 1 Press the MENU button to display the menu.
Downloaded from www.Manualslib.com manuals search engine 4.7 CHAPTER FOUR: SPECIAL FEATURES Press the MENU button to the Earth's magnetic field there may be same minor image tilt depending on the TV's location. SPECIAL FEATURES Tilt (TXM2792F) Due to exit. Press the VOL + button to select the "Picture" menu. 2 Press the CH w button to adjust the Tilt. or VOL+ buttons to select "Tilt". 3 press the VOL- When this occurs, follow the steps below. 1 Press the MENU button to display the menu.
Owners Instructions
Page 46
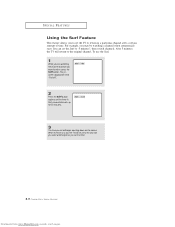
... particular channel after a certain amount of time. For example, you want to return, press the SURF button. When the time runs out, the TV will return to the channel you were watching when you set the Surf to "5 minutes", then switch channels. To use the Surf: 1 While...may be watching a channel when commercials start. You can set the timer. 4.8 CHAPTER FOUR: SPECIAL FEATURES Downloaded from www.Manualslib.com manuals search engine SPECIAL FEATURES Using the Surf Feature This feature allows you to set will begin counting down on the screen. The onscreen display will return to the...
... particular channel after a certain amount of time. For example, you want to return, press the SURF button. When the time runs out, the TV will return to the channel you were watching when you set the Surf to "5 minutes", then switch channels. To use the Surf: 1 While...may be watching a channel when commercials start. You can set the timer. 4.8 CHAPTER FOUR: SPECIAL FEATURES Downloaded from www.Manualslib.com manuals search engine SPECIAL FEATURES Using the Surf Feature This feature allows you to set will begin counting down on the screen. The onscreen display will return to the...
Owners Instructions
Page 47
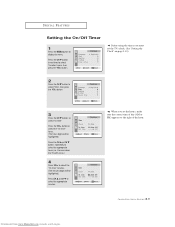
...(AM or PM) appears to select "On time". Plug & Play 3 Press the CH w button to the right of the hour. 4.9 CHAPTER FOUR: SPECIAL FEATURES Downloaded from www.Manualslib.com manuals search engine Press the VOL+ button to select the "On time" hours. (The hours digits will be highlighted.) Press... the CH v or CH w button repeatedly to select the appropriate hours (i.e., the hour when the TV will turn on page 3.10). 2 Press the CH w button to display the menu. Press the CH w button three times to select the appropriate minutes....
...(AM or PM) appears to select "On time". Plug & Play 3 Press the CH w button to the right of the hour. 4.9 CHAPTER FOUR: SPECIAL FEATURES Downloaded from www.Manualslib.com manuals search engine Press the VOL+ button to select the "On time" hours. (The hours digits will be highlighted.) Press... the CH v or CH w button repeatedly to select the appropriate hours (i.e., the hour when the TV will turn on page 3.10). 2 Press the CH w button to display the menu. Press the CH w button three times to select the appropriate minutes....
Owners Instructions
Page 48
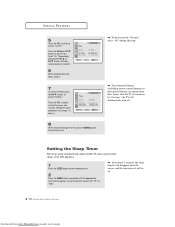
Setting the Sleep Timer The sleep timer automatically shuts off the TV after the TV is turned on by "On time", the TV will alternate between on the remote control. 2 Press the SLEEP button repeatedly until the appropriate time interval appears (any of the preset... seconds, the sleep display will disappear from the screen, and the time interval will be set. 4.10 CHAPTER FOUR: SPECIAL FEATURES Downloaded from "Off" to select "Off time." SPECIAL FEATURES 5 Press the VOL + button to exit. If no function buttons (including remote control buttons or front panel buttons) are ...
Setting the Sleep Timer The sleep timer automatically shuts off the TV after the TV is turned on by "On time", the TV will alternate between on the remote control. 2 Press the SLEEP button repeatedly until the appropriate time interval appears (any of the preset... seconds, the sleep display will disappear from the screen, and the time interval will be set. 4.10 CHAPTER FOUR: SPECIAL FEATURES Downloaded from "Off" to select "Off time." SPECIAL FEATURES 5 Press the VOL + button to exit. If no function buttons (including remote control buttons or front panel buttons) are ...

Owners Instructions
Page 51
... MENU button to exit. There may have subtitles in English, while Channel 2 has subtitles in Spanish.) 4.13 CHAPTER FOUR: SPECIAL FEATURES Downloaded from television programs, so home-recorded video tapes also provide closed captions. These are usually subtitles for the closed caption symbol in...press the VOL+ button. Text often covers a large portion of the TV. 4 Press the CH w button to "Channels" and "Field": Use the CH v, CH w, VOL + and VOL - SPECIAL FEATURES Viewing Closed Captions Your TV decodes and displays the closed captions that supplements the information in Field ...
... MENU button to exit. There may have subtitles in English, while Channel 2 has subtitles in Spanish.) 4.13 CHAPTER FOUR: SPECIAL FEATURES Downloaded from television programs, so home-recorded video tapes also provide closed captions. These are usually subtitles for the closed caption symbol in...press the VOL+ button. Text often covers a large portion of the TV. 4 Press the CH w button to "Channels" and "Field": Use the CH v, CH w, VOL + and VOL - SPECIAL FEATURES Viewing Closed Captions Your TV decodes and displays the closed captions that supplements the information in Field ...
Owners Instructions
Page 52
... you forget the PIN, press the remote-control keys in the following sequence, which resets the pin to exit. 4.14 CHAPTER FOUR: SPECIAL FEATURES Downloaded from www.Manualslib.com manuals search engine When the Confirm screen disappears, your 4-digit PIN number. Press the MENU button three times to ... the "Confirm new pin" screen appears. Press the VOL+ button. Enter your PIN has been memorized. Note: The default PIN number for a new TV set up or changed. Press the VOL+ button. Press the CH w button three times and highlight "Change pin." 4 While the "Change pin" field...
... you forget the PIN, press the remote-control keys in the following sequence, which resets the pin to exit. 4.14 CHAPTER FOUR: SPECIAL FEATURES Downloaded from www.Manualslib.com manuals search engine When the Confirm screen disappears, your 4-digit PIN number. Press the MENU button three times to ... the "Confirm new pin" screen appears. Press the VOL+ button. Enter your PIN has been memorized. Note: The default PIN number for a new TV set up or changed. Press the VOL+ button. Press the CH w button three times and highlight "Change pin." 4 While the "Change pin" field...

Owners Instructions
Page 53
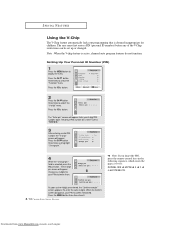
... "TV guidelines" First, set up a personal identification number (PIN), and enable the V-Chip. (See previous section.) Parental restrictions can be selected (turns blue color). Press the CH w button three times to select the "V-chip" menu. Press the VOL+ button. To enable the V-Chip feature,... The "V-Chip" screen will appear, and "V-Chip lock" will appear. Plug & Play 4.15 CHAPTER FOUR: SPECIAL FEATURES Downloaded from www.Manualslib.com manuals search engine SPECIAL FEATURES How to Enable/Disable the V-Chip 1 Press the MENU button to select the "Function" menu. Press the CH ...
... "TV guidelines" First, set up a personal identification number (PIN), and enable the V-Chip. (See previous section.) Parental restrictions can be selected (turns blue color). Press the CH w button three times to select the "V-chip" menu. Press the VOL+ button. To enable the V-Chip feature,... The "V-Chip" screen will appear, and "V-Chip lock" will appear. Plug & Play 4.15 CHAPTER FOUR: SPECIAL FEATURES Downloaded from www.Manualslib.com manuals search engine SPECIAL FEATURES How to Enable/Disable the V-Chip 1 Press the MENU button to select the "Function" menu. Press the CH ...
Owners Instructions
Page 54
... restrictions for these two groups work together similarly. (See next section.) 4.16 CHAPTER FOUR: SPECIAL FEATURES Downloaded from www.Manualslib.com manuals search engine The "Enter pin" screen will appear. Note 1: The TV-Y7, TV-PG, TV-14 and TV-MA have additional options. Press the CH v or CH w button to block or unblock the...
... restrictions for these two groups work together similarly. (See next section.) 4.16 CHAPTER FOUR: SPECIAL FEATURES Downloaded from www.Manualslib.com manuals search engine The "Enter pin" screen will appear. Note 1: The TV-Y7, TV-PG, TV-14 and TV-MA have additional options. Press the CH v or CH w button to block or unblock the...


