

Open Source Guide (ENGLISH)
Page 1
... and ours, we speak of derivative or collective works based on the Program. Finally, any free program is threatened constantly by the two goals of preserving the free status of the software, or if you receive source code or can redistribute and change . For an executable work, complete source code means all derivatives of our free software and of promoting the sharing and reuse of any...
... and ours, we speak of derivative or collective works based on the Program. Finally, any free program is threatened constantly by the two goals of preserving the free status of the software, or if you receive source code or can redistribute and change . For an executable work, complete source code means all derivatives of our free software and of promoting the sharing and reuse of any...

Open Source Guide (ENGLISH)
Page 2
... and change. To apply these terms (or, alternatively, under these terms, attach the following notices to where the full notice is safest to attach them to the start of warranty; How to Apply These Terms to Your New Libraries If you develop a new library, and you want it free software that ...OR CONSEQUENTIAL DAMAGES ARISING OUT OF THE USE OR INABILITY TO USE THE LIBRARY (INCLUDING BUT NOT LIMITED TO LOSS OF DATA OR DATA BEING RENDERED INACCURATE OR LOSSES SUSTAINED BY YOU OR THIRD PARTIES OR A FAILURE OF THE LIBRARY TO OPERATE WITH ANY OTHER SOFTWARE), EVEN IF SUCH HOLDER OR OTHER ...
... and change. To apply these terms (or, alternatively, under these terms, attach the following notices to where the full notice is safest to attach them to the start of warranty; How to Apply These Terms to Your New Libraries If you develop a new library, and you want it free software that ...OR CONSEQUENTIAL DAMAGES ARISING OUT OF THE USE OR INABILITY TO USE THE LIBRARY (INCLUDING BUT NOT LIMITED TO LOSS OF DATA OR DATA BEING RENDERED INACCURATE OR LOSSES SUSTAINED BY YOU OR THIRD PARTIES OR A FAILURE OF THE LIBRARY TO OPERATE WITH ANY OTHER SOFTWARE), EVEN IF SUCH HOLDER OR OTHER ...
User Manual (user Manual) (ver.1.0) (English)
Page 3
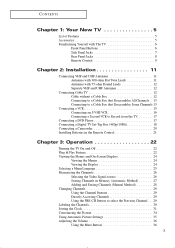
... Connecting a DVD Player 17 Connecting a Digital TV Set-Top Box (480p/1080i 18 Connecting a Camcorder 20 Installing Batteries in the Remote Control 21 Chapter 3: Operation 22 Turning the TV On and Off 22 Plug & Play Feature 22 Viewing the Menus and On-Screen Displays 24 Viewing the Menus 24 Viewing the Display 24 Selecting a Menu Language 25 Memorizing the Channels 26 Selecting the Video Signal-source 26 Storing Channels in Memory (Automatic Method 27 Adding and Erasing Channels (Manual...
... Connecting a DVD Player 17 Connecting a Digital TV Set-Top Box (480p/1080i 18 Connecting a Camcorder 20 Installing Batteries in the Remote Control 21 Chapter 3: Operation 22 Turning the TV On and Off 22 Plug & Play Feature 22 Viewing the Menus and On-Screen Displays 24 Viewing the Menus 24 Viewing the Display 24 Selecting a Menu Language 25 Memorizing the Channels 26 Selecting the Video Signal-source 26 Storing Channels in Memory (Automatic Method 27 Adding and Erasing Channels (Manual...

User Manual (user Manual) (ver.1.0) (English)
Page 4
... the Sound 37 Using Automatic Sound Settings 38 Viewing an External Signal Source 39 Setting the Signal Source 39 Assigning Names to External input mode 40 Chapter 4: Special Features 41 Fine Tuning Channels 41 Changing the Color Tone 42 Changing the Screen Size 43 Digital Noise Reduction 44 Tilt 45 Using the R.Surf Feature 46 Freezing the Picture 46 Choosing a Multi-Channel Sound (MTS) Soundtrack 47 Adjusting the Volume Automatically 48 Setting the Surround 49 Setting the Turbo Sound 50 Setting...
... the Sound 37 Using Automatic Sound Settings 38 Viewing an External Signal Source 39 Setting the Signal Source 39 Assigning Names to External input mode 40 Chapter 4: Special Features 41 Fine Tuning Channels 41 Changing the Color Tone 42 Changing the Screen Size 43 Digital Noise Reduction 44 Tilt 45 Using the R.Surf Feature 46 Freezing the Picture 46 Choosing a Multi-Channel Sound (MTS) Soundtrack 47 Adjusting the Volume Automatically 48 Setting the Surround 49 Setting the Turbo Sound 50 Setting...
User Manual (user Manual) (ver.1.0) (English)
Page 5
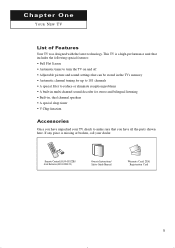
...; A special filter to reduce or eliminate reception problems • A built-in multi-channel sound decoder for stereo and bilingual listening • Built-in, dual channel speakers • A special sleep timer • V-Chip function Accessories Once you have all the parts shown here. Remote Control(AA59-00322B)/ AAA Batteries(4301-000121) Owner's Instructions/ Safety Guide Manual Warranty Card; 2EA/ Registration Card 5 C h aYOpURtNeEWr TOV n e YOUR NEW TV...
...; A special filter to reduce or eliminate reception problems • A built-in multi-channel sound decoder for stereo and bilingual listening • Built-in, dual channel speakers • A special sleep timer • V-Chip function Accessories Once you have all the parts shown here. Remote Control(AA59-00322B)/ AAA Batteries(4301-000121) Owner's Instructions/ Safety Guide Manual Warranty Card; 2EA/ Registration Card 5 C h aYOpURtNeEWr TOV n e YOUR NEW TV...
User Manual (user Manual) (ver.1.0) (English)
Page 6
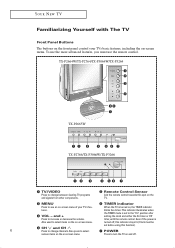
... TX-P2766/TX-P3066W/TX-P3266 Œ TV/VIDEO Press to change channels. and + the TIMER mode is turned on -screen menu. When the TV is set before using this spot on -screen menu. Press to select items on the on , the TIMER indicator tures. To use the remote control. YOUR NEW TV Familiarizing Yourself with the remote control. This indicator illuminates when ˇ VOL - Also press to change between viewing TV programs and signals...
... TX-P2766/TX-P3066W/TX-P3266 Œ TV/VIDEO Press to change channels. and + the TIMER mode is turned on -screen menu. When the TV is set before using this spot on -screen menu. Press to select items on the on , the TIMER indicator tures. To use the remote control. YOUR NEW TV Familiarizing Yourself with the remote control. This indicator illuminates when ˇ VOL - Also press to change between viewing TV programs and signals...

User Manual (user Manual) (ver.1.0) (English)
Page 9
... the preset factory settings (or select your personal, customized sound settings). ˇ P.MODE Adjust the TV picture by the Samsung remote control (i.e., TV, Set Top Box, VCR, Cable box, or DVD). PRE-CH Tunes to the previous channel. Ò TV/VIDEO Press to display all of the preset factory settings (or select your personal, customized picture settings). ¨ Number buttons Press to select channels directly on -screen. ı EXIT Press to exit the menu. ˜ Up...
... the preset factory settings (or select your personal, customized sound settings). ˇ P.MODE Adjust the TV picture by the Samsung remote control (i.e., TV, Set Top Box, VCR, Cable box, or DVD). PRE-CH Tunes to the previous channel. Ò TV/VIDEO Press to display all of the preset factory settings (or select your personal, customized picture settings). ¨ Number buttons Press to select channels directly on -screen. ı EXIT Press to exit the menu. ˜ Up...
User Manual (user Manual) (ver.1.0) (English)
Page 12
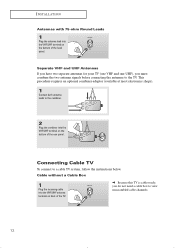
... separate antennas for your TV (one VHF and one UHF), you do not need a cable box to the TV. M Because this TV is cable-ready, you must combine the two antenna signals before connecting the antennas to view unscrambled cable channels. 12 This procedure requires an optional combiner-adaptor (available at most electronics shops). 1 Connect both antenna leads to a cable TV system, follow the instructions below...
... separate antennas for your TV (one VHF and one UHF), you do not need a cable box to the TV. M Because this TV is cable-ready, you must combine the two antenna signals before connecting the antennas to view unscrambled cable channels. 12 This procedure requires an optional combiner-adaptor (available at most electronics shops). 1 Connect both antenna leads to a cable TV system, follow the instructions below...
User Manual (user Manual) (ver.1.0) (English)
Page 14
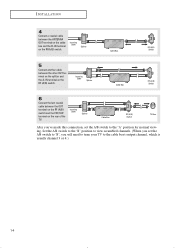
Set the A/B switch to the "B" position to view scrambled channels. (When you set the A/B switch to "B", you 've made this connection, set the A/B switch to the cable box's output channel, which is usually channel 3 or 4.) 14 Incoming Cable Splitter Cable Box RF (A/B) Switch 5 Connect another cable between the OUT terminal on the RF (A/B) switch and the VHF/UHF terminal on the rear of the TV. Incoming Cable Splitter Cable Box RF (A/B) Switch 6 Connect the last coaxial cable between the...
Set the A/B switch to the "B" position to view scrambled channels. (When you set the A/B switch to "B", you 've made this connection, set the A/B switch to the cable box's output channel, which is usually channel 3 or 4.) 14 Incoming Cable Splitter Cable Box RF (A/B) Switch 5 Connect another cable between the OUT terminal on the RF (A/B) switch and the VHF/UHF terminal on the rear of the TV. Incoming Cable Splitter Cable Box RF (A/B) Switch 6 Connect the last coaxial cable between the...
User Manual (user Manual) (ver.1.0) (English)
Page 15
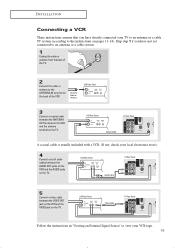
... TV. VCR Rear Panel TV Rear Panel Coaxial Cable A coaxial cable is usually included with a VCR. (If not, check your VCR tape. 15 VCR Rear Panel Video Cable TV Rear Panel Follow the instructions in "Viewing an External Signal Source" to view your local electronics store). 4 Connect a set of the VCR. INSTALLATION Connecting a VCR These instructions assume that you have already connected your TV to an antenna or a cable TV system (according to the instructions on pages...
... TV. VCR Rear Panel TV Rear Panel Coaxial Cable A coaxial cable is usually included with a VCR. (If not, check your VCR tape. 15 VCR Rear Panel Video Cable TV Rear Panel Follow the instructions in "Viewing an External Signal Source" to view your local electronics store). 4 Connect a set of the VCR. INSTALLATION Connecting a VCR These instructions assume that you have already connected your TV to an antenna or a cable TV system (according to the instructions on pages...
User Manual (user Manual) (ver.1.0) (English)
Page 17
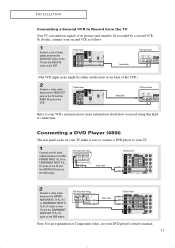
... the DVD player. INSTALLATION Connecting a Second VCR to Record from the TV Your TV can send out signals of its picture and sound to record using this , connect your second VCR as follows: 1 Connect a set of audio cables between the COMPONENT INPUT 1 (L, R) or COMPONENT INPUT 2 (L, R) jacks on the TV and the AUDIO OUT jacks on the DVD player. To do this kind of connection. DVD Player Rear Panel Audio Cable TV Rear Panel 2 Connect a video cable between the COMPONENT INPUT 1 (Y, PB, PR) or COMPONENT INPUT 2 (Y, PB...
... the DVD player. INSTALLATION Connecting a Second VCR to Record from the TV Your TV can send out signals of its picture and sound to record using this , connect your second VCR as follows: 1 Connect a set of audio cables between the COMPONENT INPUT 1 (L, R) or COMPONENT INPUT 2 (L, R) jacks on the TV and the AUDIO OUT jacks on the DVD player. To do this kind of connection. DVD Player Rear Panel Audio Cable TV Rear Panel 2 Connect a video cable between the COMPONENT INPUT 1 (Y, PB, PR) or COMPONENT INPUT 2 (Y, PB...
User Manual (user Manual) (ver.1.0) (English)
Page 18
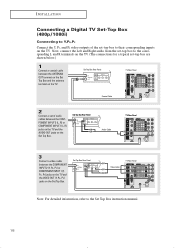
INSTALLATION Connecting a Digital TV Set-Top Box (480p/1080i) Connecting to Y,PB,PR Connect the Y, PB, and PR video outputs of audio cables between the COMPONENT INPUT 2 (L, R) or COMPONENT INPUT 1 (L, R) jacks on the TV and the AUDIO OUT jacks on the Set Top Box. Set Top Box Rear Panel TV Rear Panel Coaxial Cable 2 Connect a set of the set-top box to their corresponding inputs on the TV. Set Top Box Rear Panel Audio Cable TV Rear Panel 3 Connect a video cable between the ANTENNA OUT terminal on the Set Top Box and the antenna terminal on...
INSTALLATION Connecting a Digital TV Set-Top Box (480p/1080i) Connecting to Y,PB,PR Connect the Y, PB, and PR video outputs of audio cables between the COMPONENT INPUT 2 (L, R) or COMPONENT INPUT 1 (L, R) jacks on the TV and the AUDIO OUT jacks on the Set Top Box. Set Top Box Rear Panel TV Rear Panel Coaxial Cable 2 Connect a set of the set-top box to their corresponding inputs on the TV. Set Top Box Rear Panel Audio Cable TV Rear Panel 3 Connect a video cable between the ANTENNA OUT terminal on the Set Top Box and the antenna terminal on...
User Manual (user Manual) (ver.1.0) (English)
Page 19
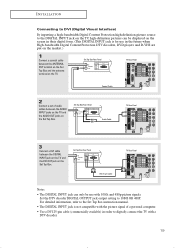
... the screen in their digital form. (This DIGITAL INPUT jack is not compatible with the picture signal of audio cables between the DIGITAL INPUT jack on the TV and the DVI OUT jack on the Set Top Box. Set Top Box Rear Panel Audio Cable TV Rear Panel 3 Connect a DVI cable between the AUDIO INPUT jacks on the TV and the AUDIO OUT jacks on the Set Top Box. For detailed information, refer to the Set Top Box instruction manual. • The DIGITAL INPUT...
... the screen in their digital form. (This DIGITAL INPUT jack is not compatible with the picture signal of audio cables between the DIGITAL INPUT jack on the TV and the DVI OUT jack on the Set Top Box. Set Top Box Rear Panel Audio Cable TV Rear Panel 3 Connect a DVI cable between the AUDIO INPUT jacks on the TV and the AUDIO OUT jacks on the Set Top Box. For detailed information, refer to the Set Top Box instruction manual. • The DIGITAL INPUT...
User Manual (user Manual) (ver.1.0) (English)
Page 22
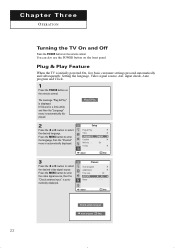
... "Channel" menu is automatically displayed. Press the MENU button to enter the video signal source, then the "Check antenna input." Plug & Play 2 Press the œ or √ button to select the desired video signal source. Adjust Skip Check antenna input. Setup Plug & Play Time Language œ Caption Melody : V-chip √ √ English √ √ On √ Adjust Skip 3 Press the œ or √ button to select the desired language. You can also use the POWER button on the remote control. C h a pOtPEeRArTIOTN h r e e OPERATION Turning...
... "Channel" menu is automatically displayed. Press the MENU button to enter the video signal source, then the "Check antenna input." Plug & Play 2 Press the œ or √ button to select the desired video signal source. Adjust Skip Check antenna input. Setup Plug & Play Time Language œ Caption Melody : V-chip √ √ English √ √ On √ Adjust Skip 3 Press the œ or √ button to select the desired language. You can also use the POWER button on the remote control. C h a pOtPEeRArTIOTN h r e e OPERATION Turning...
User Manual (user Manual) (ver.1.0) (English)
Page 53
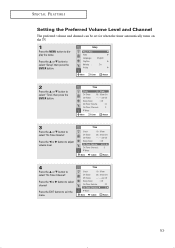
... Timer Channel œ 3 √ M More Move Adjust Return 53 am Off Sleep Timer : Off On Timer Volume : 10 On Timer Channel : 3 M More Move Enter Return 3 Press the ... or † button to select "On Timer Channel". or † button to select "On Timer Volume". SPECIAL FEATURES Setting the Preferred Volume Level and Channel The preferred volume and channel can be set for when the timer automatically turns on the TV. 1 Press the MENU button to display the menu...
... Timer Channel œ 3 √ M More Move Adjust Return 53 am Off Sleep Timer : Off On Timer Volume : 10 On Timer Channel : 3 M More Move Enter Return 3 Press the ... or † button to select "On Timer Channel". or † button to select "On Timer Volume". SPECIAL FEATURES Setting the Preferred Volume Level and Channel The preferred volume and channel can be set for when the timer automatically turns on the TV. 1 Press the MENU button to display the menu...
User Manual (user Manual) (ver.1.0) (English)
Page 54
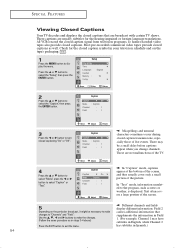
... TV shows. SPECIAL FEATURES Viewing Closed Captions Your TV decodes and displays the closed captions that supplements the information in Field 1. (For example, Channel 1 may be necessary to make changes to "Channels" and "Field": Use the L, M, œ and √ buttons to display the menu. Most pre-recorded commercial video tapes provide closed caption transmissions, especially those of the picture. Move Adjust Return Caption Caption œ On √ Mode : Caption Channel : 1 Field : 1 M Misspellings and...
... TV shows. SPECIAL FEATURES Viewing Closed Captions Your TV decodes and displays the closed captions that supplements the information in Field 1. (For example, Channel 1 may be necessary to make changes to "Channels" and "Field": Use the L, M, œ and √ buttons to display the menu. Most pre-recorded commercial video tapes provide closed caption transmissions, especially those of the picture. Move Adjust Return Caption Caption œ On √ Mode : Caption Channel : 1 Field : 1 M Misspellings and...
User Manual (user Manual) (ver.1.0) (English)
Page 56
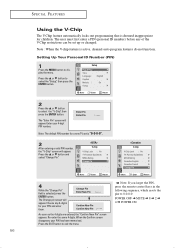
... Confirm screen disappears, your 4-digit PIN number, Enter Pin Enter Pin : - - - - The user must first enter a PIN (personal ID number) before any 4-digits for your PIN and enter them. Note: The default PIN number for children. Re-enter the same 4 digits. Setup Plug & Play Time Language : Caption Melody : V-chip √ √ English √ On √ Move Enter Return 2 Press the L or M button to exit the menu...
... Confirm screen disappears, your 4-digit PIN number, Enter Pin Enter Pin : - - - - The user must first enter a PIN (personal ID number) before any 4-digits for your PIN and enter them. Note: The default PIN number for children. Re-enter the same 4 digits. Setup Plug & Play Time Language : Caption Melody : V-chip √ √ English √ On √ Move Enter Return 2 Press the L or M button to exit the menu...
User Manual (user Manual) (ver.1.0) (English)
Page 57
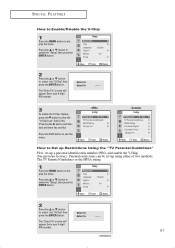
... How to Set up Restrictions Using the "TV Parental Guidelines" First, set up a personal identification number (PIN), and enable the V-Chip. (See previous section.) Parental restrictions can be set up using either of two methods: The TV Parental Guidelines or the MPAA rating. 1 Press the MENU button to exit the menu. Enter Pin Enter Pin : - - - - Enter your 4-digit PIN number. 57 continued... Setup Plug & Play Time Language : Caption Melody...
... How to Set up Restrictions Using the "TV Parental Guidelines" First, set up a personal identification number (PIN), and enable the V-Chip. (See previous section.) Parental restrictions can be set up using either of two methods: The TV Parental Guidelines or the MPAA rating. 1 Press the MENU button to exit the menu. Enter Pin Enter Pin : - - - - Enter your 4-digit PIN number. 57 continued... Setup Plug & Play Time Language : Caption Melody...
User Manual (user Manual) (ver.1.0) (English)
Page 63
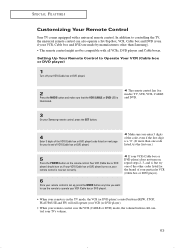
... (CABLE or DVD) mode, the volume buttons still control your Samsung remote control, press the SET button. 4 Enter 3 digits of the VCR (Cable box or DVD player) code listed on . In addition to controlling the TV, the universal remote control can also operate a Set-Top Box, VCR, Cable box and DVD (even if your VCR, Cable box and DVD are made by manufacturers other codes listed for your brand of VCR (Cable box or DVD player). œ Make sure you want to use the remote to Operate Your VCR (Cable box or DVD player) 1 Turn...
... (CABLE or DVD) mode, the volume buttons still control your Samsung remote control, press the SET button. 4 Enter 3 digits of the VCR (Cable box or DVD player) code listed on . In addition to controlling the TV, the universal remote control can also operate a Set-Top Box, VCR, Cable box and DVD (even if your VCR, Cable box and DVD are made by manufacturers other codes listed for your brand of VCR (Cable box or DVD player). œ Make sure you want to use the remote to Operate Your VCR (Cable box or DVD player) 1 Turn...
User Manual (user Manual) (ver.1.0) (English)
Page 65
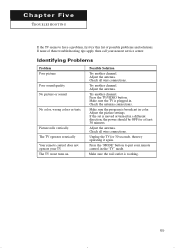
... your remote control in the "TV" mode. No picture or sound. Picture rolls vertically. Possible Solution Try another channel. Check all wire connections. Adjust the antenna. Check all wire connections. Press the "MODE" button to have a problem, first try operating it again. Make sure the wall outlet is moved or turned in a different direction, the power should be OFF for 30 seconds, then try this list of these troubleshooting tips...
... your remote control in the "TV" mode. No picture or sound. Picture rolls vertically. Possible Solution Try another channel. Check all wire connections. Adjust the antenna. Check all wire connections. Press the "MODE" button to have a problem, first try operating it again. Make sure the wall outlet is moved or turned in a different direction, the power should be OFF for 30 seconds, then try this list of these troubleshooting tips...


