
User Manual
Page 2
... cable can be electrocuted. Keep the plastic bag out of the printer. Do not bend the cable by force or leave it before usage. • If the plug does not fit perfectly with your hands wet. • You can cause a fire. SRP-370/372 ■ Safety Precautions In using the present appliance, please keep...
... cable can be electrocuted. Keep the plastic bag out of the printer. Do not bend the cable by force or leave it before usage. • If the plug does not fit perfectly with your hands wet. • You can cause a fire. SRP-370/372 ■ Safety Precautions In using the present appliance, please keep...

User Manual
Page 3
... out of order. Do not use the printer when it . PROHIBITED PRINTER DISASSEMBLING PROHIBITED PRINTER Do not let water or other foreign objects in the printer. • If this happened, switch off and unplug the printer before calling your dealer. SRP-370/372 CAUTION Violating following measures. • Switch off the printer and unplug the set from the mains...
... out of order. Do not use the printer when it . PROHIBITED PRINTER DISASSEMBLING PROHIBITED PRINTER Do not let water or other foreign objects in the printer. • If this happened, switch off and unplug the printer before calling your dealer. SRP-370/372 CAUTION Violating following measures. • Switch off the printer and unplug the set from the mains...

User Manual
Page 4
SRP-370/372 ■ Warning - Canada This Apparatus complies with class "A" limits for details of communications radio interference regulations. You should turn the printer "OFF". ■ Waste Electrical and Electric Equipment (WEEE) This marking shown on the rear side, in which .... This equipment generates uses, and can take this from other commercial wastes for environmentally safe recycling. Business users should turn the printer "OFF", before you should contact their local government office, for radio interference as specified in the Canadian department of where and...
SRP-370/372 ■ Warning - Canada This Apparatus complies with class "A" limits for details of communications radio interference regulations. You should turn the printer "OFF". ■ Waste Electrical and Electric Equipment (WEEE) This marking shown on the rear side, in which .... This equipment generates uses, and can take this from other commercial wastes for environmentally safe recycling. Business users should turn the printer "OFF", before you should contact their local government office, for radio interference as specified in the Canadian department of where and...
User Manual
Page 5
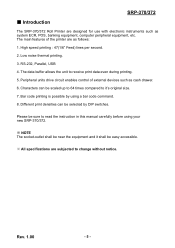
...thermal printing. 3. Characters can be selected by using your new SRP-370/372. ※ NOTE The socket-outlet shall be easy accessible. ※ All specifications are subjected to read the instruction in this manual carefully before using a bar code command. 8. SRP-370/372 ■ Introduction The SRP-370/372 Roll Printer... data even during printing. 5. Bar code printing is possible by DIP switches. Peripheral units drive circuit enables control of the printer are designed for use with electronic instruments such as cash drawer. 6. Rev. 1.00 - 5 - High speed printing :...
...thermal printing. 3. Characters can be selected by using your new SRP-370/372. ※ NOTE The socket-outlet shall be easy accessible. ※ All specifications are subjected to read the instruction in this manual carefully before using a bar code command. 8. SRP-370/372 ■ Introduction The SRP-370/372 Roll Printer... data even during printing. 5. Bar code printing is possible by DIP switches. Peripheral units drive circuit enables control of the printer are designed for use with electronic instruments such as cash drawer. 6. Rev. 1.00 - 5 - High speed printing :...

User Manual
Page 6
Specification ...22 5. Appendix ...23 5-1 Cleaning Printer ...23 Rev. 1.00 - 6 - ■ Table of Contents SRP-370/372 1. Setting Up the Printer 7 1-1 Unpacking...7 1-2 Connecting the Cables 8 1-2-1 Serial Interface (RS-232C 8 1-2-2 Parallel Interface (IEEE1284 9 1-2-3 USB Interface 10 1-3 Connecting the Drawer 10 ... 1-5 Setting the Memory Switches 13 1-6 Installing or Replacing the Paper Roll 15 1-7 Adjustments and Settings 17 1-8 Using the Printer ...18 1-9 Connecting the computer 18 1-10 Connecting the Power Supply 19 2. Self Test...20 3. Hexadecimal Dumping 21 4.
Specification ...22 5. Appendix ...23 5-1 Cleaning Printer ...23 Rev. 1.00 - 6 - ■ Table of Contents SRP-370/372 1. Setting Up the Printer 7 1-1 Unpacking...7 1-2 Connecting the Cables 8 1-2-1 Serial Interface (RS-232C 8 1-2-2 Parallel Interface (IEEE1284 9 1-2-3 USB Interface 10 1-3 Connecting the Drawer 10 ... 1-5 Setting the Memory Switches 13 1-6 Installing or Replacing the Paper Roll 15 1-7 Adjustments and Settings 17 1-8 Using the Printer ...18 1-9 Connecting the computer 18 1-10 Connecting the Power Supply 19 2. Self Test...20 3. Hexadecimal Dumping 21 4.
User Manual
Page 7
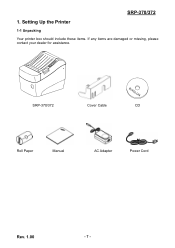
Setting Up the Printer 1-1 Unpacking Your printer box should include these items. If any items are damaged or missing, please contact your dealer for assistance. SRP-370/372 Cover Cable CD Roll Paper Manual AC Adapter Power Cord Rev. 1.00 - 7 - SRP-370/372 1.
Setting Up the Printer 1-1 Unpacking Your printer box should include these items. If any items are damaged or missing, please contact your dealer for assistance. SRP-370/372 Cover Cable CD Roll Paper Manual AC Adapter Power Cord Rev. 1.00 - 7 - SRP-370/372 1.

User Manual
Page 8
... CTS DSR SG DTR Rev. 1.00 Direction - Function Frame Ground Transmit Data Receive Data Ready To Send Clear To Send Data Set Ready Signal Ground Data Terminal Ready Output Input Output Input Input Output - 8 - They all connect to the printer. SRP-370/372 1-2 Connecting the Cables You can connect ...up the three cables to the connector panel on the back of the printer, which is shown below: ※ NOTE Before connecting any of the cables, make...
... CTS DSR SG DTR Rev. 1.00 Direction - Function Frame Ground Transmit Data Receive Data Ready To Send Clear To Send Data Set Ready Signal Ground Data Terminal Ready Output Input Output Input Input Output - 8 - They all connect to the printer. SRP-370/372 1-2 Connecting the Cables You can connect ...up the three cables to the connector panel on the back of the printer, which is shown below: ※ NOTE Before connecting any of the cables, make...

User Manual
Page 9
1-2-2 Parallel Interface (IEEE1284) POWER DK SRP-370/372 Power supply connector Drawer kick-out connector PARALLEL Interface connector Pin No. 1 2 3 4 5 6 7 8 9 10 11 12 13 14 15 16 17 18 19~30 31 32 33 34 35 36 Source Host Host / Printer Host / Printer Host / Printer Host / Printer Host / Printer Host / Printer Host / Printer Host / Printer Printer Printer Printer Printer Host Printer Host Printer Printer Printer Host Compatibility Mode nStrobe Data...
1-2-2 Parallel Interface (IEEE1284) POWER DK SRP-370/372 Power supply connector Drawer kick-out connector PARALLEL Interface connector Pin No. 1 2 3 4 5 6 7 8 9 10 11 12 13 14 15 16 17 18 19~30 31 32 33 34 35 36 Source Host Host / Printer Host / Printer Host / Printer Host / Printer Host / Printer Host / Printer Host / Printer Host / Printer Printer Printer Printer Printer Host Printer Host Printer Printer Printer Host Compatibility Mode nStrobe Data...

User Manual
Page 10
... kick-out connector on the back of the printer next to the drawer kick-out connector; out drive signal 2 Signal ground Direction - Rev. 1.00 - 10 - Shell 1 2 3 4 Signal Name Shield VBUS DD+ GND Assignment (Color) Drain Wire Red White Green Black Function Frame...printer. ※ CAUTION Do not connect a telephone line to the power supply connector. Output Input Output - out drive signal 1 Drawer open/close signal +24V Drawer kick- Pin No. 1 2 3 4 5 6 Signal name Frame ground Drawer kick- Using an improper drawer may be damaged. 1-2-3 USB Interface POWER DK SRP-370/372...
... kick-out connector on the back of the printer next to the drawer kick-out connector; out drive signal 2 Signal ground Direction - Rev. 1.00 - 10 - Shell 1 2 3 4 Signal Name Shield VBUS DD+ GND Assignment (Color) Drain Wire Red White Green Black Function Frame...printer. ※ CAUTION Do not connect a telephone line to the power supply connector. Output Input Output - out drive signal 1 Drawer open/close signal +24V Drawer kick- Pin No. 1 2 3 4 5 6 Signal name Frame ground Drawer kick- Using an improper drawer may be damaged. 1-2-3 USB Interface POWER DK SRP-370/372...

User Manual
Page 11
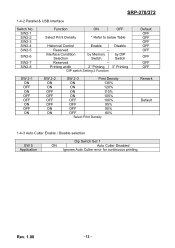
... OFF 9600 Baud OFF 19200 Baud ON 38400 Baud ON 115200 Baud Baud Rate Selection Remark Default Switch No. SRP-370/372 1-4 Setting the Dip Switches 1-4-1 Serial Interface Switch No. Cutter Function Disable Enable Paper 2 Color Mono Reserved -- SW2-1 SW2-2 SW2-3 SW2-4 SW2-5 SW2-6 SW2-7 SW2-8 Function ON OFF Select Print Density * Refer to...
... OFF 9600 Baud OFF 19200 Baud ON 38400 Baud ON 115200 Baud Baud Rate Selection Remark Default Switch No. SRP-370/372 1-4 Setting the Dip Switches 1-4-1 Serial Interface Switch No. Cutter Function Disable Enable Paper 2 Color Mono Reserved -- SW2-1 SW2-2 SW2-3 SW2-4 SW2-5 SW2-6 SW2-7 SW2-8 Function ON OFF Select Print Density * Refer to...
User Manual
Page 12
... Print Density Remark Default 1-4-3 Auto Cutter Enable / Disable selection SW 5 Application Dip Switch Set 1 ON Auto Cutter Disabled Ignores Auto Cutter error for continuous printing. SRP-370/372 1-4-2 Parallel & USB Interface Switch No. Interface Condition by Memory by DIP Selection Switch Switch Reserved --
... Print Density Remark Default 1-4-3 Auto Cutter Enable / Disable selection SW 5 Application Dip Switch Set 1 ON Auto Cutter Disabled Ignores Auto Cutter error for continuous printing. SRP-370/372 1-4-2 Parallel & USB Interface Switch No. Interface Condition by Memory by DIP Selection Switch Switch Reserved --

User Manual
Page 13
SRP-370/372 1-5 Setting the Memory Switches This printer has "Memory Switch" set which is turned off, the settings are stored in the table below (default : all OFF) : ※ NOTE The Memory Switch is available to ON or OFF as shown in the NV memory : therefore, even if the printer...Disable Fixed to following Table Rev. 1.00 - 13 - MSW1 Switch 1~3 4 5 6~8 MSW2 Switch 1 2 3 4~8 Function Reserved Cutting + Bell (Kitchen Printer) Auto Line Feed Reserved ON -Enable Enable -- Fixed to OFF Refer to OFF Function Font Selection Auto Cutter Function Reserved Code Page Selection ON OFF...
SRP-370/372 1-5 Setting the Memory Switches This printer has "Memory Switch" set which is turned off, the settings are stored in the table below (default : all OFF) : ※ NOTE The Memory Switch is available to ON or OFF as shown in the NV memory : therefore, even if the printer...Disable Fixed to following Table Rev. 1.00 - 13 - MSW1 Switch 1~3 4 5 6~8 MSW2 Switch 1 2 3 4~8 Function Reserved Cutting + Bell (Kitchen Printer) Auto Line Feed Reserved ON -Enable Enable -- Fixed to OFF Refer to OFF Function Font Selection Auto Cutter Function Reserved Code Page Selection ON OFF...

User Manual
Page 14
... OFF OFF ON MSW9-7 OFF OFF ON ON OFF MSW9-6 OFF ON OFF ON OFF Baud Rate 9600 19200 38400 57600 115200 Rev. 1.00 - 14 - SRP-370/372 MSW2-8 OFF OFF OFF OFF OFF OFF OFF OFF OFF OFF OFF OFF OFF OFF OFF OFF ON ON ON ON ON ON ON ON...
... OFF OFF ON MSW9-7 OFF OFF ON ON OFF MSW9-6 OFF ON OFF ON OFF Baud Rate 9600 19200 38400 57600 115200 Rev. 1.00 - 14 - SRP-370/372 MSW2-8 OFF OFF OFF OFF OFF OFF OFF OFF OFF OFF OFF OFF OFF OFF OFF OFF ON ON ON ON ON ON ON ON...

User Manual
Page 15
.... 1.00 - 15 - Do not use paper rolls that the printer is one. 1-6-4 Insert the paper roll as shown. otherwise, data may damage the printer. 1-6-3 Remove the used paper roll core if there is not receiving data; SRP-370/372 1-6 Installing or Replacing the Paper Roll ※ NOTE Be sure ...to use paper rolls that have the paper glued to the core because the printer cannot detect the paper end ...
.... 1.00 - 15 - Do not use paper rolls that the printer is one. 1-6-4 Insert the paper roll as shown. otherwise, data may damage the printer. 1-6-3 Remove the used paper roll core if there is not receiving data; SRP-370/372 1-6 Installing or Replacing the Paper Roll ※ NOTE Be sure ...to use paper rolls that have the paper glued to the core because the printer cannot detect the paper end ...

User Manual
Page 16
Power Error paper Feed ※ NOTE When closing the cover, press the center of paper, as shown. SRP-370/372 1-6-5 Be sure to prevent paper miss-loading. 1-6-7 Tear off the roll. 1-6-6 Pull out a small amount of printer cover firmly to note the correct direction that the paper comes off the paper as shown. Power Error paper Feed Rev. 1.00 - 16 - Then close the cover.
Power Error paper Feed ※ NOTE When closing the cover, press the center of paper, as shown. SRP-370/372 1-6-5 Be sure to prevent paper miss-loading. 1-6-7 Tear off the roll. 1-6-6 Pull out a small amount of printer cover firmly to note the correct direction that the paper comes off the paper as shown. Power Error paper Feed Rev. 1.00 - 16 - Then close the cover.

User Manual
Page 17
Paper end and Black mark. Table of normality. Optical density (O.D) must be higher than 0.6 in drawing and it might be a cause of O.D value. (Reference) 1.4 0.9 0.6 0.3 0.2 Rev. 1.00 - 17 - Make sure if the density of paper black mark is lesser it is a factory default setting. For detecting Paper End, it must be moved to secure a standard working condition. 1-7 Adjustments and Settings SRP-370/372 It has 2 features ; For detecting Black mark printed on the paper, it must be positioned at "a" Position in density to "b" position.
Paper end and Black mark. Table of normality. Optical density (O.D) must be higher than 0.6 in drawing and it might be a cause of O.D value. (Reference) 1.4 0.9 0.6 0.3 0.2 Rev. 1.00 - 17 - Make sure if the density of paper black mark is lesser it is a factory default setting. For detecting Paper End, it must be moved to secure a standard working condition. 1-7 Adjustments and Settings SRP-370/372 It has 2 features ; For detecting Black mark printed on the paper, it must be positioned at "a" Position in density to "b" position.

User Manual
Page 18
You can be disabled by the ESC c 5 command. Rev. 1.00 - 18 - 1-8 Using the Printer Control Panel SRP-370/372 ○ POWER The POWER light is on whenever the printer is used. ○ FEED The button can also hold down the FEED button to feed paper continuously. 1-9 Connecting the computer You need an appropriate interface ...
You can be disabled by the ESC c 5 command. Rev. 1.00 - 18 - 1-8 Using the Printer Control Panel SRP-370/372 ○ POWER The POWER light is on whenever the printer is used. ○ FEED The button can also hold down the FEED button to feed paper continuously. 1-9 Connecting the computer You need an appropriate interface ...

User Manual
Page 19
Otherwise, you may damage the power supply or the printer. 1-10-1 Make sure that the printer's power switch is turned off, and the power supply's power cord is unplugged from the printer, make sure that the power supply is unplugged; then grasp the connector at the arrow and pull ...damage the power supply or the printer. Rev. 1.00 - 19 - Notice that the flat side of your dealer for assistance. If the power supply's rated voltage and your outlet's voltage do not match, contact your electrical outlet. 1-10-3 Plug in the power cord. SRP-370/372 1-10 Connecting the Power Supply...
Otherwise, you may damage the power supply or the printer. 1-10-1 Make sure that the printer's power switch is turned off, and the power supply's power cord is unplugged from the printer, make sure that the power supply is unplugged; then grasp the connector at the arrow and pull ...damage the power supply or the printer. Rev. 1.00 - 19 - Notice that the flat side of your dealer for assistance. If the power supply's rated voltage and your outlet's voltage do not match, contact your electrical outlet. 1-10-3 Plug in the power cord. SRP-370/372 1-10 Connecting the Power Supply...

User Manual
Page 20
... FEED button. The self-test checks the following . *** COMPLETED *** 2-7 The printer is ready to continue printing. Please press the FEED button 2-5 Press the FEED button to receive data as soon as it completes the self-test. SRP-370/372 2. Rev. 1.00 - 20 - The self-test begins. 2-3 The self-...test prints the current printer status, which provides the control ROM version and the DIP switch setting. 2-4 After printing the current...
... FEED button. The self-test checks the following . *** COMPLETED *** 2-7 The printer is ready to continue printing. Please press the FEED button 2-5 Press the FEED button to receive data as soon as it completes the self-test. SRP-370/372 2. Rev. 1.00 - 20 - The self-test begins. 2-3 The self-...test prints the current printer status, which provides the control ROM version and the DIP switch setting. 2-4 After printing the current...

User Manual
Page 21
... print all commands except DLE EOT and DLE ENQ are disabled. 3-5 When the printing finishes, turn on the hexadecimal dump function, the printer prints all commands and data in a two-column format. During the hex dump, all the codes it receives in hexadecimal format along with a guide section to see exactly what... that has no ASCII equivalent. The first column contains the hexadecimal codes and the second column gives the ASCII characters that sends data to the printer. To use the hexadecimal dump function, follow these steps. 3-1 After you turn off . SRP-370/372 3.
... print all commands except DLE EOT and DLE ENQ are disabled. 3-5 When the printing finishes, turn on the hexadecimal dump function, the printer prints all commands and data in a two-column format. During the hex dump, all the codes it receives in hexadecimal format along with a guide section to see exactly what... that has no ASCII equivalent. The first column contains the hexadecimal codes and the second column gives the ASCII characters that sends data to the printer. To use the hexadecimal dump function, follow these steps. 3-1 After you turn off . SRP-370/372 3.