
User Manual
Page 18
SRP-350 2. Self Test The self-test checks whether the printer has any problems. If the printer does not function properly, contact your dealer. Self-test printing. Please press the FEED button 2-5 Press the FEED button to receive data as soon as it completes the self-test. The printer prints .... Rev. 1.02 - 18 - The self-test checks the following . *** COMPLETED *** 2-7 The printer is ready to continue printing. The self-test begins. 2-3 The self-test prints the current printer status, which provides the control ROM version and the DIP switch setting. 2-4 After printing the current...
SRP-350 2. Self Test The self-test checks whether the printer has any problems. If the printer does not function properly, contact your dealer. Self-test printing. Please press the FEED button 2-5 Press the FEED button to receive data as soon as it completes the self-test. The printer prints .... Rev. 1.02 - 18 - The self-test checks the following . *** COMPLETED *** 2-7 The printer is ready to continue printing. The self-test begins. 2-3 The self-test prints the current printer status, which provides the control ROM version and the DIP switch setting. 2-4 After printing the current...
User Manual
Page 19
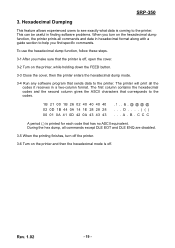
...experienced users to see exactly what data is printed for each code that corresponds to the printer. The first column contains the hexadecimal codes and the second column gives the ASCII characters that... has no ASCII equivalent. C C C A period (.) is coming to help you find specific commands. The printer will print all commands and data in a two-column format. B . During the hex dump, all commands except ...problems. When you make sure that sends data to the codes. 1B 21 00 1B 26 02 40 40 40 40 02 0D 1B 44 0A 14 1E 28 28 28 00 01 0A 41 0D 42 0A 43 43 43 D A . SRP-350...
...experienced users to see exactly what data is printed for each code that corresponds to the printer. The first column contains the hexadecimal codes and the second column gives the ASCII characters that... has no ASCII equivalent. C C C A period (.) is coming to help you find specific commands. The printer will print all commands and data in a two-column format. B . During the hex dump, all commands except ...problems. When you make sure that sends data to the codes. 1B 21 00 1B 26 02 40 40 40 40 02 0D 1B 44 0A 14 1E 28 28 28 00 01 0A 41 0D 42 0A 43 43 43 D A . SRP-350...

Service Manual
Page 28
...to Set Body, turn the Set over and attach the BRKT Hanger to match the direction of arrow as illustrated in the Figure 3-8. 4. Be sure that the BRKT attached properly... Case-Lower from the bottom of Set to the wall firmly with the eight screws. If no problem Re-assemble in the Figure 3-12. Check whether it works properly by pressing the Push Button after...Hanger of the Case-Lower. Figure 3-5 Wall Mount #1 3-2 Samsung Electro-Mechanics After opening the cover, insert the Wall-Guide L , R to the right side of the printer (Figure3-5). 2. Attach the Plate-Spring to the UpperLeft Hole ...
...to Set Body, turn the Set over and attach the BRKT Hanger to match the direction of arrow as illustrated in the Figure 3-8. 4. Be sure that the BRKT attached properly... Case-Lower from the bottom of Set to the wall firmly with the eight screws. If no problem Re-assemble in the Figure 3-12. Check whether it works properly by pressing the Push Button after...Hanger of the Case-Lower. Figure 3-5 Wall Mount #1 3-2 Samsung Electro-Mechanics After opening the cover, insert the Wall-Guide L , R to the right side of the printer (Figure3-5). 2. Attach the Plate-Spring to the UpperLeft Hole ...

Service Manual
Page 82
... S/W 3. Check the generated Frequency End Samsung Electro-Mechanics 9-1 Power VDR (+24V) Ok? Check the On/Off Signal on CPU N 1. Check the related Circuit & Pattern N 1. Check the related Circuit & Pattern 3. Y Power VTPH (+24V) Ok? 9 Troubleshooting This chapter describes the methods for troubleshooting in this Receipt Printer. 9-1 Power Problem Power Problem Power Out N Ok? On SMPS...
... S/W 3. Check the generated Frequency End Samsung Electro-Mechanics 9-1 Power VDR (+24V) Ok? Check the On/Off Signal on CPU N 1. Check the related Circuit & Pattern N 1. Check the related Circuit & Pattern 3. Y Power VTPH (+24V) Ok? 9 Troubleshooting This chapter describes the methods for troubleshooting in this Receipt Printer. 9-1 Power Problem Power Problem Power Out N Ok? On SMPS...

Service Manual
Page 83
... Signal Ok? Check the Reset Pin on PCB N 1. Y SRAM Ok? Program downLoad again N 1. Check the SRAM 3. Check the Addr/Data Pattern CPU Ok? 9 Troubleshooting 9-2 System Problem System Problem Reset Signal Ok? Y Program Ok? Check the related Circuit & Pattern on PCB 3. Check the Addr/Data Line Pattern 3. Check the Main PBA End...
... Signal Ok? Check the Reset Pin on PCB N 1. Y SRAM Ok? Program downLoad again N 1. Check the SRAM 3. Check the Addr/Data Pattern CPU Ok? 9 Troubleshooting 9-2 System Problem System Problem Reset Signal Ok? Y Program Ok? Check the related Circuit & Pattern on PCB 3. Check the Addr/Data Line Pattern 3. Check the Main PBA End...

Service Manual
Page 84
Y End Sensor Problem N 1. Check the LED Signal from CPU on Main PBA 2. Check the related Circuit, Pattern & Component N 1. Y Near End Ok? Check the Paper End Sensor Signal on ... Pattern 3. Check the related Circuit, Pattern & Component Paper End Ok? Check the Harness 4. Check the Feed S/W Signal on Main PBA 2. Check and Replace the Micro S/W Samsung Electro-Mechanics 9-3 Check the related Circuit, Pattern & Component 4. Y End N 1. Replace the Panel PBA N 1. Y Feed S/W Ok? 9-3 Panel PBA and Sensor...
Y End Sensor Problem N 1. Check the LED Signal from CPU on Main PBA 2. Check the related Circuit, Pattern & Component N 1. Y Near End Ok? Check the Paper End Sensor Signal on ... Pattern 3. Check the related Circuit, Pattern & Component Paper End Ok? Check the Harness 4. Check the Feed S/W Signal on Main PBA 2. Check and Replace the Micro S/W Samsung Electro-Mechanics 9-3 Check the related Circuit, Pattern & Component 4. Y End N 1. Replace the Panel PBA N 1. Y Feed S/W Ok? 9-3 Panel PBA and Sensor...
Service Manual
Page 85
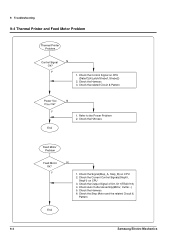
9 Troubleshooting 9-4 Thermal Printer and Feed Motor Problem Thermal Printer Problem Control Signal N Ok? Y 1. Y N 1. Check the Step Motor and the related Circuit & Pattern End 9-4 Samsung Electro-Mechanics Check the Control Signal on CPU 3. Check the related Circuit & Pattern Power Vcc VTPH Ok? Check the HArness Feed Motor Problem Feed Motor Ok? Check the Output Signal of U9, U11(TEA3718) 4. Y End...
9 Troubleshooting 9-4 Thermal Printer and Feed Motor Problem Thermal Printer Problem Control Signal N Ok? Y 1. Y N 1. Check the Step Motor and the related Circuit & Pattern End 9-4 Samsung Electro-Mechanics Check the Control Signal on CPU 3. Check the related Circuit & Pattern Power Vcc VTPH Ok? Check the HArness Feed Motor Problem Feed Motor Ok? Check the Output Signal of U9, U11(TEA3718) 4. Y End...

Service Manual
Page 86
Check the Signal on CPU 2. Check the Harness 4. N Y 1. 9-5 Auto Cutter and Drawer Problem 9 Troubleshooting Auto Cutter Problem Auto Cutter Ok? Y Auto Cutter S/W Ok? Check the Signal on CPU 2. Check the Drawer Signals on CPU(P1.6/P1.7) 3. Check the Compulsory Harness & Connector 2. ... & Component D560(Q1, Q2) 4. Check the Output Signal of U3(TA8428K) 3. Check the Solenoid in the Auto Cutter Assembly Drawer Open Failure? Y End Drawer Problem N 1. Check the Auto Cutter Assembly(Motor, Cutter...) N 1. Check the HArness 3. Check the Micro switch in the Drawer...
Check the Signal on CPU 2. Check the Harness 4. N Y 1. 9-5 Auto Cutter and Drawer Problem 9 Troubleshooting Auto Cutter Problem Auto Cutter Ok? Y Auto Cutter S/W Ok? Check the Signal on CPU 2. Check the Drawer Signals on CPU(P1.6/P1.7) 3. Check the Compulsory Harness & Connector 2. ... & Component D560(Q1, Q2) 4. Check the Output Signal of U3(TA8428K) 3. Check the Solenoid in the Auto Cutter Assembly Drawer Open Failure? Y End Drawer Problem N 1. Check the Auto Cutter Assembly(Motor, Cutter...) N 1. Check the HArness 3. Check the Micro switch in the Drawer...

Service Manual
Page 87
Check the Diode(D7~D22) 3. Check the Input Signal(DIP C1~C4) 4. Check the Diode on I /F Sel) on CPU 2. Y N 1. Check the Output Signal(I /F PBA 3. Check the Output Signal(DIP R1~4) 2. Check the Input Signal(DIP C1~C4) 4. Check the related Circuit & Pattern End 9-6 Samsung Electro-Mechanics Check the related Circuit & Pattern End I/F PBA Select Problem I /F PBA Select Problem DIP S/W Problem DIP S/W Input Ok? Y N 1. 9 Troubleshooting 9-6 DIP S/W and I /F PBA Select Ok?
Check the Diode(D7~D22) 3. Check the Input Signal(DIP C1~C4) 4. Check the Diode on I /F Sel) on CPU 2. Y N 1. Check the Output Signal(I /F PBA 3. Check the Output Signal(DIP R1~4) 2. Check the Input Signal(DIP C1~C4) 4. Check the related Circuit & Pattern End 9-6 Samsung Electro-Mechanics Check the related Circuit & Pattern End I/F PBA Select Problem I /F PBA Select Problem DIP S/W Problem DIP S/W Input Ok? Y N 1. 9 Troubleshooting 9-6 DIP S/W and I /F PBA Select Ok?

Service Manual
Page 88
Check the connection of the RS-232C Connector and Other side 2. Confirm the H/W handshaking Protocol End Samsung Electro-Mechanics 9-7 9-7 RS-232C Serial Communication Problem 9 Troubleshooting RS-232C Problem Communication Y Failure? N 1. Check the I/F Cable whether it is open or short 3. Check the connection of the H/W handshaking Line and Other side(DTR/DSR) 2. Check the ...
Check the connection of the RS-232C Connector and Other side 2. Confirm the H/W handshaking Protocol End Samsung Electro-Mechanics 9-7 9-7 RS-232C Serial Communication Problem 9 Troubleshooting RS-232C Problem Communication Y Failure? N 1. Check the I/F Cable whether it is open or short 3. Check the connection of the H/W handshaking Line and Other side(DTR/DSR) 2. Check the ...

Service Manual
Page 89
... the MAX488 Driving Chip and reated Circuit on CPU 4. Check the I/F Cable whether it is open or short 3. Check the connection of each Line End 9-8 Samsung Electro-Mechanics Check the Txd, Rxd Pin on I /F Cable whether it is affected by the Cable Noise H/W Handshake Y N 1. Confirm the H/W handshaking Protocol 4. Check the I /F PBA...
... the MAX488 Driving Chip and reated Circuit on CPU 4. Check the I/F Cable whether it is open or short 3. Check the connection of each Line End 9-8 Samsung Electro-Mechanics Check the Txd, Rxd Pin on I /F Cable whether it is affected by the Cable Noise H/W Handshake Y N 1. Confirm the H/W handshaking Protocol 4. Check the I /F PBA...

Service Manual
Page 90
N 1. Check the related Circuit and Pattern on I /F PBA End Samsung Electro-Mechanics 9-9 Check the 1284 Control Line and Status Line 3. Check the 1284 Cable whether it is open or short 5. Check the Control Lines(CS3, ... Y Failure? Check the 1284 Control, Status Data Line 3. Check the Signal of ICs(U1, U3, U6) 4. N 1. Check the Control Line(CS3) 2. 9-9 IEEE-1284 Parallel Communication Problem 9 Troubleshooting IEEE1284 Problem Froward Mode Y Failure?
N 1. Check the related Circuit and Pattern on I /F PBA End Samsung Electro-Mechanics 9-9 Check the 1284 Control Line and Status Line 3. Check the 1284 Cable whether it is open or short 5. Check the Control Lines(CS3, ... Y Failure? Check the 1284 Control, Status Data Line 3. Check the Signal of ICs(U1, U3, U6) 4. N 1. Check the Control Line(CS3) 2. 9-9 IEEE-1284 Parallel Communication Problem 9 Troubleshooting IEEE1284 Problem Froward Mode Y Failure?

Service Manual
Page 91
...) 2. Check the D+ whether it is open or short 5. Check the Data Line & Signal 3. Check the USB Cable whether it works correctly 4. 9 Troubleshooting 9-10 USB Communication Problem USB Problem Main PBA I /F PBA 9-10 Samsung Electro-Mechanics Check the related Circuit and Pattern on I /F Y Failure?
...) 2. Check the D+ whether it is open or short 5. Check the Data Line & Signal 3. Check the USB Cable whether it works correctly 4. 9 Troubleshooting 9-10 USB Communication Problem USB Problem Main PBA I /F PBA 9-10 Samsung Electro-Mechanics Check the related Circuit and Pattern on I /F Y Failure?