User Manual
Page 6
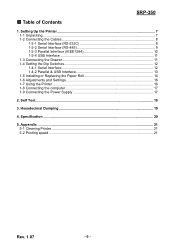
...-485 9 1-2-3 Parallel Interface (IEEE1284 10 1-2-4 USB Interface 11 1-3 Connecting the Drawer 11 1-4 Setting the Dip Switches 12 1-4-1 Serial Interface 12 1-4-2 Parallel & USB Interface 13 1-5 Installing or Replacing the Paper Roll 14 1-6 Adjustments and Settings 16 1-7 Using the Printer ...16 1-8 Connecting the computer 17 1-9 Connecting the Power Supply 17 2. Specification ...20 5. SRP-350 ■ Table of Contents 1.
...-485 9 1-2-3 Parallel Interface (IEEE1284 10 1-2-4 USB Interface 11 1-3 Connecting the Drawer 11 1-4 Setting the Dip Switches 12 1-4-1 Serial Interface 12 1-4-2 Parallel & USB Interface 13 1-5 Installing or Replacing the Paper Roll 14 1-6 Adjustments and Settings 16 1-7 Using the Printer ...16 1-8 Connecting the computer 17 1-9 Connecting the Power Supply 17 2. Specification ...20 5. SRP-350 ■ Table of Contents 1.
User Manual
Page 8
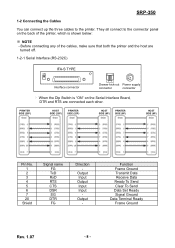
... 20 Shield Signal name FG TxD RxD RTS CTS DSR SG DTR FG Direction - Output Input Output Input Input Output - SRP-350 1-2 Connecting the Cables You can connect up the three cables to the connector panel on the Serial Interface Board, DTR and ...all connect to the printer. Function Frame Ground Transmit Data Receive Data Ready To Send Clear To Send Data Set Ready Signal Ground Data Terminal Ready Frame Ground Rev. 1.07 - 8 - Before connecting any of the ...connector Drawer kick-out Power supply connector connector ※ When the Dip Switch is shown below: ※ NOTE -
... 20 Shield Signal name FG TxD RxD RTS CTS DSR SG DTR FG Direction - Output Input Output Input Input Output - SRP-350 1-2 Connecting the Cables You can connect up the three cables to the connector panel on the Serial Interface Board, DTR and ...all connect to the printer. Function Frame Ground Transmit Data Receive Data Ready To Send Clear To Send Data Set Ready Signal Ground Data Terminal Ready Frame Ground Rev. 1.07 - 8 - Before connecting any of the ...connector Drawer kick-out Power supply connector connector ※ When the Dip Switch is shown below: ※ NOTE -
User Manual
Page 12
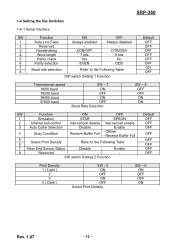
... OFF OFF ON Rev. 1.07 - 12 - Receive Buffer Full 5 6 Select Print Density Refer to the Following Table DIP switch Setting 1 Function Default OFF OFF OFF OFF OFF OFF ON OFF Transmission speed 9600 baud 19200 baud 38400 baud 57600 baud SW ... EPSON 2 Internal bell control Internal bell disable Internal bell enable 3 Auto Cutter Selection Disable Enable 4 Busy Condition Receive Buffer Full - SRP-350 1-4 Setting the Dip Switches 1-4-1 Serial Interface SW Function ON OFF 1 Auto Line Feed Always enabled Always disabled 2 Reserved - - 3 Handshaking XON/OFF DTR/...
... OFF OFF ON Rev. 1.07 - 12 - Receive Buffer Full 5 6 Select Print Density Refer to the Following Table DIP switch Setting 1 Function Default OFF OFF OFF OFF OFF OFF ON OFF Transmission speed 9600 baud 19200 baud 38400 baud 57600 baud SW ... EPSON 2 Internal bell control Internal bell disable Internal bell enable 3 Auto Cutter Selection Disable Enable 4 Busy Condition Receive Buffer Full - SRP-350 1-4 Setting the Dip Switches 1-4-1 Serial Interface SW Function ON OFF 1 Auto Line Feed Always enabled Always disabled 2 Reserved - - 3 Handshaking XON/OFF DTR/...
User Manual
Page 13
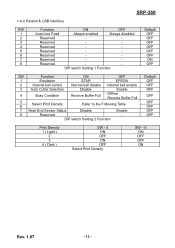
OFF 6 Reserved - - ON 8 Reserved - - Offline - OFF 5 Reserved - - OFF DIP switch Setting 1 Function SW Function ON OFF 1 Emulation STAR EPSON 2 Internal bell control Internal bell disable Internal bell enable 3 Auto ... Enable 8 Reserved - - OFF 4 Reserved - - DIP switch Setting 2 Function Default OFF OFF OFF OFF OFF OFF OFF OFF Print Density 1 ( Light ) 2 3 4 ( Dark ) SW - 5 ON OFF ON OFF Select Print Density SW - 6 ON OFF OFF ON Rev. 1.07 - 13 - OFF 7 Reserved - - SRP-350 1-4-2 Parallel & USB Interface SW Function ON OFF Default...
OFF 6 Reserved - - ON 8 Reserved - - Offline - OFF 5 Reserved - - OFF DIP switch Setting 1 Function SW Function ON OFF 1 Emulation STAR EPSON 2 Internal bell control Internal bell disable Internal bell enable 3 Auto ... Enable 8 Reserved - - OFF 4 Reserved - - DIP switch Setting 2 Function Default OFF OFF OFF OFF OFF OFF OFF OFF Print Density 1 ( Light ) 2 3 4 ( Dark ) SW - 5 ON OFF ON OFF Select Print Density SW - 6 ON OFF OFF ON Rev. 1.07 - 13 - OFF 7 Reserved - - SRP-350 1-4-2 Parallel & USB Interface SW Function ON OFF Default...
User Manual
Page 16
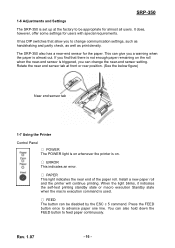
...Press the FEED button once to feed paper continuously. You can change communication settings, such as handshaking and parity check, as well as print density. This can be appropriate for almost all users. It has DIP switches that there is not enough paper remaining on . ○ ERROR This indicates...the macro execution command is used. ○ FEED The button can give you a warning when the paper is almost out. SRP-350 1-6 Adjustments and Settings The SRP-350 is set up at front or rear position. (See the below figure) Near end sensor tab 1-7 Using the Printer Control Panel ○...
...Press the FEED button once to feed paper continuously. You can change communication settings, such as handshaking and parity check, as well as print density. This can be appropriate for almost all users. It has DIP switches that there is not enough paper remaining on . ○ ERROR This indicates...the macro execution command is used. ○ FEED The button can give you a warning when the paper is almost out. SRP-350 1-6 Adjustments and Settings The SRP-350 is set up at front or rear position. (See the below figure) Near end sensor tab 1-7 Using the Printer Control Panel ○...
User Manual
Page 18
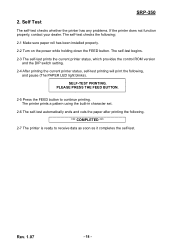
...is ready to continue printing. The self-test begins. 2-3 The self-test prints the current printer status, which provides the control ROM version and the DIP switch setting. 2-4 After printing the current printer status, self-test printing will print the following ; 2-1 Make sure paper roll has been installed properly. 2-2 Turn... as soon as it completes the self-test. The self-test checks the following , and pause (The PAPER LED light blinks). SRP-350 2. Self Test The self-test checks whether the printer has any problems. If the printer does not function properly, contact your dealer.
...is ready to continue printing. The self-test begins. 2-3 The self-test prints the current printer status, which provides the control ROM version and the DIP switch setting. 2-4 After printing the current printer status, self-test printing will print the following ; 2-1 Make sure paper roll has been installed properly. 2-2 Turn... as soon as it completes the self-test. The self-test checks the following , and pause (The PAPER LED light blinks). SRP-350 2. Self Test The self-test checks whether the printer has any problems. If the printer does not function properly, contact your dealer.