User Manual
Page 6
SRP-350 ■ Table of Contents 1. Setting Up the Printer 7 1-1 Unpacking...7 1-2 Connecting the Cables 8 1-2-1 Serial Interface (RS-232C 8 1-2-2 Serial Interface (RS-485 9 1-2-3 Parallel Interface (IEEE1284 10 1-2-4 USB Interface 11 1-3 Connecting the Drawer 11 1-4 Setting the Dip Switches 12 1-4-1 Serial Interface 12 1-4-2 Parallel & USB Interface 13 1-5 Installing or Replacing the Paper Roll 14 1-6 Adjustments and...
SRP-350 ■ Table of Contents 1. Setting Up the Printer 7 1-1 Unpacking...7 1-2 Connecting the Cables 8 1-2-1 Serial Interface (RS-232C 8 1-2-2 Serial Interface (RS-485 9 1-2-3 Parallel Interface (IEEE1284 10 1-2-4 USB Interface 11 1-3 Connecting the Drawer 11 1-4 Setting the Dip Switches 12 1-4-1 Serial Interface 12 1-4-2 Parallel & USB Interface 13 1-5 Installing or Replacing the Paper Roll 14 1-6 Adjustments and...
User Manual
Page 7
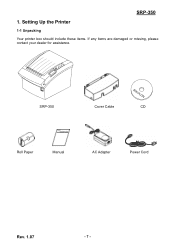
Setting Up the Printer 1-1 Unpacking Your printer box should include these items. If any items are damaged or missing, please contact your dealer for assistance. SRP-350 1. SRP-350 Cover Cable CD Roll Paper Manual AC Adapter Power Cord Rev. 1.07 - 7 -
Setting Up the Printer 1-1 Unpacking Your printer box should include these items. If any items are damaged or missing, please contact your dealer for assistance. SRP-350 1. SRP-350 Cover Cable CD Roll Paper Manual AC Adapter Power Cord Rev. 1.07 - 7 -

User Manual
Page 14
... NOTE - Be sure to use paper rolls that have the paper glued to the core because the printer cannot detect the paper end correctly. 1-5-1 Make sure that meet the specifications. Rev. 1.07 - 14 - otherwise, data may damage the printer. 1-5-3 Remove the used paper roll core if there is one.... 1-5-4 Insert the paper roll as shown. This may be lost. 1-5-2 Open the paper roll cover by pressing the cover-open the print cover while the printer is not receiving data; SRP-350 1-5 Installing or Replacing the Paper Roll ※ NOTE -...
... NOTE - Be sure to use paper rolls that have the paper glued to the core because the printer cannot detect the paper end correctly. 1-5-1 Make sure that meet the specifications. Rev. 1.07 - 14 - otherwise, data may damage the printer. 1-5-3 Remove the used paper roll core if there is one.... 1-5-4 Insert the paper roll as shown. This may be lost. 1-5-2 Open the paper roll cover by pressing the cover-open the print cover while the printer is not receiving data; SRP-350 1-5 Installing or Replacing the Paper Roll ※ NOTE -...

User Manual
Page 15
Then close the cover. ※ NOTE - When closing the cover, press the center of printer cover firmly to note the correct direction that the paper comes off the paper as shown. Rev. 1.07 - 15 - SRP-350 1-5-5 Be sure to prevent paper miss-loading. 1-5-7 Tear off the roll. 1-5-6 Pull out a small amount of paper, as shown.
Then close the cover. ※ NOTE - When closing the cover, press the center of printer cover firmly to note the correct direction that the paper comes off the paper as shown. Rev. 1.07 - 15 - SRP-350 1-5-5 Be sure to prevent paper miss-loading. 1-5-7 Tear off the roll. 1-5-6 Pull out a small amount of paper, as shown.
User Manual
Page 16
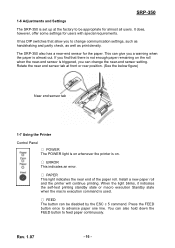
... POWER The POWER light is on the roll when the near -end sensor setting. Install a new paper roll and the printer will continue printing. The SRP-350 also has a near end of the paper roll. When the light blinks, it indicates the self-test printing standby state or macro execution Standby ...also hold down the FEED button to advance paper one line. It has DIP switches that there is not enough paper remaining on whenever the printer is used. ○ FEED The button can be appropriate for almost all users. SRP-350 1-6 Adjustments and Settings The SRP-350 is almost out. It does, however,...
... POWER The POWER light is on the roll when the near -end sensor setting. Install a new paper roll and the printer will continue printing. The SRP-350 also has a near end of the paper roll. When the light blinks, it indicates the self-test printing standby state or macro execution Standby ...also hold down the FEED button to advance paper one line. It has DIP switches that there is not enough paper remaining on whenever the printer is used. ○ FEED The button can be appropriate for almost all users. SRP-350 1-6 Adjustments and Settings The SRP-350 is almost out. It does, however,...
User Manual
Page 18
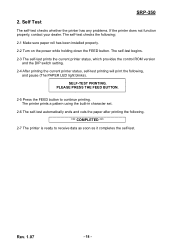
... completes the self-test. The printer prints a pattern using the built-in character set. 2-6 The self-test automatically ends and cuts the paper after printing the following ; 2-1 Make sure paper roll has been installed properly. 2-2 Turn on the power while holding down the FEED button. Rev. 1.07 - 18 - The self-test begins... the control ROM version and the DIP switch setting. 2-4 After printing the current printer status, self-test printing will print the following, and pause (The PAPER LED light blinks). SRP-350 2.
... completes the self-test. The printer prints a pattern using the built-in character set. 2-6 The self-test automatically ends and cuts the paper after printing the following ; 2-1 Make sure paper roll has been installed properly. 2-2 Turn on the power while holding down the FEED button. Rev. 1.07 - 18 - The self-test begins... the control ROM version and the DIP switch setting. 2-4 After printing the current printer status, self-test printing will print the following, and pause (The PAPER LED light blinks). SRP-350 2.

User Manual
Page 20
SRP-350 4. Rev. 1.07 - 20 - Turn off switch from any hazard. Except for paper LIFE * Mechanism Head Auto Cutter 150 Km 1,500,000 Cut MCBF * Mechanism 37,000,000 lines * These values are limited to inside of control commands. ...; (Storage) 10 ~ 80 % RH (Operating) 10 ~ 90 % RH (Storage) ; Specification Printing method Thermal line printing Dot density 180 dpi (7dots/mm) Printing width 72 mm Paper width 80 mm Characters per line (default) 42 (Font A) 56 (Font B) Printing speed 46.2 lines/sec, 150 mm/sec Receive Buffer Size 4K Bytes ※...
SRP-350 4. Rev. 1.07 - 20 - Turn off switch from any hazard. Except for paper LIFE * Mechanism Head Auto Cutter 150 Km 1,500,000 Cut MCBF * Mechanism 37,000,000 lines * These values are limited to inside of control commands. ...; (Storage) 10 ~ 80 % RH (Operating) 10 ~ 90 % RH (Storage) ; Specification Printing method Thermal line printing Dot density 180 dpi (7dots/mm) Printing width 72 mm Paper width 80 mm Characters per line (default) 42 (Font A) 56 (Font B) Printing speed 46.2 lines/sec, 150 mm/sec Receive Buffer Size 4K Bytes ※...

User Manual
Page 21
... your dealer. 5-2 Printing speed When the paper is about to print at the normal speed until all the paper is used. Press the Push button, open and then close the printer cover. Rev. 1.07 - 21 - SRP-350 5. Appendix 5-1 Cleaning Printer Paper dust inside the printer may become slower while... printing. In this case clean the printer as follows. 5-1-1 Open the printer cover and remove the paper if exists. 5-1-2 Clean the print head with a cotton swab...
... your dealer. 5-2 Printing speed When the paper is about to print at the normal speed until all the paper is used. Press the Push button, open and then close the printer cover. Rev. 1.07 - 21 - SRP-350 5. Appendix 5-1 Cleaning Printer Paper dust inside the printer may become slower while... printing. In this case clean the printer as follows. 5-1-1 Open the printer cover and remove the paper if exists. 5-1-2 Clean the print head with a cotton swab...