Operation Manual
Page 3
... 25 APPENDIX A 29 CONNECTORS 29 Interface Connector 30 Drawer Connector 32 APPENDIX B 33 SPECIFICATION 33 APPENDIX C 34 REMOVING JAMMED PAPER 34 3 CHECKING THE CONTENTS OF THE PRINTER BOX 4 1-2. FUNCTIONS 5 CHAPTER 2. INSTALLING THE ROLL PAPER 8 3-1. ROLL PAPER INSTALLATION 9 CHAPTER 4. CONNECTING THE CABLES 6 2-1. HEXADECIMAL DUMPING 16 CHAPTER 6. CODE TABLE 18 CHAPTER 8. UNPACKING 4 1-1. CONNECTING INTERFACE CABLE AND...
... 25 APPENDIX A 29 CONNECTORS 29 Interface Connector 30 Drawer Connector 32 APPENDIX B 33 SPECIFICATION 33 APPENDIX C 34 REMOVING JAMMED PAPER 34 3 CHECKING THE CONTENTS OF THE PRINTER BOX 4 1-2. FUNCTIONS 5 CHAPTER 2. INSTALLING THE ROLL PAPER 8 3-1. ROLL PAPER INSTALLATION 9 CHAPTER 4. CONNECTING THE CABLES 6 2-1. HEXADECIMAL DUMPING 16 CHAPTER 6. CODE TABLE 18 CHAPTER 8. UNPACKING 4 1-1. CONNECTING INTERFACE CABLE AND...
Operation Manual
Page 5
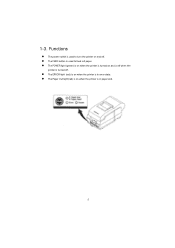
l The POWER light (green) is on when the printer is turned on and is off when the printer is in paper end. 5 1-3. l The ERROR light (red) is on and off . l The FEED button is used to feed roll paper. l The Paper Out light(red) is on when the printer is used to turn the printer on when the printer is turned off . Functions l The power switch is in error state.
l The POWER light (green) is on when the printer is turned on and is off when the printer is in paper end. 5 1-3. l The ERROR light (red) is on and off . l The FEED button is used to feed roll paper. l The Paper Out light(red) is on when the printer is used to turn the printer on when the printer is turned off . Functions l The power switch is in error state.
Operation Manual
Page 8
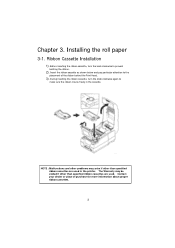
Before inserting the ribbon cassette, turn the knob clockwise again to make sure the ribbon moves freely in the printer. Insert the ribbon cassette as shown below and pay particular attention to prevent twisting the ribbon. 2). Chapter 3. During inserting the ribbon cassette, turn the knob ... other than specified ribbon cassettes are used in the cassette. Contact your dealer or place of the ribbon behind the Print Head. 3). Installing the roll paper 3-1.
Before inserting the ribbon cassette, turn the knob clockwise again to make sure the ribbon moves freely in the printer. Insert the ribbon cassette as shown below and pay particular attention to prevent twisting the ribbon. 2). Chapter 3. During inserting the ribbon cassette, turn the knob ... other than specified ribbon cassettes are used in the cassette. Contact your dealer or place of the ribbon behind the Print Head. 3). Installing the roll paper 3-1.
Operation Manual
Page 9
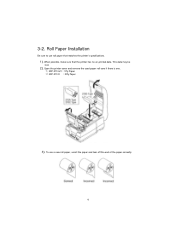
This data may be lost. 2). When possible, make sure that matches the printer's specifications. 1). Open the printer cover and remove the used paper roll core if there is one. To use roll paper that the printer has no un-printed data. 3-2. Roll Paper Installation Be sure to use a new roll paper, unroll the paper and tear off the end of the paper correctly. 9 " SRP-270 A/C : 1Ply Paper # SRP-270 D : 2Ply Paper 3).
This data may be lost. 2). When possible, make sure that matches the printer's specifications. 1). Open the printer cover and remove the used paper roll core if there is one. To use roll paper that the printer has no un-printed data. 3-2. Roll Paper Installation Be sure to use a new roll paper, unroll the paper and tear off the end of the paper correctly. 9 " SRP-270 A/C : 1Ply Paper # SRP-270 D : 2Ply Paper 3).
Operation Manual
Page 10
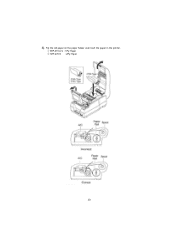
Put the roll paper on the paper holder and insert the paper in the printer. 4). " SRP-270 A/C : 1Ply Paper # SRP-270 D : 2Ply Paper 10
Put the roll paper on the paper holder and insert the paper in the printer. 4). " SRP-270 A/C : 1Ply Paper # SRP-270 D : 2Ply Paper 10
Operation Manual
Page 11
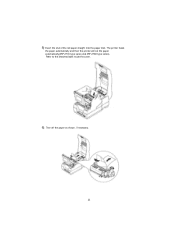
5) Insert the end of the roll paper straight into the paper inlet. The printer feeds the paper automatically and then the printer will cut the paper automatically(SRP-270C type series and SRP-270D type series). Refer to the attached label inside the cover. 6). Tear off the paper as shown, if necessary. 11
5) Insert the end of the roll paper straight into the paper inlet. The printer feeds the paper automatically and then the printer will cut the paper automatically(SRP-270C type series and SRP-270D type series). Refer to the attached label inside the cover. 6). Tear off the paper as shown, if necessary. 11
Operation Manual
Page 12
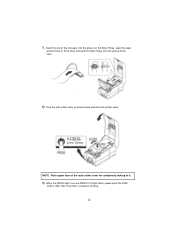
When the ERROR light is ready for completely locking of it two or three times and load the Roller-Pulley onto the groove of the Case. 8). Insert the end of the auto cutter cover for printing. 12 After that, the printer is on the Roller-Pulley, warp the paper around it . 9). NOTE : Push upper face of the roll paper into the groove on and PAPER OUT light blinks, please press the FEED button. Push the auto-cutter cover as shown below and close the printer cover. 7).
When the ERROR light is ready for completely locking of it two or three times and load the Roller-Pulley onto the groove of the Case. 8). Insert the end of the auto cutter cover for printing. 12 After that, the printer is on the Roller-Pulley, warp the paper around it . 9). NOTE : Push upper face of the roll paper into the groove on and PAPER OUT light blinks, please press the FEED button. Push the auto-cutter cover as shown below and close the printer cover. 7).
Operation Manual
Page 17
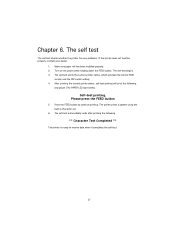
Make sure paper roll has been installed properly. 2. Please press the FEED button 5. Press the FEED button to receive data when it completes the self-test. 17 The self-test begins. 3. The printer prints a pattern using the built-in character set. 6. Turn on the power while ...the FEED button. Chapter 6. After printing the current printer status, self-test printing will print the following . ** Character Test Completed ** The printer is ready to continue printing. Self-test printing. The self-test prints the current printer status, which provides the control ROM version and ...
Make sure paper roll has been installed properly. 2. Please press the FEED button 5. Press the FEED button to receive data when it completes the self-test. 17 The self-test begins. 3. The printer prints a pattern using the built-in character set. 6. Turn on the power while ...the FEED button. Chapter 6. After printing the current printer status, self-test printing will print the following . ** Character Test Completed ** The printer is ready to continue printing. Self-test printing. The self-test prints the current printer status, which provides the control ROM version and ...
Operation Manual
Page 25
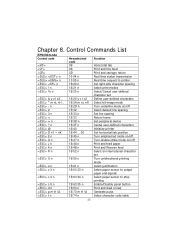
...t1 t2 1B 74 n Function Horizontal tab Print and line feed Print and carriage return Real-time status transmission Real-time request to printer Set right-side character spacing Select print modes Select/Cancel user-defined character set Define user-defined characters Select bit-image mode Turn ... Set line spacing Return home Set peripheral device Cancel user-defined characters Initialize printer Set horizontal tab position Turn emphasized mode on/off Turn double-strike mode on/off Print and feed paper Print and Reverse feed Select an international character set Turn unidirectional printing mode ...
...t1 t2 1B 74 n Function Horizontal tab Print and line feed Print and carriage return Real-time status transmission Real-time request to printer Set right-side character spacing Select print modes Select/Cancel user-defined character set Define user-defined characters Select bit-image mode Turn ... Set line spacing Return home Set peripheral device Cancel user-defined characters Initialize printer Set horizontal tab position Turn emphasized mode on/off Turn double-strike mode on/off Print and feed paper Print and Reverse feed Select an international character set Turn unidirectional printing mode ...
Operation Manual
Page 26
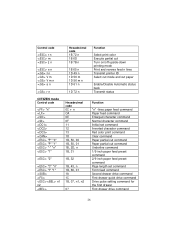
.../off upside-down printing mode Print and reverse feed n lines Transmit printer ID Select cut mode and cut paper Enable/Disable Automatic status back Transmit status Function "n" -lines paper feed command Paper feed command Enlarged character command Normal character command Initial set command Inverted... character command Red color print command Clear command Paper partial cut command Paper partial cut command Underline command 1/9 inch paper feed preset command 2/9 inch paper feed preset command Page length set command Form feed command Second drawer drive ...
.../off upside-down printing mode Print and reverse feed n lines Transmit printer ID Select cut mode and cut paper Enable/Disable Automatic status back Transmit status Function "n" -lines paper feed command Paper feed command Enlarged character command Normal character command Initial set command Inverted... character command Red color print command Clear command Paper partial cut command Paper partial cut command Underline command 1/9 inch paper feed preset command 2/9 inch paper feed preset command Page length set command Form feed command Second drawer drive ...
Operation Manual
Page 27
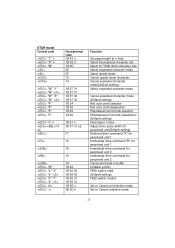
... mode deselection (Default setting) Feed paper n lines Adjust drive pulse width for peripheral unit(Default setting) Deferred drive command "A" for peripheral unit 1 Immediate drive command "B" for peripheral unit 1 Immediate drive command for peripheral unit 2 Immediate drive command for peripheral unit 2 Cancel print data in buffer Initialize printer FEED switch valid (Default setting...
... mode deselection (Default setting) Feed paper n lines Adjust drive pulse width for peripheral unit(Default setting) Deferred drive command "A" for peripheral unit 1 Immediate drive command "B" for peripheral unit 1 Immediate drive command for peripheral unit 2 Immediate drive command for peripheral unit 2 Cancel print data in buffer Initialize printer FEED switch valid (Default setting...

Operation Manual
Page 33
... Operation humidity Storage temperature Storage humidity Serial impact dot matrix 9 wires Bi-directional Approx. 4.6 LPS 40 (9*7), 33(9*9) Cartridge type (ERC-38 Black/Red) Black & Red Approx. Black : 1.5 Million characters Red : 0.75 Million characters Roll paper W76mm ¡ ¾0.5mm (2.99" ... Weight(printer only) / Weight(with box & accessories ) : SRP-270A TYPE : 2.2 Kg (4.9 lbs) / 3.2 Kg (7.1 lbs) SRP-270C TYPE : 2.5 Kg (5.5 lbs) / 3.5 Kg (7.7 lbs) SRP-270D TYPE : 2.6 Kg (5.7 lbs) / 3.6 Kg (7.9 lbs) DC 24 V, 1.0 A Standby : 8 W, Operation : 24 W FCC class A, CE UL/CSA, TUV Printer MCBF ...
... Operation humidity Storage temperature Storage humidity Serial impact dot matrix 9 wires Bi-directional Approx. 4.6 LPS 40 (9*7), 33(9*9) Cartridge type (ERC-38 Black/Red) Black & Red Approx. Black : 1.5 Million characters Red : 0.75 Million characters Roll paper W76mm ¡ ¾0.5mm (2.99" ... Weight(printer only) / Weight(with box & accessories ) : SRP-270A TYPE : 2.2 Kg (4.9 lbs) / 3.2 Kg (7.1 lbs) SRP-270C TYPE : 2.5 Kg (5.5 lbs) / 3.5 Kg (7.7 lbs) SRP-270D TYPE : 2.6 Kg (5.7 lbs) / 3.6 Kg (7.9 lbs) DC 24 V, 1.0 A Standby : 8 W, Operation : 24 W FCC class A, CE UL/CSA, TUV Printer MCBF ...

Operation Manual
Page 34
Appendix C Removing Jammed Paper 1) Open the printer cover 2) Raise the auto cutter unit by lifting the knob lock. 3) Remove the ribbon cassette. 4) Loosen the manual screw. 5) Remove the head cover. CAUTION : The printer head becomes very hot during printing. Allow it to be cool before you reach into the printer. 34
Appendix C Removing Jammed Paper 1) Open the printer cover 2) Raise the auto cutter unit by lifting the knob lock. 3) Remove the ribbon cassette. 4) Loosen the manual screw. 5) Remove the head cover. CAUTION : The printer head becomes very hot during printing. Allow it to be cool before you reach into the printer. 34
Operation Manual
Page 35
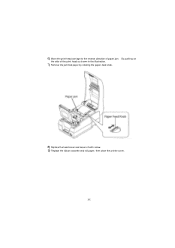
By pushing on 8) Replace the head cover and secure it with screw. 9) Replace the ribbon cassette and roll paper, then close the printer cover. 35 6) Move the print head carriage to the reverse direction of the print head as shown in the illustration. 7) Remove the jammed paper by rotating the paper-feed knob. the side of paper jam.
By pushing on 8) Replace the head cover and secure it with screw. 9) Replace the ribbon cassette and roll paper, then close the printer cover. 35 6) Move the print head carriage to the reverse direction of the print head as shown in the illustration. 7) Remove the jammed paper by rotating the paper-feed knob. the side of paper jam.
Operation Manual
Page 36
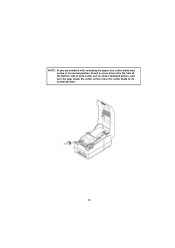
Insert a screw driver into the hole at the bottom side of auto cutter unit as shown followed picture, and turn the gear inside the cutter unit to move the cutter blade to its normal position. NOTE : If you are troubled with reloading the paper, the cutter blade may not be in its normal position. 36
Insert a screw driver into the hole at the bottom side of auto cutter unit as shown followed picture, and turn the gear inside the cutter unit to move the cutter blade to its normal position. NOTE : If you are troubled with reloading the paper, the cutter blade may not be in its normal position. 36