Operation Manual
Page 3
... A 29 CONNECTORS 29 Interface Connector 30 Drawer Connector 32 APPENDIX B 33 SPECIFICATION 33 APPENDIX C 34 REMOVING JAMMED PAPER 34 3 CONNECTING THE AC ADAPTER TO THE PRINTER 6 2-2. ROLL PAPER INSTALLATION 9 CHAPTER 4. HEXADECIMAL DUMPING 16 CHAPTER 6. FUNCTIONS 5 CHAPTER 2. INSTALLING THE ROLL PAPER 8 3-1. CODE TABLE 18 CHAPTER 8. CONNECTING THE CABLES 6 2-1. SETTING THE DIP SWITCHES...
... A 29 CONNECTORS 29 Interface Connector 30 Drawer Connector 32 APPENDIX B 33 SPECIFICATION 33 APPENDIX C 34 REMOVING JAMMED PAPER 34 3 CONNECTING THE AC ADAPTER TO THE PRINTER 6 2-2. ROLL PAPER INSTALLATION 9 CHAPTER 4. HEXADECIMAL DUMPING 16 CHAPTER 6. FUNCTIONS 5 CHAPTER 2. INSTALLING THE ROLL PAPER 8 3-1. CODE TABLE 18 CHAPTER 8. CONNECTING THE CABLES 6 2-1. SETTING THE DIP SWITCHES...
Operation Manual
Page 8
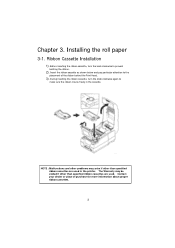
... the Print Head. 3). Ribbon Cassette Installation 1). NOTE : Malfunctions and other problems may be voided if other than specified ribbon cassettes are used . Chapter 3. Before inserting the ribbon cassette, turn the knob clockwise again to prevent twisting the ribbon. 2). During inserting the ribbon cassette, turn the knob clockwise to make sure the ribbon moves freely in the printer.
... the Print Head. 3). Ribbon Cassette Installation 1). NOTE : Malfunctions and other problems may be voided if other than specified ribbon cassettes are used . Chapter 3. Before inserting the ribbon cassette, turn the knob clockwise again to prevent twisting the ribbon. 2). During inserting the ribbon cassette, turn the knob clockwise to make sure the ribbon moves freely in the printer.

Operation Manual
Page 33
... per line Ribbon type Color Ribbon life Paper Adapter Auto Cutter ETC Paper type Paper width Roll diameter Thickness Overall dimensions Weight Types Cutter type Cutting width Cutting thickness Data buffer Overall dimension Weight Rating Power consumption EMI Safety standards Reliability Operation temperature Operation humidity Storage temperature Storage humidity Serial impact dot matrix 9 wires...
... per line Ribbon type Color Ribbon life Paper Adapter Auto Cutter ETC Paper type Paper width Roll diameter Thickness Overall dimensions Weight Types Cutter type Cutting width Cutting thickness Data buffer Overall dimension Weight Rating Power consumption EMI Safety standards Reliability Operation temperature Operation humidity Storage temperature Storage humidity Serial impact dot matrix 9 wires...

Operation Manual
Page 34
Appendix C Removing Jammed Paper 1) Open the printer cover 2) Raise the auto cutter unit by lifting the knob lock. 3) Remove the ribbon cassette. 4) Loosen the manual screw. 5) Remove the head cover. CAUTION : The printer head becomes very hot during printing. Allow it to be cool before you reach into the printer. 34
Appendix C Removing Jammed Paper 1) Open the printer cover 2) Raise the auto cutter unit by lifting the knob lock. 3) Remove the ribbon cassette. 4) Loosen the manual screw. 5) Remove the head cover. CAUTION : The printer head becomes very hot during printing. Allow it to be cool before you reach into the printer. 34
Operation Manual
Page 35
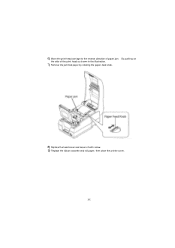
6) Move the print head carriage to the reverse direction of the print head as shown in the illustration. 7) Remove the jammed paper by rotating the paper-feed knob. the side of paper jam. By pushing on 8) Replace the head cover and secure it with screw. 9) Replace the ribbon cassette and roll paper, then close the printer cover. 35
6) Move the print head carriage to the reverse direction of the print head as shown in the illustration. 7) Remove the jammed paper by rotating the paper-feed knob. the side of paper jam. By pushing on 8) Replace the head cover and secure it with screw. 9) Replace the ribbon cassette and roll paper, then close the printer cover. 35