
User Manual (ENGLISH)
Page 6
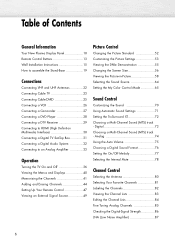
... 73 Choosing a Multi-Channel Sound (MTS) track - Table of Contents General Information Your New Plasma Display Panel 10 Remote Control Buttons 13 Wall Installation Instructions 15 How to assemble the Stand-Base 19 Connections Connecting VHF and UHF Antennas 22 Connecting ...36 Viewing the Menus and Displays 40 Memorizing the Channels 41 Adding and Erasing Channels 44 Setting Up Your Remote Control 47 Viewing an External Signal Source 49 Picture Control Changing the Picture Standard 52 Customizing the Picture Settings 53 Viewing the DNIe Demonstration 55 Changing the Screen Size...
... 73 Choosing a Multi-Channel Sound (MTS) track - Table of Contents General Information Your New Plasma Display Panel 10 Remote Control Buttons 13 Wall Installation Instructions 15 How to assemble the Stand-Base 19 Connections Connecting VHF and UHF Antennas 22 Connecting ...36 Viewing the Menus and Displays 40 Memorizing the Channels 41 Adding and Erasing Channels 44 Setting Up Your Remote Control 47 Viewing an External Signal Source 49 Picture Control Changing the Picture Standard 52 Customizing the Picture Settings 53 Viewing the DNIe Demonstration 55 Changing the Screen Size...
User Manual (ENGLISH)
Page 9
PLASMA DISPLAY PANEL General Information Your New Plasma Display Panel 10 Remote Control Buttons 13 Wall Installation Instructions 15 How to assemble the Stand-Base 19
PLASMA DISPLAY PANEL General Information Your New Plasma Display Panel 10 Remote Control Buttons 13 Wall Installation Instructions 15 How to assemble the Stand-Base 19
User Manual (ENGLISH)
Page 10
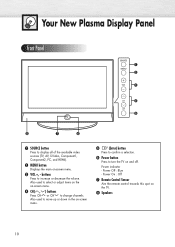
... Press to confirm a selection. Ø Power button Press to turn the TV on -screen menu. ˇ VOL +, - Power indicator - Power On : Off ∏ Remote Control Sensor Aim the remote control towards this spot on -screen menu. ¨ CH( , ) buttons Press CH or CH to change channels. Your New Plasma Display Panel Front Panel Œ...
... Press to confirm a selection. Ø Power button Press to turn the TV on -screen menu. ˇ VOL +, - Power indicator - Power On : Off ∏ Remote Control Sensor Aim the remote control towards this spot on -screen menu. ¨ CH( , ) buttons Press CH or CH to change channels. Your New Plasma Display Panel Front Panel Œ...
User Manual (ENGLISH)
Page 11
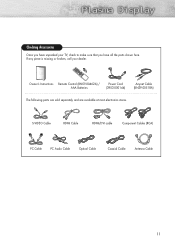
S-VIDEO Cable HDMI Cable HDMI/DVI cable Component Cables (RCA) PC Cable PC Audio Cable Optical Cable Coaxial Cable Antenna Cable 11 Owner's Instructions Remote Control (BN59-00462A) / AAA Batteries Power Cord (3903-000144) Anynet Cable (BN39-00518A) The following parts are sold separately and are available at most electronics stores. Checking Accessories Once you have unpacked your dealer. If any piece is missing or broken, call your TV, check to make sure that you have all the parts shown here.
S-VIDEO Cable HDMI Cable HDMI/DVI cable Component Cables (RCA) PC Cable PC Audio Cable Optical Cable Coaxial Cable Antenna Cable 11 Owner's Instructions Remote Control (BN59-00462A) / AAA Batteries Power Cord (3903-000144) Anynet Cable (BN39-00518A) The following parts are sold separately and are available at most electronics stores. Checking Accessories Once you have unpacked your dealer. If any piece is missing or broken, call your TV, check to make sure that you have all the parts shown here.

User Manual (ENGLISH)
Page 13
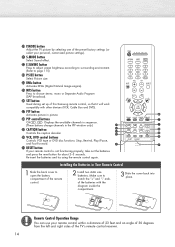
Remote Control Buttons Remote Control Œ POWER button Turns the TV on and off. ´ GUIDE button Press to display the ... functions and sets up Anynet devices. ' MENU button Displays the main on the TV screen. ¯ EXIT button Press to be controlled by the same station. For example, to select channel "54-3", press "54", then press "-" and "3". Ø MUTE button ... cursor in the menu. 13 button Press to select additional channels (digital and analog) being broadcast by the Samsung remote control (i.e., TV, STB, VCR, CABLE, or DVD). Ú PRE-CH button Tunes to the previous channel. ...
Remote Control Buttons Remote Control Œ POWER button Turns the TV on and off. ´ GUIDE button Press to display the ... functions and sets up Anynet devices. ' MENU button Displays the main on the TV screen. ¯ EXIT button Press to be controlled by the same station. For example, to select channel "54-3", press "54", then press "-" and "3". Ø MUTE button ... cursor in the menu. 13 button Press to select additional channels (digital and analog) being broadcast by the Samsung remote control (i.e., TV, STB, VCR, CABLE, or DVD). Ú PRE-CH button Tunes to the previous channel. ...
User Manual (ENGLISH)
Page 14
... choose stereo, mono or Separate Audio Program (SAP broadcast). - Remote Control Operation Range You can use your remote control within a distance of 23 feet and an angle of 30 degrees from the left and right sides of this Samsung remote control, so that it will work compatibly with the diagram inside the ...compartment. 3 Slide the cover back into place. SET button Used during set up of the TV's remote control receiver. 14 Make sure to match the "+" and ...
... choose stereo, mono or Separate Audio Program (SAP broadcast). - Remote Control Operation Range You can use your remote control within a distance of 23 feet and an angle of 30 degrees from the left and right sides of this Samsung remote control, so that it will work compatibly with the diagram inside the ...compartment. 3 Slide the cover back into place. SET button Used during set up of the TV's remote control receiver. 14 Make sure to match the "+" and ...
User Manual (ENGLISH)
Page 35
PLASMA DISPLAY PANEL Operation Turning the TV On and Off 36 Viewing the Menus and Displays 40 Memorizing the Channels 41 Adding and Erasing Channels 44 Setting Up Your Remote Control 47 Viewing an External Signal Source 49
PLASMA DISPLAY PANEL Operation Turning the TV On and Off 36 Viewing the Menus and Displays 40 Memorizing the Channels 41 Adding and Erasing Channels 44 Setting Up Your Remote Control 47 Viewing an External Signal Source 49
User Manual (ENGLISH)
Page 36
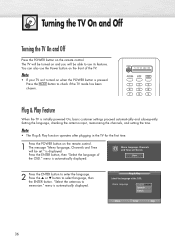
...the TV. Note • The Plug & Play function operates after plugging in the TV for the first time. 1 Press the POWER button on the remote control. The message "Menu language, Channels and Time will be set ." is pressed: Press the MODE button to enter the language. You can also use... & Play Select the language of the OSD." Turning the TV On and Off Turning the TV On and Off Press the POWER button on the remote control. menu is automatically displayed. "Select the antennas to select language, then the ENTER button. Start 2 Press the ENTER button to check if the...
...the TV. Note • The Plug & Play function operates after plugging in the TV for the first time. 1 Press the POWER button on the remote control. The message "Menu language, Channels and Time will be set ." is pressed: Press the MODE button to enter the language. You can also use... & Play Select the language of the OSD." Turning the TV On and Off Turning the TV On and Off Press the POWER button on the remote control. menu is automatically displayed. "Select the antennas to select language, then the ENTER button. Start 2 Press the ENTER button to check if the...
User Manual (ENGLISH)
Page 40
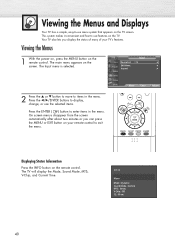
...items in the menu. On screen menus disappear from the screen automatically after about two minutes or you display the status of many of your remote control to exit the menu. Your TV also lets you can press the MENU or EXIT button on your TV's features. The Input menu is... selected. Move Enter Return Displaying Status Information Press the INFO button on the remote control. Viewing the Menus 1 With the power on, press the MENU button on the remote control. AIR 28 Mono Mode : Dynamic Sound Mode : Custom MTS : Stereo V-Chip : Off 12 : 00 am 40...
...items in the menu. On screen menus disappear from the screen automatically after about two minutes or you display the status of many of your remote control to exit the menu. Your TV also lets you can press the MENU or EXIT button on your TV's features. The Input menu is... selected. Move Enter Return Displaying Status Information Press the INFO button on the remote control. Viewing the Menus 1 With the power on, press the MENU button on the remote control. AIR 28 Mono Mode : Dynamic Sound Mode : Custom MTS : Stereo V-Chip : Off 12 : 00 am 40...
User Manual (ENGLISH)
Page 43
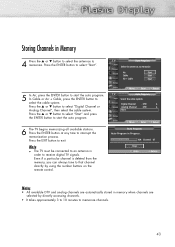
... Return Notes • All available DTV and analog channels are automatically stored in memory when channels are selected by using the number buttons on the remote control. Press the ▲ or ▼ button to select "Start" and press the ENTER button to memorize channels. 43 Move Enter Return TV Auto Program Select...
... Return Notes • All available DTV and analog channels are automatically stored in memory when channels are selected by using the number buttons on the remote control. Press the ▲ or ▼ button to select "Start" and press the ENTER button to memorize channels. 43 Move Enter Return TV Auto Program Select...
User Manual (ENGLISH)
Page 47
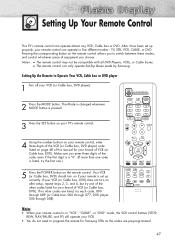
After it has been set up properly, your remote control can operate in "VCR", "CABLE", or "DVD" mode, the VCR control buttons (STOP, REW, PLAY/PAUSE, and FF) still operate your VCR. • You do not need to program the remote for Samsung STBs as the codes are listed, try one .) 5 Press ... 008). If your brand of VCR (or Cable box, DVD). Setting Up Your Remote Control This TV's remote control can only operate Set-Top Boxes made by Samsung. Your VCR (or Cable box, DVD) should turn on the remote control allows you to Operate Your VCR, Cable box or DVD player 1 Turn off your...
After it has been set up properly, your remote control can operate in "VCR", "CABLE", or "DVD" mode, the VCR control buttons (STOP, REW, PLAY/PAUSE, and FF) still operate your VCR. • You do not need to program the remote for Samsung STBs as the codes are listed, try one .) 5 Press ... 008). If your brand of VCR (or Cable box, DVD). Setting Up Your Remote Control This TV's remote control can only operate Set-Top Boxes made by Samsung. Your VCR (or Cable box, DVD) should turn on the remote control allows you to Operate Your VCR, Cable box or DVD player 1 Turn off your...
User Manual (ENGLISH)
Page 49
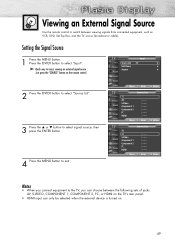
...➤ Quick way to access viewing an external signal source : Just press the "SOURCE" button on . 49 Viewing an External Signal Source Use the remote control to switch between the following sets of jacks: AV, S-VIDEO, COMPONENT 1, COMPONENT 2, PC, or HDMI on the TV's rear panel. • HDMI... input can only be selected when the external device is turned on the remote control. Setting the Signal Source 1 Press the MENU button. Move Enter Return TV Source List TV AV S-Video Component 1 Component 2 PC HDMI Move Enter...
...➤ Quick way to access viewing an external signal source : Just press the "SOURCE" button on . 49 Viewing an External Signal Source Use the remote control to switch between the following sets of jacks: AV, S-VIDEO, COMPONENT 1, COMPONENT 2, PC, or HDMI on the TV's rear panel. • HDMI... input can only be selected when the external device is turned on the remote control. Setting the Signal Source 1 Press the MENU button. Move Enter Return TV Source List TV AV S-Video Component 1 Component 2 PC HDMI Move Enter...
User Manual (ENGLISH)
Page 53
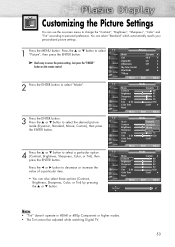
.... You can select "Standard" which automatically recalls your personalized picture settings. 1 Press the MENU button. TV Picture Mode Size Digital NR DNIe Demo My Color Control Film Mode † More : Dynamic √ : 16:9 √ : On √ : Off √ √ : Off √ Move Enter Return TV .... 53 Press the œ or √ button to personal preference. Customizing the Picture Settings You can use the on the remote control. 2 Press the ENTER button to select a particular option (Contrast, Brightness, Sharpness, Color, or Tint), then press the ENTER button.
.... You can select "Standard" which automatically recalls your personalized picture settings. 1 Press the MENU button. TV Picture Mode Size Digital NR DNIe Demo My Color Control Film Mode † More : Dynamic √ : 16:9 √ : On √ : Off √ √ : Off √ Move Enter Return TV .... 53 Press the œ or √ button to personal preference. Customizing the Picture Settings You can use the on the remote control. 2 Press the ENTER button to select a particular option (Contrast, Brightness, Sharpness, Color, or Tint), then press the ENTER button.

User Manual (ENGLISH)
Page 55
... button to select "Picture", then press the ENTER button. ➤ Quick way to select DNIe: Simply press the "DNIe" button under the cover of the remote control. 2 Press the ▲ or ▼ button to select "DNIe Demo", then press the ENTER button. 3 Press the ▲ or ▼ button to... provide a high visual quality. TV Picture Mode Size Digital NR DNIe Demo My Color Control Film Mode † More : Dynamic √ : 16:9 √ : On √ : Off √ √ : Off √ Move Enter Return TV Picture...
... button to select "Picture", then press the ENTER button. ➤ Quick way to select DNIe: Simply press the "DNIe" button under the cover of the remote control. 2 Press the ▲ or ▼ button to select "DNIe Demo", then press the ENTER button. 3 Press the ▲ or ▼ button to... provide a high visual quality. TV Picture Mode Size Digital NR DNIe Demo My Color Control Film Mode † More : Dynamic √ : 16:9 √ : On √ : Off √ √ : Off √ Move Enter Return TV Picture...

User Manual (ENGLISH)
Page 56
...Use this mode for the wide aspect ratio of a panoramic picture. • Zoom1 : Magnifies the size of the picture on the type of the remote control. 2 Press the ▲ or ▼ button to select "Size", then press the ENTER button. 3 Press the œ or √ button...Dynamic √ : 16:9 √ : On √ : Off √ √ : Off √ Move Enter Return TV Picture Mode Size Digital NR DNIe Demo My Color Control Film Mode † More : Dynamic √ : 16:9 √ : On √ : Off √ √ : Off √ Move Enter Return TV Size 16:9 ...
...Use this mode for the wide aspect ratio of a panoramic picture. • Zoom1 : Magnifies the size of the picture on the type of the remote control. 2 Press the ▲ or ▼ button to select "Size", then press the ENTER button. 3 Press the œ or √ button...Dynamic √ : 16:9 √ : On √ : Off √ √ : Off √ Move Enter Return TV Picture Mode Size Digital NR DNIe Demo My Color Control Film Mode † More : Dynamic √ : 16:9 √ : On √ : Off √ √ : Off √ Move Enter Return TV Size 16:9 ...
User Manual (ENGLISH)
Page 57
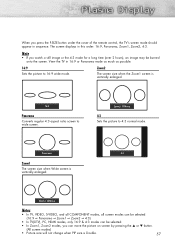
... for a long time (over 2 hours), an image may be selected. • In Zoom1, Zoom2 modes, you press the P.SIZE button under the cover of the remote control, the TV's screen mode should appear in sequence. When you can move the picture on screen by pressing the ▲ or ▼ button. (All screen...
... for a long time (over 2 hours), an image may be selected. • In Zoom1, Zoom2 modes, you press the P.SIZE button under the cover of the remote control, the TV's screen mode should appear in sequence. When you can move the picture on screen by pressing the ▲ or ▼ button. (All screen...
User Manual (ENGLISH)
Page 58
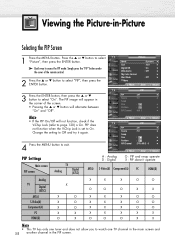
... : AIR 3 √ Note • If the PIP On/Off will alternate between "On" and "Off". The PIP image will appear in the corner of the remote control. Change the setting to Off and try it again. 4 Press the MENU button to page 120) is set to On. Move Enter Return TV PIP... and does not allow you to select "On". Viewing the Picture-in the PIP screen. Digital NR : On √ DNIe Demo : Off √ My Color Control √ Film Mode : Off √ 2 Press the ▲ or ▼ button to select "PIP", then press the ENTER button. † More Move Enter Return TV...
... : AIR 3 √ Note • If the PIP On/Off will alternate between "On" and "Off". The PIP image will appear in the corner of the remote control. Change the setting to Off and try it again. 4 Press the MENU button to page 120) is set to On. Move Enter Return TV PIP... and does not allow you to select "On". Viewing the Picture-in the PIP screen. Digital NR : On √ DNIe Demo : Off √ My Color Control √ Film Mode : Off √ 2 Press the ▲ or ▼ button to select "PIP", then press the ENTER button. † More Move Enter Return TV...
User Manual (ENGLISH)
Page 63
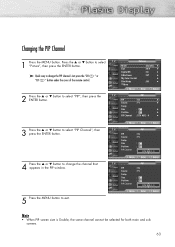
...; or ▼ button to select "PIP", then press the ENTER button. Changing the PIP Channel 1 Press the MENU button. DNIe Demo : Off √ My Color Control √ Film Mode : Off √ † More Move Enter Return 2 Press the ▲ or ▼ button to select "Picture", then press the ENTER button. TV... in the PIP window. 5 Press the MENU button to change the PIP channel: Just press the "CH " or "CH " button under the cover of the remote control.
...; or ▼ button to select "PIP", then press the ENTER button. Changing the PIP Channel 1 Press the MENU button. DNIe Demo : Off √ My Color Control √ Film Mode : Off √ † More Move Enter Return 2 Press the ▲ or ▼ button to select "Picture", then press the ENTER button. TV... in the PIP window. 5 Press the MENU button to change the PIP channel: Just press the "CH " or "CH " button under the cover of the remote control.

User Manual (ENGLISH)
Page 65
... to exit the menu. √ √ Pink Move Easy Control White Standard Enter Custom √ Return Original Red Red Move Easy Control Green Blue Enter Yellow √ Return Note • Pressing the ENTER button on the remote control for 3 seconds when there is no OSD on the screen. ...Setting the My Color Control Mode My Color Control mode allows users to adjust colors according to select the setting among the various picture ...
... to exit the menu. √ √ Pink Move Easy Control White Standard Enter Custom √ Return Original Red Red Move Easy Control Green Blue Enter Yellow √ Return Note • Pressing the ENTER button on the remote control for 3 seconds when there is no OSD on the screen. ...Setting the My Color Control Mode My Color Control mode allows users to adjust colors according to select the setting among the various picture ...

User Manual (ENGLISH)
Page 71
... ▼ button to select "Sound", then press the ENTER button. ➤ Quick way to access the picture setting: Just press the "S.MODE" button on the remote control. 2 Press the ENTER button to select "Mode". 3 Press the ▲ or ▼ button to select "Standard", "Music", "Movie", "Speech", or "Custom" sound setting, then press...
... ▼ button to select "Sound", then press the ENTER button. ➤ Quick way to access the picture setting: Just press the "S.MODE" button on the remote control. 2 Press the ENTER button to select "Mode". 3 Press the ▲ or ▼ button to select "Standard", "Music", "Movie", "Speech", or "Custom" sound setting, then press...


