

User Manual (user Manual) (ver.1.0) (English)
Page 5
... dust, chemical substances, high or low temperatures, high humidity, or where it thoroughly. Keep batteries out of the reach of the lamp nor project the picture onto eyes. When cleaning the product, disconnect the power cord and wipe the product using the product for an extended period of time, disconnect the power plug. When not using a soft dry cloth. Do not install the product in...
... dust, chemical substances, high or low temperatures, high humidity, or where it thoroughly. Keep batteries out of the reach of the lamp nor project the picture onto eyes. When cleaning the product, disconnect the power cord and wipe the product using the product for an extended period of time, disconnect the power plug. When not using a soft dry cloth. Do not install the product in...
User Manual (user Manual) (ver.1.0) (English)
Page 8
... and adjustment. Connections to minimize fan noise and beam leakage. Quality picture tuning focused on video production. The airflow and fan installation structure are optimized to peripheral devices have been improved by adopting various input terminals such as an HDMI (HDCP supported) terminal, a Component terminal, and a MONITOR OUT terminal. Various Input Ports - | Product Features | Product Views | Remote Control | Product Specifications | Optical engine with advanced DLP technology - 1024 x 768 panel...
... and adjustment. Connections to minimize fan noise and beam leakage. Quality picture tuning focused on video production. The airflow and fan installation structure are optimized to peripheral devices have been improved by adopting various input terminals such as an HDMI (HDCP supported) terminal, a Component terminal, and a MONITOR OUT terminal. Various Input Ports - | Product Features | Product Views | Remote Control | Product Specifications | Optical engine with advanced DLP technology - 1024 x 768 panel...

User Manual (user Manual) (ver.1.0) (English)
Page 9
LAMP (Blue LED) - POWER( ) Button Used to or select an item within a menu. Remote Control Signal Receiver 9. Adjustable Feet You can adjust the screen position by moving the 10.Select and Move Button( / ) adjustable feet up and down. SOURCE Button Used for Focus Adjustment. Used to use them. STAND BY (Blue LED) - Focus Ring 8. Touch them lightly with your fingers to select input signals from the external sources. 3. Zoom Knob Used to the LED Indications. 6. Use this button to enter or exit a menu or to move to...
LAMP (Blue LED) - POWER( ) Button Used to or select an item within a menu. Remote Control Signal Receiver 9. Adjustable Feet You can adjust the screen position by moving the 10.Select and Move Button( / ) adjustable feet up and down. SOURCE Button Used for Focus Adjustment. Used to use them. STAND BY (Blue LED) - Focus Ring 8. Touch them lightly with your fingers to select input signals from the external sources. 3. Zoom Knob Used to the LED Indications. 6. Use this button to enter or exit a menu or to move to...

User Manual (user Manual) (ver.1.0) (English)
Page 10
.... Refer to Action 4. ◐ ◐ ◐ A problem has occurred with the operation of the lamp has expired. Power Cable Sold separately D-Sub Cable Remote Control/ 1 Batteries (Not available in all locations) Cleaning Cloth LED Indications ●:Light is On ◐:Light is Blinking ○:Light is Off STAND LAMP BY TEMP Information ● ○ If you press the POWER button on the remote control or projector, the screen ○ appears within 30 seconds. ●...
.... Refer to Action 4. ◐ ◐ ◐ A problem has occurred with the operation of the lamp has expired. Power Cable Sold separately D-Sub Cable Remote Control/ 1 Batteries (Not available in all locations) Cleaning Cloth LED Indications ●:Light is On ◐:Light is Blinking ○:Light is Off STAND LAMP BY TEMP Information ● ○ If you press the POWER button on the remote control or projector, the screen ○ appears within 30 seconds. ●...
User Manual (user Manual) (ver.1.0) (English)
Page 11
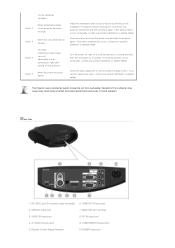
... is part of the projector becomes too high. RS-232C port (For service input terminals) 6. HDMI/DVI IN Input port 2. Cool down your product distributor or service center. If the same symptom still occurs, contact your product distributor or service center. Remote Control Signal Receiver 10.POWER Input port When temperature inside of normal operation. Disconnect and reconnect the power cord and start the projector again. This Projector uses a cooling fan system to operate. PC IN Input port 4. Turn the power...
... is part of the projector becomes too high. RS-232C port (For service input terminals) 6. HDMI/DVI IN Input port 2. Cool down your product distributor or service center. If the same symptom still occurs, contact your product distributor or service center. Remote Control Signal Receiver 10.POWER Input port When temperature inside of normal operation. Disconnect and reconnect the power cord and start the projector again. This Projector uses a cooling fan system to operate. PC IN Input port 4. Turn the power...

User Manual (user Manual) (ver.1.0) (English)
Page 12
...) Used to or select each menu item. 5. Move Used to move to turn off the projector. V.KEYSTONE(VERTICAL KEYSTONE) (+/-) Use this when video scenes are distorted or tilted. 6. MENU ( ) Button 4. HDMI Button 15. | Product Features | Product Views | Remote Control | Product Specifications | 1. ON ( ) Button 2. VIDEO Button 7. S-VIDEO Button 8. OFF ( ) Button 11. P.MODE Button 17. PC Button 1. MENU ( ) Used to VIDEO Mode. 7. VIDEO Used to switch to display Menu Screen. 4. P.SIZE Used to turn on the projector. 2. OFF ( ) Used to adjust the size of picture screen...
...) Used to or select each menu item. 5. Move Used to move to turn off the projector. V.KEYSTONE(VERTICAL KEYSTONE) (+/-) Use this when video scenes are distorted or tilted. 6. MENU ( ) Button 4. HDMI Button 15. | Product Features | Product Views | Remote Control | Product Specifications | 1. ON ( ) Button 2. VIDEO Button 7. S-VIDEO Button 8. OFF ( ) Button 11. P.MODE Button 17. PC Button 1. MENU ( ) Used to VIDEO Mode. 7. VIDEO Used to switch to display Menu Screen. 4. P.SIZE Used to turn on the projector. 2. OFF ( ) Used to adjust the size of picture screen...

User Manual (user Manual) (ver.1.0) (English)
Page 13
... to switch to check source signals, picture setup, PC screen adjustment and lamp lifespan. INSTALL Used to see still images. 14. Specifications Model Size Panel Resolution Manufacturer Type Lamp Life Time Manufacturer Color Resolution Optimum resolution Maximum resolution Input video signal Input synchronization signal Maximum Pixel Clock Diagonal screen size Projection Range Power Power Consumption Voltage Noise Dimensions Weight Key Features Brightness Contrast SP-D300B 16.5 mm / 0.65 inch XGA (1024 x 768) Texas Instrument 220W UHP (Theater mode : 172W) 3,000 Hours...
... to switch to check source signals, picture setup, PC screen adjustment and lamp lifespan. INSTALL Used to see still images. 14. Specifications Model Size Panel Resolution Manufacturer Type Lamp Life Time Manufacturer Color Resolution Optimum resolution Maximum resolution Input video signal Input synchronization signal Maximum Pixel Clock Diagonal screen size Projection Range Power Power Consumption Voltage Noise Dimensions Weight Key Features Brightness Contrast SP-D300B 16.5 mm / 0.65 inch XGA (1024 x 768) Texas Instrument 220W UHP (Theater mode : 172W) 3,000 Hours...

User Manual (user Manual) (ver.1.0) (English)
Page 14
... other visual display elements, the DMD Panel may exist, however it does not affect the picture quality nor the lifespan of the product. Sep. Sep. Sep. Sep. Sep. Sep. Sep. Sep. Sep. Sep. Sep. Sep. Sep. Sep. Sep. Sep. Sep. Sep. Sep. It may be used in DLP Projectors consists of bad pixels set by our standards. Supported Display Modes Resolution Input Source (HxV...
... other visual display elements, the DMD Panel may exist, however it does not affect the picture quality nor the lifespan of the product. Sep. Sep. Sep. Sep. Sep. Sep. Sep. Sep. Sep. Sep. Sep. Sep. Sep. Sep. Sep. Sep. Sep. Sep. Sep. It may be used in DLP Projectors consists of bad pixels set by our standards. Supported Display Modes Resolution Input Source (HxV...

User Manual (user Manual) (ver.1.0) (English)
Page 17
... screen. You can install the projector in bright surroundings, use curtains. If the screen is too bright, the picture on the screen may not be displayed clearly. Select Menu > Setup > Install > Rear-Floor To view the picture when installing the projector in bright surroundings. | Basic Settings | Connecting the Power | Connecting to the screen. Place the projector so that the beam from the projector is perpendicular to video equipment | Installing the Projector Install the projector so that the lens...
... screen. You can install the projector in bright surroundings, use curtains. If the screen is too bright, the picture on the screen may not be displayed clearly. Select Menu > Setup > Install > Rear-Floor To view the picture when installing the projector in bright surroundings. | Basic Settings | Connecting the Power | Connecting to the screen. Place the projector so that the beam from the projector is perpendicular to video equipment | Installing the Projector Install the projector so that the lens...

User Manual (user Manual) (ver.1.0) (English)
Page 19
... set the by this projector. Set up the PC Environment - Screen Z: Throw Distance Y': Distance from Lens Center to change setup. 3. Check the following items before connecting your PC to your projector. 1. tab will appear. 4. Click on [Monitor] tab and set the by referring to described in the display mode table supported by referring to described in the Supported Resolution/Size Modes table. A. Press the [Advanced] button. This projector is designed to show images...
... set the by this projector. Set up the PC Environment - Screen Z: Throw Distance Y': Distance from Lens Center to change setup. 3. Check the following items before connecting your PC to your projector. 1. tab will appear. 4. Click on [Monitor] tab and set the by referring to described in the display mode table supported by referring to described in the Supported Resolution/Size Modes table. A. Press the [Advanced] button. This projector is designed to show images...
User Manual (user Manual) (ver.1.0) (English)
Page 20
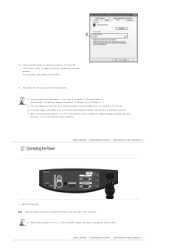
When used outside of the U.S., HAR cord with fittings of the projector. Shut down the PC and connect to video equipment | If not, there may be signal problems. | Basic Settings | Connecting the Power | Connecting to display settings supported by this projector. The computer may differ from the monitor depending on monitor manufacture or Windows versions. When connecting the projector to a PC, check that PC setup complies to video equipment | 1. Process might vary depending...
When used outside of the U.S., HAR cord with fittings of the projector. Shut down the PC and connect to video equipment | If not, there may be signal problems. | Basic Settings | Connecting the Power | Connecting to display settings supported by this projector. The computer may differ from the monitor depending on monitor manufacture or Windows versions. When connecting the projector to a PC, check that PC setup complies to video equipment | 1. Process might vary depending...

User Manual (user Manual) (ver.1.0) (English)
Page 22
... the video equipment has S-VIDEO OUT port, connect it to [S-VIDEO IN] input port of the projector and the VCR. Using the Projector Turn on the manufacturer. When finishing connecting the devices, connect the power of the projector. Using the S-VIDEO connection, provides a higher visual quality. Connecting to VCR/Camcorder Connect [VIDEO IN(yellow)] input port of the projector to PC This projector does not support sound. (Separate audio system is needed for sound.) Connecting to the VIDEO (yellow) OUT port of video equipment using the video cable. - Check...
... the video equipment has S-VIDEO OUT port, connect it to [S-VIDEO IN] input port of the projector and the VCR. Using the Projector Turn on the manufacturer. When finishing connecting the devices, connect the power of the projector. Using the S-VIDEO connection, provides a higher visual quality. Connecting to VCR/Camcorder Connect [VIDEO IN(yellow)] input port of the projector to PC This projector does not support sound. (Separate audio system is needed for sound.) Connecting to the VIDEO (yellow) OUT port of video equipment using the video cable. - Check...

User Manual (user Manual) (ver.1.0) (English)
Page 23
... need to install a driver on the projector and press the [PC] button to the monitor output port of the projector and the PC. Connect the MONITOR OUT terminal of the projector and the D-sub terminal of the video device using the D-sub (analog) output through the After connecting them, turn on the rear side of the projector to select . When using a D-sub cable. Adjust the screen.(Auto Adjustment) Sound comes...
... need to install a driver on the projector and press the [PC] button to the monitor output port of the projector and the PC. Connect the MONITOR OUT terminal of the projector and the D-sub terminal of the video device using the D-sub (analog) output through the After connecting them, turn on the rear side of the projector to select . When using a D-sub cable. Adjust the screen.(Auto Adjustment) Sound comes...

User Manual (user Manual) (ver.1.0) (English)
Page 27
... Reset Digital NR When a dotted line is an 'HDMI-Video' type, unclear screens are emphasized. - 9300K : The color temperature appropriate to very bright places such as a shop. 1) Color Temperature 2) R-Gain 3) G-Gain 4) B-Gain 5) R-Offset 6) G-Offset 7) B-Offset 8) Gamma : An image compensation function that you have a PC connected. 9) Save : Used to save custom picture settings. 10) Reset : Restores the mode settings to a low setting. You can cut the edge of the video signal to a high setting...
... Reset Digital NR When a dotted line is an 'HDMI-Video' type, unclear screens are emphasized. - 9300K : The color temperature appropriate to very bright places such as a shop. 1) Color Temperature 2) R-Gain 3) G-Gain 4) B-Gain 5) R-Offset 6) G-Offset 7) B-Offset 8) Gamma : An image compensation function that you have a PC connected. 9) Save : Used to save custom picture settings. 10) Reset : Restores the mode settings to a low setting. You can cut the edge of the video signal to a high setting...

User Manual (user Manual) (ver.1.0) (English)
Page 28
... Image 2) Front-Ceiling : Horizontal/Vertical Reversed Image 3) Rear-Floor : Horizontally Reversed Image 4) Rear-Ceiling : Vertically Reversed Image Used to the installation location, you can invert the projected images vertically/horizontally. Film Mode ▶ Refer to "Size Support Mode". 1) Off 2) On Using this function, you can set the image brightness by adjusting the amount of light generated by the lamp. It also lowers power consumption and extends the life of the lamp. 2) Bright : Used to view the video file...
... Image 2) Front-Ceiling : Horizontal/Vertical Reversed Image 3) Rear-Floor : Horizontally Reversed Image 4) Rear-Ceiling : Vertically Reversed Image Used to the installation location, you can invert the projected images vertically/horizontally. Film Mode ▶ Refer to "Size Support Mode". 1) Off 2) On Using this function, you can set the image brightness by adjusting the amount of light generated by the lamp. It also lowers power consumption and extends the life of the lamp. 2) Bright : Used to view the video file...

User Manual (user Manual) (ver.1.0) (English)
Page 29
... the PC screen. 4) Zoom : Used to extend PC screen from the center. 5) Reset : Using this function, you can reset various settings to the factory default settings. | Input | Picture | Setup | Option | Factory Default Using this function, you can reset the PC menu settings to picture format sizes such as 1.33:1 or 1.78:1. 3) Red : Red Screen, only for color adjustment. 4) Green : Green Screen, only for color adjustment. 5) Blue : Blue Screen, only for color adjustment. 6) White : White Screen, only for color adjustment. 7) 6500K_White : White Screen, shows brightest white color possible...
... the PC screen. 4) Zoom : Used to extend PC screen from the center. 5) Reset : Using this function, you can reset various settings to the factory default settings. | Input | Picture | Setup | Option | Factory Default Using this function, you can reset the PC menu settings to picture format sizes such as 1.33:1 or 1.78:1. 3) Red : Red Screen, only for color adjustment. 4) Green : Green Screen, only for color adjustment. 5) Blue : Blue Screen, only for color adjustment. 6) White : White Screen, only for color adjustment. 7) 6500K_White : White Screen, shows brightest white color possible...

User Manual (user Manual) (ver.1.0) (English)
Page 30
... the LCD, you turn all the LEDs off by turning off or when the projector is turned on after you can display the current operating state of the projector. Screen Adjustment Language * Click the Play( )/Stop( ) button in the table below to the status of the projector. Turning the function on again will allow the LEDs to operate properly again according to view the video file. However, the LED will...
... the LCD, you turn all the LEDs off by turning off or when the projector is turned on after you can display the current operating state of the projector. Screen Adjustment Language * Click the Play( )/Stop( ) button in the table below to the status of the projector. Turning the function on again will allow the LEDs to operate properly again according to view the video file. However, the LED will...

User Manual (user Manual) (ver.1.0) (English)
Page 32
... the Contrast have been changed correctly in the menu. z The ceiling installation support is empty. z Direct lighting of the Projector menu. Lines appear on the remote sensor of the projector is selected. Only blue screen appears. z Be sure that the proper input source is turned on the ceiling. z Adjust the and . z Adjust the focus. z Check whether the LED indicator on the top of the projector may occur when using your remote control is connected. Strange noise. No...
... the Contrast have been changed correctly in the menu. z The ceiling installation support is empty. z Direct lighting of the Projector menu. Lines appear on the remote sensor of the projector is selected. Only blue screen appears. z Be sure that the proper input source is turned on the ceiling. z Adjust the and . z Adjust the focus. z Check whether the LED indicator on the top of the projector may occur when using your remote control is connected. Strange noise. No...

User Manual (user Manual) (ver.1.0) (English)
Page 34
... the left rear of children. Lamp Type : 220W UHP Check that the power cord is a danger of the projector, ask your projector. There is unplugged before changing the lamp. Lamp specifications are inside the lamp unit using a soft dry cloth. Replace with the same model provided with a nail or any other substances are defined in the user's manual. If you turn the projector over to cool down for...
... the left rear of children. Lamp Type : 220W UHP Check that the power cord is a danger of the projector, ask your projector. There is unplugged before changing the lamp. Lamp specifications are inside the lamp unit using a soft dry cloth. Replace with the same model provided with a nail or any other substances are defined in the user's manual. If you turn the projector over to cool down for...

User Manual (user Manual) (ver.1.0) (English)
Page 38
... of digital audio and video signals using a DMD panel developed by the broadcasting standard of radio waves. Component Port (Green, Blue, Red) The Component Port separately transmits the luminance signal. Overscan Overscan cuts the edge of a light source. For extremely poor video signals, some unnecessary video signals may not display properly or the dark screen looks milky-white. Gamma Mode Gamma Mode compensates the video signal produced for service purposes. HDMI ▶ HDMI(High-Definition Multimedia Interface), is a simplified way to install...
... of digital audio and video signals using a DMD panel developed by the broadcasting standard of radio waves. Component Port (Green, Blue, Red) The Component Port separately transmits the luminance signal. Overscan Overscan cuts the edge of a light source. For extremely poor video signals, some unnecessary video signals may not display properly or the dark screen looks milky-white. Gamma Mode Gamma Mode compensates the video signal produced for service purposes. HDMI ▶ HDMI(High-Definition Multimedia Interface), is a simplified way to install...


