
User Manual
Page 1
Safety instructions and precautions are designed to protect users and prevent any property damage. SNT-1010 SNT-1010 1CH Video Server User's manual AB68-00610A Please read and observe these instructions thoroughly before using the SNT-1010.
Safety instructions and precautions are designed to protect users and prevent any property damage. SNT-1010 SNT-1010 1CH Video Server User's manual AB68-00610A Please read and observe these instructions thoroughly before using the SNT-1010.

User Manual
Page 2
Monitoring Through Web Browser Monitoring Through Web Browser This product enables watching a video through the Internet as outlined in advance of the product or shows the page numbers that can within that the product may not work properly or the settings may cause a serious physical damage. UPnP (Universal Plug and Play) Function It this label, it may cause a serious physical damage or loss of this product. has not tested the performance or reliability of the security or signaling aspects of property. UL Certification does not cover the performance or reliability of the ...
Monitoring Through Web Browser Monitoring Through Web Browser This product enables watching a video through the Internet as outlined in advance of the product or shows the page numbers that can within that the product may not work properly or the settings may cause a serious physical damage. UPnP (Universal Plug and Play) Function It this label, it may cause a serious physical damage or loss of this product. has not tested the performance or reliability of the security or signaling aspects of property. UL Certification does not cover the performance or reliability of the ...

User Manual
Page 3
... 3 Contents 4 System Requirements 5 Safety Precautions 6 View of SNT-1010 8 Chapter 2 Installing and Connecting Installing SNT-1010 11 Connecting SNT-1010 13 Chapter 3 Network Connection & Setup To Connect SNT-1010 to an IP sharer with the xDSL/Cable modem 20 Connect SNT-1010 to an IP sharer with local area networking 25 Connect SNT-1010 directly to a DHCP-based xDSL/Cable modem........30...
... 3 Contents 4 System Requirements 5 Safety Precautions 6 View of SNT-1010 8 Chapter 2 Installing and Connecting Installing SNT-1010 11 Connecting SNT-1010 13 Chapter 3 Network Connection & Setup To Connect SNT-1010 to an IP sharer with the xDSL/Cable modem 20 Connect SNT-1010 to an IP sharer with local area networking 25 Connect SNT-1010 directly to a DHCP-based xDSL/Cable modem........30...

User Manual
Page 4
... do not follow the instructions, it may cause fire,electric shock or malfunction. Do not bend the power cable excessively or place a heavy object over SNT-1010 such as a screw driver, coin, metal parts, etc.,or a container filled with a wet hand. In case of damage to the product. Otherwise, it may cause...
... do not follow the instructions, it may cause fire,electric shock or malfunction. Do not bend the power cable excessively or place a heavy object over SNT-1010 such as a screw driver, coin, metal parts, etc.,or a container filled with a wet hand. In case of damage to the product. Otherwise, it may cause...

User Manual
Page 5
... OUT Port 3 RX Port 6 RS-232C Port 7 Ethernet Port 8 Power Port * FACTORY RESET Button : This will return the settings of SNT-1010). When SNT-1010 is automatically allocated by DHCP without manual allocation. When the IP address is installed onto an xDSL (e.g.VDSL)or Cable modem supporting DHCP. - The...this position for the following cases. - Refer to in process or the NTP connection has failed Blinking Red : If SNT-1010 causes a problem or you install SNT-1010 on the IP sharer and use the DHCP function of IP address, Gateway and Subnet Mask information. 9 Select this ...
... OUT Port 3 RX Port 6 RS-232C Port 7 Ethernet Port 8 Power Port * FACTORY RESET Button : This will return the settings of SNT-1010). When SNT-1010 is automatically allocated by DHCP without manual allocation. When the IP address is installed onto an xDSL (e.g.VDSL)or Cable modem supporting DHCP. - The...this position for the following cases. - Refer to in process or the NTP connection has failed Blinking Red : If SNT-1010 causes a problem or you install SNT-1010 on the IP sharer and use the DHCP function of IP address, Gateway and Subnet Mask information. 9 Select this ...

User Manual
Page 6
... Samsung Electronics web site (http://www.samsung.com). To install on the floor or wall using the 2 screws (small). Fix the Fixing Metal so that the bottom of the Fixing Metal faces the floor or wall. 3 Fix the Fixing Metal on a floor or wall. Chapter 2 Installing and Connecting Installing SNT-1010 Preparation View of SNT-1010... arrow direction as described in the figure. 2 Fix the Fixing Metal onto the Fixing Block using one screw (big). 10 11 Installing and Connecting Installing SNT-1010 Disconnect the power cable before installing or moving the product.
... Samsung Electronics web site (http://www.samsung.com). To install on the floor or wall using the 2 screws (small). Fix the Fixing Metal so that the bottom of the Fixing Metal faces the floor or wall. 3 Fix the Fixing Metal on a floor or wall. Chapter 2 Installing and Connecting Installing SNT-1010 Preparation View of SNT-1010... arrow direction as described in the figure. 2 Fix the Fixing Metal onto the Fixing Block using one screw (big). 10 11 Installing and Connecting Installing SNT-1010 Disconnect the power cable before installing or moving the product.
User Manual
Page 7
... Ensure that supports RS-485 communications. Install this product may cause an injury when it is installed on a wall. Installing and Connecting Installing SNT-1010 (Continued) To install onto a dedicated shelf Assemble as described in the figure. 2 Fix the Fixing Metal onto the Fixing Block using one... screw (big). Installing and Connecting Connecting SNT-1010 If you install this product on the shelf using the 2 screws (small). Notice Dropping of this product in a dry place so that...
... Ensure that supports RS-485 communications. Install this product may cause an injury when it is installed on a wall. Installing and Connecting Installing SNT-1010 (Continued) To install onto a dedicated shelf Assemble as described in the figure. 2 Fix the Fixing Metal onto the Fixing Block using one... screw (big). Installing and Connecting Connecting SNT-1010 If you install this product on the shelf using the 2 screws (small). Notice Dropping of this product in a dry place so that...

User Manual
Page 8
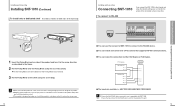
...) RS-485, ALARM I/O Block Diagram 14 To Connect a Camera Input SNT-1010 21 1 Connect the [VIDEO IN ] port of the SNT-1010 and the VIDEO OUT port of the camera. 2 Connectthe[AUDIOIN]portoftheSNT-1010 and the AUDIO OUT port of the monitor. If the camera provides an AUDIO OUT port. Monitor... 15 Chapter 2 Installing and Connecting Connecting SNT-1010 Camera To Connect a Monitor Output SNT-1010 21 1 Connect the [VIDEO OUT ] port of the SNT-1010 and the VIDEO IN port of the monitor. 2 Connect the [AUDIO OUT ] port of the...
...) RS-485, ALARM I/O Block Diagram 14 To Connect a Camera Input SNT-1010 21 1 Connect the [VIDEO IN ] port of the SNT-1010 and the VIDEO OUT port of the camera. 2 Connectthe[AUDIOIN]portoftheSNT-1010 and the AUDIO OUT port of the monitor. If the camera provides an AUDIO OUT port. Monitor... 15 Chapter 2 Installing and Connecting Connecting SNT-1010 Camera To Connect a Monitor Output SNT-1010 21 1 Connect the [VIDEO OUT ] port of the SNT-1010 and the VIDEO IN port of the monitor. 2 Connect the [AUDIO OUT ] port of the...

User Manual
Page 9
Notice MIC IN is connected to. 2 Connect the [AUDIO OUT ] port of the SNT-1010 with the LINE IN port of the SNT-1010 with the LINE OUT portof the amplifier that the microphone is not enabled. 16 Network ComPpCuter Microphone Pre-Amp SPEAKER Pre-Amp... you connect the microphone to the AUDIO OUT port, you can't hear a sound. Installing and Connecting Connecting SNT-1010 (Continued) To connect to Audio Input/Output Audio I/O Block Diagram Chapter 2 Installing and Connecting Connecting the SNT-1010 LINE-OUT Microphone Pre-Amp SPEAKER 1 Connect the [AUDIO IN ] port of the speaker.
Notice MIC IN is connected to. 2 Connect the [AUDIO OUT ] port of the SNT-1010 with the LINE IN port of the SNT-1010 with the LINE OUT portof the amplifier that the microphone is not enabled. 16 Network ComPpCuter Microphone Pre-Amp SPEAKER Pre-Amp... you connect the microphone to the AUDIO OUT port, you can't hear a sound. Installing and Connecting Connecting SNT-1010 (Continued) To connect to Audio Input/Output Audio I/O Block Diagram Chapter 2 Installing and Connecting Connecting the SNT-1010 LINE-OUT Microphone Pre-Amp SPEAKER 1 Connect the [AUDIO IN ] port of the speaker.

User Manual
Page 10
...addresses used in this manual are for the description of the PC (Viewer installed)or the network,the video transmission can set up the SNT-1010 network settings according to your PC and do not enter the addresses presented in this manual. Use AC adapter authorized by the company only.... (DC 8.4V/1A) Notice 18 Network Connection & Setup You can cause a network error. LINKSYS WRT54G - SNT-1010 network connection and setup processes are as follows. Note - D-LINK DI-624 - If the power is connected,the [POWER]LED is taken example for illustrative...
...addresses used in this manual are for the description of the PC (Viewer installed)or the network,the video transmission can set up the SNT-1010 network settings according to your PC and do not enter the addresses presented in this manual. Use AC adapter authorized by the company only.... (DC 8.4V/1A) Notice 18 Network Connection & Setup You can cause a network error. LINKSYS WRT54G - SNT-1010 network connection and setup processes are as follows. Note - D-LINK DI-624 - If the power is connected,the [POWER]LED is taken example for illustrative...
User Manual
Page 11
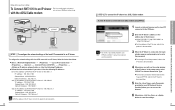
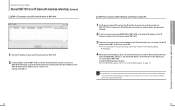
...the Internet. 6 When done, click the or button to save the settings. 21 Chapter 3 Network Connection &Setup To Connect SNT-1010 to an IP sharer with the xDSL/Cable modem SNT-1010 1 SNT-1010 2 IP Sharer xDSL or Cable Modem xDSL or Cable Modem External Remote PC Local PC DDNS Server (Data Center, KOREA) ... Provider) before you will see the setup window of the IP sharer, refer to the product's documentation. Network Connection & Setup To Connect SNT-1010 to an IP sharer This is connected, the login window appears and prompts you to enter the password. If the IP sharer is 192.168...
...the Internet. 6 When done, click the or button to save the settings. 21 Chapter 3 Network Connection &Setup To Connect SNT-1010 to an IP sharer with the xDSL/Cable modem SNT-1010 1 SNT-1010 2 IP Sharer xDSL or Cable Modem xDSL or Cable Modem External Remote PC Local PC DDNS Server (Data Center, KOREA) ... Provider) before you will see the setup window of the IP sharer, refer to the product's documentation. Network Connection & Setup To Connect SNT-1010 to an IP sharer This is connected, the login window appears and prompts you to enter the password. If the IP sharer is 192.168...
User Manual
Page 12
...168.1.1 ,http://192.168.0.1 or http://192.168.xxx.1 For the address of the browser. However, note that an external remote computer of SNT-1010 1. When SNT-1010 starts, it is connected to the xDSL /Cable modem properly Select from the Settings menu of the IP sharer are correct. [STEP 4 ]...provided by using the Direct LAN Cable (UTP cable). If using DHCP. For how to use the IP installer, refer to purchase it separately. 3. SNT-1010 is connected to S (Static IP). 2. In the setup menu, select "Automatic Configuration-DHCP " for the connection using Dynamic IP mode of the ...
...168.1.1 ,http://192.168.0.1 or http://192.168.xxx.1 For the address of the browser. However, note that an external remote computer of SNT-1010 1. When SNT-1010 starts, it is connected to the xDSL /Cable modem properly Select from the Settings menu of the IP sharer are correct. [STEP 4 ]...provided by using the Direct LAN Cable (UTP cable). If using DHCP. For how to use the IP installer, refer to purchase it separately. 3. SNT-1010 is connected to S (Static IP). 2. In the setup menu, select "Automatic Configuration-DHCP " for the connection using Dynamic IP mode of the ...
User Manual
Page 13
...run the Internet browser on the port-forwarding, refer to Use IP Sharer: Port Forwarding Setting (Port Mapping). 4 When the port forwarding is for SNT-1010. 2 If found in the address bar for the IP sharer before you select : ex1) If the address (LAN IP)of the IP sharer is... : or Follow the instructions below if you can connect to the IP sharer internal SNT-1010 from a remote PC 1 You can use DDNS URL of the IP sharer in the address bar to connect to SNT-1010. SNT-1010 1 SNT-1010 2 IP Sharer Switch HUB Firewall External Remote PC Local PC IP Sharer External PC ...
...run the Internet browser on the port-forwarding, refer to Use IP Sharer: Port Forwarding Setting (Port Mapping). 4 When the port forwarding is for SNT-1010. 2 If found in the address bar for the IP sharer before you select : ex1) If the address (LAN IP)of the IP sharer is... : or Follow the instructions below if you can connect to the IP sharer internal SNT-1010 from a remote PC 1 You can use DDNS URL of the IP sharer in the address bar to connect to SNT-1010. SNT-1010 1 SNT-1010 2 IP Sharer Switch HUB Firewall External Remote PC Local PC IP Sharer External PC ...

User Manual
Page 14
... login IP and the password, refer to the IP sharer's documentation. 4 When done, you to the Internet. Connect SNT-1010 to the power source. 4. When SNT-1010 starts, it separately. 3. SNT-1010 does not come with the Direct LAN cable. Use the IP installer on page 33. 27 Chapter 3 Network Connection &... IP sharer, refer to the product's documentation. 3 When the IP Sharer is connected to an IP sharer with the Direct LAN cable. SNT-1010 does not come with local area networking For the value for Internet Connection Type. You can check the dynamic IP address from the IP sharer...
... login IP and the password, refer to the IP sharer's documentation. 4 When done, you to the Internet. Connect SNT-1010 to the power source. 4. When SNT-1010 starts, it separately. 3. SNT-1010 does not come with the Direct LAN cable. Use the IP installer on page 33. 27 Chapter 3 Network Connection &... IP sharer, refer to the product's documentation. 3 When the IP Sharer is connected to an IP sharer with the Direct LAN cable. SNT-1010 does not come with local area networking For the value for Internet Connection Type. You can check the dynamic IP address from the IP sharer...
User Manual
Page 15
...-forwarding is not properly set or a firewall is different. 2 In this case, to resolve the problem, contact your local PC and search for SNT-1010. 2 If found in the address bar to connect to it. Alternately, launch the Internet browser manually and enter the IP address of the IP ... An IP sharer external PC can't use the DDNS URL of SNT-1010 or the Internet IP address of the SNT-1010 found , double-click the SNT-1010 to start the Internet browser and try to connect to SNT-1010. ex) http://192.168.1.2 [ STEP 5 ] To connect to SNT-1010 from a remote PC. In this case, you must set ....
...-forwarding is not properly set or a firewall is different. 2 In this case, to resolve the problem, contact your local PC and search for SNT-1010. 2 If found in the address bar to connect to it. Alternately, launch the Internet browser manually and enter the IP address of the IP ... An IP sharer external PC can't use the DDNS URL of SNT-1010 or the Internet IP address of the SNT-1010 found , double-click the SNT-1010 to start the Internet browser and try to connect to SNT-1010. ex) http://192.168.1.2 [ STEP 5 ] To connect to SNT-1010 from a remote PC. In this case, you must set ....
User Manual
Page 16
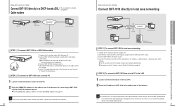
... DDNS Server (Data Center, KOREA) [ STEP 1 ] To connect SNT-1010 to the modem using the Direct LAN Cable (UTP cable). Note 30 Network Connection & Setup Connect SNT-1010 directly to local area networking SNT-1010 1 SNT-1010 2 Switch HUB Firewall External Remote PC Local PC DDNS Server (Data ...Center, KOREA) [ STEP 1 ] To connect SNT-1010 to purchase it automatically obtains an IP address from a...
... DDNS Server (Data Center, KOREA) [ STEP 1 ] To connect SNT-1010 to the modem using the Direct LAN Cable (UTP cable). Note 30 Network Connection & Setup Connect SNT-1010 directly to local area networking SNT-1010 1 SNT-1010 2 Switch HUB Firewall External Remote PC Local PC DDNS Server (Data ...Center, KOREA) [ STEP 1 ] To connect SNT-1010 to purchase it automatically obtains an IP address from a...

User Manual
Page 17
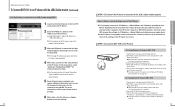
... address range provided by factory default. 3 Set up the IP related settings in their default values. The password is set up the SNT-1010 network settings automatically using UPNP is marked with your network administrator. 33 Chapter 4 Static IP Setting Manual Network Setting Confirm the MAC Address... of the SNT-1010 are displayed in the field. : The MAC Address printed on its rear panel. ex) 192.168.1.2~255, 192.168.0.2~255,or 192...
... address range provided by factory default. 3 Set up the IP related settings in their default values. The password is set up the SNT-1010 network settings automatically using UPNP is marked with your network administrator. 33 Chapter 4 Static IP Setting Manual Network Setting Confirm the MAC Address... of the SNT-1010 are displayed in the field. : The MAC Address printed on its rear panel. ex) 192.168.1.2~255, 192.168.0.2~255,or 192...

User Manual
Page 18
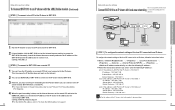
...). : A port used to transfer video using TCP protocol.The default value is selected. 6 Enter your password. The default value is 60005(UDP). 5 If SNT-1010 is installed on an IP sharer, you can 't change the port numbers of the root user. 7 Click the [OK] button. The password is restarted.... 34 If more than one SNT-1010 are automatically changed by using 6 5 7 the up port numbers. : A HTTP port used to transfer video using UDP You can use the UPNP Port ...
...). : A port used to transfer video using TCP protocol.The default value is selected. 6 Enter your password. The default value is 60005(UDP). 5 If SNT-1010 is installed on an IP sharer, you can 't change the port numbers of the root user. 7 Click the [OK] button. The password is restarted.... 34 If more than one SNT-1010 are automatically changed by using 6 5 7 the up port numbers. : A HTTP port used to transfer video using UDP You can use the UPNP Port ...

User Manual
Page 19
... use the UPNP Port Mapping function. 4 Enter your PC. 37 Chapter 5 Dynamic IP Setting Dynamic IP Setting The Auto Set window appears. Connect SNT-1010 to Dynamic IP mode 1. You have to D (Dynamic IP). 2. Static IP Setting Automatic Network Setting Before You Start! Confirm the MAC Address of ...automatically obtains an IP address from the IP sharer by the internal DHCP server in local area networking To set SNT-1010 to the IP sharer or modem using Dynamic IP - Connect SNT-1010 to a xDSL/Cable modem using the IP installer on the screen. The [Auto Set] and [Manual Set]...
... use the UPNP Port Mapping function. 4 Enter your PC. 37 Chapter 5 Dynamic IP Setting Dynamic IP Setting The Auto Set window appears. Connect SNT-1010 to Dynamic IP mode 1. You have to D (Dynamic IP). 2. Static IP Setting Automatic Network Setting Before You Start! Confirm the MAC Address of ...automatically obtains an IP address from the IP sharer by the internal DHCP server in local area networking To set SNT-1010 to the IP sharer or modem using Dynamic IP - Connect SNT-1010 to a xDSL/Cable modem using the IP installer on the screen. The [Auto Set] and [Manual Set]...

User Manual
Page 20
... remote PC can 't change the port and UPNP settings. 38 When Using an IP Sharer Port Forwarding (Port Mapping) Setting With SNT-1010 installed on your local PC, the SNT-1010 with a dynamic IP allocated is enabled only if the IP sharer supports the UPNP function. 39 Chapter 6 When Using an IP ... of the SETUP screen of the port numbers for the IP Sharer must set the port forwarding for each SNT-1010 connected to the IP sharer internal SNT-1010. For the menu location and the setting of the IP Sharer. Dynamic IP Setting Dynamic IP Setting (Continued) Dynamic IP Check 1 When you ...
... remote PC can 't change the port and UPNP settings. 38 When Using an IP Sharer Port Forwarding (Port Mapping) Setting With SNT-1010 installed on your local PC, the SNT-1010 with a dynamic IP allocated is enabled only if the IP sharer supports the UPNP function. 39 Chapter 6 When Using an IP ... of the SETUP screen of the port numbers for the IP Sharer must set the port forwarding for each SNT-1010 connected to the IP sharer internal SNT-1010. For the menu location and the setting of the IP Sharer. Dynamic IP Setting Dynamic IP Setting (Continued) Dynamic IP Check 1 When you ...