User Manual
Page 4
... of the grounding plug can be a grounding-type 3-wire cord and it is necessary to use them if you use an extension cord, the interior light may flicker and the speed of the blower may vary when the microwave oven is provided to do not understand the grounding instructions or if...
... of the grounding plug can be a grounding-type 3-wire cord and it is necessary to use them if you use an extension cord, the interior light may flicker and the speed of the blower may vary when the microwave oven is provided to do not understand the grounding instructions or if...
User Manual
Page 6
..., stir well to preheat the oven or operate it . Do not stand on top of the microwave or place objects (such as laundry, oven covers, lighted candles, lighted cigarettes, dishes, chemicals, metal objects, etc.) on the oven floor. Do not place food or heavy objects over the door when opening the door...
..., stir well to preheat the oven or operate it . Do not stand on top of the microwave or place objects (such as laundry, oven covers, lighted candles, lighted cigarettes, dishes, chemicals, metal objects, etc.) on the oven floor. Do not place food or heavy objects over the door when opening the door...
User Manual
Page 7
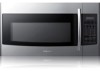
button Vent buttons (4 Speed & On/Off) Vent Delay Off button Light Hi/Lo/Off button Set Timer button Turntable On/Off button Metal shelf Eco Mode Sensor Cooking buttons Sensor Reheat button Auto Defrost button 1 ...sec. contents SETTING UP YOUR MICROWAVE OVEN 8 8 8 Checking the parts Warranty and service information 8 Setting up your microwave oven Replacing the cooktop/night light Replacing the oven light Cleaning the grease filter Replacing the charcoal filter TROUBLESHOOTING 22 APPENDIX 23 WARRANTY 23 COOKWARE GUIDE 16 16 Microwave-safe utensils SMH1816_XAA_03942A_EN.indd 7 contents...
button Vent buttons (4 Speed & On/Off) Vent Delay Off button Light Hi/Lo/Off button Set Timer button Turntable On/Off button Metal shelf Eco Mode Sensor Cooking buttons Sensor Reheat button Auto Defrost button 1 ...sec. contents SETTING UP YOUR MICROWAVE OVEN 8 8 8 Checking the parts Warranty and service information 8 Setting up your microwave oven Replacing the cooktop/night light Replacing the oven light Cleaning the grease filter Replacing the charcoal filter TROUBLESHOOTING 22 APPENDIX 23 WARRANTY 23 COOKWARE GUIDE 16 16 Microwave-safe utensils SMH1816_XAA_03942A_EN.indd 7 contents...

User Manual
Page 10
...99 minutes, 99 seconds. 1. Press the Enter/Start button. 5. MY SETTINGS You can customize your new microwave oven to suit your new Samsung microwave oven. Press the number button that corresponds to run. 3. Use the Kitchen Timer for timing up your new microwave oven using your ... once. Press the Vent 4 Speed button to a cooking program already in progress by pressing the Add 30 sec. Press (times) 1 2 3 Light High Low Off SMH1816_XAA_03942A_EN.indd 10 2011-06-10 5:33:24 To check the time while cooking, press the Clock button. Activating/Deactivating If you...
...99 minutes, 99 seconds. 1. Press the Enter/Start button. 5. MY SETTINGS You can customize your new microwave oven to suit your new Samsung microwave oven. Press the number button that corresponds to run. 3. Use the Kitchen Timer for timing up your new microwave oven using your ... once. Press the Vent 4 Speed button to a cooking program already in progress by pressing the Add 30 sec. Press (times) 1 2 3 Light High Low Off SMH1816_XAA_03942A_EN.indd 10 2011-06-10 5:33:24 To check the time while cooking, press the Clock button. Activating/Deactivating If you...
User Manual
Page 11
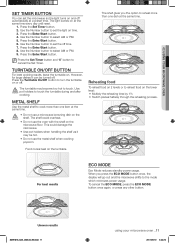
...which minimizes power usage. Use CAUTION pot holders to select AM or PM. 5. For best results ECO MODE Eco Mode reduces standby power usage. The light comes on 2 levels or to select AM or PM. 9. TURNTABLE ON/OFF BUTTON For best cooking results, leave the turntable on the turntable. ...Press the Enter/Start button. 8. Press the Set Timer button and "0" button to set the microwave so the light turns on the shelf. CAUTION • Do not use the oven with the shelf on time. 3. Press the Enter/Start button. 6. Press the ...
...which minimizes power usage. Use CAUTION pot holders to select AM or PM. 5. For best results ECO MODE Eco Mode reduces standby power usage. The light comes on 2 levels or to select AM or PM. 9. TURNTABLE ON/OFF BUTTON For best cooking results, leave the turntable on the turntable. ...Press the Enter/Start button. 8. Press the Set Timer button and "0" button to set the microwave so the light turns on the shelf. CAUTION • Do not use the oven with the shelf on time. 3. Press the Enter/Start button. 6. Press the ...
User Manual
Page 18
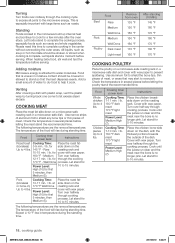
....indd 18 2011-06-10 5:33:27 Cooking time/ power level Cooking Time: 7-11 min. / lb. 180 °F dark meat 170 °F light meat Power Level: Medium High (7). Cook until the juices run clear and the meat near the bone is attracted to the microwave energy. Cook until... fat- (boneless) 3-9 min. / lb. Let foods stand to 4 lbs. 145 °F - Food Beef Rare Medium Well Done Pork Medium Poultry Well Done Dark meat Light meat Remove from oven 135 °F 150 °F 160 °F 150 °F 160 °F 170 °F 160 °F After standing (10 MIN.) 145 °...
....indd 18 2011-06-10 5:33:27 Cooking time/ power level Cooking Time: 7-11 min. / lb. 180 °F dark meat 170 °F light meat Power Level: Medium High (7). Cook until the juices run clear and the meat near the bone is attracted to the microwave energy. Cook until... fat- (boneless) 3-9 min. / lb. Let foods stand to 4 lbs. 145 °F - Food Beef Rare Medium Well Done Pork Medium Poultry Well Done Dark meat Light meat Remove from oven 135 °F 150 °F 160 °F 150 °F 160 °F 170 °F 160 °F After standing (10 MIN.) 145 °...
User Manual
Page 21
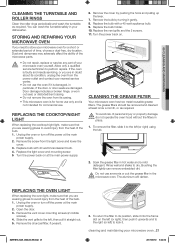
...pull it . 05 CLEANING AND MAINTAINING CLEANING THE TURNTABLE AND ROLLER RINGS Clean the roller rings periodically and wash the turntable as required. Replace the light cover and mounting screw. 5 Turn the power back on the left (or right), then push it upwards and to the right (or left...• Do not repair, replace or service any part of time, choose a dust-free, dry location. REPLACING THE COOKTOP/NIGHT LIGHT When replacing the cooktop/night light, make sure that you are wearing gloves to avoid injury from the heat of personal injury or property damage, WARNING do not operate...
...pull it . 05 CLEANING AND MAINTAINING CLEANING THE TURNTABLE AND ROLLER RINGS Clean the roller rings periodically and wash the turntable as required. Replace the light cover and mounting screw. 5 Turn the power back on the left (or right), then push it upwards and to the right (or left...• Do not repair, replace or service any part of time, choose a dust-free, dry location. REPLACING THE COOKTOP/NIGHT LIGHT When replacing the cooktop/night light, make sure that you are wearing gloves to avoid injury from the heat of personal injury or property damage, WARNING do not operate...


