Installation Instructions
Page 1
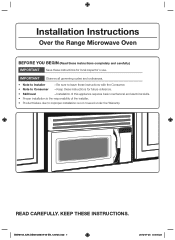
... the responsibility of the installer. • Product failure due to improper installation is not covered under the Warranty. READ CAREFULLY. Installation Instructions Over the Range Microwave Oven BEFORE YOU BEGIN (Read these instructions completely and carefully.) IMPORTANT Save these instructions for local inspector's use.
... the responsibility of the installer. • Product failure due to improper installation is not covered under the Warranty. READ CAREFULLY. Installation Instructions Over the Range Microwave Oven BEFORE YOU BEGIN (Read these instructions completely and carefully.) IMPORTANT Save these instructions for local inspector's use.
Installation Instructions
Page 2
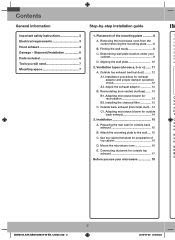
...cabinet template for outside back exhaust 14 3. Placement of top cabinet 16 D. Adapting microwave blower for exhaust adaptor and proper damper operation check 12 A2. Installation 15 A. Determining wall plate location under your...Important safety instructions 3 Electrical requirements 3 Hood exhaust 4 Damage - Shipment/Installation 6 Parts included 6 Tools you use your cabinet 9 D. Removing the microwave oven from the carton/removing the mounting plate......... 8 B. Ventilation types (choose a, b or c)........ 11 A. Recirculating (non-vented ductless)........ 13 B1...
...cabinet template for outside back exhaust 14 3. Placement of top cabinet 16 D. Adapting microwave blower for exhaust adaptor and proper damper operation check 12 A2. Installation 15 A. Determining wall plate location under your...Important safety instructions 3 Electrical requirements 3 Hood exhaust 4 Damage - Shipment/Installation 6 Parts included 6 Tools you use your cabinet 9 D. Removing the microwave oven from the carton/removing the mounting plate......... 8 B. Ventilation types (choose a, b or c)........ 11 A. Recirculating (non-vented ductless)........ 13 B1...
Installation Instructions
Page 3
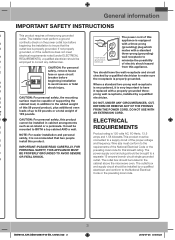
... oven DEFORM OR REMOVE ANY OF THE PRONGS e 4 loads of up to minimize the possibility of supporting the cabinet load, in the cabinet above the microwave oven. The 7 BE PROPERLY GROUNDED TO AVOID SEVERE power supply cord and plug should be installed by a qualified 3 CAUTION: For personal safety, the mounting electrician...
... oven DEFORM OR REMOVE ANY OF THE PRONGS e 4 loads of up to minimize the possibility of supporting the cabinet load, in the cabinet above the microwave oven. The 7 BE PROPERLY GROUNDED TO AVOID SEVERE power supply cord and plug should be installed by a qualified 3 CAUTION: For personal safety, the mounting electrician...
Installation Instructions
Page 7
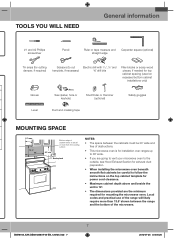
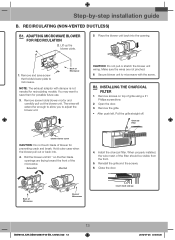
... will likely require more than 13.5˝ shown between the cabinets must be 30˝ or more from the cooking surface. Bottom edge of the microwave. 7 SMH8165_XAA DE68-03587A-04-EN_120725.indd 7 2012-07-25 �� 8:05:26 Backsplash NOTES: • The space between the range and... the bottom of cabinet needs to be 30˝ wide and free of obstructions. • This microwave oven is for installation over ranges up to 36˝ wide. • If you will need General information #1 and #2 Phillips screwdriver Pencil Ruler ...
... will likely require more than 13.5˝ shown between the cabinets must be 30˝ or more from the cooking surface. Bottom edge of the microwave. 7 SMH8165_XAA DE68-03587A-04-EN_120725.indd 7 2012-07-25 �� 8:05:26 Backsplash NOTES: • The space between the range and... the bottom of cabinet needs to be 30˝ wide and free of obstructions. • This microwave oven is for installation over ranges up to 36˝ wide. • If you will need General information #1 and #2 Phillips screwdriver Pencil Ruler ...

Installation Instructions
Page 8
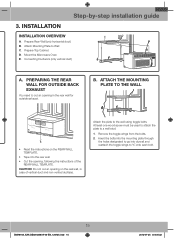
.... 2. Do not remove the Styrofoam protecting the front of the stud. Remove and properly discard plastic bags. Finding the wall studs P microwave oven from this mark. This will be used as the rear wall template and for mounting. Placement of any adjacent 4. Fold back all...original loction of outcase after removing mounting plate. 8 SMH8165_XAA DE68-03587A-04-EN_120725.indd 8 2012-07-25 �� 8:05:27 THE MICROWAVE MUST BE CONNECTED TO AT LEAST ONE WALL STUD. 5. NOTE: You will have to find a solid sound. Remove the installation instructions, Exhaust...
.... 2. Do not remove the Styrofoam protecting the front of the stud. Remove and properly discard plastic bags. Finding the wall studs P microwave oven from this mark. This will be used as the rear wall template and for mounting. Placement of any adjacent 4. Fold back all...original loction of outcase after removing mounting plate. 8 SMH8165_XAA DE68-03587A-04-EN_120725.indd 8 2012-07-25 �� 8:05:27 THE MICROWAVE MUST BE CONNECTED TO AT LEAST ONE WALL STUD. 5. NOTE: You will have to find a solid sound. Remove the installation instructions, Exhaust...

Installation Instructions
Page 9
...30˝ to Cooktop Your cabinets may have a front overhang only, with the microwave installation. This will keep the microwave level. 1. beneath flat bottom cabinet Plate position - Remove the decorative trim to install the microwave properly and to make it level. Use a level to make sure the cabinet... bottom is level. Draw a vertical line on the wall at the center of the cabinet. THE MICROWAVE MUST BE LEVEL. Tape the Rear Wall Template...
...30˝ to Cooktop Your cabinets may have a front overhang only, with the microwave installation. This will keep the microwave level. 1. beneath flat bottom cabinet Plate position - Remove the decorative trim to install the microwave properly and to make it level. Use a level to make sure the cabinet... bottom is level. Draw a vertical line on the wall at the center of the cabinet. THE MICROWAVE MUST BE LEVEL. Tape the Rear Wall Template...

Installation Instructions
Page 10
... Wall from Center of Top Cabinet Horizontal Line Area E CL Hole C Hole B Horizontal Line Draw a Horizontal line on the wall at the bottom of the microwave. NOTE: DO NOT MOUNT THE PLATE AT THIS TIME. Set the mounting plate aside. 10 SMH8165_XAA DE68-03587A-04-EN_120725.indd 10 2012-07-25...
... Wall from Center of Top Cabinet Horizontal Line Area E CL Hole C Hole B Horizontal Line Draw a Horizontal line on the wall at the bottom of the microwave. NOTE: DO NOT MOUNT THE PLATE AT THIS TIME. Set the mounting plate aside. 10 SMH8165_XAA DE68-03587A-04-EN_120725.indd 10 2012-07-25...

Installation Instructions
Page 11
... assembled to the filler-upper. And exhaust adaptor is shipped assembled for Outside Top Exhaust (except for the kit number.) C. Ventilation types (choose a, b or c) This microwave oven is required for the nonvented exhaust. (See your installation and proceed to the following three types of ventilation required for your Owner's Manual for...
... assembled to the filler-upper. And exhaust adaptor is shipped assembled for Outside Top Exhaust (except for the kit number.) C. Ventilation types (choose a, b or c) This microwave oven is required for the nonvented exhaust. (See your installation and proceed to the following three types of ventilation required for your Owner's Manual for...

Installation Instructions
Page 12
...;� 8:05:30 proper damper operation House Duct check 1. Back of Blower-Plate Damper Microwave C p th 4 For Front-to the B for exhaust adaptor and exhaust adaptor after the microwave is removed sa and damper pivots easoly before mounting 3 microwave. • You will need to make adjustments to the filler-upper. 1. Make sure tape...
...;� 8:05:30 proper damper operation House Duct check 1. Back of Blower-Plate Damper Microwave C p th 4 For Front-to the B for exhaust adaptor and exhaust adaptor after the microwave is removed sa and damper pivots easoly before mounting 3 microwave. • You will need to make adjustments to the filler-upper. 1. Make sure tape...
Installation Instructions
Page 13
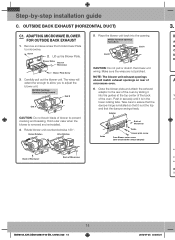
...5. Before Roll After Roll 4. Install the charcoal filter. Place the blower unit back into . 4. When properly installed, the wire mesh of the microwave. Reinstall the grille and the screws. 6. Remove screw holds blower mortor and carefully pull out the blower unit. Secure blower unit to... break. You may want to adjust the blower unit. CAUTION: Do not pull or stretch the blower unit wiring. Remove screws on top of Microwave NOTE: The exhaust adaptor with the screw. Recirculating (non-vented ductless) B1. Step-by-step installation guide B. B2. Close the door. Back...
...5. Before Roll After Roll 4. Install the charcoal filter. Place the blower unit back into . 4. When properly installed, the wire mesh of the microwave. Reinstall the grille and the screws. 6. Remove screw holds blower mortor and carefully pull out the blower unit. Secure blower unit to... break. You may want to adjust the blower unit. CAUTION: Do not pull or stretch the blower unit wiring. Remove screws on top of Microwave NOTE: The exhaust adaptor with the screw. Recirculating (non-vented ductless) B1. Step-by-step installation guide B. B2. Close the door. Back...
Installation Instructions
Page 14
... Before Rotation After Rotation 5. Take care to prevent cracking and breaking. Adaptor Guide Back of Microwave Guide blower plate screw From Blower motor screw (after attached the exhaust adaptor) Back of Microwave Back of microwave oven. 6. Lift up the Blower Plate. AFTER: Fan Blade Openings Facing Back End A ... • C ca 14 SMH8165_XAA DE68-03587A-04-EN_120725.indd 14 2012-07-25 �� 8:05:31 Blower Motor Back of Microwave Blower Plate Screw 3. Screw 2. Outside back exhaust (horizontal duct) C1. Remove and save screw that the damper swings freely. Hold outer...
... Before Rotation After Rotation 5. Take care to prevent cracking and breaking. Adaptor Guide Back of Microwave Guide blower plate screw From Blower motor screw (after attached the exhaust adaptor) Back of Microwave Back of microwave oven. 6. Lift up the Blower Plate. AFTER: Fan Blade Openings Facing Back End A ... • C ca 14 SMH8165_XAA DE68-03587A-04-EN_120725.indd 14 2012-07-25 �� 8:05:31 Blower Motor Back of Microwave Blower Plate Screw 3. Screw 2. Outside back exhaust (horizontal duct) C1. Remove and save screw that the damper swings freely. Hold outer...
Installation Instructions
Page 15
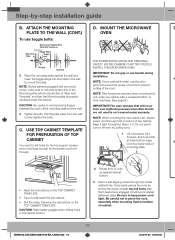
... plate through the holes designated to go into drywall and reattach the toggle wings to the wall using toggle bolts. Installation INSTALLATION OVERVIEW A. Mount the Microwave Oven E. Remove the toggle wings from the bolts. 2. Attach the mounting plate to the wall You need to the rear wall. • Cut the opening...
... plate through the holes designated to go into drywall and reattach the toggle wings to the wall using toggle bolts. Installation INSTALLATION OVERVIEW A. Mount the Microwave Oven E. Remove the toggle wings from the bolts. 2. Attach the mounting plate to the wall You need to the rear wall. • Cut the opening...
Installation Instructions
Page 16
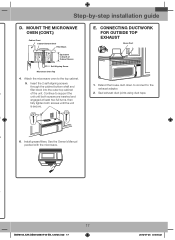
...25 �� 8:05:32 IMPORTANT:The case damage that will be completely tightened later.) Be sure to keep power cord tight. Lift microwave, tilt it underneath the top cabinet. • Drill the holes, following the instructions on the TOP CABINET TEMPLATE. • Tape it ...the cord. Be careful not to pinch the cord, especially when mounting flush to help tighten the bolts. NOTE: When mounting the microwave oven, thread power cord through top center cabinet hole. Do not pinch C. Insert a self-aligning screw through hole in the cabinet bottom....
...25 �� 8:05:32 IMPORTANT:The case damage that will be completely tightened later.) Be sure to keep power cord tight. Lift microwave, tilt it underneath the top cabinet. • Drill the holes, following the instructions on the TOP CABINET TEMPLATE. • Tape it ...the cord. Be careful not to pinch the cord, especially when mounting flush to help tighten the bolts. NOTE: When mounting the microwave oven, thread power cord through top center cabinet hole. Do not pinch C. Insert a self-aligning screw through hole in the cabinet bottom....
Installation Instructions
Page 17
...Shelf Filler Block E. Connecting ductwork for outside top exhaust House Duct Equivalent to the top cabinet. 5. s of Cabinet Recess Self-Aligning Screw Microwave Oven Top 4. Seal exhaust duct joints using duct tape. unit until both screws are inserted and engaged at least two full turns, then ...both screws until the unit is secure. y 17 SMH8165_XAA DE68-03587A-04-EN_120725.indd 17 2012-07-25 �� 8:05:32 Attach the microwave oven to Depth of the unit. d s 6. Install grease filters. Extend the house duct down to connect to support the 2. Continue to the...
...Shelf Filler Block E. Connecting ductwork for outside top exhaust House Duct Equivalent to the top cabinet. 5. s of Cabinet Recess Self-Aligning Screw Microwave Oven Top 4. Seal exhaust duct joints using duct tape. unit until both screws are inserted and engaged at least two full turns, then ...both screws until the unit is secure. y 17 SMH8165_XAA DE68-03587A-04-EN_120725.indd 17 2012-07-25 �� 8:05:32 Attach the microwave oven to Depth of the unit. d s 6. Install grease filters. Extend the house duct down to connect to support the 2. Continue to the...
Installation Instructions
Page 18
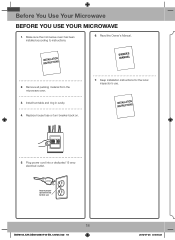
Remove all packing material from the microwave oven. 3. Replace house fuse or turn breaker back on. 7. Before You Use Your Microwave Before you use 18 SMH8165_XAA DE68-03587A-04-EN_120725.indd 18 2012-07-25 �� 8:05:33 Install turntable and ring in cavity. 4. Plug power cord into a dedicated 15 amp electrical outlet. Read the Owner's Manual. 2. Make sure the microwave oven has been installed according to instructions. 6. Insure proper ground exists before use your microwave 1. Keep installation instructions for the local inspector's use. 5.
Remove all packing material from the microwave oven. 3. Replace house fuse or turn breaker back on. 7. Before You Use Your Microwave Before you use 18 SMH8165_XAA DE68-03587A-04-EN_120725.indd 18 2012-07-25 �� 8:05:33 Install turntable and ring in cavity. 4. Plug power cord into a dedicated 15 amp electrical outlet. Read the Owner's Manual. 2. Make sure the microwave oven has been installed according to instructions. 6. Insure proper ground exists before use your microwave 1. Keep installation instructions for the local inspector's use. 5.

User Manual
Page 1
SMH1611 SMH1622 Microwave Oven user manual This manual is made with 100 % recycled paper. Please register your product at www.samsung.com/register 1-800-SAMSUNG (726-7864) ENGLISH SMH1611_SMH1622_XAA_DE68-03898A_EN+MES.indb 1 2012-09-11 �� 9:46:12 imagine the possibilities Thank you for purchasing this Samsung product.
SMH1611 SMH1622 Microwave Oven user manual This manual is made with 100 % recycled paper. Please register your product at www.samsung.com/register 1-800-SAMSUNG (726-7864) ENGLISH SMH1611_SMH1622_XAA_DE68-03898A_EN+MES.indb 1 2012-09-11 �� 9:46:12 imagine the possibilities Thank you for purchasing this Samsung product.
User Manual
Page 2
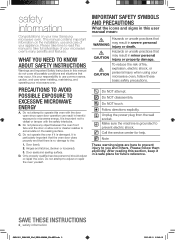
...no damage to operate this manual do not cover all possible conditions and situations that CAUTION may occur. PRECAUTIONS TO AVOID POSSIBLE EXPOSURE TO EXCESSIVE MICROWAVE ENERGY A. Hazards or unsafe practices that may result in a safe place for help. safety information Congratulations on your appliance. This manual contains... or unsafe practices that WARNING may result in this oven with the safety interlocks. CAUTION To reduce the risk of your new Samsung microwave oven. Do NOT touch. Unplug the power plug from the wall socket. Make sure the machine is grounded to...
...no damage to operate this manual do not cover all possible conditions and situations that CAUTION may occur. PRECAUTIONS TO AVOID POSSIBLE EXPOSURE TO EXCESSIVE MICROWAVE ENERGY A. Hazards or unsafe practices that may result in a safe place for help. safety information Congratulations on your appliance. This manual contains... or unsafe practices that WARNING may result in this oven with the safety interlocks. CAUTION To reduce the risk of your new Samsung microwave oven. Do NOT touch. Unplug the power plug from the wall socket. Make sure the machine is grounded to...
User Manual
Page 3
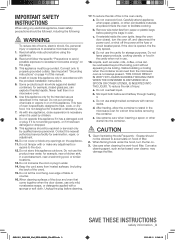
...be followed, including the following: WARNING WARNING To reduce risk of burns, electric shock, fire, personal injury or exposure to excessive microwave energy: 1. IMPORTANT SAFETY INSTRUCTIONS When using the appliance. 2. Read all safety instructions before cleaning. 17. Read and follow the specific... "Precautions to avoid possible exposure to properly grounded outlets. Connect only to excessive microwave energy" on page 4 of table or counter. 16. See Important "Grounding instructions" on this appliance only in accordance with or...
...be followed, including the following: WARNING WARNING To reduce risk of burns, electric shock, fire, personal injury or exposure to excessive microwave energy: 1. IMPORTANT SAFETY INSTRUCTIONS When using the appliance. 2. Read all safety instructions before cleaning. 17. Read and follow the specific... "Precautions to avoid possible exposure to properly grounded outlets. Connect only to excessive microwave energy" on page 4 of table or counter. 16. See Important "Grounding instructions" on this appliance only in accordance with or...
User Manual
Page 4
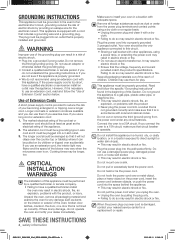
... the grounding plug can be pulled on . If the power-supply cord is too short, have a qualified technician install the oven may vary when the microwave oven is any circumstances. If you use of the blower may result in electric shock or fire. If there is on by providing an escape...
... the grounding plug can be pulled on . If the power-supply cord is too short, have a qualified technician install the oven may vary when the microwave oven is any circumstances. If you use of the blower may result in electric shock or fire. If there is on by providing an escape...
User Manual
Page 5
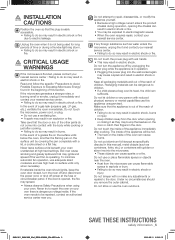
...If materials inside the oven should you . Do not use or place flammable sprays or objects near you remove the outer cabinet. If the microwave generates a strange noise, a burning smell or smoke, unplug it immediately and contact your nearest service center : Failing to do so may result... Failing to do so may result in electric shock or injury. Read and follow the specific "Precautions to Avoid Possible Exposure to Excessive Microwave Energy", found in electric shock or fire. To minimize automatic fan operation, use adequate sized cookware and use the oven outdoors. Make sure...
...If materials inside the oven should you . Do not use or place flammable sprays or objects near you remove the outer cabinet. If the microwave generates a strange noise, a burning smell or smoke, unplug it immediately and contact your nearest service center : Failing to do so may result... Failing to do so may result in electric shock or injury. Read and follow the specific "Precautions to Avoid Possible Exposure to Excessive Microwave Energy", found in electric shock or fire. To minimize automatic fan operation, use adequate sized cookware and use the oven outdoors. Make sure...


