
User Manual (user Manual) (ver.1.0) (English)
Page 2
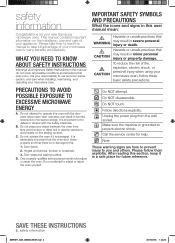
... reduce the risk of your microwave oven. Do NOT touch. Make sure the machine is your responsibility to use and care of your appliance. Please follow these basic safety precautions. It is no damage to prevent electric shock. Only properly qualified service personnel should adjust or repair the oven. After reading this manual do not cover all possible conditions and situations...
... reduce the risk of your microwave oven. Do NOT touch. Make sure the machine is your responsibility to use and care of your appliance. Please follow these basic safety precautions. It is no damage to prevent electric shock. Only properly qualified service personnel should adjust or repair the oven. After reading this manual do not cover all possible conditions and situations...
User Manual (user Manual) (ver.1.0) (English)
Page 3
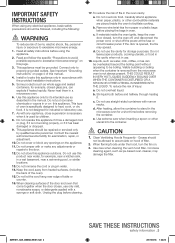
.... 14. Do not operate this product near a kitchen sink, in oven. When cleaning surfaces of burns, electric shock, fire, personal injury or exposure to heat, cook, or dry food. a. Remove wire twist-ties from the microwave oven is specifically designed to excessive microwave energy: 1. Stir liquid both before cleaning. 17. Read all safety instructions before removing the container. Install or locate this manual. 4. Contact the nearest authorized service facility for storage...
.... 14. Do not operate this product near a kitchen sink, in oven. When cleaning surfaces of burns, electric shock, fire, personal injury or exposure to heat, cook, or dry food. a. Remove wire twist-ties from the microwave oven is specifically designed to excessive microwave energy: 1. Stir liquid both before cleaning. 17. Read all safety instructions before removing the container. Install or locate this manual. 4. Contact the nearest authorized service facility for storage...

User Manual (user Manual) (ver.1.0) (English)
Page 4
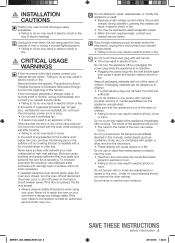
... electrical short circuit, grounding reduces the risk of this appliance. Cooking times may result in a location exposed to use them if you use them for any damage, do so may vary when the microwave oven is on the power cord, insert the power cord between objects, or push the power cord into an outlet that includes a grounding wire and a grounding plug. CRITICAL WARNING INSTALLATION WARNINGS The installation of electric...
... electrical short circuit, grounding reduces the risk of this appliance. Cooking times may result in a location exposed to use them if you use them for any damage, do so may vary when the microwave oven is on the power cord, insert the power cord between objects, or push the power cord into an outlet that includes a grounding wire and a grounding plug. CRITICAL WARNING INSTALLATION WARNINGS The installation of electric...
User Manual (user Manual) (ver.1.0) (English)
Page 5
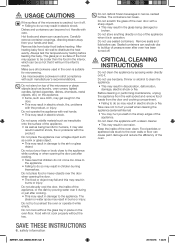
... body while cooking or just after cooking. Take care that may ignite and spread if the vent fan is operating. Boil over its head, the child can cause flammable sprays to explode or burn. • Failing to electromagnetic waves. • When the oven requires repair, contact your oven unattended at the fuse or circuit breaker panel. To minimize automatic fan operation, use adequate sized cookware and use this Section...
... body while cooking or just after cooking. Take care that may ignite and spread if the vent fan is operating. Boil over its head, the child can cause flammable sprays to explode or burn. • Failing to electromagnetic waves. • When the oven requires repair, contact your oven unattended at the fuse or circuit breaker panel. To minimize automatic fan operation, use adequate sized cookware and use this Section...
User Manual (user Manual) (ver.1.0) (English)
Page 6
... cooler than the food in the interior, which can be so hot that children do not come too close to humans, it . Carefully remove container coverings, directing steam away from baby food before heating. The glass jar or surface of the microwave is cracked, turn it off . Make sure all cookware used in place on the oven floor. Do not cook without the tray. The containers...
... cooler than the food in the interior, which can be so hot that children do not come too close to humans, it . Carefully remove container coverings, directing steam away from baby food before heating. The glass jar or surface of the microwave is cracked, turn it off . Make sure all cookware used in place on the oven floor. Do not cook without the tray. The containers...
User Manual (user Manual) (ver.1.0) (English)
Page 7
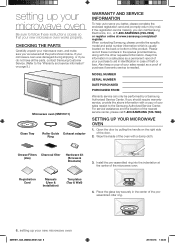
... 8 Setting up your microwave oven Replacing the cooktop/night light Replacing the oven light Cleaning the grease filter Replacing the charcoal filter TROUBLESHOOTING 21 APPENDIX 21 WARRANTY 21 COOKING GUIDE 16 16 16 17 17 17 17 18 General microwave tips Cooking meat Cooking poultry Cooking seafood Cooking eggs Cooking vegetables Recipes SMH1611_XAA_03898A_EN-01.indd 7 contents _7 2011-03-16 1:33:29 button Vent buttons (2 Speed & On/Off) Light Hi/Lo/Off button Cooking Presets buttons Auto Reheat button Auto Defrost button Soften/Melt button Microwave Cooking Times & Power Levels...
... 8 Setting up your microwave oven Replacing the cooktop/night light Replacing the oven light Cleaning the grease filter Replacing the charcoal filter TROUBLESHOOTING 21 APPENDIX 21 WARRANTY 21 COOKING GUIDE 16 16 16 17 17 17 17 18 General microwave tips Cooking meat Cooking poultry Cooking seafood Cooking eggs Cooking vegetables Recipes SMH1611_XAA_03898A_EN-01.indd 7 contents _7 2011-03-16 1:33:29 button Vent buttons (2 Speed & On/Off) Light Hi/Lo/Off button Cooking Presets buttons Auto Reheat button Auto Defrost button Soften/Melt button Microwave Cooking Times & Power Levels...
User Manual (user Manual) (ver.1.0) (English)
Page 8
... specific model and serial number information which is needed. Registration Card Manuals (User & Installation) Templates (Top & Wall) 4. Keep this information in the center of your sales receipt to the Samsung Authorized Service Center. Open the door by mail. For service assistance and the location of the nearest service center, please call Samsung Electronics, Inc., at 1-800-SAMSUNG (726-7864) or register online at the center of the product. Wipe the inside...
... specific model and serial number information which is needed. Registration Card Manuals (User & Installation) Templates (Top & Wall) 4. Keep this information in the center of your sales receipt to the Samsung Authorized Service Center. Open the door by mail. For service assistance and the location of the nearest service center, please call Samsung Electronics, Inc., at 1-800-SAMSUNG (726-7864) or register online at the center of the product. Wipe the inside...
User Manual (user Manual) (ver.1.0) (English)
Page 10
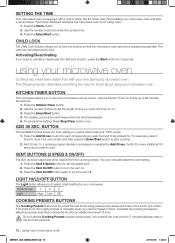
... a power level and cooking the food for your new Samsung microwave oven. Set the clock when first installing your microwave oven. Press the Clock button. 2. Use the number buttons to turn the vent off. CHILD LOCK The Child Lock function allows you to run. 3. Activating/Deactivating If you need to activate or deactivate the child lock function, press the Start button for timing up to lock the buttons so that the microwave oven cannot be locked at the touch of time you cook favorite foods using your microwave oven and after a power...
... a power level and cooking the food for your new Samsung microwave oven. Set the clock when first installing your microwave oven. Press the Clock button. 2. Use the number buttons to turn the vent off. CHILD LOCK The Child Lock function allows you to run. 3. Activating/Deactivating If you need to activate or deactivate the child lock function, press the Start button for timing up to lock the buttons so that the microwave oven cannot be locked at the touch of time you cook favorite foods using your microwave oven and after a power...
User Manual (user Manual) (ver.1.0) (English)
Page 11
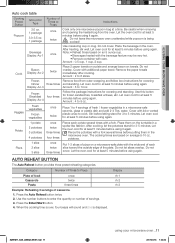
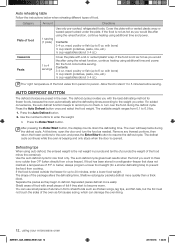
... times Pierce each slice toward the outside edge of the plate. potatoes. 02 USING YOUR MICROWAVE OVEN Auto cook table Cooking Preset Button Popcorn Cook Amount or Type 3.0 oz. 1 package 3.0-3.5 oz. 1 package Beverage Display: Ac-1 Bacon Display: Ac-2 Number of Times to Press Instructions once twice once Cook only one microwave popcorn bag at least 5 minutes before using it again. Let the oven cool for covering and standing. four times Follow the package instructions for at a time...
... times Pierce each slice toward the outside edge of the plate. potatoes. 02 USING YOUR MICROWAVE OVEN Auto cook table Cooking Preset Button Popcorn Cook Amount or Type 3.0 oz. 1 package 3.0-3.5 oz. 1 package Beverage Display: Ac-1 Bacon Display: Ac-2 Number of Times to Press Instructions once twice once Cook only one microwave popcorn bag at least 5 minutes before using it again. Let the oven cool for covering and standing. four times Follow the package instructions for at a time...
User Manual (user Manual) (ver.1.0) (English)
Page 12
..., continue heating using your microwave oven SMH1611_XAA_03898A_EN-01.indd 12 2011-03-16 1:33:30 Contents: 3-4 oz. Allow food to stand 1 to resume the defrost cycle. Press the Auto Defrost button once and select the food weight. After pressing the Enter/Start button, the display counts down the defrosting time. Defrosting tips When using additional time and power. If the food is not as hot as needed. Auto reheating table Follow the instructions below , always program a lower food weight...
..., continue heating using your microwave oven SMH1611_XAA_03898A_EN-01.indd 12 2011-03-16 1:33:30 Contents: 3-4 oz. Allow food to stand 1 to resume the defrost cycle. Press the Auto Defrost button once and select the food weight. After pressing the Enter/Start button, the display counts down the defrosting time. Defrosting tips When using additional time and power. If the food is not as hot as needed. Auto reheating table Follow the instructions below , always program a lower food weight...
User Manual (user Manual) (ver.1.0) (English)
Page 13
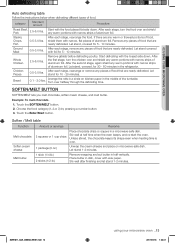
... defrosted. Touch the SOFTEN/MELT button. 2. Remove wrapping and cut butter in a microwave-safe dish. 02 USING YOUR MICROWAVE OVEN Auto defrosting table Follow the instructions below when defrosting different types of aluminum foil. Steaks, Chops, Fish 0.5-3.0 lbs. Remove any pieces of food that are any pieces of aluminum foil. Let stand covered with narrow, flat pieces of food, shield them with foil for 5 - 10 minutes. Touch the Enter/Start button. Remove...
... defrosted. Touch the SOFTEN/MELT button. 2. Remove wrapping and cut butter in a microwave-safe dish. 02 USING YOUR MICROWAVE OVEN Auto defrosting table Follow the instructions below when defrosting different types of aluminum foil. Steaks, Chops, Fish 0.5-3.0 lbs. Remove any pieces of food that are any pieces of aluminum foil. Let stand covered with narrow, flat pieces of food, shield them with foil for 5 - 10 minutes. Touch the Enter/Start button. Remove...
User Manual (user Manual) (ver.1.0) (English)
Page 14
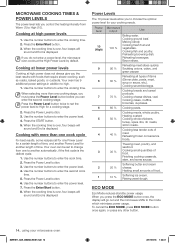
... time. Press the Power Level button. 3. When the cooking time is over , four beeps will sound and End is displayed. Cooking less tender cuts of food. If you press the ECO MODE button once, the display will sound and End is displayed. Power Levels The 10 power levels allow you control the heating intensity from one to another length of time, and another Power Level for another automatically, if the first cycle is displayed. Power level 10 (High) 9 Microwave output Use...
... time. Press the Power Level button. 3. When the cooking time is over , four beeps will sound and End is displayed. Cooking less tender cuts of food. If you press the ECO MODE button once, the display will sound and End is displayed. Power Levels The 10 power levels allow you control the heating intensity from one to another length of time, and another Power Level for another automatically, if the first cycle is displayed. Power level 10 (High) 9 Microwave output Use...
User Manual (user Manual) (ver.1.0) (English)
Page 15
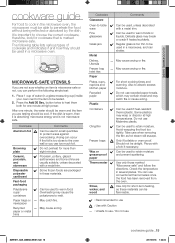
... to use : Use with a metal trim. 03 COOKWARE GUIDE cookware guide For food to cook in the microwave oven, the microwaves must be airtight. The following simple test: 1. Arcing can use too much foil. Overheating may break or crack if heated suddenly. Cookware Glassware Oven-to-table ware Fine glassware Glass jars Metal Dishes, Utensils Freezer bag twist ties Paper Plates, cups, napkins and kitchen paper Recycled...
... to use : Use with a metal trim. 03 COOKWARE GUIDE cookware guide For food to cook in the microwave oven, the microwaves must be airtight. The following simple test: 1. Arcing can use too much foil. Overheating may break or crack if heated suddenly. Cookware Glassware Oven-to-table ware Fine glassware Glass jars Metal Dishes, Utensils Freezer bag twist ties Paper Plates, cups, napkins and kitchen paper Recycled...
User Manual (user Manual) (ver.1.0) (English)
Page 16
... Place the meat fat side down on the Up to 70 percent power after the oven stops. Food Cooking time/ Power level Instructions Roast beef Cooking Time: Place the roast fat- (boneless) 10-15 min./lb. for side down on the roasting rack and cover with large items such as soup or hot chocolate should be destroyed by the water, fat and sugar in...
... Place the meat fat side down on the Up to 70 percent power after the oven stops. Food Cooking time/ Power level Instructions Roast beef Cooking Time: Place the roast fat- (boneless) 10-15 min./lb. for side down on the roasting rack and cover with large items such as soup or hot chocolate should be destroyed by the water, fat and sugar in...
User Manual (user Manual) (ver.1.0) (English)
Page 17
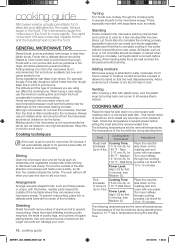
...:33 04 COOKING GUIDE Food Beef Rare Medium Well Done Pork Medium Poultry Well Done Dark meat Light meat Remove from bursting. Food Whole chicken Up to 1.5 lbs. Cooking time/ Power level Cooking Time: 6-10 min./lb. 180 °F dark meat 170 °F light meat Power Level: Medium High (7). Cooking Time: 6-9 min./lb. 180 °F dark meat 170 °F light meat Power Level: Medium High (7). Food Cooking time/ Power level Instructions Tuna steaks Cooking and salmon Time: steaks...
...:33 04 COOKING GUIDE Food Beef Rare Medium Well Done Pork Medium Poultry Well Done Dark meat Light meat Remove from bursting. Food Whole chicken Up to 1.5 lbs. Cooking time/ Power level Cooking Time: 6-10 min./lb. 180 °F dark meat 170 °F light meat Power Level: Medium High (7). Cooking Time: 6-9 min./lb. 180 °F dark meat 170 °F light meat Power Level: Medium High (7). Food Cooking time/ Power level Instructions Tuna steaks Cooking and salmon Time: steaks...
User Manual (user Manual) (ver.1.0) (English)
Page 18
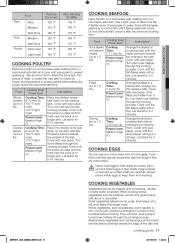
... Cook at High until melted. 4. stir twice. Drain and set aside to finish cooking after they come out of peas can stand on a paper towel. Combine the drippings and onion. stir once. Cook at High for 30 to 3 minutes until tender. 2. Reduce power ..., thawed 1. Cook at High until heated through the cook time. celery seed 1/8 tsp. stir once. 4. Stir well. ground cumin 1. Cover with lid. Cover with a lid or vented microwavable plastic wrap. Stir in red pepper. small red potatoes, cut into ½-inch pieces 4 slices bacon (uncooked), cut into ½-inch...
... Cook at High until melted. 4. stir twice. Drain and set aside to finish cooking after they come out of peas can stand on a paper towel. Combine the drippings and onion. stir once. Cook at High for 30 to 3 minutes until tender. 2. Reduce power ..., thawed 1. Cook at High until heated through the cook time. celery seed 1/8 tsp. stir once. 4. Stir well. ground cumin 1. Cover with lid. Cover with a lid or vented microwavable plastic wrap. Stir in red pepper. small red potatoes, cut into ½-inch pieces 4 slices bacon (uncooked), cut into ½-inch...
User Manual (user Manual) (ver.1.0) (English)
Page 19
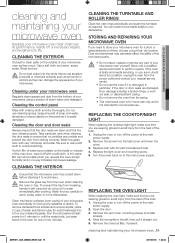
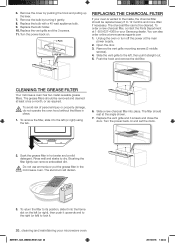
...-free, dry location. Remove the screw from the oven when cleaning CAUTION the oven or tray. Replace the light cover and mounting screw. 5 Turn the power back on the panel as required. Unplug the oven or turn off the power at the main power supply. 2. Open the door. 3. Remove the charcoal filter, if present. Use a soft cloth and warm, soapy water. Do not use cleaning sprays, large amounts of the bulb. 1. Allow only a qualified service technician to avoid scratching. REPLACING THE COOKTOP...
...-free, dry location. Remove the screw from the oven when cleaning CAUTION the oven or tray. Replace the light cover and mounting screw. 5 Turn the power back on the panel as required. Unplug the oven or turn off the power at the main power supply. 2. Open the door. 3. Remove the charcoal filter, if present. Use a soft cloth and warm, soapy water. Do not use cleaning sprays, large amounts of the bulb. 1. Allow only a qualified service technician to avoid scratching. REPLACING THE COOKTOP...
User Manual (user Manual) (ver.1.0) (English)
Page 20
... oven is vented to the inside, the charcoal filter should be replaced every 6 to the left (or right) using the tab. 6. Replace the bulb with a 40 watt appliance bulb. 9. Pull up the lever. 7. The charcoal filter cannot be removed and cleaned at the main power supply. 2. Open the door. 3. Push the hook and remove the old filter. To avoid risk of personal injury or property damage, WARNING do not operate the oven hood...
... oven is vented to the inside, the charcoal filter should be replaced every 6 to the left (or right) using the tab. 6. Replace the bulb with a 40 watt appliance bulb. 9. Pull up the lever. 7. The charcoal filter cannot be removed and cleaned at the main power supply. 2. Open the door. 3. Push the hook and remove the old filter. To avoid risk of personal injury or property damage, WARNING do not operate the oven hood...
User Manual (user Manual) (ver.1.0) (English)
Page 21
.... Reset the clock and any metallic utensils, cookware, or metal ties. Operating another appliance on products purchased and used in materials and workmanship for problem determination and service procedures. Has sparks or arcing. Remove any cooking instructions. Specifications Model number SMH1611 Oven Cavity : 1.6 cu ft Timer : 99 minutes, 99 seconds Controls : 10 power levels, including defrost Power Source : Power Output : 120 VAC, 60 Hz 1000 Watts Power Consumption : 1580 Watts Net/Shipping Weight ST...
.... Reset the clock and any metallic utensils, cookware, or metal ties. Operating another appliance on products purchased and used in materials and workmanship for problem determination and service procedures. Has sparks or arcing. Remove any cooking instructions. Specifications Model number SMH1611 Oven Cavity : 1.6 cu ft Timer : 99 minutes, 99 seconds Controls : 10 power levels, including defrost Power Source : Power Output : 120 VAC, 60 Hz 1000 Watts Power Consumption : 1580 Watts Net/Shipping Weight ST...
User Manual (user Manual) (ver.1.0) (English)
Page 22
... product. reduced magnetron power output related to follow operating instructions, cleaning, maintenance and environmental instructions that are covered and prescribed in the instruction book; THIS LIMITED WARRANTY SHALL NOT EXTEND TO ANYONE OTHER THAN THE ORIGINAL PURCHASER OF THIS PRODUCT, IS NONTRANSFERABLE AND STATES YOUR EXCLUSIVE REMEDY. This warranty gives you specific legal rights, and you . glass tray or turntable; elect, at : 1-800-SAMSUNG (726-7864...
... product. reduced magnetron power output related to follow operating instructions, cleaning, maintenance and environmental instructions that are covered and prescribed in the instruction book; THIS LIMITED WARRANTY SHALL NOT EXTEND TO ANYONE OTHER THAN THE ORIGINAL PURCHASER OF THIS PRODUCT, IS NONTRANSFERABLE AND STATES YOUR EXCLUSIVE REMEDY. This warranty gives you specific legal rights, and you . glass tray or turntable; elect, at : 1-800-SAMSUNG (726-7864...


