

User Manual (user Manual) (English)
Page 1
Index 1. Setup Installing the COMBO Drive Connecting the Cables Installing the CD Record Utility Installing the Device Driver Setting Up the Device Driver 4. Troubleshooting Solving Recording Problems Caution with errors Solving Technical Problems 6. Using the Drive Using the COMBO Drive Storing and Cleaning Your Discs Upgrading the Firmware Flash Memory System Requirements 5. Safety Precautions Notational Installation While Operating Other 2. Introduction Front Rear 3. Specifications 3 3 4 5 6 7 7 8 9 9 9 12 12 12 13 13 13 14 14 15 15 16 18 19 English - 2
Index 1. Setup Installing the COMBO Drive Connecting the Cables Installing the CD Record Utility Installing the Device Driver Setting Up the Device Driver 4. Troubleshooting Solving Recording Problems Caution with errors Solving Technical Problems 6. Using the Drive Using the COMBO Drive Storing and Cleaning Your Discs Upgrading the Firmware Flash Memory System Requirements 5. Safety Precautions Notational Installation While Operating Other 2. Introduction Front Rear 3. Specifications 3 3 4 5 6 7 7 8 9 9 9 12 12 12 13 13 13 14 14 15 15 16 18 19 English - 2

User Manual (user Manual) (English)
Page 8
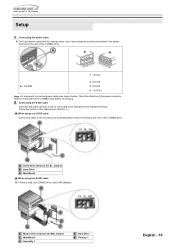
Connecting the Cables English - 9 Setup Installing the COMBO Drive To install your COMBO Drive in the illustration. Make sure that the PC is powered off and disconnected from a free expansion slot and install the COMBO drive, as shown in the PC, proceed as follows. Remove the cover from any power source. If necessary, attach a horizontal bracket to both sides of the drive.
Connecting the Cables English - 9 Setup Installing the COMBO Drive To install your COMBO Drive in the illustration. Make sure that the PC is powered off and disconnected from a free expansion slot and install the COMBO drive, as shown in the PC, proceed as follows. Remove the cover from any power source. If necessary, attach a horizontal bracket to both sides of the drive.
User Manual (user Manual) (English)
Page 9
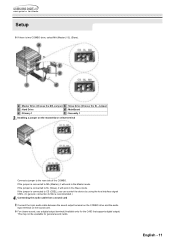
... there is connected to the hard disk to the interface terminal. (Place the red line of the cable close to the Pin 1.) When using one COMBO drive, select MA (Master). Connecting the E-IDE cable Insert the IDE cable (40-pin), which is only one E-IDE cable Connect the cable to the ...power terminal on the rear of the COMBO drive. 1 +5V DC A - Cut Side 2 Ground 3 Ground 4 +12V DC Note: An improperly connected power cable may cause trouble. Setup Connecting the power cable The 4-pin power...
... there is connected to the hard disk to the interface terminal. (Place the red line of the cable close to the Pin 1.) When using one COMBO drive, select MA (Master). Connecting the E-IDE cable Insert the IDE cable (40-pin), which is only one E-IDE cable Connect the cable to the ...power terminal on the rear of the COMBO drive. 1 +5V DC A - Cut Side 2 Ground 3 Ground 4 +12V DC Note: An improperly connected power cable may cause trouble. Setup Connecting the power cable The 4-pin power...
User Manual (user Manual) (English)
Page 10
... is recommended.) Connecting the audio cable from a sound card Connect the 4-pin audio cable between the sound output terminal on the COMBO drive and the audio input terminal on the master/slave select terminal Connect a jumper to MA (Master), it will work in the ... to SL (Slave), it will work in the Slave mode. English - 11 If the jumper is two COMBO drive, select MA (Master) / SL (Slave). a : Master Drive (Choose the MA Jumper) b : Slave Drive (Choose the SL Jumper) c : Hard Drive d : MainBoard e : Primary 1 f : Secondly 1 Installing a jumper on the sound card. For ...
... is recommended.) Connecting the audio cable from a sound card Connect the 4-pin audio cable between the sound output terminal on the COMBO drive and the audio input terminal on the master/slave select terminal Connect a jumper to MA (Master), it will work in the ... to SL (Slave), it will work in the Slave mode. English - 11 If the jumper is two COMBO drive, select MA (Master) / SL (Slave). a : Master Drive (Choose the MA Jumper) b : Slave Drive (Choose the SL Jumper) c : Hard Drive d : MainBoard e : Primary 1 f : Secondly 1 Installing a jumper on the sound card. For ...
User Manual (user Manual) (English)
Page 11
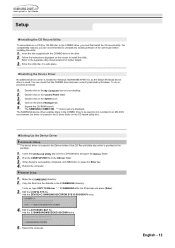
... on the System icon. Insert the CD Record Utility disc into the CD-ROM drive and open the Ddriver folder. When Setup is displayed. Edit the AUTOEXEC.BAT file. English - 12 Double-click on your desktop. The SAMSUNG COMBO SM - *** device name is successfully completed, click OK button or press the Enter key. Setting...
... on the System icon. Insert the CD Record Utility disc into the CD-ROM drive and open the Ddriver folder. When Setup is displayed. Edit the AUTOEXEC.BAT file. English - 12 Double-click on your desktop. The SAMSUNG COMBO SM - *** device name is successfully completed, click OK button or press the Enter key. Setting...
User Manual (user Manual) (English)
Page 12
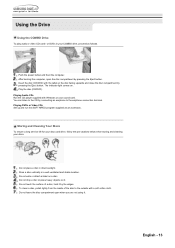
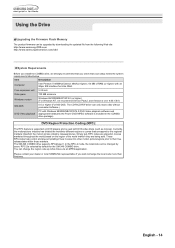
... Eject button. Do not write or attach a label on it . Storing and Cleaning Your Discs To ensure a long service life for your discs and drive, follow the pre-cautions below when storing and cleaning your discs. Playing DVDs or Video CDs Set up and run the SOFT MPEG program supplied...stable location. Do not leave the disc compartment open the disc compartment by pressing the Eject button. Using the Drive Using the COMBO Drive To play audio or video CDs and / or DVDs in your COMBO drive, proceed as an accessory. After booting the computer, open when you are not using it . Do not ...
... Eject button. Do not write or attach a label on it . Storing and Cleaning Your Discs To ensure a long service life for your discs and drive, follow the pre-cautions below when storing and cleaning your discs. Playing DVDs or Video CDs Set up and run the SOFT MPEG program supplied...stable location. Do not leave the disc compartment open the disc compartment by pressing the Eject button. Using the Drive Using the COMBO Drive To play audio or video CDs and / or DVDs in your COMBO drive, proceed as an accessory. After booting the computer, open when you are not using it . Do not ...
User Manual (user Manual) (English)
Page 13
...Windows 98/2000/ME/XP/NT4.0 (or higher) (For Windows NT, we strongly recommend that you check that your dealer or local SAMSUNG representative if you install the COMBO drive, we recommend Service Pack2, and Version is over 4.00.1381) MS-DOS 5.0 or higher (For MS-DOS, The CD-R/CD-...Video playback software and appropriate hardware (the Power DVD MPEG software is included in the COMBO drive package) DVD Region Protection Coding (RPC): The RPC feature is used with an 80pin IDE interface for the SM-348 COMBO drive. RPC-2is selected by default for Ultra DMA. English - 14 You can change ...
...Windows 98/2000/ME/XP/NT4.0 (or higher) (For Windows NT, we strongly recommend that you check that your dealer or local SAMSUNG representative if you install the COMBO drive, we recommend Service Pack2, and Version is over 4.00.1381) MS-DOS 5.0 or higher (For MS-DOS, The CD-R/CD-...Video playback software and appropriate hardware (the Power DVD MPEG software is included in the COMBO drive package) DVD Region Protection Coding (RPC): The RPC feature is used with an 80pin IDE interface for the SM-348 COMBO drive. RPC-2is selected by default for Ultra DMA. English - 14 You can change ...
User Manual (user Manual) (English)
Page 14
... and then copy the image file to record more than the record speed, reduce the record speed. Check the CD-ROM drive record speed. Note The COMBO Drive provide a High Speed rewriting Disc recording function (CD-RW 24X). There are using the Windows defragmenter feature: START / PROGRAMS...ACCESSORIES / SYSTEM TOOLS / DISC DEFRAGMENTER Decompress the hard disk if it is compressed. Troubleshooting If you have any problems recording via your COMBO drive, follow the appropriate instructions below for the source that the space available on the hard disk is at a High speed, use the ...
... and then copy the image file to record more than the record speed, reduce the record speed. Check the CD-ROM drive record speed. Note The COMBO Drive provide a High Speed rewriting Disc recording function (CD-RW 24X). There are using the Windows defragmenter feature: START / PROGRAMS...ACCESSORIES / SYSTEM TOOLS / DISC DEFRAGMENTER Decompress the hard disk if it is compressed. Troubleshooting If you have any problems recording via your COMBO drive, follow the appropriate instructions below for the source that the space available on the hard disk is at a High speed, use the ...

User Manual (user Manual) (English)
Page 16
... + Check the DMA checkbox to enabled on your PC system. DMA Setting Before you install your COMBO drive, we recommend to set DMA transfer mode in System Properties + Expand the CD-ROM icon + Click OK + Restart your COMBO drive. About DMA Installation For stable writing performance at high speeds, Installation of DMA transfer mode...
... + Check the DMA checkbox to enabled on your PC system. DMA Setting Before you install your COMBO drive, we recommend to set DMA transfer mode in System Properties + Expand the CD-ROM icon + Click OK + Restart your COMBO drive. About DMA Installation For stable writing performance at high speeds, Installation of DMA transfer mode...
User Manual (user Manual) (English)
Page 17
... on the PC mother board, rather than to the CD by MS-DOS. Check whether the audio cable is heard from the Samsung Web site. - The COMBO drive is not detected after inserting the disc. Open and close the disc compartment and try again. Preferably, connect a second IDE cable... to the computer. http://www.samsung-ODD.com - http://www.samsungelectronics.com/odd This case may not recognize the disc if you start ...
... on the PC mother board, rather than to the CD by MS-DOS. Check whether the audio cable is heard from the Samsung Web site. - The COMBO drive is not detected after inserting the disc. Open and close the disc compartment and try again. Preferably, connect a second IDE cable... to the computer. http://www.samsung-ODD.com - http://www.samsungelectronics.com/odd This case may not recognize the disc if you start ...


