
Quick Guide (ENGLISH)
Page 4
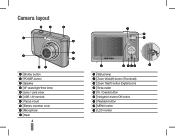
Camera layout 1 2 10 9 8 7 1 Shutter button 2 POWER button 3 Speaker 4 AF-assist light/timer lamp 5 Lens / Lens cover 6 USB / AV terminal 7 Tripod mount 8 Battery chamber cover 9 Microphone 10 Flash 4 3 4 5 6 11 12 13 19 18 17 16 15 14 11 Status lamp 12 Zoom Wide(W) button (Thumbnail) 13 Zoom Tele(T) button (Digital zoom) 14 Strap eyelet 15 Fn / Delete button 16 Navigation button/OK button 17 Playback button 18 MENU button 19 LCD monitor
Camera layout 1 2 10 9 8 7 1 Shutter button 2 POWER button 3 Speaker 4 AF-assist light/timer lamp 5 Lens / Lens cover 6 USB / AV terminal 7 Tripod mount 8 Battery chamber cover 9 Microphone 10 Flash 4 3 4 5 6 11 12 13 19 18 17 16 15 14 11 Status lamp 12 Zoom Wide(W) button (Thumbnail) 13 Zoom Tele(T) button (Digital zoom) 14 Strap eyelet 15 Fn / Delete button 16 Navigation button/OK button 17 Playback button 18 MENU button 19 LCD monitor

Quick Guide (ENGLISH)
Page 5
... this product. The contents can vary depending on the sales region. Optional accessories Camera AA Alkaline Batteries AD81-00867A Memory cards Rechargeable Battery AD81-00879A USB cable AD81-09092A Camera strap AD63-02596A AD63-02604A Charger AD81-00898A A/V Cable AD81-00735A Quick Start... Manual AD68-04185A Software CD-ROM (User manual included) AD46-00284A AC Cord AD81-00696A Camera case 5 English Setting up your nearest Samsung dealer or Samsung service ...
... this product. The contents can vary depending on the sales region. Optional accessories Camera AA Alkaline Batteries AD81-00867A Memory cards Rechargeable Battery AD81-00879A USB cable AD81-09092A Camera strap AD63-02596A AD63-02604A Charger AD81-00898A A/V Cable AD81-00735A Quick Start... Manual AD68-04185A Software CD-ROM (User manual included) AD46-00284A AC Cord AD81-00696A Camera case 5 English Setting up your nearest Samsung dealer or Samsung service ...

Quick Guide (ENGLISH)
Page 10
Transferring files to a PC (Windows) 1 Insert the installation CD in a CD-ROM drive and follow the onscreen instructions. 2 Connect the camera to the PC. 10 Disconnecting safely (for Windows XP) Click ▼ Click 3 Turn on the camera. 4 On your PC, select My Computer → Removable Disk → DCIM → 100PHOTO. 5 Select the files you want and drag or save them to the PC with the USB cable.
Transferring files to a PC (Windows) 1 Insert the installation CD in a CD-ROM drive and follow the onscreen instructions. 2 Connect the camera to the PC. 10 Disconnecting safely (for Windows XP) Click ▼ Click 3 Turn on the camera. 4 On your PC, select My Computer → Removable Disk → DCIM → 100PHOTO. 5 Select the files you want and drag or save them to the PC with the USB cable.

User Manual (ENGLISH)
Page 2
...note that the manufacturer holds no responsibility for buying a Samsung Digital Camera. å Prior to using this camera, please read the user manual thoroughly. å If you require After Sales service, please bring the camera and the cause of the camera malfunction (such as battery, Memory card etc.) to... editing program. (p.88) Take a picture Take a picture. (p.18) Insert the USB cable Insert the supplied USB cable into the PC's USB port and the camera's USB connection terminal. (p.90) Check the camera's power. After this has been done, the stored images in the following order. ...
...note that the manufacturer holds no responsibility for buying a Samsung Digital Camera. å Prior to using this camera, please read the user manual thoroughly. å If you require After Sales service, please bring the camera and the cause of the camera malfunction (such as battery, Memory card etc.) to... editing program. (p.88) Take a picture Take a picture. (p.18) Insert the USB cable Insert the supplied USB cable into the PC's USB port and the camera's USB connection terminal. (p.90) Check the camera's power. After this has been done, the stored images in the following order. ...

User Manual (ENGLISH)
Page 6
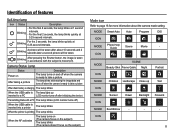
... Zone 051 File name 052 Imprinting the recording date 052 Auto power off 053 Selecting Video out type 054 Auto Focus lamp 054 Setting the USB 054 Selecting a battery type PLAY 055 055 055 056 056 057 057 058 058 Starting play mode Playing back a still image Playing back a ...movie clip Movie clip capture function Playing back a recorded voice Playing back a voice memo LCD monitor Indicator Using the camera buttons to set the camera Play mode button 058 Thumbnail / Enlargement button 058 Smart Album 061 Info (DISP) / Up button 061 Play & Pause / OK button 062 Left ...
... Zone 051 File name 052 Imprinting the recording date 052 Auto power off 053 Selecting Video out type 054 Auto Focus lamp 054 Setting the USB 054 Selecting a battery type PLAY 055 055 055 056 056 057 057 058 058 Starting play mode Playing back a still image Playing back a ...movie clip Movie clip capture function Playing back a recorded voice Playing back a voice memo LCD monitor Indicator Using the camera buttons to set the camera Play mode button 058 Thumbnail / Enlargement button 058 Smart Album 061 Info (DISP) / Up button 061 Play & Pause / OK button 062 Left ...

User Manual (ENGLISH)
Page 7
Contents 075 Copy To Card 076 PictBridge 077 PictBridge : Picture Selection 077 PictBridge : Print Setting 078 PictBridge : Reset 078 Important notes 080 Warning indicator 081 Before contacting a service centre 083 Specifications SOFTWARE 086 086 087 088 090 093 094 097 097 098 Software Notes System Requirements About the software Setting up the application software Starting PC mode Removing the removable disk Samsung Master Setting up the USB Driver for MAC Using the USB Driver for MAC FAQ 6
Contents 075 Copy To Card 076 PictBridge 077 PictBridge : Picture Selection 077 PictBridge : Print Setting 078 PictBridge : Reset 078 Important notes 080 Warning indicator 081 Before contacting a service centre 083 Specifications SOFTWARE 086 086 087 088 090 093 094 097 097 098 Software Notes System Requirements About the software Setting up the application software Starting PC mode Removing the removable disk Samsung Master Setting up the USB Driver for MAC Using the USB Driver for MAC FAQ 6

User Manual (ENGLISH)
Page 8
...contents before using this product. Parts and accessories illustrated below may differ from exact appearance. Package Contents Camera AA Alkaline Batteries AD81-00867A USB cable AD81-09092A Sold Separately Camera strap AD63-02596A AD63-02604A Software CD (see p.87) AD46-00284A User manual, Product warranty ... MMC (see p.15) Rechargeable battery AD81-00879A Charger AD81-00898A AV cable AD81-00735A AC cord AD81-00696A Camera case 7 To buy the optional equipment, contact your nearest Samsung dealer or Samsung service centre. The contents can vary depending on the sales region.
...contents before using this product. Parts and accessories illustrated below may differ from exact appearance. Package Contents Camera AA Alkaline Batteries AD81-00867A USB cable AD81-09092A Sold Separately Camera strap AD63-02596A AD63-02604A Software CD (see p.87) AD46-00284A User manual, Product warranty ... MMC (see p.15) Rechargeable battery AD81-00879A Charger AD81-00898A AV cable AD81-00735A AC cord AD81-00696A Camera case 7 To buy the optional equipment, contact your nearest Samsung dealer or Samsung service centre. The contents can vary depending on the sales region.
User Manual (ENGLISH)
Page 12
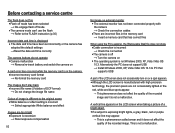
... image is taken in accordance with a PC The lamp blinks (LCD monitor turns off) When the USB cable is inserted into a printer The lamp blinks When the printer is The lamp lights up Text... saving the image data and turns off when the camera is ready to take a picture When flash battery is charging The lamp blinks When the USB cable is printing The lamp blinks When the AF ...activates The lamp turns on (The camera focus on the subject) The lamp blinks (The camera doesn't focus on the subject) ...
... image is taken in accordance with a PC The lamp blinks (LCD monitor turns off) When the USB cable is inserted into a printer The lamp blinks When the printer is The lamp lights up Text... saving the image data and turns off when the camera is ready to take a picture When flash battery is charging The lamp blinks When the USB cable is printing The lamp blinks When the AF ...activates The lamp turns on (The camera focus on the subject) The lamp blinks (The camera doesn't focus on the subject) ...

User Manual (ENGLISH)
Page 54
... of device (monitor or TV, etc.) to an external monitor, some parts of the TV. - PAL mode can be a digital noise on the LCD monitor. Video Out AF Lamp USB Battery Type NTS:CNTSC PAL :On :Auto :Alkaline Back Set - If the image is not in the centre of the screen..., use the TV controls to an external monitor, the image and menus on the LCD monitor will be NTSC or PAL. When the camera is connected to which the camera is connected. Video White - Your choice of output will be displayed. - PAL : Australia, Austria, Belgium, China, Denmark, Finland, Germany, U.K., Holland, Italy,...
... of device (monitor or TV, etc.) to an external monitor, some parts of the TV. - PAL mode can be a digital noise on the LCD monitor. Video Out AF Lamp USB Battery Type NTS:CNTSC PAL :On :Auto :Alkaline Back Set - If the image is not in the centre of the screen..., use the TV controls to an external monitor, the image and menus on the LCD monitor will be NTSC or PAL. When the camera is connected to which the camera is connected. Video White - Your choice of output will be displayed. - PAL : Australia, Austria, Belgium, China, Denmark, Finland, Germany, U.K., Holland, Italy,...

User Manual (ENGLISH)
Page 55
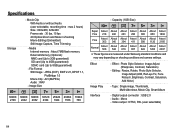
... Type Back :NTSC Off :On On :Auto :Alkaline Set Setting the USB If the camera is selected, the camera will light up in low light conditions. Sub menus [Off] : The AF lamp will not light up in low light conditions. [On]* : The AF lamp ... type If a battery type is set to connect automatically to the selected battery type. [Battery Type] sub Menu : [Alkaline]* / [Ni-MH] Video Out AF Lamp USB Battery Type :NTSC :On :Auto Alka:lAinlekaline Ni-MH Back Set 54 Settings ( " ) Auto Focus lamp You can manually set [Computer] or [Printer...
... Type Back :NTSC Off :On On :Auto :Alkaline Set Setting the USB If the camera is selected, the camera will light up in low light conditions. Sub menus [Off] : The AF lamp will not light up in low light conditions. [On]* : The AF lamp ... type If a battery type is set to connect automatically to the selected battery type. [Battery Type] sub Menu : [Alkaline]* / [Ni-MH] Video Out AF Lamp USB Battery Type :NTSC :On :Auto Alka:lAinlekaline Ni-MH Back Set 54 Settings ( " ) Auto Focus lamp You can manually set [Computer] or [Printer...

User Manual (ENGLISH)
Page 65
Card - 4X6 - A3 - p.77 Auto - p.78 - Ä Menus are subject to the camera, sold separately) with a USB cable. Size L - 2L - Index - Menu Tab Main Menu Type Quality ❹ Date File Name Reset Sub Menu...- - - p.77 - - - - - - Layout 4 - 8 - 9 - 16 - Letter - ❹ A4 - Setting up the play back function using the LCD monitor This menu is available while the camera is connected to a PictBridge supporting printer (direct connection to change without prior notice. 64 Menu Tab Main Menu Sub Menu Secondary Menu Page Images One...
Card - 4X6 - A3 - p.77 Auto - p.78 - Ä Menus are subject to the camera, sold separately) with a USB cable. Size L - 2L - Index - Menu Tab Main Menu Type Quality ❹ Date File Name Reset Sub Menu...- - - p.77 - - - - - - Layout 4 - 8 - 9 - 16 - Letter - ❹ A4 - Setting up the play back function using the LCD monitor This menu is available while the camera is connected to a PictBridge supporting printer (direct connection to change without prior notice. 64 Menu Tab Main Menu Sub Menu Secondary Menu Page Images One...

User Manual (ENGLISH)
Page 77
...next image. 1. Movie clips and voice files cannot be Print Menu printed with USB cable. - Pressing the OK button : 2. Connect the camera and printer with the printer's default setting. Ä If automatic connection fails, set the [USB] menu to [Printer]. (p.54) Ä For a printer that Ê...and print the stored images When you can enable removable disks, set the [USB] menu to [Printer]. Ê Connecting the Camera to a Printer 76 Once the camera is turned on, the camera automatically recognizes the printer and is connected to printer directly. PictBridge You can...
...next image. 1. Movie clips and voice files cannot be Print Menu printed with USB cable. - Pressing the OK button : 2. Connect the camera and printer with the printer's default setting. Ä If automatic connection fails, set the [USB] menu to [Printer]. (p.54) Ä For a printer that Ê...and print the stored images When you can enable removable disks, set the [USB] menu to [Printer]. Ê Connecting the Camera to a Printer 76 Once the camera is turned on, the camera automatically recognizes the printer and is connected to printer directly. PictBridge You can...

User Manual (ENGLISH)
Page 80
... automatical battery discharged. Rough handling can form on the memory card. If this occurs, turn itself off the camera and remove the memory card. Samsung cannot be held responsible for at all moisture is a good idea to get fingerprints or foreign substances on Using...the discoloration and deterioration of the lens. å If the digital camera is transferred from photo stores) to a warm and humid environment, condensation can damage the LCD monitor. If this case, disconnect and reconnect the USB cable before the recording. 79 Use a soft brush (available ...
... automatical battery discharged. Rough handling can form on the memory card. If this occurs, turn itself off the camera and remove the memory card. Samsung cannot be held responsible for at all moisture is a good idea to get fingerprints or foreign substances on Using...the discoloration and deterioration of the lens. å If the digital camera is transferred from photo stores) to a warm and humid environment, condensation can damage the LCD monitor. If this case, disconnect and reconnect the USB cable before the recording. 79 Use a soft brush (available ...
User Manual (ENGLISH)
Page 83
...;Reset the date and time correctly The camera buttons do not operate åCamera malfunction à Remove/re-insert battery and switch the camera on A card error has occurred while the memory card is in the memory card à Insert a memory card that supports USB A part of the LCD screen does ...not occasionally turn on or a spot appears. åAlthough the LCD screen is manufactured with the camera à Check the connection cables åThere are not occasionally lighted or the...
...;Reset the date and time correctly The camera buttons do not operate åCamera malfunction à Remove/re-insert battery and switch the camera on A card error has occurred while the memory card is in the memory card à Insert a memory card that supports USB A part of the LCD screen does ...not occasionally turn on or a spot appears. åAlthough the LCD screen is manufactured with the camera à Check the connection cables åThere are not occasionally lighted or the...
User Manual (ENGLISH)
Page 85
... About 506 About 548 About 616 About 657 About 822 About 1263 About 2397 Ä These figures are measured under Samsung standard conditions and may vary depending on shooting conditions and camera settings. Type : Single image, Thumbnails, Multi slide show, Movie Clip, Smart Album - Video output : NTSC, PAL (user selectable) 84 Movie... 1.1, PictBridge 1.0 ·Movie Clip : AVI (MJPEG) ·Audio : WAV - Image Size 3648X 3648X 3648X 3072X 2592X 2048X 1024X 2736 2432 2052 2304 1944 1536 768 - Digital output connector : USB 2.0 - Specifications Storage -
... About 506 About 548 About 616 About 657 About 822 About 1263 About 2397 Ä These figures are measured under Samsung standard conditions and may vary depending on shooting conditions and camera settings. Type : Single image, Thumbnails, Multi slide show, Movie Clip, Smart Album - Video output : NTSC, PAL (user selectable) 84 Movie... 1.1, PictBridge 1.0 ·Movie Clip : AVI (MJPEG) ·Audio : WAV - Image Size 3648X 3648X 3648X 3072X 2592X 2048X 1024X 2736 2432 2052 2304 1944 1536 768 - Digital output connector : USB 2.0 - Specifications Storage -
User Manual (ENGLISH)
Page 87
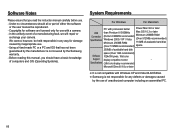
... use of computers and O/S (Operating Systems). System Requirements For Windows For Macintosh PC with processor better Power Mac G3 or later USB Connection Specifications than Pentium III 500MHz (Pentium III 800MHz recommended) Windows 2000 / XP / Vista Minimum 256MB RAM Mac OS...- Copyrights for software are licensed only for damage caused by the Samsung warranty. - Software Notes Please ensure that has not been guaranteed by the manufacturer is not responsible for any way for use with a camera. - Under no circumstances should have a basic knowledge of unauthorized ...
... use of computers and O/S (Operating Systems). System Requirements For Windows For Macintosh PC with processor better Power Mac G3 or later USB Connection Specifications than Pentium III 500MHz (Pentium III 800MHz recommended) Windows 2000 / XP / Vista Minimum 256MB RAM Mac OS...- Copyrights for software are licensed only for damage caused by the Samsung warranty. - Software Notes Please ensure that has not been guaranteed by the manufacturer is not responsible for any way for use with a camera. - Under no circumstances should have a basic knowledge of unauthorized ...

User Manual (ENGLISH)
Page 90
Turn the camera power on. The [Found New Hardware Wizard] will open and the computer will recognise the camera. Ä If your OS is Windows XP/ Vista, an image viewer program will open. 89 After restarting the computer, connect the PC to the camera with the USB cable. 4. Setting up the application software 3.
Turn the camera power on. The [Found New Hardware Wizard] will open and the computer will recognise the camera. Ä If your OS is Windows XP/ Vista, an image viewer program will open. 89 After restarting the computer, connect the PC to the camera with the USB cable. 4. Setting up the application software 3.

User Manual (ENGLISH)
Page 91
.... 3. If the Internet is connected to it. Ä If automatic connection fails, set the [USB] menu to a USB port on your PC through the USB cable. Ê Camera settings for connection 1. Before opening the PDF files, you must install the Adobe Reader included in the CD. å To install the...not enabled, install Adobe Reader by using the executable file located in the Software CD-ROM. Connect the camera and computer with Windows explorer. Starting PC mode If you connect the USB cable to [Computer]. (p.54) 90 Setting up the application software å PDF documents of user manual...
.... 3. If the Internet is connected to it. Ä If automatic connection fails, set the [USB] menu to a USB port on your PC through the USB cable. Ê Camera settings for connection 1. Before opening the PDF files, you must install the Adobe Reader included in the CD. å To install the...not enabled, install Adobe Reader by using the executable file located in the Software CD-ROM. Connect the camera and computer with Windows explorer. Starting PC mode If you connect the USB cable to [Computer]. (p.54) 90 Setting up the application software å PDF documents of user manual...

User Manual (ENGLISH)
Page 92
Select an image and press the right mouse button. 91 On your PC with the USB cable. 2. Starting PC mode Ê Connecting the camera to a PC Ê Disconnecting the camera and PC Refer to page 93 (Removing the removable disk). Ê Downloading stored images You can download the still images stored on the camera to your PC's hard disk and print them or use a photo editing software to your computer's desktop display, select [My computer] and double click [Removable Disk à DCIMà 100PHOTO].The image files will then be displayed. 3. Connect the camera to edit them. 1.
Select an image and press the right mouse button. 91 On your PC with the USB cable. 2. Starting PC mode Ê Connecting the camera to a PC Ê Disconnecting the camera and PC Refer to page 93 (Removing the removable disk). Ê Downloading stored images You can download the still images stored on the camera to your PC's hard disk and print them or use a photo editing software to your computer's desktop display, select [My computer] and double click [Removable Disk à DCIMà 100PHOTO].The image files will then be displayed. 3. Connect the camera to edit them. 1.

User Manual (ENGLISH)
Page 94
The [Stop a Hardware device] window will open . Select the [USB Mass Storage Device] and click the [OK] button. 93 The [Unplug or Eject Hardware] window will open . Double-click the [Unplug or Eject Hardware] icon ...on . 2. Click the [OK] button. 6. Click the [Close] button and the removable disk will open . Unplug the USB cable. 4. Select the [USB Mass Storage Device] and click the [Stop] button. [Double-click!] 5. If the camera status lamp blinks, please wait until the lamp has finished blinking and is constantly on the task bar...
The [Stop a Hardware device] window will open . Select the [USB Mass Storage Device] and click the [OK] button. 93 The [Unplug or Eject Hardware] window will open . Double-click the [Unplug or Eject Hardware] icon ...on . 2. Click the [OK] button. 6. Click the [Close] button and the removable disk will open . Unplug the USB cable. 4. Select the [USB Mass Storage Device] and click the [Stop] button. [Double-click!] 5. If the camera status lamp blinks, please wait until the lamp has finished blinking and is constantly on the task bar...


