

User Manual (ENGLISH)
Page 2
All rights reserved. • SF-560R and Samsung logo are trademarks of Samsung Electronics Co., Ltd. • All other brand or product names are trademarks of this manual. © 2007 Samsung Electronics Co., Ltd. All information included herein is not responsible for information purposes only. Samsung Electronics is subject to use of their respective companies or organizations. This manual is provided for any direct or indirect damages, arising from or related to change without notice.
All rights reserved. • SF-560R and Samsung logo are trademarks of Samsung Electronics Co., Ltd. • All other brand or product names are trademarks of this manual. © 2007 Samsung Electronics Co., Ltd. All information included herein is not responsible for information purposes only. Samsung Electronics is subject to use of their respective companies or organizations. This manual is provided for any direct or indirect damages, arising from or related to change without notice.

User Manual (ENGLISH)
Page 5
... System 1.19 Available Fax Setup Options 1.20 Chapter 2: BASIC FUNCTIONS Sending a Fax 2.2 Preparing a Document 2.2 Loading a Document 2.2 Adjusting the Document Resolution 2.3 Sending a Fax Automatically 2.4 Sending a Fax Manually 2.4 Redialing the Last Number 2.5 Confirming Transmission 2.5 Automatic Redialing 2.5 Receiving a Fax 2.6 iv
... System 1.19 Available Fax Setup Options 1.20 Chapter 2: BASIC FUNCTIONS Sending a Fax 2.2 Preparing a Document 2.2 Loading a Document 2.2 Adjusting the Document Resolution 2.3 Sending a Fax Automatically 2.4 Sending a Fax Manually 2.4 Redialing the Last Number 2.5 Confirming Transmission 2.5 Automatic Redialing 2.5 Receiving a Fax 2.6 iv
User Manual (ENGLISH)
Page 6
About Receiving Modes 2.6 Loading Paper for Receiving Faxes 2.6 Receiving Automatically in Fax Mode 2.7 Receiving Manually in Tel Mode 2.7 Receiving Automatically in Ans/Fax Mode 2.7 Receiving Manually Using an Extension Telephone 2.8 Receiving Faxes Using the DRPD Mode 2.8 Receiving Faxes in the Memory 2.9 Making a... Copy 2.10 Loading Paper for Copying 2.10 Setting the Paper Type and Size for the Manual Feeder .... 2.11 Making a Copy 2.11 Setting Copy Options 2.12 Darkness 2.12 Original Type 2.12 Number of Copies 2.12 Reduced/Enlarged...
About Receiving Modes 2.6 Loading Paper for Receiving Faxes 2.6 Receiving Automatically in Fax Mode 2.7 Receiving Manually in Tel Mode 2.7 Receiving Automatically in Ans/Fax Mode 2.7 Receiving Manually Using an Extension Telephone 2.8 Receiving Faxes Using the DRPD Mode 2.8 Receiving Faxes in the Memory 2.9 Making a... Copy 2.10 Loading Paper for Copying 2.10 Setting the Paper Type and Size for the Manual Feeder .... 2.11 Making a Copy 2.11 Setting Copy Options 2.12 Darkness 2.12 Original Type 2.12 Number of Copies 2.12 Reduced/Enlarged...

User Manual (ENGLISH)
Page 7
... 6.2 Exit Misfeed 6.2 Clearing Paper Jams 6.3 In the Paper Tray 6.3 In the Paper Exit Area 6.3 In the Fuser Area or Around the Toner Cartridge 6.4 In the Manual Feeder 6.5 Tips for Avoiding Paper Jams 6.5 Clearing LCD Error Messages 6.5 Solving Problems 6.8 Paper Feeding Problems 6.8 Copying Problems 6.9 Faxing Problems 6.9 Appendix A: SPECIFICATIONS General Specifications A.2 Copier Specifications...
... 6.2 Exit Misfeed 6.2 Clearing Paper Jams 6.3 In the Paper Tray 6.3 In the Paper Exit Area 6.3 In the Fuser Area or Around the Toner Cartridge 6.4 In the Manual Feeder 6.5 Tips for Avoiding Paper Jams 6.5 Clearing LCD Error Messages 6.5 Solving Problems 6.8 Paper Feeding Problems 6.8 Copying Problems 6.9 Faxing Problems 6.9 Appendix A: SPECIFICATIONS General Specifications A.2 Copier Specifications...

User Manual (ENGLISH)
Page 19
Understanding the Component Location These are the main components of your machine: Front View Document Input Automatic Document Support Feeder Control Panel (See page 1.5) Document Output Tray Document Guides Front Output Tray (Face down) Front Cover Paper Output Extension Handset Paper Level Indicator Manual Feeder Paper Tray Manual Feeder Guides Toner Cartridge Rear View Rear Cover EXT Jack* Line Jack Rear Output Slot (Face up) Power Switch AC Power Cord Connector * If your country has a different telephone connection system, this socket may be blocked. 1.4 GETTING STARTED
Understanding the Component Location These are the main components of your machine: Front View Document Input Automatic Document Support Feeder Control Panel (See page 1.5) Document Output Tray Document Guides Front Output Tray (Face down) Front Cover Paper Output Extension Handset Paper Level Indicator Manual Feeder Paper Tray Manual Feeder Guides Toner Cartridge Rear View Rear Cover EXT Jack* Line Jack Rear Output Slot (Face up) Power Switch AC Power Cord Connector * If your country has a different telephone connection system, this socket may be blocked. 1.4 GETTING STARTED

User Manual (ENGLISH)
Page 39
You can use the one -touch keypad or speed or group dial numbers. Sending a Fax Manually 1 Load the document(s) face down into the ADF. Sending a Fax Automatically 1 Load the document(s) face down into the ADF. The number is dialed and then ...
You can use the one -touch keypad or speed or group dial numbers. Sending a Fax Manually 1 Load the document(s) face down into the ADF. Sending a Fax Automatically 1 Load the document(s) face down into the ADF. The number is dialed and then ...
User Manual (ENGLISH)
Page 42
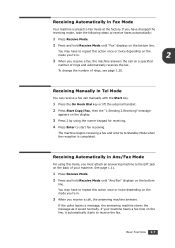
...Fax mode at the factory. If the caller leaves a message, the answering machine stores the message as it automatically starts to receive the fax. Receiving Manually in . 3 When you receive a call, the answering machine answers. See page 1.11. 1 Press Receive Mode. 2 Press and hold Receive Mode... on a specified number of rings and automatically receives the fax. Receiving Automatically in . 2 3 When you receive a fax, the machine answers the call manually with the Start key. 1 Press the On Hook Dial key or lift the external handset. 2 Press Start Copy/Fax, then the "1.Sending 2.Receiving"...
...Fax mode at the factory. If the caller leaves a message, the answering machine stores the message as it automatically starts to receive the fax. Receiving Manually in . 3 When you receive a call, the answering machine answers. See page 1.11. 1 Press Receive Mode. 2 Press and hold Receive Mode... on a specified number of rings and automatically receives the fax. Receiving Automatically in . 2 3 When you receive a fax, the machine answers the call manually with the Start key. 1 Press the On Hook Dial key or lift the external handset. 2 Press Start Copy/Fax, then the "1.Sending 2.Receiving"...

User Manual (ENGLISH)
Page 43
... you are fixed, but you can "learn" the ring pattern you designate to be answered by different ringing patterns, which is receiving faxes manually, when the answering machine is connected to your machine, you must be installed on the extension telephone. NOTES: • When you have ... service must switch off or no answering machine is connected to the EXT jack, your FAX number from outside. 2.8 BASIC FUNCTIONS Receiving Manually Using an Extension Telephone You can easily suspend or change the middle number to dial your machine automatically goes into Fax mode after a ...
... you are fixed, but you can "learn" the ring pattern you designate to be answered by different ringing patterns, which is receiving faxes manually, when the answering machine is connected to your machine, you must be installed on the extension telephone. NOTES: • When you have ... service must switch off or no answering machine is connected to the EXT jack, your FAX number from outside. 2.8 BASIC FUNCTIONS Receiving Manually Using an Extension Telephone You can easily suspend or change the middle number to dial your machine automatically goes into Fax mode after a ...

User Manual (ENGLISH)
Page 45
... problems. 2 Adjust the guide to load special print material, such as transparencies or labels, if they are Letter-, A4-, Legalsized. Oils from the manual feeder, the printed side should be facing down with paper feed, turn the paper around. 2.10 BASIC FUNCTIONS Making a Copy Loading Paper for Copying ...The instructions for loading in the manual feeder: 1 Load a sheet of the print material with the print side face up and into the paper tray are the same whether you can...
... problems. 2 Adjust the guide to load special print material, such as transparencies or labels, if they are Letter-, A4-, Legalsized. Oils from the manual feeder, the printed side should be facing down with paper feed, turn the paper around. 2.10 BASIC FUNCTIONS Making a Copy Loading Paper for Copying ...The instructions for loading in the manual feeder: 1 Load a sheet of the print material with the print side face up and into the paper tray are the same whether you can...

User Manual (ENGLISH)
Page 46
...on . See page 2.2 for further details about preparing a document and loading it . 7 To return to set the paper size for the Manual Feeder After loading paper in the manual feeder, you access this area. 4 After copying, close the rear cover. Sorts the copy job. Press Enter to access the menu item... are using the control panel buttons. Be careful when you need to Standby mode, press Stop/Clear. Setting the Paper Type and Size for the manual feeder: 1 Press Menu. see page 2.14 BASIC FUNCTIONS 2.11 NOTE: If you are using envelopes or card stocks, you make 2 copies of 3 page ...
...on . See page 2.2 for further details about preparing a document and loading it . 7 To return to set the paper size for the Manual Feeder After loading paper in the manual feeder, you access this area. 4 After copying, close the rear cover. Sorts the copy job. Press Enter to access the menu item... are using the control panel buttons. Be careful when you need to Standby mode, press Stop/Clear. Setting the Paper Type and Size for the manual feeder: 1 Press Menu. see page 2.14 BASIC FUNCTIONS 2.11 NOTE: If you are using envelopes or card stocks, you make 2 copies of 3 page ...

User Manual (ENGLISH)
Page 80
... cover to resume printing. TROUBLESHOOTING 6.3 Clearing Paper Jams When a paper jam occurs, "Paper Jam" appears on the next pages to clear the jam. In the manual feeder In the paper exit area page 6.4 page 6.5 page 6.3 To avoid tearing the paper, pull the jammed paper out gently and slowly. If the paper...
... cover to resume printing. TROUBLESHOOTING 6.3 Clearing Paper Jams When a paper jam occurs, "Paper Jam" appears on the next pages to clear the jam. In the manual feeder In the paper exit area page 6.4 page 6.5 page 6.3 To avoid tearing the paper, pull the jammed paper out gently and slowly. If the paper...

User Manual (ENGLISH)
Page 82
..., if necessary. Ensure that the print side of print materials is below the paper capacity mark on page 1.9 when you try to print using the manual feeder and the machine does not detect paper, due to no paper or improper paper loading. Ensure that case, pull the paper out of the... the paper before loading. • Do not use creased, damp or highly curled paper. • Do not mix paper types in alphabetical order. In the Manual Feeder " " appears on the display to indicate the control panel to indicate 6 the machine's status or errors. In that the paper is facing down in...
..., if necessary. Ensure that the print side of print materials is below the paper capacity mark on page 1.9 when you try to print using the manual feeder and the machine does not detect paper, due to no paper or improper paper loading. Ensure that case, pull the paper out of the... the paper before loading. • Do not use creased, damp or highly curled paper. • Do not mix paper types in alphabetical order. In the Manual Feeder " " appears on the display to indicate the control panel to indicate 6 the machine's status or errors. In that the paper is facing down in...

User Manual (ENGLISH)
Page 83
... the fuser unit. There is already engaged. Please contact a service representative. Try again after more than one -touch or speed dial number or dial a number manually using the number keypad. Or, turn the ECM on. If the problem persists, please contact a service representative. The memory is full.
... the fuser unit. There is already engaged. Please contact a service representative. Try again after more than one -touch or speed dial number or dial a number manually using the number keypad. Or, turn the ECM on. If the problem persists, please contact a service representative. The memory is full.

User Manual (ENGLISH)
Page 84
... jammed in the paper exit area. • A paper jam has occurred in the paper tray. out. Load paper in the manual feeder or the machine detects non-feeding from the manual feeder. Check the display to see page 2.15. Power has turned off then on and the machine's memory has not been.... TROUBLESHOOTING 6.7 You are doing this, you were trying to cancel the redial operation. Display [No Answer] NO. Suggested solutions Try again. area. Dial the number manually using the number keypad or assign the number. You can temporarily reestablish printing operations.
... jammed in the paper exit area. • A paper jam has occurred in the paper tray. out. Load paper in the manual feeder or the machine detects non-feeding from the manual feeder. Check the display to see page 2.15. Power has turned off then on and the machine's memory has not been.... TROUBLESHOOTING 6.7 You are doing this, you were trying to cancel the redial operation. Display [No Answer] NO. Suggested solutions Try again. area. Dial the number manually using the number keypad or assign the number. You can temporarily reestablish printing operations.
User Manual (ENGLISH)
Page 85
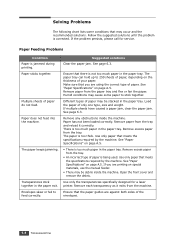
... only paper that may be stacked in the paper tray. If you are printing on the thickness of paper, depending on special materials, use the manual feeder. • There may occur and the recommended solutions. Solving Problems The following chart lists some paper to feed correctly. Paper sticks together. Envelopes skew...
... only paper that may be stacked in the paper tray. If you are printing on the thickness of paper, depending on special materials, use the manual feeder. • There may occur and the recommended solutions. Solving Problems The following chart lists some paper to feed correctly. Paper sticks together. Envelopes skew...

User Manual (ENGLISH)
Page 90
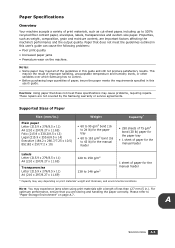
... in Letter) Copy speed (MDSC)** Up to 7 cpm in A4 (8 cpm in Letter) Paper type Paper tray: Plain paper (60 ~ 90 g/m2, 16 ~ 24 lb) Manual feeder: Plain paper, Transparencies, Labels Copy resolution 300 x 300 dpi Zoom rate 50 ~ 150% Multiple copies 99 pages Halftone 256 levels *Copy Speed is based...
... in Letter) Copy speed (MDSC)** Up to 7 cpm in A4 (8 cpm in Letter) Paper type Paper tray: Plain paper (60 ~ 90 g/m2, 16 ~ 24 lb) Manual feeder: Plain paper, Transparencies, Labels Copy resolution 300 x 300 dpi Zoom rate 50 ~ 150% Multiple copies 99 pages Halftone 256 levels *Copy Speed is based...
User Manual (ENGLISH)
Page 92
... not produce satisfactory results. NOTES: • Some paper may be the result of improper handling, unacceptable temperature and humidity levels, or other variables over which Samsung has no control. • Before purchasing large quantities of paper, insure the paper meets the requirements specified in this user's guide can cause the following...; 60 to 90 g/m2 bond (16 to 24 lb) for the paper tray • 60 to 163 g/m2 bond (16 to 43 lb) for the manual feeder Capacity* • 250 sheets of 75 g/m2 bond (20 lb) paper for the paper tray • 1 sheet of paper for the...
... not produce satisfactory results. NOTES: • Some paper may be the result of improper handling, unacceptable temperature and humidity levels, or other variables over which Samsung has no control. • Before purchasing large quantities of paper, insure the paper meets the requirements specified in this user's guide can cause the following...; 60 to 90 g/m2 bond (16 to 24 lb) for the paper tray • 60 to 163 g/m2 bond (16 to 43 lb) for the manual feeder Capacity* • 250 sheets of 75 g/m2 bond (20 lb) paper for the paper tray • 1 sheet of paper for the...

User Manual (ENGLISH)
Page 96
... system, set advanced settings 4.4 basic settings 1.19 G group dial dialing 2.18 editing 2.18 setting 2.17 H handset, attach 1.7 J jam, clear document 6.2 paper 6.3 M machine ID, set 1.13 manual feeder, paper load 2.10 memory, clear 5.2 O one-touch dial dialing 2.15 storing 2.15 P paper jam, clear 6.3 paper level indicator 2.6 paper size, set 1.16 paper tray...
... system, set advanced settings 4.4 basic settings 1.19 G group dial dialing 2.18 editing 2.18 setting 2.17 H handset, attach 1.7 J jam, clear document 6.2 paper 6.3 M machine ID, set 1.13 manual feeder, paper load 2.10 memory, clear 5.2 O one-touch dial dialing 2.15 storing 2.15 P paper jam, clear 6.3 paper level indicator 2.6 paper size, set 1.16 paper tray...

User Manual (ENGLISH)
Page 97
... Receiving mode 4.2 in Tel mode 2.7 in the memory 2.9 redial, last number 3.2 reduced/enlarged copy 2.13 reports, print 4.3 resolution, set 2.3 S searching Phonebook 2.19 sending a fax automatically 2.4 manually 2.4 shading, adjust 5.3 sounds, set 1.17 specifications facsimile A.4 general A.2 paper A.5 scanner and copier A.3 speed dial dialing 2.16 storing 2.16 T tel line, connect 1.11 toll save mode...
... Receiving mode 4.2 in Tel mode 2.7 in the memory 2.9 redial, last number 3.2 reduced/enlarged copy 2.13 reports, print 4.3 resolution, set 2.3 S searching Phonebook 2.19 sending a fax automatically 2.4 manually 2.4 shading, adjust 5.3 sounds, set 1.17 specifications facsimile A.4 general A.2 paper A.5 scanner and copier A.3 speed dial dialing 2.16 storing 2.16 T tel line, connect 1.11 toll save mode...


