
Universal Print Driver Guide (ENGLISH)
Page 9
... guide. The most recently used printers. You need to see the troubleshooting guide. • Printer Settings: Opens SyncThur Web Service, which provides options for pop-ups and searches. Changing Samsung Universal Print Driver settings Setting the pop-up : 1. There are ...IP address. • My Printer - Using the Samsung Universal Print Driver_ 9 Shows status of the list. - Search Now: Searches printers that are four options for buying supplies. • TroubleShooting Guide: Opens the troubleshooting chapter of the model you print. Recently Used Printers...
... guide. The most recently used printers. You need to see the troubleshooting guide. • Printer Settings: Opens SyncThur Web Service, which provides options for pop-ups and searches. Changing Samsung Universal Print Driver settings Setting the pop-up : 1. There are ...IP address. • My Printer - Using the Samsung Universal Print Driver_ 9 Shows status of the list. - Search Now: Searches printers that are four options for buying supplies. • TroubleShooting Guide: Opens the troubleshooting chapter of the model you print. Recently Used Printers...
User Manual (ENGLISH)
Page 8
... Change Passcode 7.15 Clearing Memory 7.15 Setting E-mail Notification 7.16 Setting the Machine Setup tab 7.16 Setting the Contact Information tab 7.18 Chapter 8: TROUBLESHOOTING Fault Clearance 8.2 Document Jams 8.2 Input Misfeed 8.2 Exit Misfeed 8.3 Roller Misfeed 8.4 Paper Jams 8.5 Paper Feed Area 8.5 Fuser Area 8.7 Paper Exit... Chart 8.20 Printing Problem Solution Chart 8.22 Scanning Problems 8.25 Fax Problem Solution Chart (only for SCX-6320F 8.26 Common Linux Problems 8.28 Troubleshooting PostScript Errors (Option) ........ 8.31 Common Macintosh Problems (Option 8.32 vii
... Change Passcode 7.15 Clearing Memory 7.15 Setting E-mail Notification 7.16 Setting the Machine Setup tab 7.16 Setting the Contact Information tab 7.18 Chapter 8: TROUBLESHOOTING Fault Clearance 8.2 Document Jams 8.2 Input Misfeed 8.2 Exit Misfeed 8.3 Roller Misfeed 8.4 Paper Jams 8.5 Paper Feed Area 8.5 Fuser Area 8.7 Paper Exit... Chart 8.20 Printing Problem Solution Chart 8.22 Scanning Problems 8.25 Fax Problem Solution Chart (only for SCX-6320F 8.26 Common Linux Problems 8.28 Troubleshooting PostScript Errors (Option) ........ 8.31 Common Macintosh Problems (Option 8.32 vii
User Manual (ENGLISH)
Page 142
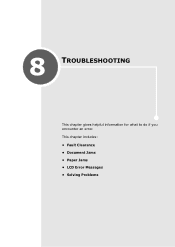
8 TROUBLESHOOTING This chapter gives helpful information for what to do if you encounter an error. This chapter includes: • Fault Clearance • Document Jams • Paper Jams • LCD Error Messages • Solving Problems
8 TROUBLESHOOTING This chapter gives helpful information for what to do if you encounter an error. This chapter includes: • Fault Clearance • Document Jams • Paper Jams • LCD Error Messages • Solving Problems
User Manual (ENGLISH)
Page 143
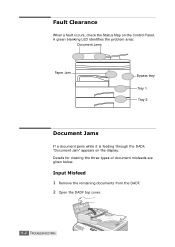
A green blanking LED identifies the problem area: Document Jams Paper Jam Bypass tray Tray 1 Tray 2 Document Jams If a document jams while it is feeding through the DADF, "Document Jam" appears on the Control Panel. Fault Clearance When a fault occurs, check the Status Map on the display. Input Misfeed 1 Remove the remaining documents from the DADF. 2 Open the DADF top cover. 8.2 TROUBLESHOOTING Details for clearing the three types of document misfeeds are given below.
A green blanking LED identifies the problem area: Document Jams Paper Jam Bypass tray Tray 1 Tray 2 Document Jams If a document jams while it is feeding through the DADF, "Document Jam" appears on the Control Panel. Fault Clearance When a fault occurs, check the Status Map on the display. Input Misfeed 1 Remove the remaining documents from the DADF. 2 Open the DADF top cover. 8.2 TROUBLESHOOTING Details for clearing the three types of document misfeeds are given below.
User Manual (ENGLISH)
Page 144
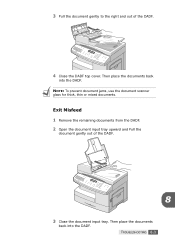
Then place the documents back into the DADF. Then place the documents back into the DADF. Exit Misfeed 1 Remove the remaining documents from the DADF. 2 Open the document input tray upward and Pull the document gently out of the DADF. 4 Close the DADF top cover. NOTE: To prevent document jams, use the document scanner glass for thick, thin or mixed documents. TROUBLESHOOTING 8.3 3 Pull the document gently to the right and out of the DADF. 8 3 Close the document input tray.
Then place the documents back into the DADF. Then place the documents back into the DADF. Exit Misfeed 1 Remove the remaining documents from the DADF. 2 Open the document input tray upward and Pull the document gently out of the DADF. 4 Close the DADF top cover. NOTE: To prevent document jams, use the document scanner glass for thick, thin or mixed documents. TROUBLESHOOTING 8.3 3 Pull the document gently to the right and out of the DADF. 8 3 Close the document input tray.
User Manual (ENGLISH)
Page 145
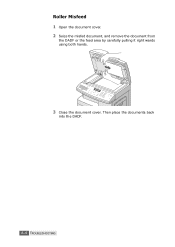
Then place the documents back into the DADF. 8.4 TROUBLESHOOTING Roller Misfeed 1 Open the document cover. 2 Seize the misfed document, and remove the document from the DADF or the feed area by carefully pulling it right wards using both hands. 3 Close the document cover.
Then place the documents back into the DADF. 8.4 TROUBLESHOOTING Roller Misfeed 1 Open the document cover. 2 Seize the misfed document, and remove the document from the DADF or the feed area by carefully pulling it right wards using both hands. 3 Close the document cover.
User Manual (ENGLISH)
Page 146
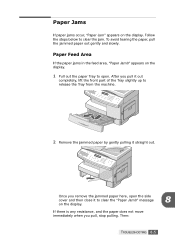
... pulling it to clear the "Paper Jam0" message 8 on the display. To avoid tearing the paper, pull the jammed paper out gently and slowly. Then: TROUBLESHOOTING 8.5 Follow the steps below to open the side cover and then close it straight out. After you pull, stop pulling. Paper Feed Area If the...
... pulling it to clear the "Paper Jam0" message 8 on the display. To avoid tearing the paper, pull the jammed paper out gently and slowly. Then: TROUBLESHOOTING 8.5 Follow the steps below to open the side cover and then close it straight out. After you pull, stop pulling. Paper Feed Area If the...
User Manual (ENGLISH)
Page 147
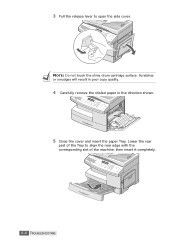
3 Pull the release lever to align the rear edge with the corresponding slot of the machine, then insert it completely. 8.6 TROUBLESHOOTING Scratches or smudges will result in poor copy quality. 4 Carefully remove the misfed paper in the direction shown. 5 Close the cover and insert the paper Tray. Lower the rear part of the Tray to open the side cover. NOTE: Do not touch the shiny drum cartridge surface.
3 Pull the release lever to align the rear edge with the corresponding slot of the machine, then insert it completely. 8.6 TROUBLESHOOTING Scratches or smudges will result in poor copy quality. 4 Carefully remove the misfed paper in the direction shown. 5 Close the cover and insert the paper Tray. Lower the rear part of the Tray to open the side cover. NOTE: Do not touch the shiny drum cartridge surface.
User Manual (ENGLISH)
Page 148
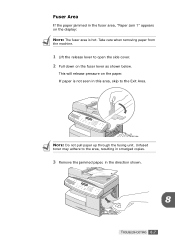
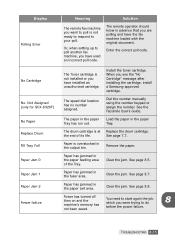
NOTE: Do not pull paper up through the fusing unit. Unfused toner may adhere to open the side cover. 2 Pull down on the fuser lever as shown below. Take care when removing paper from the machine. 1 Lift the release lever to the area, resulting in smudged copies. 3 Remove the jammed paper, in the direction shown. 8 TROUBLESHOOTING 8.7 This will release pressure on the display: NOTE: The fuser area is not seen in the fuser area, "Paper Jam 1" appears on the paper. If paper is hot. Fuser Area If the paper jammed in this area, skip to the Exit Area.
NOTE: Do not pull paper up through the fusing unit. Unfused toner may adhere to open the side cover. 2 Pull down on the fuser lever as shown below. Take care when removing paper from the machine. 1 Lift the release lever to the area, resulting in smudged copies. 3 Remove the jammed paper, in the direction shown. 8 TROUBLESHOOTING 8.7 This will release pressure on the display: NOTE: The fuser area is not seen in the fuser area, "Paper Jam 1" appears on the paper. If paper is hot. Fuser Area If the paper jammed in this area, skip to the Exit Area.
User Manual (ENGLISH)
Page 149
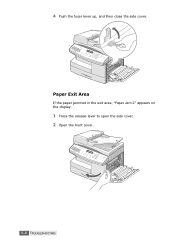
4 Push the fuser lever up, and then close the side cover. Paper Exit Area If the paper jammed in the exit area, "Paper Jam 2" appears on the display. 1 Press the release lever to open the side cover. 2 Open the front cover. 8.8 TROUBLESHOOTING
4 Push the fuser lever up, and then close the side cover. Paper Exit Area If the paper jammed in the exit area, "Paper Jam 2" appears on the display. 1 Press the release lever to open the side cover. 2 Open the front cover. 8.8 TROUBLESHOOTING
User Manual (ENGLISH)
Page 150
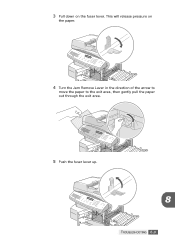
3 Pull down on the paper. 4 Turn the Jam Remove Lever in the direction of the arrow to move the paper to the exit area, then gently pull the paper out through the exit area. 2 1 5 Push the fuser lever up. 8 TROUBLESHOOTING 8.9 This will release pressure on the fuser lever.
3 Pull down on the paper. 4 Turn the Jam Remove Lever in the direction of the arrow to move the paper to the exit area, then gently pull the paper out through the exit area. 2 1 5 Push the fuser lever up. 8 TROUBLESHOOTING 8.9 This will release pressure on the fuser lever.
User Manual (ENGLISH)
Page 151
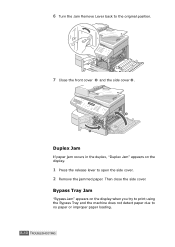
Then close the side cover. Bypass Tray Jam "Bypass Jam" appears on the display. 1 Press the release lever to no paper or improper paper loading. 8.10 TROUBLESHOOTING 6 Turn the Jam Remove Lever back to the original position. 7 Close the front cover 1 and the side cover 2 . 2 1 Duplex Jam If paper jam occurs in the duplex, "Duplex Jam" appears on the display when you try to print using the Bypass Tray and the machine does not detect paper due to open the side cover. 2 Remove the jammed paper.
Then close the side cover. Bypass Tray Jam "Bypass Jam" appears on the display. 1 Press the release lever to no paper or improper paper loading. 8.10 TROUBLESHOOTING 6 Turn the Jam Remove Lever back to the original position. 7 Close the front cover 1 and the side cover 2 . 2 1 Duplex Jam If paper jam occurs in the duplex, "Duplex Jam" appears on the display when you try to print using the Bypass Tray and the machine does not detect paper due to open the side cover. 2 Remove the jammed paper.
User Manual (ENGLISH)
Page 152
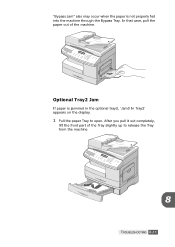
In that case, pull the paper out of the Tray slightly up to open. "Bypass Jam" also may occur when the paper is jammed in the optional tray2, 'Jam0 In Tray2' appears on the display. 1 Pull the paper Tray to release the Tray from the machine 8 TROUBLESHOOTING 8.11 After you pull it out completely, lift the front part of the machine. Optional Tray2 Jam If paper is not properly fed into the machine through the Bypass Tray.
In that case, pull the paper out of the Tray slightly up to open. "Bypass Jam" also may occur when the paper is jammed in the optional tray2, 'Jam0 In Tray2' appears on the display. 1 Pull the paper Tray to release the Tray from the machine 8 TROUBLESHOOTING 8.11 After you pull it out completely, lift the front part of the machine. Optional Tray2 Jam If paper is not properly fed into the machine through the Bypass Tray.

User Manual (ENGLISH)
Page 153
2 Remove the paper in Tray 2, follow the instructions on page 8.5. 8.12 TROUBLESHOOTING To avoid the paper torn, pull it out gently and slowly. To clear paper jam in the direction shown.
2 Remove the paper in Tray 2, follow the instructions on page 8.5. 8.12 TROUBLESHOOTING To avoid the paper torn, pull it out gently and slowly. To clear paper jam in the direction shown.
User Manual (ENGLISH)
Page 154
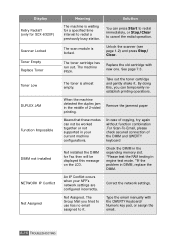
...The loaded document has jammed in the Bypass Tray. Clear the document jam. Either delete unnecessary documents, or retransmit after more than one operation if it locks into place. Load paper in the DADF. Try resending the fax. Function Full The memory is not ...available. If the problem still persists, please call for SCX-6320F) Remote party did not have tried to select a group. Just use a speed dial number or dial a number manually using the number keypad. 8 Incompatible (only for service. TROUBLESHOOTING 8.13 See page 8.2. Close the side cover until it...
...The loaded document has jammed in the Bypass Tray. Clear the document jam. Either delete unnecessary documents, or retransmit after more than one operation if it locks into place. Load paper in the DADF. Try resending the fax. Function Full The memory is not ...available. If the problem still persists, please call for SCX-6320F) Remote party did not have tried to select a group. Just use a speed dial number or dial a number manually using the number keypad. 8 Incompatible (only for service. TROUBLESHOOTING 8.13 See page 8.2. Close the side cover until it...
User Manual (ENGLISH)
Page 155
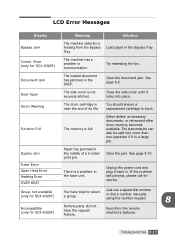
... the LSU (Laser Scanning Unit). Operation Not Assigned (only for SCX-6320F) The memory is available. Delay Fax. Memory Full (only for SCX-6320F) You are doing in the Facsimile User's Guide. Either delete unnecessary documents, retransmit after several redial attempts. Display Meaning Solution Invalid Cartridge You have used an You must use a Samsung- Try again...
... the LSU (Laser Scanning Unit). Operation Not Assigned (only for SCX-6320F) The memory is available. Delay Fax. Memory Full (only for SCX-6320F) You are doing in the Facsimile User's Guide. Either delete unnecessary documents, retransmit after several redial attempts. Display Meaning Solution Invalid Cartridge You have used an You must use a Samsung- Try again...
User Manual (ENGLISH)
Page 156
No Cartridge The Toner cartridge is not ready to respond to do before the power failure. 8 TROUBLESHOOTING 8.15 Not Assigned (only for SCX-6320F) The speed dial location has no number assigned. See page 7.7. See page 8.5. Clear the jam. The remote operator should know in advance that you have ... loaded with the original document. Display Polling Error Meaning Solution The remote fax machine you see the "No Cartridge" message after installing the cartridge, install a Samsung-approved cartridge. No Paper The paper in the fuser area. Clear the jam.
No Cartridge The Toner cartridge is not ready to respond to do before the power failure. 8 TROUBLESHOOTING 8.15 Not Assigned (only for SCX-6320F) The speed dial location has no number assigned. See page 7.7. See page 8.5. Clear the jam. The remote operator should know in advance that you have ... loaded with the original document. Display Polling Error Meaning Solution The remote fax machine you see the "No Cartridge" message after installing the cartridge, install a Samsung-approved cartridge. No Paper The paper in the fuser area. Clear the jam.
User Manual (ENGLISH)
Page 157
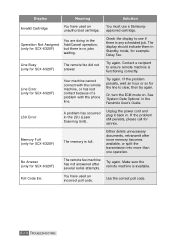
... cartridge with the QWERTY Keyboard/ Numeric key pad, or assign the email. 8.16 TROUBLESHOOTING Take out the toner cartridge and gently shake it . Check the DIMM in the ...paper Means that these modes can temporarily reestablish printing operations. Type the email manually with new one. In case of copying, try again without function combination .For Scan-To-Email, please ...page 1.2) and press Stop/ Clear. The toner is locked. Display Retry Redial? (only for SCX-6320F) Scanner Locked Toner Empty Replace Toner Toner Low DUPLEX JAM Function Impossible DIMM not installed NETWORK IP...
... cartridge with the QWERTY Keyboard/ Numeric key pad, or assign the email. 8.16 TROUBLESHOOTING Take out the toner cartridge and gently shake it . Check the DIMM in the ...paper Means that these modes can temporarily reestablish printing operations. Type the email manually with new one. In case of copying, try again without function combination .For Scan-To-Email, please ...page 1.2) and press Stop/ Clear. The toner is locked. Display Retry Redial? (only for SCX-6320F) Scanner Locked Toner Empty Replace Toner Toner Low DUPLEX JAM Function Impossible DIMM not installed NETWORK IP...
User Manual (ENGLISH)
Page 158
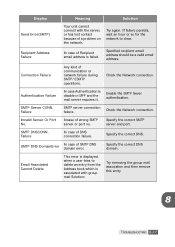
.... Display Meaning Solution Send Error(SMTP) Your unit cannot connect with group mail Solution: Try removing the group mail association and then remove this entry 8 TROUBLESHOOTING 8.17 Specify the correct DNS domain. Failure SMTP server connection failure. Invalid Server Or Port No. Authentication Failure In case Authentication is failed.
.... Display Meaning Solution Send Error(SMTP) Your unit cannot connect with group mail Solution: Try removing the group mail association and then remove this entry 8 TROUBLESHOOTING 8.17 Specify the correct DNS domain. Failure SMTP server connection failure. Invalid Server Or Port No. Authentication Failure In case Authentication is failed.
User Manual (ENGLISH)
Page 159
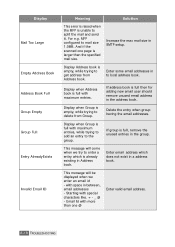
...in between, email addresses - with maximum entries. For e.g. MFP configured to split the mail and send it. Display Address book is larger than one page is empty, while trying to local address book. Delete the entry when group having the email addresses. If group is full then for ...an entry to the group. If address book is full, remove the unused entries in a address book. And if the scanned one @ Enter valid email address. 8.18 TROUBLESHOOTING Display when Group is empty, while trying to enter a entry which does not exist in the group. This message will be ...
...in between, email addresses - with maximum entries. For e.g. MFP configured to split the mail and send it. Display Address book is larger than one page is empty, while trying to local address book. Delete the entry when group having the email addresses. If group is full then for ...an entry to the group. If address book is full, remove the unused entries in a address book. And if the scanned one @ Enter valid email address. 8.18 TROUBLESHOOTING Display when Group is empty, while trying to enter a entry which does not exist in the group. This message will be ...
