
User Guide
Page 6
00326A SCC-931T(P)-eng 9/25/02 12:30 PM Page 10 Before Installation Checking the Contents of the Package Be sure to the holes at the bottom for waterproof protection when installing the camera on a pipe (CH M5 L8 XM7 + 0 RING) ✔ L WRENCH 1 ea. ❙ for COVER DOME removal ✔ DECORATION-MOUNT 1 ea. ❙ for covering...
00326A SCC-931T(P)-eng 9/25/02 12:30 PM Page 10 Before Installation Checking the Contents of the Package Be sure to the holes at the bottom for waterproof protection when installing the camera on a pipe (CH M5 L8 XM7 + 0 RING) ✔ L WRENCH 1 ea. ❙ for COVER DOME removal ✔ DECORATION-MOUNT 1 ea. ❙ for covering...

User Guide
Page 7
... sheath is not caught on columns by using a WALL MOUNT ADAPTER (SADT-101WM), CONER MOUNT ADAPTER (SADT-110CM), or POLE MOUNT ADAPTER (SADT-100PM). (These items are kept within the limits specified below : - Be sure not expose the SCC-931T(P) to a safe location before installation. ✔ Make ...the installation area, where objects might fall during use or storage. Power Consumption: 6W - Voltage: DC 12V 600mA, AC 24V 300mA 12 SCC-931T(P) - Installation Examples ✔ It can be directly installed on ceilings. ✔ It can be directly installed on pipes coming down from...
... sheath is not caught on columns by using a WALL MOUNT ADAPTER (SADT-101WM), CONER MOUNT ADAPTER (SADT-110CM), or POLE MOUNT ADAPTER (SADT-100PM). (These items are kept within the limits specified below : - Be sure not expose the SCC-931T(P) to a safe location before installation. ✔ Make ...the installation area, where objects might fall during use or storage. Power Consumption: 6W - Voltage: DC 12V 600mA, AC 24V 300mA 12 SCC-931T(P) - Installation Examples ✔ It can be directly installed on ceilings. ✔ It can be directly installed on pipes coming down from...

User Guide
Page 9
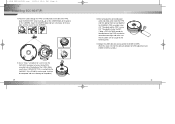
...may twist the inside the PIPE and then pulling them out, put together the CAMERA's PIPE assembly screw (3/4" Threaded) and the PIPE's screw (3/4" Threaded) to fasten... to either left or right. After assembling the DOME COVER in the desired direction, hold the COVER- Fit the DECORATION MOUNT into the PIPE. (A DECORATION MOUNT is not loose. 7. Excesive rotation of the ... the LENS body together with a soft cotton flannel cleaning cloth. 8. 00326A SCC-931T(P)-eng 9/25/02 12:30 PM Page 16 Installing SCC-931T(P) 6. Adjust the LENS direction. 1) Turn the STOPPER RING counter-clockwise as...
...may twist the inside the PIPE and then pulling them out, put together the CAMERA's PIPE assembly screw (3/4" Threaded) and the PIPE's screw (3/4" Threaded) to fasten... to either left or right. After assembling the DOME COVER in the desired direction, hold the COVER- Fit the DECORATION MOUNT into the PIPE. (A DECORATION MOUNT is not loose. 7. Excesive rotation of the ... the LENS body together with a soft cotton flannel cleaning cloth. 8. 00326A SCC-931T(P)-eng 9/25/02 12:30 PM Page 16 Installing SCC-931T(P) 6. Adjust the LENS direction. 1) Turn the STOPPER RING counter-clockwise as...
User Guide
Page 11
...SCC-931T(P)-eng 9/25/02 12:30 PM Page 20 Installing SCC-931T(P) 7) Route the cables through the PIPE assembly hole on the side of the PIPE, align the INDEX KEY arrow mark ( ) of the CAMERA body to the groove on the CAMERA, mount the CAMERA... arranging the connected power cable and video cable inside the PIPE and then pulling them out, put together the CAMERA's PIPE assembly screw (3/4" Threaded) and the PIPE's screw (3/4" Threaded) to fasten the SET. (*Wrap a... 10) Adjust the LENS direction and assemble the DOME COVER. (Refer the steps 6 to 8 of the ceiling installation for LENS adjustment and...
...SCC-931T(P)-eng 9/25/02 12:30 PM Page 20 Installing SCC-931T(P) 7) Route the cables through the PIPE assembly hole on the side of the PIPE, align the INDEX KEY arrow mark ( ) of the CAMERA body to the groove on the CAMERA, mount the CAMERA... arranging the connected power cable and video cable inside the PIPE and then pulling them out, put together the CAMERA's PIPE assembly screw (3/4" Threaded) and the PIPE's screw (3/4" Threaded) to fasten the SET. (*Wrap a... 10) Adjust the LENS direction and assemble the DOME COVER. (Refer the steps 6 to 8 of the ceiling installation for LENS adjustment and...