User Manual
Page 2
... Checking the Contents Checking the Components Parts Control Panel Direct Key guide Function Key Guide Reverse Side Installation Attaching the Stand Removing the Stand Adjusting the Product Tilt Installing a Wall-mount Kit or Desktop Stand Anti-theft Lock Before Connecting Pre-connection Checkpoints Connecting and Using a PC Connecting to a PC Connecting the Power Driver...
... Checking the Contents Checking the Components Parts Control Panel Direct Key guide Function Key Guide Reverse Side Installation Attaching the Stand Removing the Stand Adjusting the Product Tilt Installing a Wall-mount Kit or Desktop Stand Anti-theft Lock Before Connecting Pre-connection Checkpoints Connecting and Using a PC Connecting to a PC Connecting the Power Driver...

User Manual
Page 26
... stand neck with one hand, pound the other fisted hand down onto the top of the stand base in the direction of the arrow to protect the product and place the product onto the cloth so that the front of the arrow as shown in the direction of the product faces downwards. Remove... the stand neck from the stand base by pulling it . Turn the connecting screw at the bottom of the stand base to separate it in the figure. 26 1 Preparations Place a soft cloth over the table to...
... stand neck with one hand, pound the other fisted hand down onto the top of the stand base in the direction of the arrow to protect the product and place the product onto the cloth so that the front of the arrow as shown in the direction of the product faces downwards. Remove... the stand neck from the stand base by pulling it . Turn the connecting screw at the bottom of the stand base to separate it in the figure. 26 1 Preparations Place a soft cloth over the table to...
User Manual
Page 28
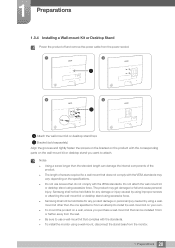
...caused by using excessive force. 1 Preparations 1.3.4 Installing a Wall-mount Kit or Desktop Stand Power the product off and remove the power cable from the power socket. 1 2 A A 3 4 B Attach the wall-mount kit or desktop stand here B Bracket (sold separately) Align the grooves and tightly fasten the screws on...the bracket on the product with the standards. To install the monitor using a wall mount, disconnect the stand base from the monitor. 28 1 Preparations Samsung shall not be held liable for any damage or injury caused by using improper screws or attaching the wall-mount ...
...caused by using excessive force. 1 Preparations 1.3.4 Installing a Wall-mount Kit or Desktop Stand Power the product off and remove the power cable from the power socket. 1 2 A A 3 4 B Attach the wall-mount kit or desktop stand here B Bracket (sold separately) Align the grooves and tightly fasten the screws on...the bracket on the product with the standards. To install the monitor using a wall mount, disconnect the stand base from the monitor. 28 1 Preparations Samsung shall not be held liable for any damage or injury caused by using improper screws or attaching the wall-mount ...


