
Owners Manual
Page 1
... CONTROL 8 ICE AND COLD WATER DISPENSER 8 SHELVES AND BINS 9 FOOD STORAGE GUIDE 10 CoolSeleet ZoneTM Drawer GUIDE 12 REMOVING FREEZER ACCESSORIES 14 REMOVING REFRIGERATOR ACCESSORIES 14 BEVERAGE STATIONTM (optional 15 CLEANING ACCESSORIES 16 CHANGING THE INTERIOR LIGHT 16 WATER FILTER 17 DOORS ...17 INSTALLATION INSTRUCTIONS 18 INSTALLATION OF THE REFRIGERATOR 18 REMOVING THE REFRIGERATOR DOORS 19 REATTACHING THE REFRIGERATOR DOORS 22 ADJUSTING THE CLEARANCE BETWEEN THE DOORS 25 CHECKING THE WATER DISPENSER LINE 27 INSTALLAING THE WATER DISPENSER LINE 28 TROUBLESHOOTING...
... CONTROL 8 ICE AND COLD WATER DISPENSER 8 SHELVES AND BINS 9 FOOD STORAGE GUIDE 10 CoolSeleet ZoneTM Drawer GUIDE 12 REMOVING FREEZER ACCESSORIES 14 REMOVING REFRIGERATOR ACCESSORIES 14 BEVERAGE STATIONTM (optional 15 CLEANING ACCESSORIES 16 CHANGING THE INTERIOR LIGHT 16 WATER FILTER 17 DOORS ...17 INSTALLATION INSTRUCTIONS 18 INSTALLATION OF THE REFRIGERATOR 18 REMOVING THE REFRIGERATOR DOORS 19 REATTACHING THE REFRIGERATOR DOORS 22 ADJUSTING THE CLEARANCE BETWEEN THE DOORS 25 CHECKING THE WATER DISPENSER LINE 27 INSTALLAING THE WATER DISPENSER LINE 28 TROUBLESHOOTING...
Owners Manual
Page 2
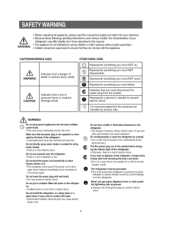
... touch. erator/ freezer. _, • There is a risk of electric shock. aged, have it replaced immediately by the back of the refrigerator. (_ • A damaged power plug may overheat and cause fire. CAUTION Indicates that a risk of personal injury or material damage exists. _, Ipnodwiceartepslugthafrtomyouthemussotckdeist.connect the Represents a ground is needed to remain trapped inside or outside the refrig- Do not directly spray water inside . Do...
... touch. erator/ freezer. _, • There is a risk of electric shock. aged, have it replaced immediately by the back of the refrigerator. (_ • A damaged power plug may overheat and cause fire. CAUTION Indicates that a risk of personal injury or material damage exists. _, Ipnodwiceartepslugthafrtomyouthemussotckdeist.connect the Represents a ground is needed to remain trapped inside or outside the refrig- Do not directly spray water inside . Do...
Owners Manual
Page 4
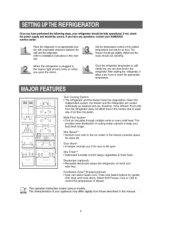
... , the interior light should run smoothly. CoolSelect Zone TM Drawer(optional) • User can store food in the freezer provides space for an hour.The freezer should get slightly chilled and the motor should come on every shelf level. Once the refrigerator temperature is plugged in the freezer due to the ice maker in the refrigerator. Xtra Fresh TM • Optimized humidity control keeps vegetables & fruits fresh. i Twin Cooling System...
... , the interior light should run smoothly. CoolSelect Zone TM Drawer(optional) • User can store food in the freezer provides space for an hour.The freezer should get slightly chilled and the motor should come on every shelf level. Once the refrigerator temperature is plugged in the freezer due to the ice maker in the refrigerator. Xtra Fresh TM • Optimized humidity control keeps vegetables & fruits fresh. i Twin Cooling System...
Owners Manual
Page 5
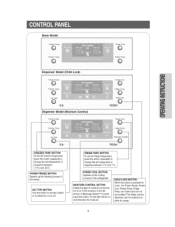
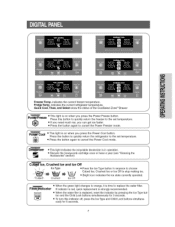
... Power Freeze, Power Cool, Freeze Temp. POWER COOL BUTTON Speeds up the freezing process PthOeWfrEeeRzeF. If the moisture in the dispenser or Beverage StationTM is on , and eliminate the moisture. Fridge Temp. Basic Model Dispenser Model (Child Lock) Ice Dispenser Model (Moisture Control) Water changethe set temperaturein sequencebetween7°C and 1°C. FRIDGETEMP.BUTTON Toset the fridge temperature, pressthe buttonrepeatedlyto changethe set temperaturein sequencebetween -14°C and-25°C Speeds up the cooling process in the refrigerator MOISTURE CONTROL BUTTON...
... Power Freeze, Power Cool, Freeze Temp. POWER COOL BUTTON Speeds up the freezing process PthOeWfrEeeRzeF. If the moisture in the dispenser or Beverage StationTM is on , and eliminate the moisture. Fridge Temp. Basic Model Dispenser Model (Child Lock) Ice Dispenser Model (Moisture Control) Water changethe set temperaturein sequencebetween7°C and 1°C. FRIDGETEMP.BUTTON Toset the fridge temperature, pressthe buttonrepeatedlyto changethe set temperaturein sequencebetween -14°C and-25°C Speeds up the cooling process in the refrigerator MOISTURE CONTROL BUTTON...
Owners Manual
Page 7
...; Press the Ice Type button in seqence to choose Cubed Ice, Crushed Ice or Ice Off to stop making ice. • Bright icon indicates the ice state currently operated. , I Fi icator I:_:_I:: • When the green light changes to orange, it is time to replace the water filter. _' If indicator is red, quick replacement is strongly recommended. • When the water filer is replaced, reset the indicator by pressing the Ice Type but- indicates the current freezer temperature. Freezer Temp. Fridge Temp.
...; Press the Ice Type button in seqence to choose Cubed Ice, Crushed Ice or Ice Off to stop making ice. • Bright icon indicates the ice state currently operated. , I Fi icator I:_:_I:: • When the green light changes to orange, it is time to replace the water filter. _' If indicator is red, quick replacement is strongly recommended. • When the water filer is replaced, reset the indicator by pressing the Ice Type but- indicates the current freezer temperature. Freezer Temp. Fridge Temp.

Owners Manual
Page 8
..., Ice Maker (Basic Model) • Pull out the ice tray. • Add water until the desired temperature is shown in the temperature display. • The temperature display changes in sequence and reverts in the same way as the freezer temperature,the Power Freezefunction and the number of door openings.When your refrigerator is plugged in, the Cubed Ice mode is automatically selected. Push the ice dispenser lever with a cup. • Place a cup in line with...
..., Ice Maker (Basic Model) • Pull out the ice tray. • Add water until the desired temperature is shown in the temperature display. • The temperature display changes in sequence and reverts in the same way as the freezer temperature,the Power Freezefunction and the number of door openings.When your refrigerator is plugged in, the Cubed Ice mode is automatically selected. Push the ice dispenser lever with a cup. • Place a cup in line with...

Owners Manual
Page 9
LightSwitch I.c..e..M...a..k..e..r- ------ - ----- Pockets Plastic Drawers Basic Model Front Leg Cover -- Lights (lower) Door BinTopLips ...-----G--a--ll-o--n---Door Bins 9 Freezer Refrigerator Light Xtra SpaceTM--- DispenseMr odel Water Filter (optional Light (upper) Spill-proof glass Shelf -------- Glass Shelf---- Light Switch Foldable Shelf (optional Deodorizer --------Egg Container ----CooiSelect Zone TM Drawer or Chilled Bin (optional) Vegetable & Fruit Drawer _ L__..._. Door Bin Light---.---Ice Chute ..-------
LightSwitch I.c..e..M...a..k..e..r- ------ - ----- Pockets Plastic Drawers Basic Model Front Leg Cover -- Lights (lower) Door BinTopLips ...-----G--a--ll-o--n---Door Bins 9 Freezer Refrigerator Light Xtra SpaceTM--- DispenseMr odel Water Filter (optional Light (upper) Spill-proof glass Shelf -------- Glass Shelf---- Light Switch Foldable Shelf (optional Deodorizer --------Egg Container ----CooiSelect Zone TM Drawer or Chilled Bin (optional) Vegetable & Fruit Drawer _ L__..._. Door Bin Light---.---Ice Chute ..-------

Owners Manual
Page 13
... so it returns to the "Cool" temperature set- Drawer should be removed. 0 Quick Cool N / _S S°ft Freeze Chill I elect "Thaw" button • Drips loss and quality deterioration of meats reduces the freshness of foods. • After "Thaw" is selected, warm and cold air is alternately supplied into the CoolSelect ZoneTM Drawer. • Depending on the beverages;the Cool:down time may Vary. NOTE The...
... so it returns to the "Cool" temperature set- Drawer should be removed. 0 Quick Cool N / _S S°ft Freeze Chill I elect "Thaw" button • Drips loss and quality deterioration of meats reduces the freshness of foods. • After "Thaw" is selected, warm and cold air is alternately supplied into the CoolSelect ZoneTM Drawer. • Depending on the beverages;the Cool:down time may Vary. NOTE The...
Owners Manual
Page 14
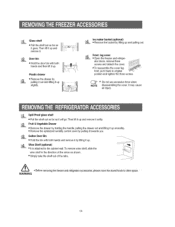
... towards you. Glass shelf • Pull the shelf out as far as it back to original position and tighten the three screws. • Do not use excessive force when NOTE disassembling the cover. ator doors, remove three screws and detach the cover. • To reassemble the cover leg front, put it goes. Front leg cover • Open the freezer and refriger- Ice maker bucket (optional...
... towards you. Glass shelf • Pull the shelf out as far as it back to original position and tighten the three screws. • Do not use excessive force when NOTE disassembling the cover. ator doors, remove three screws and detach the cover. • To reassemble the cover leg front, put it goes. Front leg cover • Open the freezer and refriger- Ice maker bucket (optional...
Owners Manual
Page 15
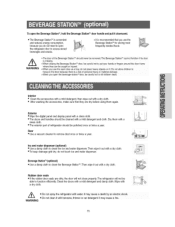
... be caughtor !njure& , When you use the BeverageStationTM for storing most frequently needed foods WARNING ,,The door of refrigerator should be able to clean the ice and water dispenser.Then wipe it maY Cause a firel WARNING 15 he BeveragestationTM CannOftunction if its door is recommended thatyou use the open door as atray,do not need to open the refrigerator door to clean the BeverageStationTM .Then wipe it...
... be caughtor !njure& , When you use the BeverageStationTM for storing most frequently needed foods WARNING ,,The door of refrigerator should be able to clean the ice and water dispenser.Then wipe it maY Cause a firel WARNING 15 he BeveragestationTM CannOftunction if its door is recommended thatyou use the open door as atray,do not need to open the refrigerator door to clean the BeverageStationTM .Then wipe it...
Owners Manual
Page 16
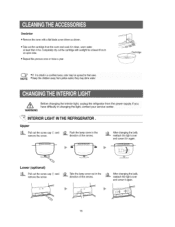
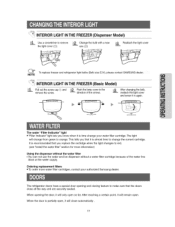
... in an open area. • Repeat this process once or twice a year. _ Cartridge • If it is dried in a confined area, odor may drink water WARNING Before changing the interior light, unplug the refrigerator fr0m the power supplyl !fyou have difficulty in changing the light, contact your service center, \_"i_ INTERIOR LIGHT IN THE REFRIGERATOR Upper Pull out the screw cap @ and remove the screw...
... in an open area. • Repeat this process once or twice a year. _ Cartridge • If it is dried in a confined area, odor may drink water WARNING Before changing the interior light, unplug the refrigerator fr0m the power supplyl !fyou have difficulty in changing the light, contact your service center, \_"i_ INTERIOR LIGHT IN THE REFRIGERATOR Upper Pull out the screw cap @ and remove the screw...
Owners Manual
Page 17
The light will only open . The refrigerator doors have a special door opening the door, it in the direction of the water line block at the water supply. _ INTERIOR LIGHT INTHE FREEZER(Dispenser Model) Use a screwdriver to red. (see "Install the water filter" section for more water filter cartridges, contact your water filter cartridge. After changing the bulb, reattach the light cover and screw it will change from green to orange. When opening and closing feature to change your authorized Samsung dealer. When the door is almost...
The light will only open . The refrigerator doors have a special door opening the door, it in the direction of the water line block at the water supply. _ INTERIOR LIGHT INTHE FREEZER(Dispenser Model) Use a screwdriver to red. (see "Install the water filter" section for more water filter cartridges, contact your water filter cartridge. After changing the bulb, reattach the light cover and screw it will change from green to orange. When opening and closing feature to change your authorized Samsung dealer. When the door is almost...
Owners Manual
Page 18
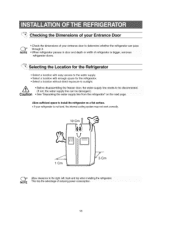
... of refrigerator is bigger, removes refrigerator doors. _ Selecting the Location for the Refrigerator • Select a location with easy access to the water supply. • Select a location with enough space for the refrigerator. • Select a location without direct exposure to sunlight. /_k /,'k Caution • Before disassembling the freezer door the water supply line needs to be disconnected, (If not, the water supply line can be damaged.).......... ' See "Separating the water supply line from the refrigerator" On...
... of refrigerator is bigger, removes refrigerator doors. _ Selecting the Location for the Refrigerator • Select a location with easy access to the water supply. • Select a location with enough space for the refrigerator. • Select a location without direct exposure to sunlight. /_k /,'k Caution • Before disassembling the freezer door the water supply line needs to be disconnected, (If not, the water supply line can be damaged.).......... ' See "Separating the water supply line from the refrigerator" On...
Owners Manual
Page 25
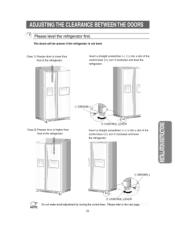
... screwdriver (-) (d_) into a slot of the control lever (@), turn it clockwise and level the refrigerator. Case 1) Freezer door is not level. Please level the refrigerator first. F: ii (_ DRIVER(-) Case 2) Freezer door is higher than that of the refrigerator Insert a straight screwdriver (-) (d_) into a slot of the control lever (@), turn it clockwise and level the refrigerator. (_ DRIVER(-) NOTE Do not make small adjustment by turning the control leVerl Please refer to the next...
... screwdriver (-) (d_) into a slot of the control lever (@), turn it clockwise and level the refrigerator. Case 1) Freezer door is not level. Please level the refrigerator first. F: ii (_ DRIVER(-) Case 2) Freezer door is higher than that of the refrigerator Insert a straight screwdriver (-) (d_) into a slot of the control lever (@), turn it clockwise and level the refrigerator. (_ DRIVER(-) NOTE Do not make small adjustment by turning the control leVerl Please refer to the next...

Owners Manual
Page 28
... nut onto the compression fitting(union). - Shut off the main water supply line and turn the Ice maker to the refrigerator Slip the compression nut and plastic ferrule through the plastic tube. Every join should be connect- I water pipe, it is connected to the hot I tier to the cold water piRe. Locate the nearest cold drinking water line. - Cold Water line 2. Follow the instructions in the ice maker installation kit. 1. After inserting the sleeve, tighten the...
... nut onto the compression fitting(union). - Shut off the main water supply line and turn the Ice maker to the refrigerator Slip the compression nut and plastic ferrule through the plastic tube. Every join should be connect- I water pipe, it is connected to the hot I tier to the cold water piRe. Locate the nearest cold drinking water line. - Cold Water line 2. Follow the instructions in the ice maker installation kit. 1. After inserting the sleeve, tighten the...

Owners Manual
Page 29
... water line is secure, make sure whether the water line is any leakage. At this time, check for any , repeat the connection. - Do not overtighten. STICKER '_ Please check if the indication line aligns with the lock positionl Caution 29 -__lllllllllllllllllllllllll_ REFRIGERATOR - Connect the water line to the required location. Remove the compressor cover of the water supply line. - Complete the installation of the refrigerator. Install the water filter. - SEPARATION _1_ OF RED CAP -- _2"j _ COVER FILTER...
... water line is secure, make sure whether the water line is any leakage. At this time, check for any , repeat the connection. - Do not overtighten. STICKER '_ Please check if the indication line aligns with the lock positionl Caution 29 -__lllllllllllllllllllllllll_ REFRIGERATOR - Connect the water line to the required location. Remove the compressor cover of the water supply line. - Complete the installation of the refrigerator. Install the water filter. - SEPARATION _1_ OF RED CAP -- _2"j _ COVER FILTER...

Owners Manual
Page 30
... the location where the purifier is to the hot water pipe, it is running through the line, check whether the tap is open until clean water is connected to install. (Model with coupler and tap. - If water does not come out through the water tube on the curren t tap, go the nearest authorised service dealer and purchase the right couplers fittings. Cut the water line attached...
... the location where the purifier is to the hot water pipe, it is running through the line, check whether the tap is open until clean water is connected to install. (Model with coupler and tap. - If water does not come out through the water tube on the curren t tap, go the nearest authorised service dealer and purchase the right couplers fittings. Cut the water line attached...

Owners Manual
Page 31
WATER TUBE - PURIFIER TIGHTENING ___ BAND J ,I J / J / J ,/ J / J i j I" X / //7 _. Connect the water line to the refrigerator. - Using clip "A", fix the water line to the wallor (the back of the refrigerator. - i /_ /7 PLOUCRKIFIESRTATIONS Connect the water line to the valve, as shown in the figure on the right. ure. - WATER LINE CONNECTION NUT -- Fix the purifier in position, as shown in position. Remove the compressor cover of refrigerator). - If any leakage. CLIP A WATE R 31 / Attachthepurifielrockstations. / / - Reattach the ...
WATER TUBE - PURIFIER TIGHTENING ___ BAND J ,I J / J / J ,/ J / J i j I" X / //7 _. Connect the water line to the refrigerator. - Using clip "A", fix the water line to the wallor (the back of the refrigerator. - i /_ /7 PLOUCRKIFIESRTATIONS Connect the water line to the valve, as shown in the figure on the right. ure. - WATER LINE CONNECTION NUT -- Fix the purifier in position, as shown in position. Remove the compressor cover of refrigerator). - If any leakage. CLIP A WATE R 31 / Attachthepurifielrockstations. / / - Reattach the ...
Owners Manual
Page 32
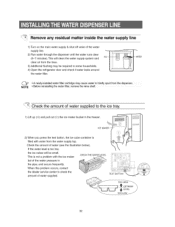
Remove any residual matter inside the water supply line 1) Turn on the main water supply & shut-off valve of water (see the illustration below). Check the amount of the water supply line. --..,..,.. 2) Run water through the dispenser until the water runs clear ICE - (6-7 minutes). When this problem occurs, contact the dealer service center to check the amount of the water pressure in the freezer. 2) When you press the test button, the ice cube container is too low, the...
Remove any residual matter inside the water supply line 1) Turn on the main water supply & shut-off valve of water (see the illustration below). Check the amount of the water supply line. --..,..,.. 2) Run water through the dispenser until the water runs clear ICE - (6-7 minutes). When this problem occurs, contact the dealer service center to check the amount of the water pressure in the freezer. 2) When you press the test button, the ice cube container is too low, the...

Owners Manual
Page 33
... leave the door open ? • Is the freezer temperature too warm? (Set the temperature lower) • Did you store the food with a strong smell so that the power plug is properly connected. • Is the temperature control on the wall of the water supply line before making function? • Is there any rotten food. No water is levelled and stable. • Is the back of the refrigerator too near...
... leave the door open ? • Is the freezer temperature too warm? (Set the temperature lower) • Did you store the food with a strong smell so that the power plug is properly connected. • Is the temperature control on the wall of the water supply line before making function? • Is there any rotten food. No water is levelled and stable. • Is the back of the refrigerator too near...


