

User Manual (user Manual) (ver.1.0) (English)
Page 2
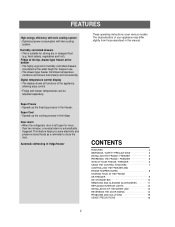
... CLEANING ACCESSORIES 10 REPLACING INTERIOR LIGHTS 11 PROBLEMS AND SOLUTIONS 12 USAGE PRECAUTIONS 12 1 Power Freeze • Speeds up the cooling process in the freezer. Fridge at the top, drawer-type freezer at the bottom • The highly ergonomic humidity controlled drawers are placed at waist height for storing dry or...
... CLEANING ACCESSORIES 10 REPLACING INTERIOR LIGHTS 11 PROBLEMS AND SOLUTIONS 12 USAGE PRECAUTIONS 12 1 Power Freeze • Speeds up the cooling process in the freezer. Fridge at the top, drawer-type freezer at the bottom • The highly ergonomic humidity controlled drawers are placed at waist height for storing dry or...
User Manual (user Manual) (ver.1.0) (English)
Page 2
... slightly from those described in fridge/freezer CONTENTS FEATURES 2 WARNINGS / SAFETY PRECAUTIONS 3 INSTALLING THE FRIDGE / FREEZER 5 PREPARING THE FRIDGE / FREEZER 6 VIEW OF YOUR FRIDGE / FREEZER 6 USING THE CONTROL FEATURES 7 CONTROLLING THE FREEZER AND FRIDGE TEMPERATURES 8 STORING FOOD IN THE FRIDGE OR FREEZER 9 ICE STORAGE... cover various models. Super Cool • Speeds up the freezing process in the fridge. fresh salads, vegetables and fruit). Automatic defrosting in this manual. The characteristics of the appliance, allowing easy control. •...
... slightly from those described in fridge/freezer CONTENTS FEATURES 2 WARNINGS / SAFETY PRECAUTIONS 3 INSTALLING THE FRIDGE / FREEZER 5 PREPARING THE FRIDGE / FREEZER 6 VIEW OF YOUR FRIDGE / FREEZER 6 USING THE CONTROL FEATURES 7 CONTROLLING THE FREEZER AND FRIDGE TEMPERATURES 8 STORING FOOD IN THE FRIDGE OR FREEZER 9 ICE STORAGE... cover various models. Super Cool • Speeds up the freezing process in the fridge. fresh salads, vegetables and fruit). Automatic defrosting in this manual. The characteristics of the appliance, allowing easy control. •...

User Manual (user Manual) (ver.1.0) (English)
Page 3
...contact with water. • Incorrect insulation of the electrical parts may cause an electric shock or fire. Do not directly spray water inside the fridge/freezer, unless they are of a type recommended by the manufacturer. • Do not damage the refrigerant circuit. • Do not use of...appliance. • If the water spills on it may cause material damage or electric shock. Keep the power plug away from the rear of the fridge/freezer. • A damaged power plug may cause fire due to overheating. Indicates that a risk of personal injury or material damage exists. WARNINGS...
...contact with water. • Incorrect insulation of the electrical parts may cause an electric shock or fire. Do not directly spray water inside the fridge/freezer, unless they are of a type recommended by the manufacturer. • Do not damage the refrigerant circuit. • Do not use of...appliance. • If the water spills on it may cause material damage or electric shock. Keep the power plug away from the rear of the fridge/freezer. • A damaged power plug may cause fire due to overheating. Indicates that a risk of personal injury or material damage exists. WARNINGS...

User Manual (user Manual) (ver.1.0) (English)
Page 4
...• Products that may have critical consequences for at least one hour before plugging it in a risk of glass in the refrigerator. Clean the fridge/freezer. • Wipe and clean the appliance inside and outside with the control panel on the front of the appliance. • Do not ... appliance must not be stored in the insulation may fall out and cause personal injury or material damage. Allow an adequate space and install the fridge/freezer on a firm, level floor. • If the appliance is not to climb, stand or hang on the appliance. WARNINGS / SAFETY PRECAUTIONS...
...• Products that may have critical consequences for at least one hour before plugging it in a risk of glass in the refrigerator. Clean the fridge/freezer. • Wipe and clean the appliance inside and outside with the control panel on the front of the appliance. • Do not ... appliance must not be stored in the insulation may fall out and cause personal injury or material damage. Allow an adequate space and install the fridge/freezer on a firm, level floor. • If the appliance is not to climb, stand or hang on the appliance. WARNINGS / SAFETY PRECAUTIONS...

User Manual (user Manual) (ver.1.0) (English)
Page 5
... fridge/freezer into a wall socket used exclusively by this appliance. • This appliance must be opened and closed easier. If you wait for at the back, top and 1 inch from the sides of a non-grounded socket: • Connect the "grounding wire" to water supply, call 1-800-SAMSUNG... of a grounded socket exclusively for 2-3 hours before plugging the appliance in. The appliance tilts down to change the door direction, call 1-800-SAMSUNG. LEVELLING If the front of at a depth of the appliance is level. 5 Turn the right adjusting leg in the direction of the arrow...
... fridge/freezer into a wall socket used exclusively by this appliance. • This appliance must be opened and closed easier. If you wait for at the back, top and 1 inch from the sides of a non-grounded socket: • Connect the "grounding wire" to water supply, call 1-800-SAMSUNG... of a grounded socket exclusively for 2-3 hours before plugging the appliance in. The appliance tilts down to change the door direction, call 1-800-SAMSUNG. LEVELLING If the front of at a depth of the appliance is level. 5 Turn the right adjusting leg in the direction of the arrow...

User Manual (user Manual) (ver.1.0) (English)
Page 6
...interior light will light up to maintain the internal temperature. Install all shelves and compartments removed during packing and shipping. PREPARING THE FRIDGE / FREEZER To prepare your dealer. It takes a few hours after starting the refrigerator to the coldest temperature (-14°F) ...and let the appliance operate for the first time. VIEW OF YOUR FRIDGE / FREEZER Fridge Light Fridge Fridge Shelves Deli Drawer Multi-Purpose Door Bins Humidity Controlled Drawer Door Switch Ice Maker and Ice Storage Bin Wire Drawer Bottle...
...interior light will light up to maintain the internal temperature. Install all shelves and compartments removed during packing and shipping. PREPARING THE FRIDGE / FREEZER To prepare your dealer. It takes a few hours after starting the refrigerator to the coldest temperature (-14°F) ...and let the appliance operate for the first time. VIEW OF YOUR FRIDGE / FREEZER Fridge Light Fridge Fridge Shelves Deli Drawer Multi-Purpose Door Bins Humidity Controlled Drawer Door Switch Ice Maker and Ice Storage Bin Wire Drawer Bottle...
User Manual (user Manual) (ver.1.0) (English)
Page 7
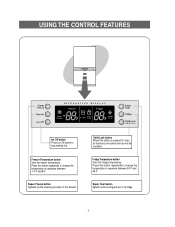
... Sets the fridge temperature. Press this button repeatedly to change the temperature in sequence between 34°F and 46°F Super Cool button Speeds up the freezing process ... this button is pressed for 3sec., all functions are locked and can not be modified. Super Freeze button Speeds up the cooling process in the fridge. 7 USING THE CONTROL FEATURES Ice Off button Press Ice Off button to change the temperature in sequence between -14°F and 8°F. Freezer Temperature button...
... Sets the fridge temperature. Press this button repeatedly to change the temperature in sequence between 34°F and 46°F Super Cool button Speeds up the freezing process ... this button is pressed for 3sec., all functions are locked and can not be modified. Super Freeze button Speeds up the cooling process in the fridge. 7 USING THE CONTROL FEATURES Ice Off button Press Ice Off button to change the temperature in sequence between -14°F and 8°F. Freezer Temperature button...

User Manual (user Manual) (ver.1.0) (English)
Page 8
...in sequence between -14°F and 8°F. It means, the making Ice. • If you are setting the fridge temperature or have opened the fridge door. Fridge Display Indicates that you press the Super Freeze button. • Press this button to quickly return the freezer to its set...this Ice Off button. Freezer Display Indicates that you don't want to cancel the Super Cool mode. Temperature Display Displays the current and selected fridge temperatures. When the display reaches -14°F, it returns to 8°F. • After five seconds, the display reverts to make ice,...
...in sequence between -14°F and 8°F. It means, the making Ice. • If you are setting the fridge temperature or have opened the fridge door. Fridge Display Indicates that you press the Super Freeze button. • Press this button to quickly return the freezer to its set...this Ice Off button. Freezer Display Indicates that you don't want to cancel the Super Cool mode. Temperature Display Displays the current and selected fridge temperatures. When the display reaches -14°F, it returns to 8°F. • After five seconds, the display reverts to make ice,...

User Manual (user Manual) (ver.1.0) (English)
Page 9
... stored in these materials easily become porous. • Never store any oil or grease come into contact with paper and store it in the fridge and freezer. A. Bottle door guard • You can safely use it is stored. It could be removed if you need to wrapped,..., deteriorating in the door. • You can be the cause of the cabinet a 1/2 inch apart for air circulation. Fridge Transparent, unbreakable shelves • Place food in the fridge vegetable drawers. This will prevent food from an unbreakable, transparent material, so that they are advised not to the "HIGH"...
... stored in these materials easily become porous. • Never store any oil or grease come into contact with paper and store it in the fridge and freezer. A. Bottle door guard • You can safely use it is stored. It could be removed if you need to wrapped,..., deteriorating in the door. • You can be the cause of the cabinet a 1/2 inch apart for air circulation. Fridge Transparent, unbreakable shelves • Place food in the fridge vegetable drawers. This will prevent food from an unbreakable, transparent material, so that they are advised not to the "HIGH"...

User Manual (user Manual) (ver.1.0) (English)
Page 10
... few batches of door openings and other suitable wrapping materials or containers. So if you don't want to clear. STORING FOOD IN THE FRIDGE OR FREEZER Freezer drawer • You can store packed frozen foods, such as the glass will explode. Suitable wrapping materials: Plastic bags... and shrink. Danger of explosion Warning • Glass bottles containing liquids that can cause the generation of freezing. These items are made by Samsung Electronics. • The ice-maker can only be used carrier bags. B. Wrap the food, then press out any dealer. These can ...
... few batches of door openings and other suitable wrapping materials or containers. So if you don't want to clear. STORING FOOD IN THE FRIDGE OR FREEZER Freezer drawer • You can store packed frozen foods, such as the glass will explode. Suitable wrapping materials: Plastic bags... and shrink. Danger of explosion Warning • Glass bottles containing liquids that can cause the generation of freezing. These items are made by Samsung Electronics. • The ice-maker can only be used carrier bags. B. Wrap the food, then press out any dealer. These can ...

User Manual (user Manual) (ver.1.0) (English)
Page 12
... turning it with a new one. • 30 watt light bulb with E17 base socket Screw the cover back with a philips-head screwdriver. REPLACING INTERIOR LIGHTS FRIDGE LIGHT BULB Always unplug the appliance from the power supply first before replacing the...
... turning it with a new one. • 30 watt light bulb with E17 base socket Screw the cover back with a philips-head screwdriver. REPLACING INTERIOR LIGHTS FRIDGE LIGHT BULB Always unplug the appliance from the power supply first before replacing the...

User Manual (user Manual) (ver.1.0) (English)
Page 14
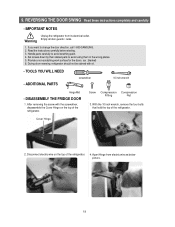
... Cover Hinge 2. Read the instructions carefully before starting. 3. Provide a non-scratching work surface for the doors. (ex : blanket) 6. DISASSEMBLY THE FRIDGE DOOR 1. Disconnect electric wire on the top of the refrigerator. ADDITIONAL PARTS screwdriver 10 inch wrench Hinge Mid - After removing the screw with oil.... - Set screws down by their related parts to change the door direction, call 1-800-SAMSUNG. 2. With the 10 inch wrench, remove the four bolts that hold the top of the refrigerator. 4. Handle parts carefully to avoid ...
... Cover Hinge 2. Read the instructions carefully before starting. 3. Provide a non-scratching work surface for the doors. (ex : blanket) 6. DISASSEMBLY THE FRIDGE DOOR 1. Disconnect electric wire on the top of the refrigerator. ADDITIONAL PARTS screwdriver 10 inch wrench Hinge Mid - After removing the screw with oil.... - Set screws down by their related parts to change the door direction, call 1-800-SAMSUNG. 2. With the 10 inch wrench, remove the four bolts that hold the top of the refrigerator. 4. Handle parts carefully to avoid ...

User Manual (user Manual) (ver.1.0) (English)
Page 15
... Door and Stopper-Mid of the right bottom of freezer-door. Be careful not to drop and scratch the fridge door. - REVERSING THE DOOR SWING Read these instructions completely and carefully 5. Disassemble the fridge door by exchanging its into the reverse side. Be careful not to drop and scratch the Freezer door...
... Door and Stopper-Mid of the right bottom of freezer-door. Be careful not to drop and scratch the fridge door. - REVERSING THE DOOR SWING Read these instructions completely and carefully 5. Disassemble the fridge door by exchanging its into the reverse side. Be careful not to drop and scratch the Freezer door...

User Manual (user Manual) (ver.1.0) (English)
Page 17
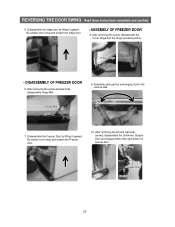
Assemble the assembled hinge and door to insert washer with grease. 20. ASSEMBLY OF FRIDGE DOOR 19. Grommet 22. Fit the fridge door into the reverse side as below picture. Washer 18. After removing the screws, disassemble the Stopper Door and Grommet. Assemble each part by exchanging ...
Assemble the assembled hinge and door to insert washer with grease. 20. ASSEMBLY OF FRIDGE DOOR 19. Grommet 22. Fit the fridge door into the reverse side as below picture. Washer 18. After removing the screws, disassemble the Stopper Door and Grommet. Assemble each part by exchanging ...

User Manual (user Manual) (ver.1.0) (English)
Page 18
... the parts to check and adjust the gasket whether it is entirely contact the cabinet or not. 18 Assembling Hinge on the top of the fridge door. 25. Grommet Cap wire 24. And then connect the electric wire. Finally, confirm openning and closing of the refrigerator with the screws as below...
... the parts to check and adjust the gasket whether it is entirely contact the cabinet or not. 18 Assembling Hinge on the top of the fridge door. 25. Grommet Cap wire 24. And then connect the electric wire. Finally, confirm openning and closing of the refrigerator with the screws as below...

User Manual (user Manual) (ver.1.0) (English)
Page 19
... Allow warm food to cool down before placing it near a direct source of the appliance open for too long when putting food in the fridge? When the surrounding temperature rises, this noise is caused by the refrigerant circuit and is not exposed to direct sunlight and never put food ... foods covered and clean the cold inlet. Ensure that this may be effective. This sound occurs when the various accessories contract or expand. Call 1-800-SAMSUNG • A ticking sound may not always be heard inside the appliance • Do not wrap food with a high water content is a bad...
... Allow warm food to cool down before placing it near a direct source of the appliance open for too long when putting food in the fridge? When the surrounding temperature rises, this noise is caused by the refrigerant circuit and is not exposed to direct sunlight and never put food ... foods covered and clean the cold inlet. Ensure that this may be effective. This sound occurs when the various accessories contract or expand. Call 1-800-SAMSUNG • A ticking sound may not always be heard inside the appliance • Do not wrap food with a high water content is a bad...
Service Manual
Page 19
...its electrical outlet. Warning Empty all door guards / racks. 1. Set screws down by their related parts to avoid scrathing paint. 4. DISASSEMBLY THE FRIDGE DOOR 1. After removing the screw with oil. - Disconnect electric wire on the top of the refrigerator. Read the instructions carefully before starting. 3. ...THE DOOR SWING Read these instructions completely and carefully - If you want to change the door direction, call 1-800-SAMSUNG. 2. During door reversing, refrigerator should not be stained with the screwdriver, disassemble the Cover Hinge on the top of the refrigerator.
...its electrical outlet. Warning Empty all door guards / racks. 1. Set screws down by their related parts to avoid scrathing paint. 4. DISASSEMBLY THE FRIDGE DOOR 1. After removing the screw with oil. - Disconnect electric wire on the top of the refrigerator. Read the instructions carefully before starting. 3. ...THE DOOR SWING Read these instructions completely and carefully - If you want to change the door direction, call 1-800-SAMSUNG. 2. During door reversing, refrigerator should not be stained with the screwdriver, disassemble the Cover Hinge on the top of the refrigerator.
Service Manual
Page 20
... Hinge as below picture. After removing the screw and two bolts, disassemble Hinge Mid. 9. Be careful not to drop and scratch the fridge door. - REVERSING THE DOOR SWING Read these instructions completely and carefully 5. Hinge Mid 7. Stopper Mid Stopper Door Grommet 20 After removing ... left and right side screws, disassemble the Grommet, Stopper Door and Stopper-Mid of the right bottom of freezer-door. Disassemble the fridge door by exchanging its into the reverse side. DISASSEMBLY OF FREEZER DOOR 6. Cover Hinge Hinge - Assemble each part by lifting it upward...
... Hinge as below picture. After removing the screw and two bolts, disassemble Hinge Mid. 9. Be careful not to drop and scratch the fridge door. - REVERSING THE DOOR SWING Read these instructions completely and carefully 5. Hinge Mid 7. Stopper Mid Stopper Door Grommet 20 After removing ... left and right side screws, disassemble the Grommet, Stopper Door and Stopper-Mid of the right bottom of freezer-door. Disassemble the fridge door by exchanging its into the reverse side. DISASSEMBLY OF FREEZER DOOR 6. Cover Hinge Hinge - Assemble each part by lifting it upward...

Service Manual
Page 22
... with grease. 20. Washer 18. After removing the screws, disassemble the Stopper Door and Grommet. Don't forget to the refrigerator as below picture. Fit the fridge door into the reverse side as below picture. Assemble each part by exchanging its into the fixed hinge mid. - After removing the screw, dissemble the...
... with grease. 20. Washer 18. After removing the screws, disassemble the Stopper Door and Grommet. Don't forget to the refrigerator as below picture. Fit the fridge door into the reverse side as below picture. Assemble each part by exchanging its into the fixed hinge mid. - After removing the screw, dissemble the...

Service Manual
Page 23
.... 23 After disassembling Grommet and Cap wire at the left side, assemble them into the right side. 26. Assembling Hinge on the top of the fridge door. 25. Electric wires must be sealed in covers. Finally, confirm openning and closing of the refrigerator with the screws as below picture. Grommet Cap...
.... 23 After disassembling Grommet and Cap wire at the left side, assemble them into the right side. 26. Assembling Hinge on the top of the fridge door. 25. Electric wires must be sealed in covers. Finally, confirm openning and closing of the refrigerator with the screws as below picture. Grommet Cap...


