User Manual
Page 2
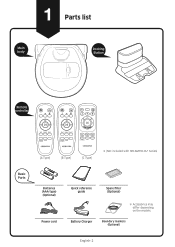
1 Parts list Main body Docking Station Remote controller Basic Parts [A Type] [B Type] [C Type] ✻✻ (Not included with SR1AM7010U* Series) Batteries (AAA type) (Optional) Power cord Quick reference guide Spare filter (Optional) Battery Charger ✻✻ Accessories may differ depending on the models. Boundary markers (Optional) English-2
1 Parts list Main body Docking Station Remote controller Basic Parts [A Type] [B Type] [C Type] ✻✻ (Not included with SR1AM7010U* Series) Batteries (AAA type) (Optional) Power cord Quick reference guide Spare filter (Optional) Battery Charger ✻✻ Accessories may differ depending on the models. Boundary markers (Optional) English-2

User Manual
Page 3
...risk of fire, electric shock, or injury: General • Use only as described in this manual. • Do not operate POWERbot or the battery charger / docking station if it has been damaged in any way. • If the vacuum cleaner is not working as it for your reference...objects on the POWERbot without adult supervision. • Place the cords from outlet when not in water, contact an authorized Samsung service center. • Do not handle the battery charger / docking station or POWERbot with reduced physical, sensory or mental capabilities, or lack of experience and knowledge, unless ...
...risk of fire, electric shock, or injury: General • Use only as described in this manual. • Do not operate POWERbot or the battery charger / docking station if it has been damaged in any way. • If the vacuum cleaner is not working as it for your reference...objects on the POWERbot without adult supervision. • Place the cords from outlet when not in water, contact an authorized Samsung service center. • Do not handle the battery charger / docking station or POWERbot with reduced physical, sensory or mental capabilities, or lack of experience and knowledge, unless ...
User Manual
Page 4
...Do not use with a damaged cord or plug or a loose power outlet. • Do not pull or carry by a qualified Samsung service center. • Do not expose the battery charger / docking station to come into openings. Seek medical attention. If the liquid gets on . • Do not put fingers..., wash quickly with water. Repairs should only be present. Keep the cord away from heated surfaces. • Do not use with the battery charger / docking station. Do not use extension cords or outlets with clean water for a minimum of any objects into contact with any openings...
...Do not use with a damaged cord or plug or a loose power outlet. • Do not pull or carry by a qualified Samsung service center. • Do not expose the battery charger / docking station to come into openings. Seek medical attention. If the liquid gets on . • Do not put fingers..., wash quickly with water. Repairs should only be present. Keep the cord away from heated surfaces. • Do not use with the battery charger / docking station. Do not use extension cords or outlets with clean water for a minimum of any objects into contact with any openings...
User Manual
Page 7
... • If the power cord is damaged, contact a Samsuing service center to replace the batteries. --Using batteries from POWERbot, immediately shut off the prongs of the power plug. --There is a risk of fire or electric shock. • Contact a Samsung Electronics service center if you need to get it may contaminate other areas if... not pass through liquid. • Attach the boundary markers to places where the POWERbot may fall such as the top of POWERbot, and then contact a Samsung service center.
... • If the power cord is damaged, contact a Samsuing service center to replace the batteries. --Using batteries from POWERbot, immediately shut off the prongs of the power plug. --There is a risk of fire or electric shock. • Contact a Samsung Electronics service center if you need to get it may contaminate other areas if... not pass through liquid. • Attach the boundary markers to places where the POWERbot may fall such as the top of POWERbot, and then contact a Samsung service center.
User Manual
Page 9
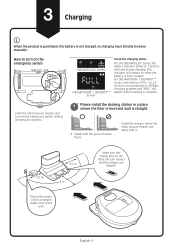
...where the floor is level and wall is arranged neatly next to the wall. English-9 Hold the robot vacuum cleaner and turn on when the battery is complete. Ensure the power cord is straight. ÚÚ Install with the grain of the " " will turn on successively to ...the robot vacuum cleaner and the charger are aligned. The indicator will appear when charging is fully charged. For the SR1AM7010U* Series, the battery indicator blinks at 1 second intervals during charging. For SR1AM7040W* / SR2AM70**** Series, each section of wood floors. 3 Charging When the product is ...
...where the floor is level and wall is arranged neatly next to the wall. English-9 Hold the robot vacuum cleaner and turn on when the battery is complete. Ensure the power cord is straight. ÚÚ Install with the grain of the " " will turn on successively to ...the robot vacuum cleaner and the charger are aligned. The indicator will appear when charging is fully charged. For the SR1AM7010U* Series, the battery indicator blinks at 1 second intervals during charging. For SR1AM7040W* / SR2AM70**** Series, each section of wood floors. 3 Charging When the product is ...

User Manual
Page 10
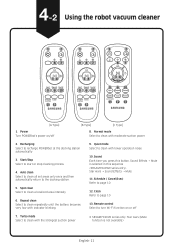
... vacuum cleaner Starting Auto clean mode The POWERbot moves and automatically cleans the set areas only once. ✻✻ SR1AM7010U* series : Cleans repeatedly until the battery is cleaning by the direction control buttons of the remote controller. Recharging You can be selected by pressing this button. Manual Clean Manual clean mode...
... vacuum cleaner Starting Auto clean mode The POWERbot moves and automatically cleans the set areas only once. ✻✻ SR1AM7010U* series : Cleans repeatedly until the battery is cleaning by the direction control buttons of the remote controller. Recharging You can be selected by pressing this button. Manual Clean Manual clean mode...
User Manual
Page 11
... clean with indicator blinking 9. Recharging Select to page 10 12. Start/Stop Select to page 10 13. Quiet mode Select to clean repeatedly until the battery becomes very low with lower operation noise 10. Clock Refer to start or stop cleaning process 4. Auto clean Select to clean all set areas only...
... clean with indicator blinking 9. Recharging Select to page 10 12. Start/Stop Select to page 10 13. Quiet mode Select to clean repeatedly until the battery becomes very low with lower operation noise 10. Clock Refer to start or stop cleaning process 4. Auto clean Select to clean all set areas only...
