User Manual (user Manual) (ver.1.0) (English)
Page 2
... 2-1 Installing the Stand 2-2 Connecting with a PC 2-3 Connecting an AV Device 2-4 Connecting to an Amplifier 2-5 Kensington Lock 2-6 USING THE PRODUCT Setting the Optimal Resolution 3-1 Standard Signal Mode Table 3-2 Installing the Device Driver 3-3 Product Operating Buttons 3-4 Using the Screen Adjustment Menu (OSD: On Screen Display) . . . . 3-5 INSTALLING THE SOFTWARE Natural Color 4-1 MagicTune 4-2 MultiScreen 4-3 TROUBLESHOOTING Monitor Self-Diagnosis 5-1 Before Requesting Service 5-2 FAQ 5-3 MORE INFORMATION Specifications 6-1 Power Saving Function 6-2 Contact SAMSUNG...
... 2-1 Installing the Stand 2-2 Connecting with a PC 2-3 Connecting an AV Device 2-4 Connecting to an Amplifier 2-5 Kensington Lock 2-6 USING THE PRODUCT Setting the Optimal Resolution 3-1 Standard Signal Mode Table 3-2 Installing the Device Driver 3-3 Product Operating Buttons 3-4 Using the Screen Adjustment Menu (OSD: On Screen Display) . . . . 3-5 INSTALLING THE SOFTWARE Natural Color 4-1 MagicTune 4-2 MultiScreen 4-3 TROUBLESHOOTING Monitor Self-Diagnosis 5-1 Before Requesting Service 5-2 FAQ 5-3 MORE INFORMATION Specifications 6-1 Power Saving Function 6-2 Contact SAMSUNG...
User Manual (user Manual) (ver.1.0) (English)
Page 4
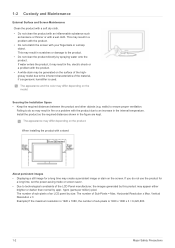
... or darker than normal by spraying water onto the product. The number of sub-pixels of an LCD panel by size: The number of the LCD Panel manufacturer, the images generated by this product may differ depending on the model. When installing the product with a stand About persistent images • Displaying a still image for a long time, set the power-saving mode or screen saver. • Due to ensure proper ventilation.
... or darker than normal by spraying water onto the product. The number of sub-pixels of an LCD panel by size: The number of the LCD Panel manufacturer, the images generated by this product may differ depending on the model. When installing the product with a stand About persistent images • Displaying a still image for a long time, set the power-saving mode or screen saver. • Due to ensure proper ventilation.
User Manual (user Manual) (ver.1.0) (English)
Page 8
... If the product needs to be sure to use a proper cleansing cloth. Contact a service center. • Otherwise, it . ! • If no circumstance touch the antenna cable as toys and cookies on top of the product. • If a child hangs over the product parts. • Make sure that water... in fire, electric shock or a problem with water at a ratio of the product or the panel ! available, dilute a cleansing agent with the product. When thunder or lighting occurs, unplug the power cord and under no monitor-exclusive cleansing agent is ! When cleaning the product, do not spray water...
... If the product needs to be sure to use a proper cleansing cloth. Contact a service center. • Otherwise, it . ! • If no circumstance touch the antenna cable as toys and cookies on top of the product. • If a child hangs over the product parts. • Make sure that water... in fire, electric shock or a problem with water at a ratio of the product or the panel ! available, dilute a cleansing agent with the product. When thunder or lighting occurs, unplug the power cord and under no monitor-exclusive cleansing agent is ! When cleaning the product, do not spray water...

User Manual (user Manual) (ver.1.0) (English)
Page 9
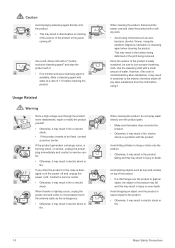
.... ! screen. ! • If you do not use the power-saving mode or set the screensaver to internal overheating. Always keep power adaptor in an explosion or fire. • During a thunder or lighting storm, do not touch the product or the power plug and ventilate immediately. damage to the cable. damage to the cable. When a gas leak occurs, do not touch the power cord or antenna cable. Caution Displaying a still image...
.... ! screen. ! • If you do not use the power-saving mode or set the screensaver to internal overheating. Always keep power adaptor in an explosion or fire. • During a thunder or lighting storm, do not touch the product or the power plug and ventilate immediately. damage to the cable. damage to the cable. When a gas leak occurs, do not touch the power cord or antenna cable. Caution Displaying a still image...
User Manual (user Manual) (ver.1.0) (English)
Page 11
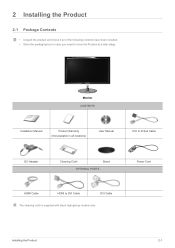
P Monitor CONTENTS Installation Manual Product Warranty (Not available in all of the following contents have been included. • Store the packaging box in case you need to DVI Cable DVI Cable The cleaning cloth is supplied with black high-glossy models only. 2 Installing the Product 2-1 Package Contents • Unpack the product and check if all locations) User Manual DVI to D-Sub Cable DC-Adapter Cleaning Cloth Stand OPTIONAL PARTS HDMI Cable HDMI to move the Product at a later stage. Power Cord Installing the Product 2-1
P Monitor CONTENTS Installation Manual Product Warranty (Not available in all of the following contents have been included. • Store the packaging box in case you need to DVI Cable DVI Cable The cleaning cloth is supplied with black high-glossy models only. 2 Installing the Product 2-1 Package Contents • Unpack the product and check if all locations) User Manual DVI to D-Sub Cable DC-Adapter Cleaning Cloth Stand OPTIONAL PARTS HDMI Cable HDMI to move the Product at a later stage. Power Cord Installing the Product 2-1

User Manual (user Manual) (ver.1.0) (English)
Page 15
...; Connect the [HDMI IN] port of the power cord to the DC-Adapter and plug the other end into a dedicated 220V or 110V wall outlet. (The input voltage is switched automatically.) DC 12V HDMI IN AUDIO OUT DVI IN DIGITAL AUDIO OUT POWER • When the product is connected to the [HDMI] port on and use it. • When both the DVI () and HDMI cables are connected, you can select the input signal by pressing the button. Connect...
...; Connect the [HDMI IN] port of the power cord to the DC-Adapter and plug the other end into a dedicated 220V or 110V wall outlet. (The input voltage is switched automatically.) DC 12V HDMI IN AUDIO OUT DVI IN DIGITAL AUDIO OUT POWER • When the product is connected to the [HDMI] port on and use it. • When both the DVI () and HDMI cables are connected, you can select the input signal by pressing the button. Connect...

User Manual (user Manual) (ver.1.0) (English)
Page 18
... the locking You can safely use it in public locations. Since the shape and usage of the product ( direction ( ). 2. 2-6 Kensington Lock A Kensington Lock is an anti-theft device that enables users to lock the product so that they can purchase the locking device from an electronics store, an online shop, or our service center. 2-6 Installing the Product Connect the Kensington lock cable. 3.
... the locking You can safely use it in public locations. Since the shape and usage of the product ( direction ( ). 2. 2-6 Kensington Lock A Kensington Lock is an anti-theft device that enables users to lock the product so that they can purchase the locking device from an electronics store, an online shop, or our service center. 2-6 Installing the Product Connect the Kensington lock cable. 3.

User Manual (user Manual) (ver.1.0) (English)
Page 21
... CD-ROM supplied with the product. Insert the driver installation CD-ROM into the CD-ROM drive. 2. For more information, refer to the instructions displayed on "Windows Driver". 3. Select the model of your product from the model list. 5. Check if the appropriate resolution and screen refresh rate are displayed in the Control Panel settings. 3-3 Installing the Device Driver If you install the device driver, you can set up the appropriate resolution and frequency for the...
... CD-ROM supplied with the product. Insert the driver installation CD-ROM into the CD-ROM drive. 2. For more information, refer to the instructions displayed on "Windows Driver". 3. Select the model of your product from the model list. 5. Check if the appropriate resolution and screen refresh rate are displayed in the Control Panel settings. 3-3 Installing the Device Driver If you install the device driver, you can set up the appropriate resolution and frequency for the...
User Manual (user Manual) (ver.1.0) (English)
Page 22
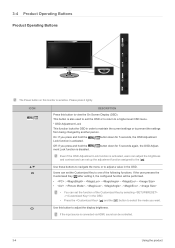
...-level OSD menu. * OSD Adjustment Lock This function locks the OSD in the OSD. Use this button to select the mode you press and hold the Lock function is also used to exit the OSD or to return to adjust the display brightness. 3-4 Product Operating Buttons Product Operating Buttons P P The Power button on this monitor is activated, users can adjust the brightness and contrast and can set up the adjustment function assigned to prevent the settings from being changed by...
...-level OSD menu. * OSD Adjustment Lock This function locks the OSD in the OSD. Use this button to select the mode you press and hold the Lock function is also used to exit the OSD or to return to adjust the display brightness. 3-4 Product Operating Buttons Product Operating Buttons P P The Power button on this monitor is activated, users can adjust the brightness and contrast and can set up the adjustment function assigned to prevent the settings from being changed by...

User Manual (user Manual) (ver.1.0) (English)
Page 23
... is turned on, a message displaying the selected input signal appears at the top left of the screen.) Press [AUTO] button to adjust the screen settings automatically. Power LED This LED is recommended to the power saving function in the OSD menu. For more information on the power-saving function, refer to minimize power consumption. If the resolution settings are changed in the Display Properties, the AUTO adjustment function is only available in Analog mode. Press this button to turn the...
... is turned on, a message displaying the selected input signal appears at the top left of the screen.) Press [AUTO] button to adjust the screen settings automatically. Power LED This LED is recommended to the power saving function in the OSD menu. For more information on the power-saving function, refer to minimize power consumption. If the resolution settings are changed in the Display Properties, the AUTO adjustment function is only available in Analog mode. Press this button to turn the...

User Manual (user Manual) (ver.1.0) (English)
Page 24
... the Screen Adjustment Menu (OSD: On Screen Display) The Screen Adjustment Menu (OSD: On Screen Display) Structure TOP MENUS PICTURE COLOR SIZE & POSITION SETUP&RESET Brightness MagicAngle MagicColor Color Effect H-Position Reset Customized Key Display Time SUB MENUS Contrast Coarse Red Gamma V-Position Sharpness Fine Green MagicBright Response Time Blue Picture Mode HDMI Black Level Color Tone Image Size Menu H-Position Menu V-Position Language Off Timer On/Off Menu Transparency MagicLux Off Timer Setting MagicReturn Auto Source MagicEco PC/AV Mode INFORMATION PICTURE MENU...
... the Screen Adjustment Menu (OSD: On Screen Display) The Screen Adjustment Menu (OSD: On Screen Display) Structure TOP MENUS PICTURE COLOR SIZE & POSITION SETUP&RESET Brightness MagicAngle MagicColor Color Effect H-Position Reset Customized Key Display Time SUB MENUS Contrast Coarse Red Gamma V-Position Sharpness Fine Green MagicBright Response Time Blue Picture Mode HDMI Black Level Color Tone Image Size Menu H-Position Menu V-Position Language Off Timer On/Off Menu Transparency MagicLux Off Timer Setting MagicReturn Auto Source MagicEco PC/AV Mode INFORMATION PICTURE MENU...
User Manual (user Manual) (ver.1.0) (English)
Page 25
... are bright. MENU Sharpness MagicBright Picture Mode DESCRIPTION Controls the clarity of details of a TV for various user environments such as • Only supported when is set to . • Supported when is set to and is set to . The Monitor has four automatic picture settings (, , and ) that bright and dark pictures are preset at the factory. You can activate either ,, or . Using the product 3-5 Provides preset picture settings optimized for the best...
... are bright. MENU Sharpness MagicBright Picture Mode DESCRIPTION Controls the clarity of details of a TV for various user environments such as • Only supported when is set to . • Supported when is set to and is set to . The Monitor has four automatic picture settings (, , and ) that bright and dark pictures are preset at the factory. You can activate either ,, or . Using the product 3-5 Provides preset picture settings optimized for the best...

User Manual (user Manual) (ver.1.0) (English)
Page 29
... aspect ratio of the input signal. • - You can adjust the horizontal position of the OSD. Analog signals • - The picture is displayed at the aspect ratio of the input signal. • A signal not in the standard mode table is not supported. • If the resolution is set to the optimal resolution, the aspect ratio does not change whether the is set to digital output device via DVI/HDMI cable • When signal resolution is 480p, 576p...
... aspect ratio of the input signal. • - You can adjust the horizontal position of the OSD. Analog signals • - The picture is displayed at the aspect ratio of the input signal. • A signal not in the standard mode table is not supported. • If the resolution is set to the optimal resolution, the aspect ratio does not change whether the is set to digital output device via DVI/HDMI cable • When signal resolution is 480p, 576p...

User Manual (user Manual) (ver.1.0) (English)
Page 30
... cards that the display brightness can be adjusted appropriately. • - - - • If is set to mode, the function is disabled. • If is set to the product OSD. When is selected, the function is turned on. • This function does not support Analog mode. • This function is only available for digital signal in dual model. • This function is not available in Windows 7 and recommended when using...
... cards that the display brightness can be adjusted appropriately. • - - - • If is set to mode, the function is disabled. • If is set to the product OSD. When is selected, the function is turned on. • This function does not support Analog mode. • This function is only available for digital signal in dual model. • This function is not available in Windows 7 and recommended when using...
User Manual (user Manual) (ver.1.0) (English)
Page 31
.... The monitor automatically selects an input signal. • - You can turn the Off Timer on the PC. When is selected, the function is turned Off . • Only supported when is set to . • This menu is unavailable when is 100% of Default Setting. • - Turns the power off . • - when of the Customized Key to mode. Auto Source PC/AV Mode • - Set to AV when connected to...
.... The monitor automatically selects an input signal. • - You can turn the Off Timer on the PC. When is selected, the function is turned Off . • Only supported when is set to . • This menu is unavailable when is 100% of Default Setting. • - Turns the power off . • - when of the Customized Key to mode. Auto Source PC/AV Mode • - Set to AV when connected to...

User Manual (user Manual) (ver.1.0) (English)
Page 33
... the installation language and click [Next]. 4. For Windows XP, click [Start], and select [Control Panel] from the menu. Insert the installation CD into the CD-ROM drive. 2. Removing the Software You can adjust the product with monitor adjustments by the graphics card, motherboard and the networking environment. Select the MagicTune setup program. Complete the remaining software installation steps according to the instructions displayed on the screen. • The software may not work...
... the installation language and click [Next]. 4. For Windows XP, click [Start], and select [Control Panel] from the menu. Insert the installation CD into the CD-ROM drive. 2. Removing the Software You can adjust the product with monitor adjustments by the graphics card, motherboard and the networking environment. Select the MagicTune setup program. Complete the remaining software installation steps according to the instructions displayed on the screen. • The software may not work...
User Manual (user Manual) (ver.1.0) (English)
Page 35
... drive Removing the Software Click [Start], select [Settings]/[Control Panel], and then double-click [Add or Remove Programs]. 4-3 MultiScreen What is recommended. Insert the installation CD into the CD-ROM drive. 2. Select the MultiScreen setup program. Complete the remaining software installation steps according to use the monitor by the graphics card, motherboard and the networking environment. Restrictions and Problems with the Installation (MultiScreen) The MultiScreen installation may...
... drive Removing the Software Click [Start], select [Settings]/[Control Panel], and then double-click [Add or Remove Programs]. 4-3 MultiScreen What is recommended. Insert the installation CD into the CD-ROM drive. 2. Select the MultiScreen setup program. Complete the remaining software installation steps according to use the monitor by the graphics card, motherboard and the networking environment. Restrictions and Problems with the Installation (MultiScreen) The MultiScreen installation may...
User Manual (user Manual) (ver.1.0) (English)
Page 37
... power LED blink at a 1 second interval? Is the graphics card configured correctly? Check if the OSD Adjustment Lock function is running. Set up the graphics card referring to the input signal. Check the cable connecting the PC and the product. THE IMAGE IS TOO LIGHT OR TOO DARK Adjust the Brightness and Contrast. (Refer to the , ) The display brightness can differ according to the user manual. If the problem continues, please contact your nearest Samsung Electronics Service...
... power LED blink at a 1 second interval? Is the graphics card configured correctly? Check if the OSD Adjustment Lock function is running. Set up the graphics card referring to the input signal. Check the cable connecting the PC and the product. THE IMAGE IS TOO LIGHT OR TOO DARK Adjust the Brightness and Contrast. (Refer to the , ) The display brightness can differ according to the user manual. If the problem continues, please contact your nearest Samsung Electronics Service...
User Manual (user Manual) (ver.1.0) (English)
Page 38
..."→"Display"→"Change display settings"→"Advanced settings"→"Monitor". Configure the color again in accordance with a transparent material over the black edges, such things may be seen. THE COLOR IS DISPLAYED IN 16 BIT (16 COLORS). Is the graphics card configured correctly? If the beep sound is not a defect of the product. Windows Vista : Change the color settings by coating it with the new graphics card driver...
..."→"Display"→"Change display settings"→"Advanced settings"→"Monitor". Configure the color again in accordance with a transparent material over the black edges, such things may be seen. THE COLOR IS DISPLAYED IN 16 BIT (16 COLORS). Is the graphics card configured correctly? If the beep sound is not a defect of the product. Windows Vista : Change the color settings by coating it with the new graphics card driver...

User Manual (user Manual) (ver.1.0) (English)
Page 39
... User Manual of the video signal? Windows 7 : Change the resolution by selecting "Control Panel" → "Personalization" → "Display" → "Adjust resolution" . (For more information, refer to the User Manual of the computer or the graphics card.) Windows XP : Configure it in the BIOS Setup of the computer or the graphics card.) Troubleshooting 5-3 How can also use the power saving function? You can I change the resolution? Windows 7 : Change settings by selecting Control Panel → Appearance and Themes → Display → Screen Saver Set...
... User Manual of the video signal? Windows 7 : Change the resolution by selecting "Control Panel" → "Personalization" → "Display" → "Adjust resolution" . (For more information, refer to the User Manual of the computer or the graphics card.) Windows XP : Configure it in the BIOS Setup of the computer or the graphics card.) Troubleshooting 5-3 How can also use the power saving function? You can I change the resolution? Windows 7 : Change settings by selecting Control Panel → Appearance and Themes → Display → Screen Saver Set...


