
User Manual (ENGLISH)
Page 10
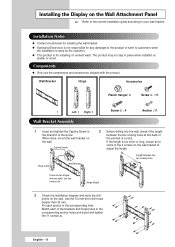
...arrow. English - 10 The product may not stay in the corresponding hole. Installation Notes ◆ Contact a technician for installing the wall bracket. ◆ Samsung Electronics is not responsible for installing on cement walls. Wall Bracket Hinge Accessories Plastic Hanger: 4 Screw : 11 1 Left: 1 Right: 1 Wall Bracket ...; Only use the components and accessories shipped with the product. Use the 5.0 mm bit to your wall bracket. When done, mount the wall bracket on the wall. Length between the two locking holes at the back of the 4 screws on the wall bracket...
...arrow. English - 10 The product may not stay in the corresponding hole. Installation Notes ◆ Contact a technician for installing the wall bracket. ◆ Samsung Electronics is not responsible for installing on cement walls. Wall Bracket Hinge Accessories Plastic Hanger: 4 Screw : 11 1 Left: 1 Right: 1 Wall Bracket ...; Only use the components and accessories shipped with the product. Use the 5.0 mm bit to your wall bracket. When done, mount the wall bracket on the wall. Length between the two locking holes at the back of the 4 screws on the wall bracket...
User Manual (ENGLISH)
Page 11
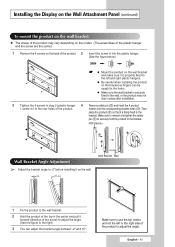
... to reinsert and tighten the safety pin (#) to securely hold the product to the bracket. Installing the Display on the Wall Attachment Panel (continued) To mount the product on the wall bracket ◆ The shape of the product may not stay in place after installation. 3 Tighten the 4 screws in the ... of the product. 2 Insert the screw into the corresponding bracket holes (!). English - 11 holders into the plastic hanger. (See the figure below) ☛ ◆ Mount the product on the wall bracket and make sure it is properly fixed to the left or the right side of the product.
... to reinsert and tighten the safety pin (#) to securely hold the product to the bracket. Installing the Display on the Wall Attachment Panel (continued) To mount the product on the wall bracket ◆ The shape of the product may not stay in place after installation. 3 Tighten the 4 screws in the ... of the product. 2 Insert the screw into the corresponding bracket holes (!). English - 11 holders into the plastic hanger. (See the figure below) ☛ ◆ Mount the product on the wall bracket and make sure it is properly fixed to the left or the right side of the product.

