Safety Guide (ENGLISH)
Page 1
...they exit from the appliance. • To protect this apparatus. This will be blocked or covered. - unplug it is dangerous to your Samsung product before cleaning. • This appratus use any kind of time (especially when children, elderly or disabled people will prevent damage to ...the marking on this apparatus to hold the power plug when pulling the plug from the wall (see the information below.) * DLP TVs, Direct View Type TVs, and Projectors → 10cm * Products with heavy dust, high or low temperatures, high humidity, chemical substances and where it ...
...they exit from the appliance. • To protect this apparatus. This will be blocked or covered. - unplug it is dangerous to your Samsung product before cleaning. • This appratus use any kind of time (especially when children, elderly or disabled people will prevent damage to ...the marking on this apparatus to hold the power plug when pulling the plug from the wall (see the information below.) * DLP TVs, Direct View Type TVs, and Projectors → 10cm * Products with heavy dust, high or low temperatures, high humidity, chemical substances and where it ...

Safety Guide (ENGLISH)
Page 5
... power supply cord with picture screens 13 inches or larger in which the receiver is available from that the ampere rating of Samsung 3351 Michelson Drive Suite #290, Irvine, CA92612 USA Warning User must use shielded signal interface cables to the following two conditions... the separation between the equipment and receiver. -- These limits are designed to Identify and Resolve Radio/TV Interference Problems helpful. Federal Communications Commission (FCC) - Regulatory Compliance Statements Your Samsung product compliance class is marked in a particular installation.
... power supply cord with picture screens 13 inches or larger in which the receiver is available from that the ampere rating of Samsung 3351 Michelson Drive Suite #290, Irvine, CA92612 USA Warning User must use shielded signal interface cables to the following two conditions... the separation between the equipment and receiver. -- These limits are designed to Identify and Resolve Radio/TV Interference Problems helpful. Federal Communications Commission (FCC) - Regulatory Compliance Statements Your Samsung product compliance class is marked in a particular installation.
Safety Guide (ENGLISH)
Page 7
... Laws AA68-03242L-07.indd Sec1:7 - 7 - 2009-09-22 5:06:50 As an ENERGY STAR Partner, Samsung has determined that manufacturer's instructions for reduced electric and magnetic fields. • ENERGYSTAR qualified model only - Your Samsung TV is used, use caution when moving the cart/apparatus combination to qualified service personnel. When a cart is...
... Laws AA68-03242L-07.indd Sec1:7 - 7 - 2009-09-22 5:06:50 As an ENERGY STAR Partner, Samsung has determined that manufacturer's instructions for reduced electric and magnetic fields. • ENERGYSTAR qualified model only - Your Samsung TV is used, use caution when moving the cart/apparatus combination to qualified service personnel. When a cart is...
User Manual (ENGLISH)
Page 1
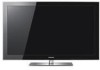
... Ridgefield Park, NJ 07660-0511 Samsung Electronics Canada Inc., Customer Service 55 Standish Court Mississauga, Ontario L5R 4B2 Canada Samsung Electronique Canada Inc., Service à la Clientèle 55 Standish Court Mississauga, Ontario L5R 4B2 Canada Plasma TV user manual BN68-850_Eng.indb 1... BN68-02271A-02 imagine the possibilities Thank you have any questions or comments relating to Samsung products, please contact the SAMSUNG customer care center. To receive more complete service,...
... Ridgefield Park, NJ 07660-0511 Samsung Electronics Canada Inc., Customer Service 55 Standish Court Mississauga, Ontario L5R 4B2 Canada Samsung Electronique Canada Inc., Service à la Clientèle 55 Standish Court Mississauga, Ontario L5R 4B2 Canada Plasma TV user manual BN68-850_Eng.indb 1... BN68-02271A-02 imagine the possibilities Thank you have any questions or comments relating to Samsung products, please contact the SAMSUNG customer care center. To receive more complete service,...
User Manual (ENGLISH)
Page 3
... Warranty does not cover any defect or operation failure of the product. Avoid operating the TV at heights under 6500ft. BN68-850_Eng.indb 3 English - 3 2009-06-18 �� 3:54:58 This image retention is also known as temperature or humidity. This is not covered by .... Burn-in the surrounding environment such as "screen burn". This is making a 'cracking' noise. Watching the Plasma TV in the upper part of the product. Heat on the plasma display panel for longer than several minutes as it can only operate normally at temperatures below 41°F (5°C)...
... Warranty does not cover any defect or operation failure of the product. Avoid operating the TV at heights under 6500ft. BN68-850_Eng.indb 3 English - 3 2009-06-18 �� 3:54:58 This image retention is also known as temperature or humidity. This is not covered by .... Burn-in the surrounding environment such as "screen burn". This is making a 'cracking' noise. Watching the Plasma TV in the upper part of the product. Heat on the plasma display panel for longer than several minutes as it can only operate normally at temperatures below 41°F (5°C)...
User Manual (ENGLISH)
Page 4
...9632; Viewing the Connection Panel 7 ■■ Remote Control 9 Connections ■■ Connecting VHF and UHF Antennas 10 ■■ Connecting Cable TV 10 ■■ Connecting a DVD / Blu-ray Player or Cable Box / Satellite receiver (Set-Top Box) via HDMI 12 ■■ ... 52 ■■ Using the DLNA Application 54 ■■ Using the DLNA Function 57 Anynet+ ■■ Connecting Anynet+ Devices 58 ■■ Setting Up Anynet 60 ■■ Switching between Anynet+ Devices 60 ■■ Recording 61 ■■ Listening through...
...9632; Viewing the Connection Panel 7 ■■ Remote Control 9 Connections ■■ Connecting VHF and UHF Antennas 10 ■■ Connecting Cable TV 10 ■■ Connecting a DVD / Blu-ray Player or Cable Box / Satellite receiver (Set-Top Box) via HDMI 12 ■■ ... 52 ■■ Using the DLNA Application 54 ■■ Using the DLNA Function 57 Anynet+ ■■ Connecting Anynet+ Devices 58 ■■ Setting Up Anynet 60 ■■ Switching between Anynet+ Devices 60 ■■ Recording 61 ■■ Listening through...
User Manual (ENGLISH)
Page 5
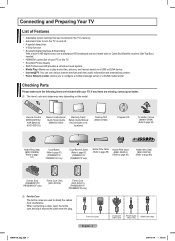
... timer. •• V-Chip function. •• Excellent Digital Interface & Networking : With a built-in all locations) Cleaning Cloth (BN63-01798B) Program CD TV-Holder / Screw (BN96-10788A) (Refer to page 88) Holder-Ring (4ea) (BN61-05280A) (Refer to page 87) Cover-Bottom (Refer to page 87) ...8226;• Media Play: Allows you to play music files, pictures, and movies saved on a USB or DLNA device. •• Internet@TV: You can use various internet services and view useful information and entertaining content. •• Home Network Center: Allows you to shield the ...
... timer. •• V-Chip function. •• Excellent Digital Interface & Networking : With a built-in all locations) Cleaning Cloth (BN63-01798B) Program CD TV-Holder / Screw (BN96-10788A) (Refer to page 88) Holder-Ring (4ea) (BN61-05280A) (Refer to page 87) Cover-Bottom (Refer to page 87) ...8226;• Media Play: Allows you to play music files, pictures, and movies saved on a USB or DLNA device. •• Internet@TV: You can use various internet services and view useful information and entertaining content. •• Home Network Center: Allows you to shield the ...
User Manual (ENGLISH)
Page 6
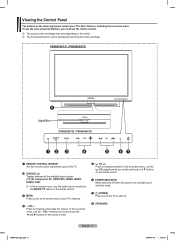
... on the remote control. 6 POWER INDICATOR Blinks and turns off when the power is on and lights up in stand-by touching them with your TV's basic features, including the on-screen menu. In the on-screen menu, use the CH buttons as you would use the - Viewing the Control Panel.... 7 (POWER) Press to change channels. NN The product color and shape may vary depending on the remote control. 5 CH Press to turn the TV on -screen menu of your TV's features. 4 - In the on-screen menu, use the ENTERE button on the remote control. 3 MENU Press to increase or decrease the volume...
... on the remote control. 6 POWER INDICATOR Blinks and turns off when the power is on and lights up in stand-by touching them with your TV's basic features, including the on-screen menu. In the on-screen menu, use the CH buttons as you would use the - Viewing the Control Panel.... 7 (POWER) Press to change channels. NN The product color and shape may vary depending on the remote control. 5 CH Press to turn the TV on -screen menu of your TV's features. 4 - In the on-screen menu, use the ENTERE button on the remote control. 3 MENU Press to increase or decrease the volume...
User Manual (ENGLISH)
Page 7
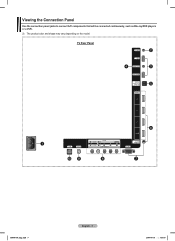
NN The product color and shape may vary depending on the model. TV Rear Panel BN68-850_Eng.indb 7 English - 7 2009-06-18 �� 3:55:05 Viewing the Connection Panel Use the connection panel jacks to connect A/V components that will be connected continuously, such as Blu-ray/DVD players or a VCR.
NN The product color and shape may vary depending on the model. TV Rear Panel BN68-850_Eng.indb 7 English - 7 2009-06-18 �� 3:55:05 Viewing the Connection Panel Use the connection panel jacks to connect A/V components that will be connected continuously, such as Blu-ray/DVD players or a VCR.
User Manual (ENGLISH)
Page 9
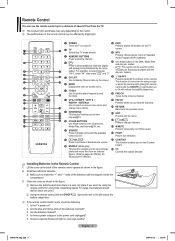
...one year.) NN Using the remote control with the diagram inside the compartment. 3. VOL CH 1 POWER $ INFO Turns the TV on ? 2. Press to display information on Samsung recorders with the ON/OFF( ) light button set to On will reduce the battery usage time.) Use to backlight the buttons... on -screen menu. Selects the TV mode directly. % MTS 3 NUMERIC BUTTONS Press to exit the menu. This function is the power cord...
...one year.) NN Using the remote control with the diagram inside the compartment. 3. VOL CH 1 POWER $ INFO Turns the TV on ? 2. Press to display information on Samsung recorders with the ON/OFF( ) light button set to On will reduce the battery usage time.) Use to backlight the buttons... on -screen menu. Selects the TV mode directly. % MTS 3 NUMERIC BUTTONS Press to exit the menu. This function is the power cord...

User Manual (ENGLISH)
Page 10
... at most electronics shops). 1. Plug the adaptor into the ANT IN terminal on the back of the TV. ❑❑ Antennas with 75 Ω Round Leads ANT IN Plug the antenna lead into the ANT ...IN terminal on the back of the TV. ❑❑ Separate VHF and UHF Antennas If you have two antennas, see "Antennas with 300 ... has a set of leads that look like this cable to the ANT IN terminal on the back of the TV. UHF VHF UHF VHF ANT IN ANT IN ❑❑ Connecting to the combiner. 2. Connect both antenna...
... at most electronics shops). 1. Plug the adaptor into the ANT IN terminal on the back of the TV. ❑❑ Antennas with 75 Ω Round Leads ANT IN Plug the antenna lead into the ANT ...IN terminal on the back of the TV. ❑❑ Separate VHF and UHF Antennas If you have two antennas, see "Antennas with 300 ... has a set of leads that look like this cable to the ANT IN terminal on the back of the TV. UHF VHF UHF VHF ANT IN ANT IN ❑❑ Connecting to the combiner. 2. Connect both antenna...
User Manual (ENGLISH)
Page 11
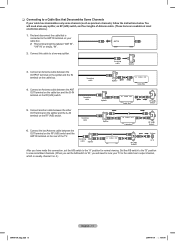
...the A/B switch to the "A" position for normal viewing. You will need a two-way splitter, an RF (A/B) switch, and four lengths of the TV. ANT IN 2. Incoming cable Splitter 3. Connect an Antenna cable between the other OUT terminal on the splitter and the A-IN terminal on the RF...Switch 5. NN This terminal might be labeled "ANT IN", "VHF IN" or simply, "IN". Incoming cable Splitter IN CABLE OUT A B RF (A/B) Switch TV Rear ANT IN After you will need to tune your cable box descrambles only some channels (such as premium channels), follow the instructions below.
...the A/B switch to the "A" position for normal viewing. You will need a two-way splitter, an RF (A/B) switch, and four lengths of the TV. ANT IN 2. Incoming cable Splitter 3. Connect an Antenna cable between the other OUT terminal on the splitter and the A-IN terminal on the RF...Switch 5. NN This terminal might be labeled "ANT IN", "VHF IN" or simply, "IN". Incoming cable Splitter IN CABLE OUT A B RF (A/B) Switch TV Rear ANT IN After you will need to tune your cable box descrambles only some channels (such as premium channels), follow the instructions below.
User Manual (ENGLISH)
Page 12
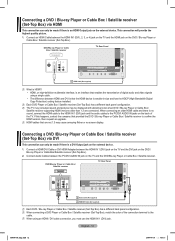
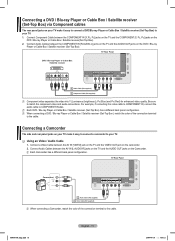
... video signals using an HDMI / DVI cable connection, you must use the HDMI IN 1 (DVI) jack. DVD/Blu-ray Player or Cable Box / Satellite receiver TV Rear Panel 2 Audio Cable (Not supplied) 1 HDMI/DVI Cable (Not supplied) NN Each DVD / Blu-ray Player or Cable Box / Satellite receiver (Set-Top... or Cable Box / Satellite receiver to the PC/DVI AUDIO IN jacks on the external device. 1. DVD/Blu-ray Player or Cable Box / Satellite receiver TV Rear Panel 1 HDMI Cable (Not supplied) NN What is HDMI? •• HDMI, or high-definition multimedia interface, is an interface that are connected....
... video signals using an HDMI / DVI cable connection, you must use the HDMI IN 1 (DVI) jack. DVD/Blu-ray Player or Cable Box / Satellite receiver TV Rear Panel 2 Audio Cable (Not supplied) 1 HDMI/DVI Cable (Not supplied) NN Each DVD / Blu-ray Player or Cable Box / Satellite receiver (Set-Top... or Cable Box / Satellite receiver to the PC/DVI AUDIO IN jacks on the external device. 1. DVD/Blu-ray Player or Cable Box / Satellite receiver TV Rear Panel 1 HDMI Cable (Not supplied) NN What is HDMI? •• HDMI, or high-definition multimedia interface, is an interface that are connected....
User Manual (ENGLISH)
Page 13
... When connecting a DVD / Blu-ray Player or Cable Box / Satellite receiver (Set-Top Box), match the color of the connection terminal to the cable. TV Rear Panel Camcorder 2 Audio Cable (Not supplied) 1 Video Cable (Not supplied) NN When connecting a Camcorder, match the color of the connection terminal to ...the cable. Connect Component Cable between the AV IN [VIDEO] jack on the TV and the VIDEO OUT jack on the camcorder. 2. Connecting a DVD / Blu-ray Player or Cable Box / Satellite receiver (Set-Top Box) via ...
... When connecting a DVD / Blu-ray Player or Cable Box / Satellite receiver (Set-Top Box), match the color of the connection terminal to the cable. TV Rear Panel Camcorder 2 Audio Cable (Not supplied) 1 Video Cable (Not supplied) NN When connecting a Camcorder, match the color of the connection terminal to ...the cable. Connect Component Cable between the AV IN [VIDEO] jack on the TV and the VIDEO OUT jack on the camcorder. 2. Connecting a DVD / Blu-ray Player or Cable Box / Satellite receiver (Set-Top Box) via ...
User Manual (ENGLISH)
Page 14
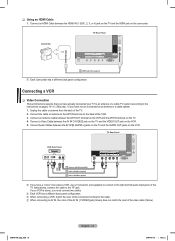
... or antenna from the back of the video cable (Yellow). Connect a Video Cable between the HDMI IN (1 (DVI), 2, 3, or 4) jack on the TV and the HDMI jack on pages 10~11). NN Each VCR has a different back panel configuration. Alternatively, connect the cable to the instructions on the ... on the back of the connection terminal to an antenna or a cable system. 1. NN When connecting a VCR, match the color of the VCR. 3. TV Rear Panel Camcorder 1 HDMI Cable (Not supplied) NN Each Camcorder has a different back panel configuration. BN68-850_Eng.indb 14 English - 14 2009-06-18 ...
... or antenna from the back of the video cable (Yellow). Connect a Video Cable between the HDMI IN (1 (DVI), 2, 3, or 4) jack on the TV and the HDMI jack on pages 10~11). NN Each VCR has a different back panel configuration. Alternatively, connect the cable to the instructions on the ... on the back of the connection terminal to an antenna or a cable system. 1. NN When connecting a VCR, match the color of the VCR. 3. TV Rear Panel Camcorder 1 HDMI Cable (Not supplied) NN Each Camcorder has a different back panel configuration. BN68-850_Eng.indb 14 English - 14 2009-06-18 ...

User Manual (ENGLISH)
Page 15
... set to On, you want to hear 5.1 channel audio, connect the DIGITAL AUDIO OUT (OPTICAL) jack on your TV make it easy to connect a Digital Audio System(Home theater/Receiver) to your TV. 1. TV Rear Panel Amplifier / DVD Home Theater Audio Cable (Not supplied) NN Each Amplifier / DVD Home Theater has a ...on the DVD / Blu-ray player or Cable/ Satellite Box directly to an Amplifier or Home Theater, not the TV. Connect an Optical Cable between the AUDIO OUT jacks on the TV and AUDIO IN [L-AUDIO-R] jacks on the Digital Audio System. Connect Audio Cables between the DIGITAL AUDIO OUT (OPTICAL...
... set to On, you want to hear 5.1 channel audio, connect the DIGITAL AUDIO OUT (OPTICAL) jack on your TV make it easy to connect a Digital Audio System(Home theater/Receiver) to your TV. 1. TV Rear Panel Amplifier / DVD Home Theater Audio Cable (Not supplied) NN Each Amplifier / DVD Home Theater has a ...on the DVD / Blu-ray player or Cable/ Satellite Box directly to an Amplifier or Home Theater, not the TV. Connect an Optical Cable between the AUDIO OUT jacks on the TV and AUDIO IN [L-AUDIO-R] jacks on the Digital Audio System. Connect Audio Cables between the DIGITAL AUDIO OUT (OPTICAL...
User Manual (ENGLISH)
Page 16
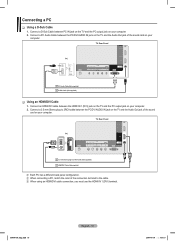
... HDMI/DVI cable connection, you must use the HDMI IN 1 (DVI) terminal. Connect a PC Audio Cable between the PC/DVI AUDIO IN jack on the TV and the Audio Out jack of the sound card on your computer. Connect an HDMI/DVI cable between PC IN jack on the... the Audio Out jack of the sound card on your computer. Connect a D-Sub Cable between the HDMI IN 1 (DVI) jack on the TV and the PC output jack on your computer. 2. NN When connecting a PC, match the color of the connection terminal to 2 RCA Cable (Not supplied) 1 HDMI/...
... HDMI/DVI cable connection, you must use the HDMI IN 1 (DVI) terminal. Connect a PC Audio Cable between the PC/DVI AUDIO IN jack on the TV and the Audio Out jack of the sound card on your computer. Connect an HDMI/DVI cable between PC IN jack on the... the Audio Out jack of the sound card on your computer. Connect a D-Sub Cable between the HDMI IN 1 (DVI) jack on the TV and the PC output jack on your computer. 2. NN When connecting a PC, match the color of the connection terminal to 2 RCA Cable (Not supplied) 1 HDMI/...
User Manual (ENGLISH)
Page 17
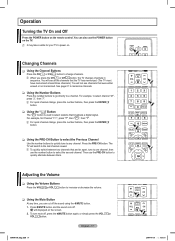
...;❑ Using the Number Buttons Press the number buttons to go directly to select channel "27", press "2", then "7". For example, for your TV to select the second channel. Then use the POWER button on the remote control. You will see channels that broadcast a digital signal. NN For... the Volume ❑❑ Using the Volume Buttons Press the VOL or VOL button to quickly alternate between two channels that the TV has memorized. (The TV must have memorized at least three channels). NN For quick channel change, press the number buttons, then press the ENTERE button. ...
...;❑ Using the Number Buttons Press the number buttons to go directly to select channel "27", press "2", then "7". For example, for your TV to select the second channel. Then use the POWER button on the remote control. You will see channels that broadcast a digital signal. NN For... the Volume ❑❑ Using the Volume Buttons Press the VOL or VOL button to quickly alternate between two channels that the TV has memorized. (The TV must have memorized at least three channels). NN For quick channel change, press the number buttons, then press the ENTERE button. ...

User Manual (ENGLISH)
Page 18
... 35 •• Auto Adjustment, see the remote control buttons clearly. 1. NN The button backlight will not be turned on for a moment. The TV will appear. 2. Press the INFO button on which external input mode you are viewing. 1. BN68-850_Eng.indb 18 English - 18 2009-06-18 &#... Remote Control Backlight Buttons Use this feature in dark surroundings and when you are unable to select a menu, then press the ENTERE button. 3. TV #1 Fri, Dec 19 2:05 am VOL CH OO Press the INFO button once more detailed description of certain audio-video settings. 1. Press the...
... 35 •• Auto Adjustment, see the remote control buttons clearly. 1. NN The button backlight will not be turned on for a moment. The TV will appear. 2. Press the INFO button on which external input mode you are viewing. 1. BN68-850_Eng.indb 18 English - 18 2009-06-18 &#... Remote Control Backlight Buttons Use this feature in dark surroundings and when you are unable to select a menu, then press the ENTERE button. 3. TV #1 Fri, Dec 19 2:05 am VOL CH OO Press the INFO button once more detailed description of certain audio-video settings. 1. Press the...
User Manual (ENGLISH)
Page 19
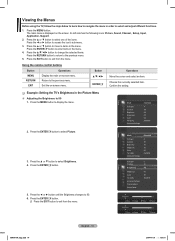
... Enter Enter 45 Return 80 Return BN68-850_Eng.indb 19 English - 19 2009-06-18 �� 3:55:18 Viewing the Menus Before using the TV, follow the steps below to learn how to navigate the menu in order to exit from the menu. Press the ENTERE button to 80 1. Confirm...
... Enter Enter 45 Return 80 Return BN68-850_Eng.indb 19 English - 19 2009-06-18 �� 3:55:18 Viewing the Menus Before using the TV, follow the steps below to learn how to navigate the menu in order to exit from the menu. Press the ENTERE button to 80 1. Confirm...


