
User Manual
Page 3
... to 6,221,000(FHD-level) pixels which require sophisticated technology to the screen. Altitude The PDP can cause screen image retention. Avoid operating the TV at temperatures below 41°F (5°0) A still image displayed too long may be a few bright or dark pixels on the Screen, Displaying still.... Burn-in 4:3 format for a long period of time may occur when the product contracts or expands due to the PDP Panel. Watching the Plasma TV in is making a 'cracking' noise, A 'cracking' noise may leave traces of borders displayed on the left, right and center of the screen ...
... to 6,221,000(FHD-level) pixels which require sophisticated technology to the screen. Altitude The PDP can cause screen image retention. Avoid operating the TV at temperatures below 41°F (5°0) A still image displayed too long may be a few bright or dark pixels on the Screen, Displaying still.... Burn-in 4:3 format for a long period of time may occur when the product contracts or expands due to the PDP Panel. Watching the Plasma TV in is making a 'cracking' noise, A 'cracking' noise may leave traces of borders displayed on the left, right and center of the screen ...
User Manual
Page 4
...VCR 13 ,,, Connecting a Digital Audio System 14 ,,, Connecting an Amplifier / DVD Home Theater 14 ,,, Connecting a PC 15 ,,, Turning the TV On and Off 16 ,,, Changing Channels 16 ,,, Adjusting the Volume 16 ,,, Using the TOOLS Button 17 ,,, Viewing the Display 17 ,,, Viewing...Troubleshooting forAnynet 39 ,,, Troubleshooting 40 ,,, Preparation before installing the Wall-Mount 41 ,,, How to attach the Stand-Base 41 ,,, Securing the TV to the Wall 42 ,,, Wall Mount Kit Specifications (VESA 43 ,,, Specifications 44 ,,, Dimensions (PN42B450B1D 45 ,,, Dimensions (PNSOB450B1D 46 ,,, ...
...VCR 13 ,,, Connecting a Digital Audio System 14 ,,, Connecting an Amplifier / DVD Home Theater 14 ,,, Connecting a PC 15 ,,, Turning the TV On and Off 16 ,,, Changing Channels 16 ,,, Adjusting the Volume 16 ,,, Using the TOOLS Button 17 ,,, Viewing the Display 17 ,,, Viewing...Troubleshooting forAnynet 39 ,,, Troubleshooting 40 ,,, Preparation before installing the Wall-Mount 41 ,,, How to attach the Stand-Base 41 ,,, Securing the TV to the Wall 42 ,,, Wall Mount Kit Specifications (VESA 43 ,,, Specifications 44 ,,, Dimensions (PN42B450B1D 45 ,,, Dimensions (PNSOB450B1D 46 ,,, ...
User Manual
Page 5
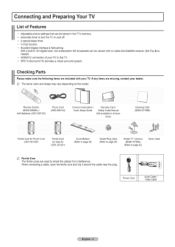
... Setup Guide Warranty Card / Safety Guide Manual (Not available in HD digital tuner, non-subscription HD broadcasts can be stored in the TV's memory. • Automatic timer to turn the TV on the model. if any items are used to shield the cables from interference. Connecting and Preparing Your... for Side-AV (3301-001201 ) Cover-Bottom (Refer to page 40) Holder-Ring (4ea) (Refer to page 40) Holder TV / Screws (BN96-10788A) (Refer to this TV. • SRS TruSurround HD provides a virtual surround system. Checking Parts Please make sure the following items are included with no Cable...
... Setup Guide Warranty Card / Safety Guide Manual (Not available in HD digital tuner, non-subscription HD broadcasts can be stored in the TV's memory. • Automatic timer to turn the TV on the model. if any items are used to shield the cables from interference. Connecting and Preparing Your... for Side-AV (3301-001201 ) Cover-Bottom (Refer to page 40) Holder-Ring (4ea) (Refer to page 40) Holder TV / Screws (BN96-10788A) (Refer to this TV. • SRS TruSurround HD provides a virtual surround system. Checking Parts Please make sure the following items are included with no Cable...
User Manual
Page 6
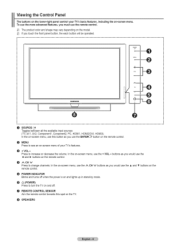
In the on-screen menu, use the + VOL = buttons as you touch the front panel button, the each button will be operated. ^1 SAMSUNG e O SOURCE Toggles between all the available input sources (TV, AV1, AV2, Component1, Conponent2, PC, HDMI1, HDMI2/DVI, HDMI3). O POWER INDICATOR Blinks and turns off when the power is on and... lights up in stand-by mode. 0 (POWER) Press to change channels. In the on-screen menu, use this spot on the TV. buttons on the remote control. If you use the and _. In the on-screen menu, use the A CN V buttonsas you must use the A and T ...
In the on-screen menu, use the + VOL = buttons as you touch the front panel button, the each button will be operated. ^1 SAMSUNG e O SOURCE Toggles between all the available input sources (TV, AV1, AV2, Component1, Conponent2, PC, HDMI1, HDMI2/DVI, HDMI3). O POWER INDICATOR Blinks and turns off when the power is on and... lights up in stand-by mode. 0 (POWER) Press to change channels. In the on-screen menu, use this spot on the TV. buttons on the remote control. If you use the and _. In the on-screen menu, use the A CN V buttonsas you must use the A and T ...

User Manual
Page 7
AVIN2 Video and audio inputs for service only. COMPONENT IN 1, 2/AV IN 1 Connects Component video / audio. TV Rear Panel "iV Side Panel -0 -@ O POWER IN Connects the supplied power cord. DVl AUDIO IN (AUDIO-R/L) Connect to the DVI audio output jack of an ... optional HDMI/DVl cable will be connected continuously, such as a DVl connection with an HDMI output. (HDMI 2 supports HDMI-DVl IN and connection from your TV allow you to receive left and right audio from a PC.) HDMI 2 can also be used as theAV IN 1 jack. @ Connect the video cable to the...
AVIN2 Video and audio inputs for service only. COMPONENT IN 1, 2/AV IN 1 Connects Component video / audio. TV Rear Panel "iV Side Panel -0 -@ O POWER IN Connects the supplied power cord. DVl AUDIO IN (AUDIO-R/L) Connect to the DVI audio output jack of an ... optional HDMI/DVl cable will be connected continuously, such as a DVl connection with an HDMI output. (HDMI 2 supports HDMI-DVl IN and connection from your TV allow you to receive left and right audio from a PC.) HDMI 2 can also be used as theAV IN 1 jack. @ Connect the video cable to the...

User Manual
Page 8
...Used to select additional channels (digital control recording on ? 2. Lift the cover at the back of the batteries with the Anynet+ feature) TV Selects the TV mode directly. Is there a power outage or is the power cord unplugged? 5. Remote Control You can be used functions. _) P.SIZE ... bright light. Press to increase or decrease the volume. 0 SOURCE _) FAV.CH Press to switch to the previous channel. Is the TV power on Samsung recorders with the diagram inside the compartment. 3, Close the cover as shown in the figure. 2, Install two AAA size batteries. @ Make...
...Used to select additional channels (digital control recording on ? 2. Lift the cover at the back of the batteries with the Anynet+ feature) TV Selects the TV mode directly. Is there a power outage or is the power cord unplugged? 5. Remote Control You can be used functions. _) P.SIZE ... bright light. Press to increase or decrease the volume. 0 SOURCE _) FAV.CH Press to switch to the previous channel. Is the TV power on Samsung recorders with the diagram inside the compartment. 3, Close the cover as shown in the figure. 2, Install two AAA size batteries. @ Make...

User Manual
Page 9
... has 300 £_ twin flat leads, follow the instructions below . Plug the adaptor into the ANT IN terminal on the back of the TV. This procedure requires an optional combiner-adaptor (available at most electronics shops). 1. Connect the other end of this , see "Antennas with 75...2. Find the cable that is cable-ready, you are using an off=airantenna (such as a roof antenna or rabbit ears) that looks like this TV is connected to tighten the screws. 2. I Connections Connecting VHF and UHF Antennas if your cable box. C) Separate VHF and UHFAntennas if you have...
... has 300 £_ twin flat leads, follow the instructions below . Plug the adaptor into the ANT IN terminal on the back of the TV. This procedure requires an optional combiner-adaptor (available at most electronics shops). 1. Connect the other end of this , see "Antennas with 75...2. Find the cable that is cable-ready, you are using an off=airantenna (such as a roof antenna or rabbit ears) that looks like this TV is connected to tighten the screws. 2. I Connections Connecting VHF and UHF Antennas if your cable box. C) Separate VHF and UHFAntennas if you have...

User Manual
Page 10
... the cable box and the B-IN terminal on your cable box. Sp,it,_r L j RF(ffIS) Switch After you will need to tune your TV to the cable box's output channel, which is connected to the "A" position for normal viewing. incoming IN c_uE our Splitter L ) Cable Box RF... (such as premium channels), follow the instructions below, You will need a two-way splitter, an RF (A/B) switch, and four lengths of the TV. __ _ _ TV RAN_TEIar I ..... incoming cable Splitter Connect an Antenna cable between the OUT terminal on the RF (A/B) switch and the ANT IN terminal on the cable...
... the cable box and the B-IN terminal on your cable box. Sp,it,_r L j RF(ffIS) Switch After you will need to tune your TV to the cable box's output channel, which is connected to the "A" position for normal viewing. incoming IN c_uE our Splitter L ) Cable Box RF... (such as premium channels), follow the instructions below, You will need a two-way splitter, an RF (A/B) switch, and four lengths of the TV. __ _ _ TV RAN_TEIar I ..... incoming cable Splitter Connect an Antenna cable between the OUT terminal on the RF (A/B) switch and the ANT IN terminal on the cable...
User Manual
Page 11
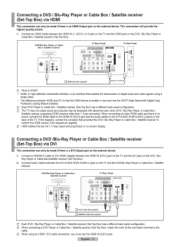
...must use the HDMI IN 2(DVl) jack. Each DVD Player or Cable Box / Satellite receiver (Set-Top Box) has a different back panel configuration. The TV may not output sound and pictures may be displayed with abnormal color when DVD I Blu-Ray Player or Cable Box I Satellite receiver supporting HDMI versions... on the back of the connection terminal to confirm the HDMI version, then request an upgrade. OVO/Blu-Ray Player or Cable Box / Satellite receiver TV Rear Panel (Not supplied) _ Audio Cable _ HDMi/DVI Cable (Not supplied} Each DVD / Blu-Ray Player or Cable Box / Satellite receiver (Set-Top...
...must use the HDMI IN 2(DVl) jack. Each DVD Player or Cable Box / Satellite receiver (Set-Top Box) has a different back panel configuration. The TV may not output sound and pictures may be displayed with abnormal color when DVD I Blu-Ray Player or Cable Box I Satellite receiver supporting HDMI versions... on the back of the connection terminal to confirm the HDMI version, then request an upgrade. OVO/Blu-Ray Player or Cable Box / Satellite receiver TV Rear Panel (Not supplied) _ Audio Cable _ HDMi/DVI Cable (Not supplied} Each DVD / Blu-Ray Player or Cable Box / Satellite receiver (Set-Top...

User Manual
Page 12
...Red) for enhanced video quality. Connect a Video Cable between the COMPONENT IN (1 or 2) [R-AUDIO-L] jacks on the TV and the AUDIO OUT jacks on your TV. [3 Using a Video I Audio Cable 1. TV Side Panel Carttcorder _ Video Cable (Not supplied) _ Audio Cable (Not supplied) [D Each Camcorder has a different back... panel configuration. [D When connecting a Camcorder, match the color of the connection terminal to your TV make it easy to connect a DVD/Blu=Ray Player or Cable Box / Satellite receiver [Set=Top Box) to the cable. Be sure to...
...Red) for enhanced video quality. Connect a Video Cable between the COMPONENT IN (1 or 2) [R-AUDIO-L] jacks on the TV and the AUDIO OUT jacks on your TV. [3 Using a Video I Audio Cable 1. TV Side Panel Carttcorder _ Video Cable (Not supplied) _ Audio Cable (Not supplied) [D Each Camcorder has a different back... panel configuration. [D When connecting a Camcorder, match the color of the connection terminal to your TV make it easy to connect a DVD/Blu=Ray Player or Cable Box / Satellite receiver [Set=Top Box) to the cable. Be sure to...

User Manual
Page 13
... stereo, you have not yet connected to the right and left audio input jacks of the TV. Connect a Video Cable between the HDMI IN (1, 2(DVl), or 3) jack on the TV and the HDMI jack on the TV. 4. Connect an HDMI Cable between the AV IN 1 [YNIDEO] or AV IN 2 [VIDEO)jack on the... the cable or antenna to the instructions on the VCR. 6. Connect an Antenna Cable between the AV IN 1 (or AV IN 2) [R-AUDIO-L] jacks on the TV and the AUDIO OUT jacks on the back of the video cable (Yellow). Alternatively, connect the cable to AV IN 1, the color of the AV...
... stereo, you have not yet connected to the right and left audio input jacks of the TV. Connect a Video Cable between the HDMI IN (1, 2(DVl), or 3) jack on the TV and the HDMI jack on the TV. 4. Connect an HDMI Cable between the AV IN 1 [YNIDEO] or AV IN 2 [VIDEO)jack on the... the cable or antenna to the instructions on the VCR. 6. Connect an Antenna Cable between the AV IN 1 (or AV IN 2) [R-AUDIO-L] jacks on the TV and the AUDIO OUT jacks on the back of the video cable (Yellow). Alternatively, connect the cable to AV IN 1, the color of the AV...

User Manual
Page 14
...Each Digital Audio System has a different back panel configuration. When an audio amplifier is displaying a DTV(air) signal, the TV will be heard from the TV's Optical jack. TV Rear Panel Amplifier / DVD Home Theater "1 Each Amplifier / DVD Home Theater has a different back panel configuration. Connecting an... Amplifier / DVD Home Theater Connect Audio Cables between the DIGITAL AUDIO OUT (OPTICAL)jacks on the TV and the Digital Audio Input (OPTICAL) jacks on the DVD / Blu-Ray player or Cable/ Satellite Box directly to the Home ...
...Each Digital Audio System has a different back panel configuration. When an audio amplifier is displaying a DTV(air) signal, the TV will be heard from the TV's Optical jack. TV Rear Panel Amplifier / DVD Home Theater "1 Each Amplifier / DVD Home Theater has a different back panel configuration. Connecting an... Amplifier / DVD Home Theater Connect Audio Cables between the DIGITAL AUDIO OUT (OPTICAL)jacks on the TV and the Digital Audio Input (OPTICAL) jacks on the DVD / Blu-Ray player or Cable/ Satellite Box directly to the Home ...

User Manual
Page 15
... of the connection terminal to 2RCA cable between the HDMI IN 2(DVI) jack on the TV and the PC output jack on your computer. 2. Connect a PC Audio Cable between PC IN [PC] jack on the...jack on your computer. 2. Connect a D-Sub Cable between the PC IN [AUDIO] jack on the TV and the Audio Out jack of the sound card on your computer. Connect a 3.5 mm Stereo plug ...the cable. [D When using an HDMI/DVl cable connection, you must use the HDMI IN 2(DVl) terminal. TV Rear Panel PC _PC Audio Cable (Not suppled} _ D-Sub Cable (Not supplied) Using an HDMI/DVICable 1. Connecting a PC Usingthe ...
... of the connection terminal to 2RCA cable between the HDMI IN 2(DVI) jack on the TV and the PC output jack on your computer. 2. Connect a PC Audio Cable between PC IN [PC] jack on the...jack on your computer. 2. Connect a D-Sub Cable between the PC IN [AUDIO] jack on the TV and the Audio Out jack of the sound card on your computer. Connect a 3.5 mm Stereo plug ...the cable. [D When using an HDMI/DVl cable connection, you must use the HDMI IN 2(DVl) terminal. TV Rear Panel PC _PC Audio Cable (Not suppled} _ D-Sub Cable (Not supplied) Using an HDMI/DVICable 1. Connecting a PC Usingthe ...
User Manual
Page 16
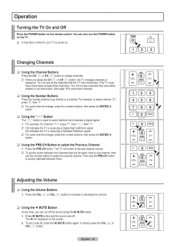
... displayed on . Youwill not see all the channels that are far apart, tune to one channel, then use the POWER button on the TV. For example, to memorize channels. i ..i.. ............1...1.... ,..... J.,.... Pressthe VOL + or VOL '=_ buttonto increaseor decreasethe volume. See page 19 to... will see channels that broadcast a digital signal. 1. i li Adjusting the Volume C) Using the Volume Buttons 1. HD indicates the TV is receiving a Standard Definition signal. To quickly switch between them. When you can also use the number button to power on the...
... displayed on . Youwill not see all the channels that are far apart, tune to one channel, then use the POWER button on the TV. For example, to memorize channels. i ..i.. ............1...1.... ,..... J.,.... Pressthe VOL + or VOL '=_ buttonto increaseor decreasethe volume. See page 19 to... will see channels that broadcast a digital signal. 1. i li Adjusting the Volume C) Using the Volume Buttons 1. HD indicates the TV is receiving a Standard Definition signal. To quickly switch between them. When you can also use the number button to power on the...

User Manual
Page 17
... quickly and easily. Using the TOOLS Button You can use the selected items. For a more or wait approximately 10 seconds and it disappears automatically. The TV will display the channel the type of sound, and the status of certain audJowideo settings. 1.
... quickly and easily. Using the TOOLS Button You can use the selected items. For a more or wait approximately 10 seconds and it disappears automatically. The TV will display the channel the type of sound, and the status of certain audJowideo settings. 1.
User Manual
Page 18
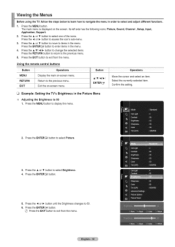
...from the menu. Press the ENTERI_ button. & Press the _1or _,- Press the EXIT button to select Brightness. 4. Viewing the Menus Before using the TV, follow the steps below to learn how to navigate the menu in order to display the menu. 2. Press the _ or _. ENTER_ Select the currently...the A or T button to 80. 6. Using the remote control buttons MENU Display the main on-screen menu. Confirm the setting. [3 Example:Setting the TV's Brightness in the menu. 4. button to 80 1. Press the MENU button. Press the ENTERI_ button to the previous menu. Move the cursor and select an...
...from the menu. Press the ENTERI_ button. & Press the _1or _,- Press the EXIT button to select Brightness. 4. Viewing the Menus Before using the TV, follow the steps below to learn how to navigate the menu in order to display the menu. 2. Press the _ or _. ENTER_ Select the currently...the A or T button to 80. 6. Using the remote control buttons MENU Display the main on-screen menu. Confirm the setting. [3 Example:Setting the TV's Brightness in the menu. 4. button to 80 1. Press the MENU button. Press the ENTERI_ button to the previous menu. Move the cursor and select an...
User Manual
Page 19
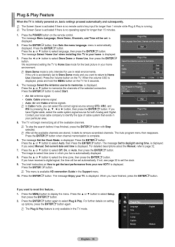
... signal source among STD, HRC, and mRCby pressing the A, _, _ or _ button, then press the ENTERI:_ button. Contact your particular area. 6. The TV will be set the clock. 9. Press the ENTERI:_ button when channel memorization is displayed. The message Set the Clock Mode. Press the A or T button ...; Cable: Cable antenna signal. • Auto: Air and Cable antenna signals. @ In Cable mode, you want to select time zone in the TV mode. Press the ENTER_ button. If you live is accidentally set automatically. The Auto program menu then reappears. is displayed. 2. The image to reset...
... signal source among STD, HRC, and mRCby pressing the A, _, _ or _ button, then press the ENTERI:_ button. Contact your particular area. 6. The TV will be set the clock. 9. Press the ENTERI:_ button when channel memorization is displayed. The message Set the Clock Mode. Press the A or T button ...; Cable: Cable antenna signal. • Auto: Air and Cable antenna signals. @ In Cable mode, you want to select time zone in the TV mode. Press the ENTER_ button. If you live is accidentally set automatically. The Auto program menu then reappears. is displayed. 2. The image to reset...
User Manual
Page 20
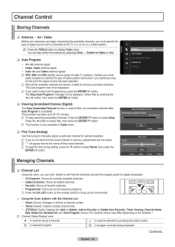
... signal. • Cable: Cable antenna signal. • Auto: Air and Cable antenna signals STD, HRC and IRC identify various types of cable TV systems. Contact your local cable company to identify the type of cable system that is completed. button, then press the ENTER_ button. _3 ClearingScrambled Channel... source has been selected. The Auto program menu then reappears. This process may differ depending on the remote control to bring up to the TV (i.e. an Air or a Cable system)• You can Add / Delete or set Favorite channels and use the program guide for optimal reception...
... signal. • Cable: Cable antenna signal. • Auto: Air and Cable antenna signals STD, HRC and IRC identify various types of cable TV systems. Contact your local cable company to identify the type of cable system that is completed. button, then press the ENTER_ button. _3 ClearingScrambled Channel... source has been selected. The Auto program menu then reappears. This process may differ depending on the remote control to bring up to the TV (i.e. an Air or a Cable system)• You can Add / Delete or set Favorite channels and use the program guide for optimal reception...
User Manual
Page 22
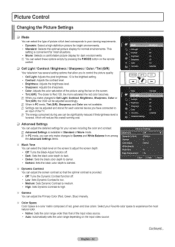
..., Tint (G/R), Sharpness and Color are not available. @ Settings can be significantly reduced if thebrightness level is lowered, which best corresponds to an input of the TV. @ The energy consumed during use can be adjusted and stored for each external device you to control the picture quality. • Cell Light: Adjusts the...
..., Tint (G/R), Sharpness and Color are not available. @ Settings can be significantly reduced if thebrightness level is lowered, which best corresponds to an input of the TV. @ The energy consumed during use can be adjusted and stored for each external device you to control the picture quality. • Cell Light: Adjusts the...
User Manual
Page 23
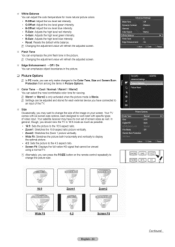
...most comfortable color tone for viewing. @ Warm1 or Warm2 is only activated when the picture mode is Movie. @ Settings can be viewed using a normal TV. {_,)Alternately, you have its own set of screen sizes as possible. • 16:9: Sets the picture to the 16:9 aspect ratio. • Zoom1... both horizontally and vertically to display the optimal picture. • 4:3: Sets the picture to an input of the TV. B-Gain: Adjusts the high level blue intensity. Your TV comes with six screen size options, each external device you can press the RSIZE button on your screen. G=Offset:Adjust...
...most comfortable color tone for viewing. @ Warm1 or Warm2 is only activated when the picture mode is Movie. @ Settings can be viewed using a normal TV. {_,)Alternately, you have its own set of screen sizes as possible. • 16:9: Sets the picture to the 16:9 aspect ratio. • Zoom1... both horizontally and vertically to display the optimal picture. • 4:3: Sets the picture to an input of the TV. B-Gain: Adjusts the high level blue intensity. Your TV comes with six screen size options, each external device you can press the RSIZE button on your screen. G=Offset:Adjust...


