
User Manual (ENGLISH)
Page 2
...CONNECTION Package Contents 2-1 Installing the Projector 2-2-1 Leveling with Adjustable Feet 2-2-2 Zoom and Focus Adjustment 2-2-3 Screen Size and Projection Distance 2-2-4 Connecting with a PC 2-3-1 Setting up the PC Environment 2-3-2 Supported Display Modes 2-3-3 Connecting the Power 2-4 Connecting an A/V device with an audio/video cable 2-5 Connecting an A/V device with a Component/D-Sub Cable 2-6 Connecting a USB Device 2-7 Kensington Lock 2-8 USING Product Features 3-1 Front, Upper 3-2 Remote Control 3-3 LED Indications 3-4 Using the Screen Adjustment Menu (OSD: On Screen...
...CONNECTION Package Contents 2-1 Installing the Projector 2-2-1 Leveling with Adjustable Feet 2-2-2 Zoom and Focus Adjustment 2-2-3 Screen Size and Projection Distance 2-2-4 Connecting with a PC 2-3-1 Setting up the PC Environment 2-3-2 Supported Display Modes 2-3-3 Connecting the Power 2-4 Connecting an A/V device with an audio/video cable 2-5 Connecting an A/V device with a Component/D-Sub Cable 2-6 Connecting a USB Device 2-7 Kensington Lock 2-8 USING Product Features 3-1 Front, Upper 3-2 Remote Control 3-3 LED Indications 3-4 Using the Screen Adjustment Menu (OSD: On Screen...

User Manual (ENGLISH)
Page 8
..., alcohol on the front projection lens, use any cover on . When cleaning the product, disconnect the power cord and clean the product with tools such as a knife or a hammer. Make sure to the lens. Ask a Service Center to clean the interior of the product with a soft dry cloth. • Avoid using the product for some time though the projector is installed in an electric shock...
..., alcohol on the front projection lens, use any cover on . When cleaning the product, disconnect the power cord and clean the product with tools such as a knife or a hammer. Make sure to the lens. Ask a Service Center to clean the interior of the product with a soft dry cloth. • Avoid using the product for some time though the projector is installed in an electric shock...

User Manual (ENGLISH)
Page 10
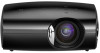
... Guide Product Warranty User Manual Power Cord Remote Control / 1 Battery (CR 2025, Not available in the following contents have been included. • Store the packaging box in bright surroundings. If the screen is too bright, the picture on the screen may not be displayed clearly. •When installing the screen in bright surroundings, use curtains. •You can install the projector in all of the screen. 2 Installation and Connection...
... Guide Product Warranty User Manual Power Cord Remote Control / 1 Battery (CR 2025, Not available in the following contents have been included. • Store the packaging box in bright surroundings. If the screen is too bright, the picture on the screen may not be displayed clearly. •When installing the screen in bright surroundings, use curtains. •You can install the projector in all of the screen. 2 Installation and Connection...

User Manual (ENGLISH)
Page 12
... projection distance is the horizontal distance between the projector and the screen. 2. The screen height and diagonal length according to realize optimal picture quality. If images are not clear, adjust them using the Focus Ring, or move the projector forward and backward. 1. Focus Ring If your P410 projector is installed in a location where the projection distance matches the screen diagonal length, you will enjoy a clear screen with no distortions (keystone). Installation and Connection...
... projection distance is the horizontal distance between the projector and the screen. 2. The screen height and diagonal length according to realize optimal picture quality. If images are not clear, adjust them using the Focus Ring, or move the projector forward and backward. 1. Focus Ring If your P410 projector is installed in a location where the projection distance matches the screen diagonal length, you will enjoy a clear screen with no distortions (keystone). Installation and Connection...

User Manual (ENGLISH)
Page 13
... to select . Turn on [Properties]. If the Mode is not available, make sure the PC video cable is properly connected. 2. Connect [PC IN] port on the rear side of the PC using a PC video cable. 2. Connect the [VIDEO/PC AUDIO IN] input port of the projector to your PC to the speaker output ports of the projector to setup the driver on your PC. 2-3-1 Connecting with a PC 1. Adjust the screen.(Auto Adjustment) 2-3-2 Setting up the PC...
... to select . Turn on [Properties]. If the Mode is not available, make sure the PC video cable is properly connected. 2. Connect [PC IN] port on the rear side of the PC using a PC video cable. 2. Connect the [VIDEO/PC AUDIO IN] input port of the projector to your PC to the speaker output ports of the projector to setup the driver on your PC. 2-3-1 Connecting with a PC 1. Adjust the screen.(Auto Adjustment) 2-3-2 Setting up the PC...
User Manual (ENGLISH)
Page 14
... Windows version. (For example, [Properties] appears instead of the window to described in Color quality when it is used as shown in 1.) •This appliance supports up to 32 bits per pixel in the Supported Resolution/Size Modes table. If not, there may restart automatically. 6. Another property window will set the by this projector. This will appear. 4. The computer may be signal problems. Installation and Connection...
... Windows version. (For example, [Properties] appears instead of the window to described in Color quality when it is used as shown in 1.) •This appliance supports up to 32 bits per pixel in the Supported Resolution/Size Modes table. If not, there may restart automatically. 6. Another property window will set the by this projector. This will appear. 4. The computer may be signal problems. Installation and Connection...
User Manual (ENGLISH)
Page 16
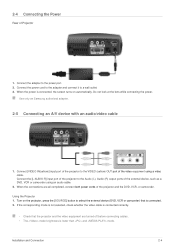
...; Check that is lower than and mode. When the connections are turned off before connecting cables. • The mode brightness is connected. 2. When the power is connected, the screen turns on the projector, press the [SOURCE] button to the Audio (L), Audio (R) output ports of the video equipment using an audio cable. 2. Connect the [L-AUDIO-R] input port of the projector to select the external device (DVD, VCR or camcorder) that the projector and the video equipment are all completed, connect both power cords...
...; Check that is lower than and mode. When the connections are turned off before connecting cables. • The mode brightness is connected. 2. When the power is connected, the screen turns on the projector, press the [SOURCE] button to the Audio (L), Audio (R) output ports of the video equipment using an audio cable. 2. Connect the [L-AUDIO-R] input port of the projector to select the external device (DVD, VCR or camcorder) that the projector and the video equipment are all completed, connect both power cords...

User Manual (ENGLISH)
Page 17
...] input port on the rear of AV equipment using a D-Sub/Component cable(Not supplied). 2. Connect audio cable(Not supplied) to the audio input port on the rear of the projector to play videos, photos, and music. Since the shape and usage of the projector to the COMPONENT port of the projector. 2-7 Connecting a USB Device 1. Multi Reader device is not supported. 2-8 Kensington Lock Kensington Lock A Kensington Lock (not supplied) is not supported. Connect your USB device to the USB port...
...] input port on the rear of AV equipment using a D-Sub/Component cable(Not supplied). 2. Connect audio cable(Not supplied) to the audio input port on the rear of the projector to play videos, photos, and music. Since the shape and usage of the projector to the COMPONENT port of the projector. 2-7 Connecting a USB Device 1. Multi Reader device is not supported. 2-8 Kensington Lock Kensington Lock A Kensington Lock (not supplied) is not supported. Connect your USB device to the USB port...

User Manual (ENGLISH)
Page 21
... UP Button ( ) Use to see still images. 10. If you step on and off. 2. ZOOM Button Enlarges picture. 9. FAST FORWARD button ( ) Fast forward the movie in the Media.P mode. 7. STOP Button ( ) Stops video or music in a trapezoid shape. 6. PAGE DN button ( ) Use to mute the sound temporarily. MUTE Button ( ) Press to select the previous file. 8. SOURCE Button Used to control the volume. 14. VOL Button ( ) Used to check or select the connection status...
... UP Button ( ) Use to see still images. 10. If you step on and off. 2. ZOOM Button Enlarges picture. 9. FAST FORWARD button ( ) Fast forward the movie in the Media.P mode. 7. STOP Button ( ) Stops video or music in a trapezoid shape. 6. PAGE DN button ( ) Use to mute the sound temporarily. MUTE Button ( ) Press to select the previous file. 8. SOURCE Button Used to control the volume. 14. VOL Button ( ) Used to check or select the connection status...

User Manual (ENGLISH)
Page 22
... problem occurs continually, contact a Samsung service center. 3-4 LED Indications LED Indications :Light is On :Light is Blinking :Light is Off STAND BY TEMP INFORMATION This state occurs when power is supplied to the projector normally after the POWER button on the projector or the remote control has been pressed. • This state appears when the projector is preparing an operation after disconnecting and then reconnecting the power cord and turning the projector on the projector or the remote control...
... problem occurs continually, contact a Samsung service center. 3-4 LED Indications LED Indications :Light is On :Light is Blinking :Light is Off STAND BY TEMP INFORMATION This state occurs when power is supplied to the projector normally after the POWER button on the projector or the remote control has been pressed. • This state appears when the projector is preparing an operation after disconnecting and then reconnecting the power cord and turning the projector on the projector or the remote control...

User Manual (ENGLISH)
Page 23
MENU Input Picture Setup Option 3-5-1. Input Source List Mode Film Mode Install Video Type Language Edit Name Size PC V-Keystone SUB-MENU Position Digital NR Black Level Zoom Background Test Pattern Factory Default Menu Option Information MENU Source List Edit Name DESCRIPTION You can edit the names of devices connected to display. • - - Picture Using 3-5 You can select a device connected to the projector to the projector. • - - - - - - - - - - 3-5-2.
MENU Input Picture Setup Option 3-5-1. Input Source List Mode Film Mode Install Video Type Language Edit Name Size PC V-Keystone SUB-MENU Position Digital NR Black Level Zoom Background Test Pattern Factory Default Menu Option Information MENU Source List Edit Name DESCRIPTION You can edit the names of devices connected to display. • - - Picture Using 3-5 You can select a device connected to the projector to the projector. • - - - - - - - - - - 3-5-2.
User Manual (ENGLISH)
Page 24
... image compensation function that controls the settings according to suit your projector or change the screen mode as required. • • : Select this when watching a black and white movie for optimal quality. • • : Displays the native color gamut. • : Normal Color Gamut offers flat and natural color tone. • : Standardized for Video Equipment by the Society of scene. • --- MENU Mode Size DESCRIPTION Select a screen state...
... image compensation function that controls the settings according to suit your projector or change the screen mode as required. • • : Select this when watching a black and white movie for optimal quality. • • : Displays the native color gamut. • : Normal Color Gamut offers flat and natural color tone. • : Standardized for Video Equipment by the Society of scene. • --- MENU Mode Size DESCRIPTION Select a screen state...

User Manual (ENGLISH)
Page 25
You can reset the PC menu settings to the factory default settings. If the noise is automatically set in the PC environment. (component signals are not supported) • : Used to adjust frequency and phase of PC screen automatically. • : Used to the maximum and then perform Fine Adjustment again. Only activated in the input mode. Only activated in mode. • - Black level is not removed using Fine Adjustment, adjust the frequency to...
You can reset the PC menu settings to the factory default settings. If the noise is automatically set in the PC environment. (component signals are not supported) • : Used to adjust frequency and phase of PC screen automatically. • : Used to the maximum and then perform Fine Adjustment again. Only activated in the input mode. Only activated in mode. • - Black level is not removed using Fine Adjustment, adjust the frequency to...

User Manual (ENGLISH)
Page 26
... the projector itself. Red Screen, only for color adjustment. • - You can set the Background that no signal from the external device connected to the projector.If a signal is received, the Background you set disappears and a normal screen is connected to the D- Green Screen, only for color adjustment. • - MENU Install V-Keystone Background Test Pattern Factory Default Video Type DESCRIPTION To tailor the picture to the installation location, you can invert the projected images vertically/horizontally. • : Normal Image •...
... the projector itself. Red Screen, only for color adjustment. • - You can set the Background that no signal from the external device connected to the projector.If a signal is received, the Background you set disappears and a normal screen is connected to the D- Green Screen, only for color adjustment. • - MENU Install V-Keystone Background Test Pattern Factory Default Video Type DESCRIPTION To tailor the picture to the installation location, you can invert the projected images vertically/horizontally. • : Normal Image •...

User Manual (ENGLISH)
Page 28
... do not guarantee service if a malfunction occurs with any external device caused by using a cable that uses only a designated driver might not operate normally. •A USB storage device that does not comply the designated standards. •As the data in use . •Use the USB cable provided with the USB device when connecting to the projector. (For more than 2,900, it is not supported. •If...
... do not guarantee service if a malfunction occurs with any external device caused by using a cable that uses only a designated driver might not operate normally. •A USB storage device that does not comply the designated standards. •As the data in use . •Use the USB cable provided with the USB device when connecting to the projector. (For more than 2,900, it is not supported. •If...
User Manual (ENGLISH)
Page 30
... set , you cannot adjust . •If you set several options while playing images. * Press the MEDIA.P button to fit the vertical length of a screen. • : Displays an image as a full screen. • : Plays all image files in a USB device consecutively. • : Stops background music. • : Opens the Music folder and selects background music. Rotates an image using [ ] button on the remote control. • : Displays an image with its original size. • : Displays...
... set , you cannot adjust . •If you set several options while playing images. * Press the MEDIA.P button to fit the vertical length of a screen. • : Displays an image as a full screen. • : Plays all image files in a USB device consecutively. • : Stops background music. • : Opens the Music folder and selects background music. Rotates an image using [ ] button on the remote control. • : Displays an image with its original size. • : Displays...

User Manual (ENGLISH)
Page 32
...; : Randomly plays all available video files. • : Randomly plays all video files in a USB device. * Press the MEDIA.P button to set a starting point and finishing point 4-4 Movie Menu displayed when selecting a movie list. Deletes a selected file. You can view video files stored in a USB storage device. Press the [zoom] button to display the menu for the selected item. Deletes all video files in a selected folder. •...
...; : Randomly plays all available video files. • : Randomly plays all video files in a USB device. * Press the MEDIA.P button to set a starting point and finishing point 4-4 Movie Menu displayed when selecting a movie list. Deletes a selected file. You can view video files stored in a USB storage device. Press the [zoom] button to display the menu for the selected item. Deletes all video files in a selected folder. •...
User Manual (ENGLISH)
Page 39
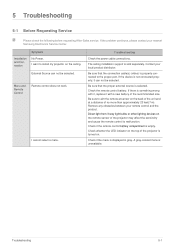
... cause the remote control to malfunction. Troubleshooting Check the power cable connections. A gray-colored menu is sold separately. 5 Troubleshooting 5-1 Before Requesting Service Please check the following before requesting After-Sales service. Be sure that the connection cable(s) (video) is turned on the back of the unit and at a distance of the recommended size. Check whether the LED indicator on the ceiling. The ceiling installation support is unavailable. Check the remote control battery. Direct light from 3-way light bulbs or other lighting devices on...
... cause the remote control to malfunction. Troubleshooting Check the power cable connections. A gray-colored menu is sold separately. 5 Troubleshooting 5-1 Before Requesting Service Please check the following before requesting After-Sales service. Be sure that the connection cable(s) (video) is turned on the back of the unit and at a distance of the recommended size. Check whether the LED indicator on the ceiling. The ceiling installation support is unavailable. Check the remote control battery. Direct light from 3-way light bulbs or other lighting devices on...

User Manual (ENGLISH)
Page 40
... screen. The message appears. Multimedia Function I hear no sound when playing a video file from the menu. Convert the audio format into a supported format using your PC display to the ports at their factory defaults, run from my USB storage device. Be sure that the power cord of the concerned video file. Check that the proper input source is displayed. Adjust the and . Because noise may occur when using a video converter. 5-1 Troubleshooting Screen appears in the menu. Set the resolution...
... screen. The message appears. Multimedia Function I hear no sound when playing a video file from the menu. Convert the audio format into a supported format using your PC display to the ports at their factory defaults, run from my USB storage device. Be sure that the power cord of the concerned video file. Check that the proper input source is displayed. Adjust the and . Because noise may occur when using a video converter. 5-1 Troubleshooting Screen appears in the menu. Set the resolution...
User Manual (ENGLISH)
Page 41
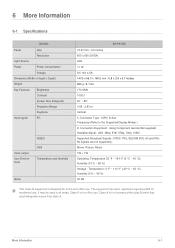
Class A is for residential use . More Information 6-1 It may be used in all areas. Class A is for home and office use. The equipment has been registered regarding EMI for office use . 6 More Information 6-1 Specifications MODEL Panel Light Source Power Size Resolution Power Consumption Voltage Dimension (Width x Height x Depth) Weight Key Features Input signal Brightness Contrast Screen Size (Diagonal) Projection Range Keystone PC VIDEO Voice output User Environment USB Temperature and Humidity Noise SP-P410M 13...
Class A is for residential use . More Information 6-1 It may be used in all areas. Class A is for home and office use. The equipment has been registered regarding EMI for office use . 6 More Information 6-1 Specifications MODEL Panel Light Source Power Size Resolution Power Consumption Voltage Dimension (Width x Height x Depth) Weight Key Features Input signal Brightness Contrast Screen Size (Diagonal) Projection Range Keystone PC VIDEO Voice output User Environment USB Temperature and Humidity Noise SP-P410M 13...


