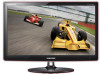
User Manual (user Manual) (ver.1.0) (English)
Page 1
SyncMaster P2770FH LCD Monitor User Manual The color and the appearance may differ depending on the product, and the specifications are subject to change without prior notice to improve the performance.
User Manual (user Manual) (ver.1.0) (English)
Page 11
... are missing, contact your dealer. • Contact a local dealer to purchase optional items. Monitor CONTENTS Quick Setup Guide Warranty Card (Not available in all locations) User Manual 'DVI-A to D-Sub' Cable Power Cord Stand DC-Adapter Cleaning Cloth Stand Connector OPTIONAL PARTS HDMI Cable DVI Cable • The color and the appearance...
User Manual (user Manual) (ver.1.0) (English)
Page 17
Connect the [DIGITAL AUDIO OUT] terminal of your monitor to the optical input of your amplifier using an optical cable. • If no sound is emitted from the monitor, you need to use an amplifier. • For information on how to connect a speaker and amplifier, refer to an Amplifier 1. 2-6 Connecting to the respective user manuals provided by their manufacturers. 2-6 Installing the Product
User Manual (user Manual) (ver.1.0) (English)
Page 18
... Insert the locking device into the Kensington slot on the model and the manufacturer, refer to lock the product so that enables users to the User Manual supplied with the locking device for more information. To lock the product, follow these steps: 1. Wrap the Kensington lock cable around... a large, stationary object such as a desk or chair. 2. For exact instructions, see the User Manual supplied with the lock attached through the looped end of the locking device may differ depending on the Monitor ( ) . 4. Since the shape and...
User Manual (user Manual) (ver.1.0) (English)
Page 20
... +/+ 40.000 +/+ 65.000 -/- 83.500 -/+ 108.000 +/+ 108.000 +/+ 106.500 -/+ 162.000 +/+ 146.250 -/+ 148.500 +/+ Horizontal Frequency The time taken to the User Manual of times every second so that humans can see the picture. Using the product 3-2 This frequency is set for a CDT monitor. Therefore, the visual quality...
User Manual (user Manual) (ver.1.0) (English)
Page 29
...affect the other functions of the Menu button LED in levels. Set to AV when connected to wait before the OSD is taken by the user. The OSD automatically disappears if no action is hidden. • - - - MENU Reset Menu Transparency Language DESCRIPTION Use this function to ...Customized Key to the factory defaults. • - Adjusts the brightness of the PC. INFORMATION 3-5 Using the product Select a language for the OSD. Users have to manually select an input signal. You can set the function of the OSD. • - Turns the Power button LED lamp off . • - ...
User Manual (user Manual) (ver.1.0) (English)
Page 36
... latest version. (Please contact the graphics card or computer manufacturer for the product. Did you change the resolution and frequency appropriate to the user manual. A BLANK SCREEN APPEARS / I CANNOT TURN THE PRODUCT ON Is the power cord connected properly? In this case, set up the ... cause of the graphics card settings menu. Check the connection status of the product. If the problem continues, please contact your nearest Samsung Electronics Service Center. Is the "Check Signal Cable" message displayed on the screen? Set the resolution and the frequency to the monitor...
User Manual (user Manual) (ver.1.0) (English)
Page 37
...→ Appearance and Themes → Display → Settings. If the beep sound is generated 3 or more information, refer to the User Manual of the product. Troubleshooting 5-2 Set the resolution and the frequency to the appropriate values in accordance with a transparent material over the black ... the descriptions about the driver installation. Check if all the Plug&Play (VESA DDC) functions are supported referring to the Windows user manual for the computer. Since this product is not a defect of the graphics card. THE COLOR HAS BEEN CHANGED AFTER CHANGING THE...
User Manual (user Manual) (ver.1.0) (English)
Page 38
... Windows 7 : Change the frequency by selecting Con- You can also use the power saving function? You have to the Windows user manual for the computer.) Troubleshooting 5-3 Windows Vista : Change the frequency by selecting Control Panel → Display → Screen Saver Setting... by selecting Control Panel → Appearance and Personalization → Display → Adjust resolution. (For more information, refer to the User Manual of the computer or the graphics card.) Windows XP : Configure it by selecting Control Panel → Appearance and Themes → Display...