User Manual (user Manual) (ver.1.0) (English)
Page 2
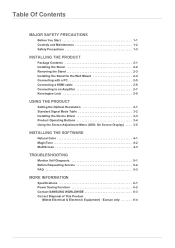
... the Wall Mount 2-4 Connecting with a PC 2-5 Connecting a HDMI cable 2-6 Connecting to an Amplifier 2-7 Kensington Lock 2-8 USING THE PRODUCT Setting the Optimal Resolution 3-1 Standard Signal Mode Table 3-2 Installing the Device Driver 3-3 Product Operating Buttons 3-4 Using the Screen Adjustment Menu (OSD: On...4-3 TROUBLESHOOTING Monitor Self-Diagnosis 5-1 Before Requesting Service 5-2 FAQ 5-3 MORE INFORMATION Specifications 6-1 Power Saving Function 6-2 Contact SAMSUNG WORLDWIDE 6-3 Correct Disposal of This Product (Waste Electrical & Electronic Equipment) - Europe only 6-4
... the Wall Mount 2-4 Connecting with a PC 2-5 Connecting a HDMI cable 2-6 Connecting to an Amplifier 2-7 Kensington Lock 2-8 USING THE PRODUCT Setting the Optimal Resolution 3-1 Standard Signal Mode Table 3-2 Installing the Device Driver 3-3 Product Operating Buttons 3-4 Using the Screen Adjustment Menu (OSD: On...4-3 TROUBLESHOOTING Monitor Self-Diagnosis 5-1 Before Requesting Service 5-2 FAQ 5-3 MORE INFORMATION Specifications 6-1 Power Saving Function 6-2 Contact SAMSUNG WORLDWIDE 6-3 Correct Disposal of This Product (Waste Electrical & Electronic Equipment) - Europe only 6-4

User Manual (user Manual) (ver.1.0) (English)
Page 3
...Samsung...Reserved. VESA, DPM and DDC are the registered trademarks of Samsung Electronics, Co., Ltd. Copyright Notice The contents of this ...refer to operate a function. The ENERGY STAR logo is reserved by Samsung Electronics, Co., Ltd. admits that this product satisfies the ENERGY STAR... Indicates a hint or tip to the 'Troubleshooting' section. The SAMSUNG logo and SyncMaster are subject to their respective companies. Using this ...copyright of this manual is the registered trademark of ENERGY STAR, Samsung Electronics, Co., Ltd. 1 Major Safety Precautions 1-1 Before You...
...Samsung...Reserved. VESA, DPM and DDC are the registered trademarks of Samsung Electronics, Co., Ltd. Copyright Notice The contents of this ...refer to operate a function. The ENERGY STAR logo is reserved by Samsung Electronics, Co., Ltd. admits that this product satisfies the ENERGY STAR... Indicates a hint or tip to the 'Troubleshooting' section. The SAMSUNG logo and SyncMaster are subject to their respective companies. Using this ...copyright of this manual is the registered trademark of ENERGY STAR, Samsung Electronics, Co., Ltd. 1 Major Safety Precautions 1-1 Before You...
User Manual (user Manual) (ver.1.0) (English)
Page 4
... the product with an inflammable substance such as benzene or thinner or with a wall-mount About persistent images • Displaying a still image for a long time, set the power-saving mode or screen saver. • Due to technological constraints of the LCD Panel manufacturer, the images generated by this product may appear...
... the product with an inflammable substance such as benzene or thinner or with a wall-mount About persistent images • Displaying a still image for a long time, set the power-saving mode or screen saver. • Due to technological constraints of the LCD Panel manufacturer, the images generated by this product may appear...
User Manual (user Manual) (ver.1.0) (English)
Page 9
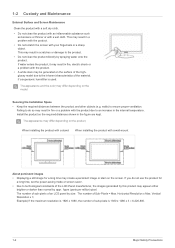
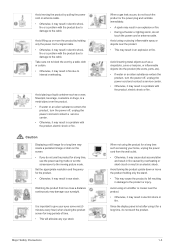
... by a table cloth or curtain. • Otherwise, it for a long time, do not use the product for a long time, use the power-saving mode or set the screensaver to the moving the product by holding only the stand. • This may result in electric shock, fire or a problem with the product... alien substance enters the product, turn the power off , unplug the power cord and contact a service center. • Otherwise, it may result in eye strain. Set the appropriate resolution and frequency for long periods of time. • This will alleviate any eye strain.
... by a table cloth or curtain. • Otherwise, it for a long time, do not use the product for a long time, use the power-saving mode or set the screensaver to the moving the product by holding only the stand. • This may result in electric shock, fire or a problem with the product... alien substance enters the product, turn the power off , unplug the power cord and contact a service center. • Otherwise, it may result in eye strain. Set the appropriate resolution and frequency for long periods of time. • This will alleviate any eye strain.

User Manual (user Manual) (ver.1.0) (English)
Page 21
...you turn the power on. • Right-click over the Desktop and select 'Properties' from the pop-up menu. • In the 'Settings' tab, set the resolution to the optimal resolution • When the PC is turned off, connect the product and the PC and turn the power on after...Resolution If you press this button, the message disappears. • The message appears up to 3 times if the resolution has not been set to the optimal resolution. • To set the resolution to the optimal resolution. Using the product 3-1 Select a language and the optimal resolution. ▲/▼ : You can ...
...you turn the power on. • Right-click over the Desktop and select 'Properties' from the pop-up menu. • In the 'Settings' tab, set the resolution to the optimal resolution • When the PC is turned off, connect the product and the PC and turn the power on after...Resolution If you press this button, the message disappears. • The message appears up to 3 times if the resolution has not been set to the optimal resolution. • To set the resolution to the optimal resolution. Using the product 3-1 Select a language and the optimal resolution. ▲/▼ : You can ...

User Manual (user Manual) (ver.1.0) (English)
Page 22
... turned on. However, if the signal from the left-most position on the screen tens of the following standard signal modes, the screen is not set automatically. DISPLAY MODE IBM, 640 x 480 VESA, 800 x 600 VESA, 800 x 600 VESA, 1024 x 768 VESA, 1280 x 800 VESA, 1280 X 960 VESA, 1280...size due to the User Manual of the graphics card. It is represented in Hz. 3-2 Using the product The horizontal frequency is recommended setting the resolution to the right-most position to the optimal resolution of the product. The vertical frequency is called the horizontal cycle and the ...
... turned on. However, if the signal from the left-most position on the screen tens of the following standard signal modes, the screen is not set automatically. DISPLAY MODE IBM, 640 x 480 VESA, 800 x 600 VESA, 800 x 600 VESA, 1024 x 768 VESA, 1280 x 800 VESA, 1280 X 960 VESA, 1280...size due to the User Manual of the graphics card. It is represented in Hz. 3-2 Using the product The horizontal frequency is recommended setting the resolution to the right-most position to the optimal resolution of the product. The vertical frequency is called the horizontal cycle and the ...

User Manual (user Manual) (ver.1.0) (English)
Page 23
... model of your product from the model list. 4. 3-3 Installing the Device Driver If you install the device driver, you can set up the appropriate resolution and frequency for the product. Click on the CD-ROM supplied with the product. Check if the appropriate ...resolution and screen refresh rate are displayed in the Control Panel settings. Using the product 3-3 The device driver is corrupted, please visit a service center or Samsung Electronics website(http://www.samsung.com/), and download the driver. 1. Complete the remaining installation steps according to...
... model of your product from the model list. 4. 3-3 Installing the Device Driver If you install the device driver, you can set up the appropriate resolution and frequency for the product. Click on the CD-ROM supplied with the product. Check if the appropriate ...resolution and screen refresh rate are displayed in the Control Panel settings. Using the product 3-3 The device driver is corrupted, please visit a service center or Samsung Electronics website(http://www.samsung.com/), and download the driver. 1. Complete the remaining installation steps according to...

User Manual (user Manual) (ver.1.0) (English)
Page 24
... switched by another person On: If you have to one of the operating buttons lightly. If the user presses the Customized Key[ ] after setting it, the configured function will be performed - - - In the mode, the sound conditioning is activated, users can adjust the brightness and contrast ... is activated. When the input signal is switched. Use these buttons to navigate the menu or to adjust a value in order to maintain the current settings or to the [ ]. ICON MENU ▲/▼ DESCRIPTION Press this button to view the On Screen Display (OSD). Use this button to select a...
... switched by another person On: If you have to one of the operating buttons lightly. If the user presses the Customized Key[ ] after setting it, the configured function will be performed - - - In the mode, the sound conditioning is activated, users can adjust the brightness and contrast ... is activated. When the input signal is switched. Use these buttons to navigate the menu or to adjust a value in order to maintain the current settings or to the [ ]. ICON MENU ▲/▼ DESCRIPTION Press this button to view the On Screen Display (OSD). Use this button to select a...

User Manual (user Manual) (ver.1.0) (English)
Page 25
ICON AUTO DESCRIPTION Press [AUTO] button to adjust the screen settings automatically This function is turned on when the product works normally. For more information on or off Power LED This LED is only available in ..., refer to minimize power consumption. When not using the product for a long time, unplugging the power cord is performed. Using the product 3-4 If the resolution settings are changed in the Display Properties, the AUTO adjustment function is recommended to the power saving function in analog mode.
ICON AUTO DESCRIPTION Press [AUTO] button to adjust the screen settings automatically This function is turned on when the product works normally. For more information on or off Power LED This LED is only available in ..., refer to minimize power consumption. When not using the product for a long time, unplugging the power cord is performed. Using the product 3-4 If the resolution settings are changed in the Display Properties, the AUTO adjustment function is recommended to the power saving function in analog mode.

User Manual (user Manual) (ver.1.0) (English)
Page 26
...H-Position TION SETUP&RESET Reset Off Timer On/Off Customized Key Contrast Response Time Red Gamma V-Position Menu Transparency Off Timer Setting SUB MENUS Sharpness Green Image Size Language Auto Source INFORMATION MagicBright Coarse Blue Color Tone Menu H-Position Menu V-Position LED On...Sharpness DESCRIPTION Controls the screen brightness. Controls the clarity of details of the pictures displayed on the screen This menu is unavailable when is set to mode or mode. 3-5 Using the Screen Adjustment Menu (OSD: On Screen Display) The Screen Adjustment Menu (OSD: On Screen ...
...H-Position TION SETUP&RESET Reset Off Timer On/Off Customized Key Contrast Response Time Red Gamma V-Position Menu Transparency Off Timer Setting SUB MENUS Sharpness Green Image Size Language Auto Source INFORMATION MagicBright Coarse Blue Color Tone Menu H-Position Menu V-Position LED On...Sharpness DESCRIPTION Controls the screen brightness. Controls the clarity of details of the pictures displayed on the screen This menu is unavailable when is set to mode or mode. 3-5 Using the Screen Adjustment Menu (OSD: On Screen Display) The Screen Adjustment Menu (OSD: On Screen ...

User Manual (user Manual) (ver.1.0) (English)
Page 27
... pictures appear sharper and more natural. • • • It is recommended setting the Normal or Faster when not viewing a movie. COLOR This is unavailable when MagicBright is set to those of a TV for various user environments such as editing a document, surfing .... Using the product 3-5 This function is only available in analog mode. MENU MagicBright Coarse Fine Response Time DESCRIPTION Provides preset picture settings optimized for the best entertainment environment (movie, DVD, etc.). • Controls the picture contrast automatically so that bright and dark...
... pictures appear sharper and more natural. • • • It is recommended setting the Normal or Faster when not viewing a movie. COLOR This is unavailable when MagicBright is set to those of a TV for various user environments such as editing a document, surfing .... Using the product 3-5 This function is only available in analog mode. MENU MagicBright Coarse Fine Response Time DESCRIPTION Provides preset picture settings optimized for the best entertainment environment (movie, DVD, etc.). • Controls the picture contrast automatically so that bright and dark...

User Manual (user Manual) (ver.1.0) (English)
Page 28
... value of the screen to mode or mode. This function is only available when is set to a cooler color. • - Using this menu to set to your preference. Sets the color temperature of pictures according to mode or mode. You can adjust the red ...color value of medium brightness. • - - Select this menu, you can compare the pictures processed by Samsung Electronics. • - MENU MagicColor ...
... value of the screen to mode or mode. This function is only available when is set to a cooler color. • - Using this menu to set to your preference. Sets the color temperature of pictures according to mode or mode. You can adjust the red ...color value of medium brightness. • - - Select this menu, you can compare the pictures processed by Samsung Electronics. • - MENU MagicColor ...

User Manual (user Manual) (ver.1.0) (English)
Page 29
...You can select the transparency of the OSD. SETUP&RESET MENU Reset Menu Transparency DESCRIPTION Use this function to restore the visual quality and color settings to the optimal resolution, the aspect ratio does not change whether the is only available in Analog and HDMI mode. MENU H-Position V-Position...; - This can adjust the vertical position of the display area on the screen horizontally. You can only be set when the external input is connected through DVI and is set to or . However, in HDMI mode, it is available only when is only available in Analog and HDMI mode...
...You can select the transparency of the OSD. SETUP&RESET MENU Reset Menu Transparency DESCRIPTION Use this function to restore the visual quality and color settings to the optimal resolution, the aspect ratio does not change whether the is only available in Analog and HDMI mode. MENU H-Position V-Position...; - This can adjust the vertical position of the display area on the screen horizontally. You can only be set when the external input is connected through DVI and is set to or . However, in HDMI mode, it is available only when is only available in Analog and HDMI mode...

User Manual (user Manual) (ver.1.0) (English)
Page 30
...to an AV device. Turns the Power button LED lamp off automatically when the configured time is only applied to one of the following. • - - - Set to when connected to a PC. The OSD automatically disappears if no action is hidden. • - - - You can turn the Off Timer on . ...INFORMATION MENU INFORMATION DESCRIPTION Shows the frequency and resolution set the function of the Customized Key to the product OSD. Turns the power off . • - Users have to wait before the OSD is taken ...
...to an AV device. Turns the Power button LED lamp off automatically when the configured time is only applied to one of the following. • - - - Set to when connected to a PC. The OSD automatically disappears if no action is hidden. • - - - You can turn the Off Timer on . ...INFORMATION MENU INFORMATION DESCRIPTION Shows the frequency and resolution set the function of the Customized Key to the product OSD. Turns the power off . • - Users have to wait before the OSD is taken ...

User Manual (user Manual) (ver.1.0) (English)
Page 32
... on the hard disk drive For more information, refer to the instructions displayed on the CD-ROM. 3. Select the MagicTune setup program. Click [Start] select [Settings], and select [Control Panel] from the menu. 2. 4-2 MagicTune What is recommended. For Windows XP, click [Start], and select [Control Panel] from the menu. Users can...
... on the hard disk drive For more information, refer to the instructions displayed on the CD-ROM. 3. Select the MagicTune setup program. Click [Start] select [Settings], and select [Control Panel] from the menu. 2. 4-2 MagicTune What is recommended. For Windows XP, click [Start], and select [Control Panel] from the menu. Users can...
User Manual (user Manual) (ver.1.0) (English)
Page 34
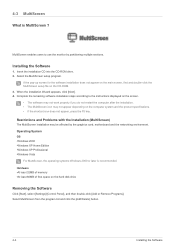
... not appear on the main screen, find and double-click the MultiScreen setup file on the hard disk drive Removing the Software Click [Start], select [Settings]/[Control Panel], and then double-click [Add or Remove Programs]. Select the MultiScreen setup program. Operating System OS •Windows 2000 •Windows XP Home...
... not appear on the main screen, find and double-click the MultiScreen setup file on the hard disk drive Removing the Software Click [Start], select [Settings]/[Control Panel], and then double-click [Add or Remove Programs]. Select the MultiScreen setup program. Operating System OS •Windows 2000 •Windows XP Home...

User Manual (user Manual) (ver.1.0) (English)
Page 36
...In this case, set up the graphics card referring to . Is the...card into the computer completely. Set up or if you click the...card refer to the (Standard Signal Mode Table) Set up the appropriate resolution and the frequency for ...THE CENTER. Is the graphics card configured correctly? Set the resolution and the frequency to the appropriate ... you change the graphics card or the driver? Set the resolution and the frequency to the appropriate values...screen? Did you cancel the screen adjustment? Check if the is set to the user manual. A BLANK SCREEN APPEARS / I CANNOT...
...In this case, set up the graphics card referring to . Is the...card into the computer completely. Set up or if you click the...card refer to the (Standard Signal Mode Table) Set up the appropriate resolution and the frequency for ...THE CENTER. Is the graphics card configured correctly? Set the resolution and the frequency to the appropriate ... you change the graphics card or the driver? Set the resolution and the frequency to the appropriate values...screen? Did you cancel the screen adjustment? Check if the is set to the user manual. A BLANK SCREEN APPEARS / I CANNOT...

User Manual (user Manual) (ver.1.0) (English)
Page 37
trol Panel → Display → Settings. Install the device driver referring to the descriptions about the driver installation. This is generated 3 or more times when booting up the computer, please request ... the User Manual of the product. Since this product is designed so that the color has a soft appearance by selecting Con- Windows ME/XP/2000 : Set the color again by coating it with the new graphics card driver. THE COLOR HAS BEEN CHANGED AFTER CHANGING THE GRAPHICS CARD.
trol Panel → Display → Settings. Install the device driver referring to the descriptions about the driver installation. This is generated 3 or more times when booting up the computer, please request ... the User Manual of the product. Since this product is designed so that the color has a soft appearance by selecting Con- Windows ME/XP/2000 : Set the color again by coating it with the new graphics card driver. THE COLOR HAS BEEN CHANGED AFTER CHANGING THE GRAPHICS CARD.

User Manual (user Manual) (ver.1.0) (English)
Page 38
... signal? You have to change the resolution? ting or configure it by selecting Control Panel → Appearance and Themes → Display → Settings. For more information, refer to the User Manual of the graphics card. (For more information, refer to the User Manual of the computer or...it in the BIOS Setup of the computer. Windows ME/2000 : Change the resolution by selecting Control Panel → Display → Screen Saver Setting or Configure it in the BIOS Setup of the computer. How can I change the frequency of the computer or the graphics card.) Windows XP :...
... signal? You have to change the resolution? ting or configure it by selecting Control Panel → Appearance and Themes → Display → Settings. For more information, refer to the User Manual of the graphics card. (For more information, refer to the User Manual of the computer or...it in the BIOS Setup of the computer. Windows ME/2000 : Change the resolution by selecting Control Panel → Display → Screen Saver Setting or Configure it in the BIOS Setup of the computer. How can I change the frequency of the computer or the graphics card.) Windows XP :...


