User Manual (user Manual) (ver.1.0) (English)
Page 3
... Stand 2-2 Removing the Stand 2-3 Installing the Stand for the Wall Mount 2-4 Connecting with a PC 2-5 Kensington Lock 2-6 USING THE PRODUCT Setting the Optimal Resolution 3-1 Standard Signal Mode Table 3-2 Installing the Device Driver 3-3 Product Operating Buttons 3-4 Using the Screen Adjustment Menu (OSD: On...4-2 MultiScreen 4-3 TROUBLESHOOTING Monitor Self-Diagnosis 5-1 Before Requesting Service 5-2 FAQ 5-3 MORE INFORMATION Specifications 6-1 Power Saving Function 6-2 Contact SAMSUNG WORLDWIDE 6-3 Correct Disposal of This Product (Waste Electrical & Electronic Equipment) -
... Stand 2-2 Removing the Stand 2-3 Installing the Stand for the Wall Mount 2-4 Connecting with a PC 2-5 Kensington Lock 2-6 USING THE PRODUCT Setting the Optimal Resolution 3-1 Standard Signal Mode Table 3-2 Installing the Device Driver 3-3 Product Operating Buttons 3-4 Using the Screen Adjustment Menu (OSD: On...4-2 MultiScreen 4-3 TROUBLESHOOTING Monitor Self-Diagnosis 5-1 Before Requesting Service 5-2 FAQ 5-3 MORE INFORMATION Specifications 6-1 Power Saving Function 6-2 Contact SAMSUNG WORLDWIDE 6-3 Correct Disposal of This Product (Waste Electrical & Electronic Equipment) -
User Manual (user Manual) (ver.1.0) (English)
Page 5
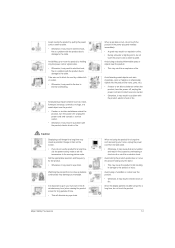
...this manual ICON NAME Caution MEANING Indicates cases where the function may not work or the setting may be canceled. All Rights Reserved. The ENERGY STAR logo is reserved by Samsung Electronics, Co., Ltd. All other trademarks mentioned herein belong to operate a function. .... admits that this manual is the registered trademark of ENERGY STAR, Samsung Electronics, Co., Ltd. The copyright of Samsung Electronics, Co., Ltd. The SAMSUNG logo and SyncMaster are the registered trademarks of Samsung Electronics, Co., Ltd. Microsoft, Windows and Windows NT are subject to...
...this manual ICON NAME Caution MEANING Indicates cases where the function may not work or the setting may be canceled. All Rights Reserved. The ENERGY STAR logo is reserved by Samsung Electronics, Co., Ltd. All other trademarks mentioned herein belong to operate a function. .... admits that this manual is the registered trademark of ENERGY STAR, Samsung Electronics, Co., Ltd. The copyright of Samsung Electronics, Co., Ltd. The SAMSUNG logo and SyncMaster are the registered trademarks of Samsung Electronics, Co., Ltd. Microsoft, Windows and Windows NT are subject to...
User Manual (user Manual) (ver.1.0) (English)
Page 6
... number of the material, if a supersonic humidifier is 1680 x 1050 x 3 = 5,292,000. 1-2 Major Safety Precautions About persistent images • Displaying a still image for a long time, set the power-saving mode or screen saver. • Due to the product. • Do not clean the product directly by appr. 1ppm (parts per million...
... number of the material, if a supersonic humidifier is 1680 x 1050 x 3 = 5,292,000. 1-2 Major Safety Precautions About persistent images • Displaying a still image for a long time, set the power-saving mode or screen saver. • Due to the product. • Do not clean the product directly by appr. 1ppm (parts per million...
User Manual (user Manual) (ver.1.0) (English)
Page 11
...; Otherwise, it may result in damage to the product or injury. Caution Displaying a still image for a long time, use the power-saving mode or set the screensaver to the moving the product by holding only the stand. • This may result in fire due to the cable. Since the display... the product, turn the power off , unplug the power cord and contact a service center. • Otherwise, it may result in an electric shock. Set the appropriate resolution and frequency for long periods of time. • This will alleviate any eye strain. When not using it may cause the product...
...; Otherwise, it may result in damage to the product or injury. Caution Displaying a still image for a long time, use the power-saving mode or set the screensaver to the moving the product by holding only the stand. • This may result in fire due to the cable. Since the display... the product, turn the power off , unplug the power cord and contact a service center. • Otherwise, it may result in an electric shock. Set the appropriate resolution and frequency for long periods of time. • This will alleviate any eye strain. When not using it may cause the product...
User Manual (user Manual) (ver.1.0) (English)
Page 21
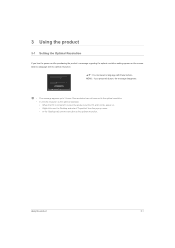
... Optimal Resolution If you press this button, the message disappears. • The message appears up menu. • In the 'Settings' tab, set the resolution to the optimal resolution • When the PC is turned off, connect the product and the PC and turn the power on after ...purchasing the product, a message regarding the optimal resolution setting appears on . • Right-click over the Desktop and select 'Properties' from the pop-up to 3 times if the resolution has not been...
... Optimal Resolution If you press this button, the message disappears. • The message appears up menu. • In the 'Settings' tab, set the resolution to the optimal resolution • When the PC is turned off, connect the product and the PC and turn the power on after ...purchasing the product, a message regarding the optimal resolution setting appears on . • Right-click over the Desktop and select 'Properties' from the pop-up to 3 times if the resolution has not been...
User Manual (user Manual) (ver.1.0) (English)
Page 22
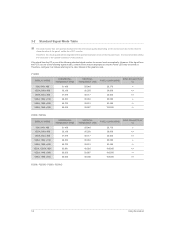
...the signal from the PC is one of the following standard signal modes, the screen is recommended setting the resolution to the optimal resolution of the graphics card. It is set for a CDT monitor. Therefore, configure it as follows referring to the inherent characteristics of the...(MHZ) SYNC POLARITY (H/ V) 25.175 -/- 36.000 +/+ 40.000 +/+ 65.000 -/- 83.500 -/+ 108.000 +/+ 106.500 -/+ 108.000 +/+ P2250 / P2250G / P2350 / P2350G 3-2 Using the product 3-2 Standard Signal Mode Table The LCD monitor has one optimal resolution for the best visual quality depending on ...
...the signal from the PC is one of the following standard signal modes, the screen is recommended setting the resolution to the optimal resolution of the graphics card. It is set for a CDT monitor. Therefore, configure it as follows referring to the inherent characteristics of the...(MHZ) SYNC POLARITY (H/ V) 25.175 -/- 36.000 +/+ 40.000 +/+ 65.000 -/- 83.500 -/+ 108.000 +/+ 106.500 -/+ 108.000 +/+ P2250 / P2250G / P2350 / P2350G 3-2 Using the product 3-2 Standard Signal Mode Table The LCD monitor has one optimal resolution for the best visual quality depending on ...

User Manual (user Manual) (ver.1.0) (English)
Page 24
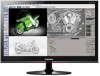
...the driver installation CD-ROM into the CD-ROM drive. 2. 3-3 Installing the Device Driver If you install the device driver, you can set up the appropriate resolution and frequency for the product. Complete the remaining installation steps according to the document about the Windows operating system. 3-3... Using the product Check if the appropriate resolution and screen refresh rate are displayed in the Control Panel settings. Select the model of your product from the model list. 4. If the supplied drive file is included on "Windows Driver". 3....
...the driver installation CD-ROM into the CD-ROM drive. 2. 3-3 Installing the Device Driver If you install the device driver, you can set up the appropriate resolution and frequency for the product. Complete the remaining installation steps according to the document about the Windows operating system. 3-3... Using the product Check if the appropriate resolution and screen refresh rate are displayed in the Control Panel settings. Select the model of your product from the model list. 4. If the supplied drive file is included on "Windows Driver". 3....
User Manual (user Manual) (ver.1.0) (English)
Page 25
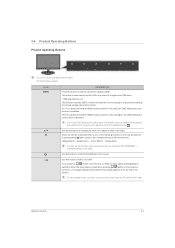
...The LED buttons appear. ICON MENU ▲/▼ DESCRIPTION Press this button to adjust a value in order to maintain the current settings or to prevent the settings from being changed by pressing [ ] button or the product is turned on, a message displaying the selected input signal appears at ...the top left of the operating buttons lightly. Even if the OSD Adjustment Lock function is switched. You can set the function of the following functions. Use this button to select a function. Using the product 3-4 Use this button to control the ...
...The LED buttons appear. ICON MENU ▲/▼ DESCRIPTION Press this button to adjust a value in order to maintain the current settings or to prevent the settings from being changed by pressing [ ] button or the product is turned on, a message displaying the selected input signal appears at ...the top left of the operating buttons lightly. Even if the OSD Adjustment Lock function is switched. You can set the function of the following functions. Use this button to select a function. Using the product 3-4 Use this button to control the ...

User Manual (user Manual) (ver.1.0) (English)
Page 26
... time, unplugging the power cord is recommended to the power saving function in More Information. Press this button to adjust the screen settings automatically This function is only available in the Display Properties, the AUTO adjustment function is turned on when the product works normally. ...If the resolution settings are touch-type buttons. • Touch the buttons lightly with your finger. ICON AUTO DESCRIPTION Press [AUTO] button to turn ...
... time, unplugging the power cord is recommended to the power saving function in More Information. Press this button to adjust the screen settings automatically This function is only available in the Display Properties, the AUTO adjustment function is turned on when the product works normally. ...If the resolution settings are touch-type buttons. • Touch the buttons lightly with your finger. ICON AUTO DESCRIPTION Press [AUTO] button to turn ...

User Manual (user Manual) (ver.1.0) (English)
Page 27
...) Structure TOP MENUS PICTURE COLOR Brightness Fine MagicColor Color Effect SIZE & POSI- This menu is unavailable when is set to mode. This menu is unavailable when is set to mode. Controls the contrast of pictures displayed on the screen This menu is unavailable when is... H-Position TION SETUP&RESET Reset Off Timer On/Off Customized Key Contrast Response Time Red Gamma V-Position Menu Transparency Off Timer Setting SUB MENUS Sharpness Green Image Size Language Auto Source INFORMATION MagicBright Coarse Blue Color Tone Menu H-Position Menu V-Position LED On/...
...) Structure TOP MENUS PICTURE COLOR Brightness Fine MagicColor Color Effect SIZE & POSI- This menu is unavailable when is set to mode. This menu is unavailable when is set to mode. Controls the contrast of pictures displayed on the screen This menu is unavailable when is... H-Position TION SETUP&RESET Reset Off Timer On/Off Customized Key Contrast Response Time Red Gamma V-Position Menu Transparency Off Timer Setting SUB MENUS Sharpness Green Image Size Language Auto Source INFORMATION MagicBright Coarse Blue Color Tone Menu H-Position Menu V-Position LED On/...
User Manual (user Manual) (ver.1.0) (English)
Page 28
...require a fast screen refresh rate. • This mode provides the picture setting appropriate for watching sports games that include lots of movement. • This mode provides brightness and sharpness settings similar to those of a TV for various user environments such as editing...3-5 Using the product This function is only available in analog mode. MENU MagicBright Coarse Fine Response Time DESCRIPTION Provides preset picture settings optimized for the best entertainment environment (movie, DVD, etc.). • Controls the picture contrast automatically so that moving pictures ...
...require a fast screen refresh rate. • This mode provides the picture setting appropriate for watching sports games that include lots of movement. • This mode provides brightness and sharpness settings similar to those of a TV for various user environments such as editing...3-5 Using the product This function is only available in analog mode. MENU MagicBright Coarse Fine Response Time DESCRIPTION Provides preset picture settings optimized for the best entertainment environment (movie, DVD, etc.). • Controls the picture contrast automatically so that moving pictures ...
User Manual (user Manual) (ver.1.0) (English)
Page 29
.... • - You can adjust the green color value of pictures. You can compare the pictures processed by Samsung Electronics. • - This menu is unavailable when is set the color temperature manually. Displays pictures in green mono color. • - You can adjust the blue color ...value of medium brightness. (This is unavailable when MagicBright is set to a cooler color. • - MENU MagicColor Red Green Blue Color Tone Color Effect Gamma DESCRIPTION Expresses natural colors more clearly without ...
.... • - You can adjust the green color value of pictures. You can compare the pictures processed by Samsung Electronics. • - This menu is unavailable when is set the color temperature manually. Displays pictures in green mono color. • - You can adjust the blue color ...value of medium brightness. (This is unavailable when MagicBright is set to a cooler color. • - MENU MagicColor Red Green Blue Color Tone Color Effect Gamma DESCRIPTION Expresses natural colors more clearly without ...

User Manual (user Manual) (ver.1.0) (English)
Page 30
... the OSD. SETUP&RESET MENU Reset Menu Transparency DESCRIPTION Use this function to restore the visual quality and color settings to . You can adjust the horizontal position of the OSD. • - 3-5 Using the product AV signals • - The picture is... set to the factory defaults. • - This function is set to or . Moves the position of the input signal. • A signal not in the standard mode table is not supported...
... the OSD. SETUP&RESET MENU Reset Menu Transparency DESCRIPTION Use this function to restore the visual quality and color settings to . You can adjust the horizontal position of the OSD. • - 3-5 Using the product AV signals • - The picture is... set to the factory defaults. • - This function is set to or . Moves the position of the input signal. • A signal not in the standard mode table is not supported...

User Manual (user Manual) (ver.1.0) (English)
Page 31
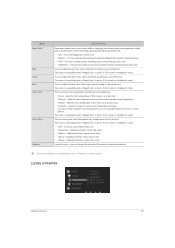
...Timer on the PC. MENU Language Select a language for the OSD. DESCRIPTION LED On/Off LED Brightness Off Timer On/Off Off Timer Setting Auto Source PC/AV Mode Display Time Customized Key The selected language is reached. • - Turns the Menu button LED on . ...Turns the Power button LED lamp off . • - Set to AV when connected to a PC. INFORMATION MENU INFORMATION DESCRIPTION Shows the frequency and resolution set the function of the following. • - - - Using the product 3-5 Adjusts the brightness of the PC....
...Timer on the PC. MENU Language Select a language for the OSD. DESCRIPTION LED On/Off LED Brightness Off Timer On/Off Off Timer Setting Auto Source PC/AV Mode Display Time Customized Key The selected language is reached. • - Turns the Menu button LED on . ...Turns the Power button LED lamp off . • - Set to AV when connected to a PC. INFORMATION MENU INFORMATION DESCRIPTION Shows the frequency and resolution set the function of the following. • - - - Using the product 3-5 Adjusts the brightness of the PC....
User Manual (user Manual) (ver.1.0) (English)
Page 33
... can only remove MagicTune™through [Add or Remove Programs ] in the Control Panel. To remove MagicTune™, complete the following steps. 1. Click [Start] select [Settings], and select [Control Panel] from the menu. 2. System Requirements OS • Windows 2000 • Windows XP Home Edition • Windows XP Professional • Windows Vista...
... can only remove MagicTune™through [Add or Remove Programs ] in the Control Panel. To remove MagicTune™, complete the following steps. 1. Click [Start] select [Settings], and select [Control Panel] from the menu. 2. System Requirements OS • Windows 2000 • Windows XP Home Edition • Windows XP Professional • Windows Vista...
User Manual (user Manual) (ver.1.0) (English)
Page 35
.... Restrictions and Problems with the Installation (MultiScreen) The MultiScreen installation may not appear depending on the hard disk drive Removing the Software Click [Start], select [Settings]/[Control Panel], and then double-click [Add or Remove Programs]. Select MultiScreen from the program list and click the [Add/Delete] button. Installing the Software...
.... Restrictions and Problems with the Installation (MultiScreen) The MultiScreen installation may not appear depending on the hard disk drive Removing the Software Click [Start], select [Settings]/[Control Panel], and then double-click [Add or Remove Programs]. Select MultiScreen from the program list and click the [Add/Delete] button. Installing the Software...

User Manual (user Manual) (ver.1.0) (English)
Page 37
... maximum frequency of the product. This occurs when the power saving function is set to . THE ON SCREEN ADJUSTMENT MENU (OSD) DOES NOT APPEAR. If the problem continues, please contact your nearest Samsung Electronics Service Center. In this case, reboot the PC while the DVI cable... is set up or if you change the resolution and the frequency appropriate to the user manual. THE DISPLAY...
... maximum frequency of the product. This occurs when the power saving function is set to . THE ON SCREEN ADJUSTMENT MENU (OSD) DOES NOT APPEAR. If the problem continues, please contact your nearest Samsung Electronics Service Center. In this case, reboot the PC while the DVI cable... is set up or if you change the resolution and the frequency appropriate to the user manual. THE DISPLAY...
User Manual (user Manual) (ver.1.0) (English)
Page 38
Windows ME/XP/2000 : Set the color again by coating it with the new graphics card driver. Is the graphics card configured correctly? Configure the color again in accordance with a ... referring to the descriptions about the driver installation. Install the device driver referring to the User Manual of the product. trol Panel → Display → Settings. WHEN I CONNECT THE MONITOR, THE 'UNKNOWN MONITOR, PLUG&PLAY (VESA DDC) MONITOR FOUND' MESSAGE IS DISPLAYED. THE COLOR HAS BEEN CHANGED AFTER CHANGING THE GRAPHICS...
Windows ME/XP/2000 : Set the color again by coating it with the new graphics card driver. Is the graphics card configured correctly? Configure the color again in accordance with a ... referring to the descriptions about the driver installation. Install the device driver referring to the User Manual of the product. trol Panel → Display → Settings. WHEN I CONNECT THE MONITOR, THE 'UNKNOWN MONITOR, PLUG&PLAY (VESA DDC) MONITOR FOUND' MESSAGE IS DISPLAYED. THE COLOR HAS BEEN CHANGED AFTER CHANGING THE GRAPHICS...

User Manual (user Manual) (ver.1.0) (English)
Page 39
...2000 : Configure it by selecting Control Panel → Display → Screen Saver Setting or Configure it by selecting Control Panel → Appearance and Themes → Display → Screen Saver Set- trol Panel → Display → Settings. (For more information, refer to the User Manual of the computer. Troubleshooting 5-3 ... video signal? Windows ME/2000 : Change the resolution by selecting Control Panel → Appearance and Themes → Display → Settings. You have to the Windows user manual for the computer. How can I use the power saving function?
...2000 : Configure it by selecting Control Panel → Display → Screen Saver Setting or Configure it by selecting Control Panel → Appearance and Themes → Display → Screen Saver Set- trol Panel → Display → Settings. (For more information, refer to the User Manual of the computer. Troubleshooting 5-3 ... video signal? Windows ME/2000 : Change the resolution by selecting Control Panel → Appearance and Themes → Display → Settings. You have to the Windows user manual for the computer. How can I use the power saving function?


