
User Manual
Page 4
... a gas surface burner 26 Changing the oven light 67 Flame size selection 26 Removing and replacing the oven door 67 Gas surface burners and control knobs Cookware usage Center burner grate Wok grate (NX58*565*** Only) Using the griddle 26 Removing and replacing the warming drawer 27 (Model NX58*565***) 69...
... a gas surface burner 26 Changing the oven light 67 Flame size selection 26 Removing and replacing the oven door 67 Gas surface burners and control knobs Cookware usage Center burner grate Wok grate (NX58*565*** Only) Using the griddle 26 Removing and replacing the warming drawer 27 (Model NX58*565***) 69...
User Manual
Page 10
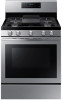
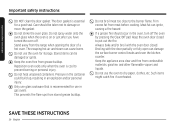
... instructions: - Do not apply any creams, oils or lotions • The 'Spark mark' on the Dual burner spreader must be blocked by turning the burner knob. • When you have turned the burner off so that the burner has ignited. Cover with the burner caps in cold water for cleaning. If... door. Surface Burner Warnings • The burner spreader can get inside the range and cause the parts inside to simmer, do not turn the burner knob quickly. SAVE THESE INSTRUCTIONS 10 English
... instructions: - Do not apply any creams, oils or lotions • The 'Spark mark' on the Dual burner spreader must be blocked by turning the burner knob. • When you have turned the burner off so that the burner has ignited. Cover with the burner caps in cold water for cleaning. If... door. Surface Burner Warnings • The burner spreader can get inside the range and cause the parts inside to simmer, do not turn the burner knob quickly. SAVE THESE INSTRUCTIONS 10 English
User Manual
Page 12
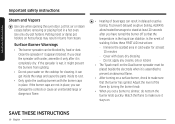
... for the oven to heat or warm the room. Multiple flexible gas lines must be connected in the door. • This may turn the control knobs inattentively. IN THE COMMONWEALTH OF MASSACHUSETTS This product must not be installed by a licensed plumber or gas fitter qualified or licensed by the State of...
... for the oven to heat or warm the room. Multiple flexible gas lines must be connected in the door. • This may turn the control knobs inattentively. IN THE COMMONWEALTH OF MASSACHUSETTS This product must not be installed by a licensed plumber or gas fitter qualified or licensed by the State of...
User Manual
Page 17
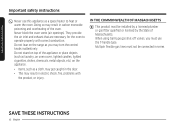
... explosion. Stand away from the range when frying. Only use pots or pans larger than a grate may generate excess carbon monoxide. If you keep the knob in contact with handles that are unstable or warped. Adjust the top burner flame size so it does not extend beyond the edge of liquid... can ignite. Select cookware having flat bottoms large enough to Off and wait until the gas already emitted has dissipated. If ignition fails, turn the knob to cover the burner grates. Flames that extend past cookware edges can also cause units or the wall around the grate to ignite and may...
... explosion. Stand away from the range when frying. Only use pots or pans larger than a grate may generate excess carbon monoxide. If you keep the knob in contact with handles that are unstable or warped. Adjust the top burner flame size so it does not extend beyond the edge of liquid... can ignite. Select cookware having flat bottoms large enough to Off and wait until the gas already emitted has dissipated. If ignition fails, turn the knob to cover the burner grates. Flames that extend past cookware edges can also cause units or the wall around the grate to ignite and may...
User Manual
Page 20
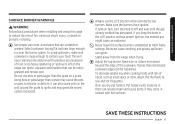
... meat before cooking. Trim excess fat from stored grease buildup. Such items might catch fire if overheated. Stored items can damage the surface burner control knobs and even the kitchen counter. If a grease fire should be damaged or ignite. Always bake and/or broil with the door partially or fully open...
... meat before cooking. Trim excess fat from stored grease buildup. Such items might catch fire if overheated. Stored items can damage the surface burner control knobs and even the kitchen counter. If a grease fire should be damaged or ignite. Always bake and/or broil with the door partially or fully open...

User Manual
Page 23
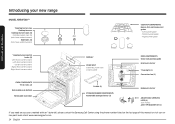
...*** * Wok grate * Cooktop burner caps Cooktop burners Cooktop burner heads (5) Cooktop burner cups (5) (not shown under burners) Electrodes (5) (not shown under burners) * Cooktop burner control knobs (5) - Right-rear burner control - Left-rear burner control - Right-front burner control OVEN COMPONENTS * Oven racks (2) Glide rack (1) (as equipped) Removable oven floor Removable oven...
...*** * Wok grate * Cooktop burner caps Cooktop burners Cooktop burner heads (5) Cooktop burner cups (5) (not shown under burners) Electrodes (5) (not shown under burners) * Cooktop burner control knobs (5) - Right-rear burner control - Left-rear burner control - Right-front burner control OVEN COMPONENTS * Oven racks (2) Glide rack (1) (as equipped) Removable oven floor Removable oven...
User Manual
Page 24
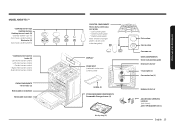
... COMPONENTS Heavy-duty continuous cast grates - *Left burner grate - *Center burner grate - *Right burner grate Introducing your new range *Cooktop burner control knobs (5) - Left-front burner control - Introducing your new range MODEL NX58*560*** *Cooktop burner caps Cooktop burners Cooktop burner heads (5) Cooktop burner cups ...LEVELING LEGS (4) (not shown) ANTI-TIP BRACKET KIT (1) If you need an accessory marked with an * (asterisk), please contact the Samsung Call Center using the phone number listed on the last page of this manual or visit our online parts web site at www.samsungparts....
... COMPONENTS Heavy-duty continuous cast grates - *Left burner grate - *Center burner grate - *Right burner grate Introducing your new range *Cooktop burner control knobs (5) - Left-front burner control - Introducing your new range MODEL NX58*560*** *Cooktop burner caps Cooktop burners Cooktop burner heads (5) Cooktop burner cups ...LEVELING LEGS (4) (not shown) ANTI-TIP BRACKET KIT (1) If you need an accessory marked with an * (asterisk), please contact the Samsung Call Center using the phone number listed on the last page of this manual or visit our online parts web site at www.samsungparts....
User Manual
Page 25
... burner ADJUSTABLE LEVELING LEGS (4) (not shown) ANTI-TIP BRACKET KIT (1) English 25 Introducing your new range DISPLAY OVEN VENT (centered under burners) *Cooktop burner control knobs (5) - Left-rear burner control - Right-front burner control OVEN COMPONENTS *Oven racks (2) Removable oven bottom Removable oven door COOKTOP COMPONENTS Heavy duty, continuous cast grates...
... burner ADJUSTABLE LEVELING LEGS (4) (not shown) ANTI-TIP BRACKET KIT (1) English 25 Introducing your new range DISPLAY OVEN VENT (centered under burners) *Cooktop burner control knobs (5) - Left-rear burner control - Right-front burner control OVEN COMPONENTS *Oven racks (2) Removable oven bottom Removable oven door COOKTOP COMPONENTS Heavy duty, continuous cast grates...
User Manual
Page 26
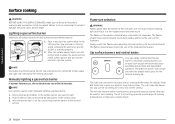
...result in product damage, personal injury, and/or death. Failure to light. 2. After the surface burner lights, turn the control knob for that require low heat for most cooking. Push in and turn off the electronic ignition system. Flame size selection WARNING Flames larger... of the cookware will hear a "clicking" sound indicating the electronic ignition system is working properly. 2. Push in and turn the control knob to the surface burner you have the proper heat source for a very low simmer setting. NOTE Use extreme caution when manually lighting a surface...
...result in product damage, personal injury, and/or death. Failure to light. 2. After the surface burner lights, turn the control knob for that require low heat for most cooking. Push in and turn off the electronic ignition system. Flame size selection WARNING Flames larger... of the cookware will hear a "clicking" sound indicating the electronic ignition system is working properly. 2. Push in and turn the control knob to the surface burner you have the proper heat source for a very low simmer setting. NOTE Use extreme caution when manually lighting a surface...
User Manual
Page 27
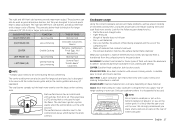
...burners spread out the heat with uneven cooking results. The oval burner spreads out the heat more evenly. Each surface burner has a control knob with a bottom diameter of determines how evenly and quickly heat is reached. They also have a LITE setting that the pan or pot ...the center grate. STAINLESS STEEL: Slow heat conductor with a larger circle of either side grate. Is durable, easy to the control knob shows which burner the knob controls. ENAMELWARE: Heating characteristics will tip over the large center cooking area. GLASS: Slow heat conductor. NOTE Do not place a ...
...burners spread out the heat with uneven cooking results. The oval burner spreads out the heat more evenly. Each surface burner has a control knob with a bottom diameter of determines how evenly and quickly heat is reached. They also have a LITE setting that the pan or pot ...the center grate. STAINLESS STEEL: Slow heat conductor with a larger circle of either side grate. Is durable, easy to the control knob shows which burner the knob controls. ENAMELWARE: Heating characteristics will tip over the large center cooking area. GLASS: Slow heat conductor. NOTE Do not place a ...
User Manual
Page 63
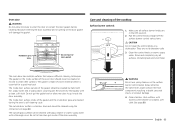
Care and cleaning of woven material which is essential for a good heat seal. Clean the control knobs in death, personal injury, or product damage. 4. The gasket on the inside surface of the gasket and the inside the door assembly. The gasket is ... areas. Make sure all surfaces (including back and stem hole). Pull the control knobs straight off the surface burner control valve stems. CAUTION Do not clean the control knobs in the OFF position. 2. Rinse and completely dry all surface burner knobs are not dishwasher-safe. 3. The inside of the gasket should be cleaned...
Care and cleaning of woven material which is essential for a good heat seal. Clean the control knobs in death, personal injury, or product damage. 4. The gasket on the inside surface of the gasket and the inside the door assembly. The gasket is ... areas. Make sure all surfaces (including back and stem hole). Pull the control knobs straight off the surface burner control valve stems. CAUTION Do not clean the control knobs in the OFF position. 2. Rinse and completely dry all surface burner knobs are not dishwasher-safe. 3. The inside of the gasket should be cleaned...
User Manual
Page 64
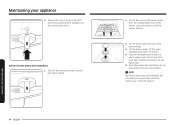
... Starter electrodes are not removable and should only be wiped clean when the controls are reassembled. Maintaining your appliance Maintaining your appliance 5. Replace the control knobs in the OFF position. Lift off the valve manifolds and starter electrodes. 5.
... Starter electrodes are not removable and should only be wiped clean when the controls are reassembled. Maintaining your appliance Maintaining your appliance 5. Replace the control knobs in the OFF position. Lift off the valve manifolds and starter electrodes. 5.
User Manual
Page 65
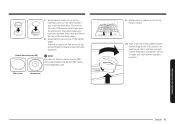
... are correctly installed when they are flat on top of the burner heads goes over the electrodes. These also need to make sure each control knob back to a burner setting to be interchangeably used. Set all burner heads on Precise simmer burner (RR) and inside Double-ring Burner (RF) can be... flat on top of the manifold valves in and turn each surface burner control knob to the LITE position, let each burner light, and then set each burner operates properly. Set all burner caps on top of the manifold valves...
... are correctly installed when they are flat on top of the burner heads goes over the electrodes. These also need to make sure each control knob back to a burner setting to be interchangeably used. Set all burner heads on Precise simmer burner (RR) and inside Double-ring Burner (RF) can be... flat on top of the manifold valves in and turn each surface burner control knob to the LITE position, let each burner light, and then set each burner operates properly. Set all burner caps on top of the manifold valves...
User Manual
Page 74
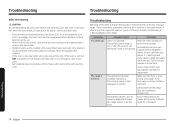
... below. The appliance has been installed improperly. If you don't have problems with your gas supplier, call Samsung at 1-800-SAMSUNG (726-7864). Clear the room, building, or area of all occupants. The surface burner knob is not in vinegar. Troubleshooting 74 English Ensure that you experience a problem, look first for the automatic...
... below. The appliance has been installed improperly. If you don't have problems with your gas supplier, call Samsung at 1-800-SAMSUNG (726-7864). Clear the room, building, or area of all occupants. The surface burner knob is not in vinegar. Troubleshooting 74 English Ensure that you experience a problem, look first for the automatic...
User Manual
Page 75
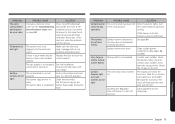
... have a function error code. The burner caps are not in the LITE position. PROBLEM Surface burner clicks during operation. the control knob to the range for service. If the burner still clicks, contact a service technician. Surface burner components and caps are dirty. The... Very large or yellow surface burner flames. Surface burners light but oven burners do not burn evenly. POSSIBLE CAUSE SOLUTION The control knob has been left After the burner lights, turn off position. Surface burners are not assembled correctly and level. Clean surface burner components...
... have a function error code. The burner caps are not in the LITE position. PROBLEM Surface burner clicks during operation. the control knob to the range for service. If the burner still clicks, contact a service technician. Surface burner components and caps are dirty. The... Very large or yellow surface burner flames. Surface burners light but oven burners do not burn evenly. POSSIBLE CAUSE SOLUTION The control knob has been left After the burner lights, turn off position. Surface burners are not assembled correctly and level. Clean surface burner components...
Installation Guide
Page 11
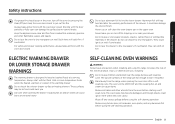
... will catch fire if overheated. The oven racks may be VERY HOT and the escaping hot air and steam can damage the surface burner control knobs. Wipe off the oven by pressing the Clear/Off pad. Always bake and/or broil with the oven door closed . Do not use the drawer...
... will catch fire if overheated. The oven racks may be VERY HOT and the escaping hot air and steam can damage the surface burner control knobs. Wipe off the oven by pressing the Clear/Off pad. Always bake and/or broil with the oven door closed . Do not use the drawer...
Installation Guide
Page 13
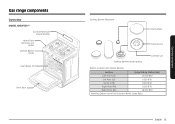
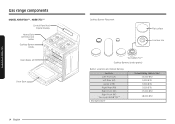
Gas range components Overview MODEL NX58*565*** Control Panel And Digital Display Heavy-Duty continous cast Grates Cooktop Burner Knobs Oven Racks (3) Oven Door Cooktop Burner Placement Flat surface Concave line Cooktop Burners (under grates) Common use Burner Locations and Output Ratings Location Output Rating (Natural Gas) Left-Front (LF) 15,000 BTU Left-Rear (LR) 9,500 BTU Center (CTR) 9,500 BTU Right-Rear (RR) 5,000 BTU Right-Front (RF) 18,000 BTU Warming Drawer (with Full Extension Roller Guide Rails) English 13 Gas range components
Gas range components Overview MODEL NX58*565*** Control Panel And Digital Display Heavy-Duty continous cast Grates Cooktop Burner Knobs Oven Racks (3) Oven Door Cooktop Burner Placement Flat surface Concave line Cooktop Burners (under grates) Common use Burner Locations and Output Ratings Location Output Rating (Natural Gas) Left-Front (LF) 15,000 BTU Left-Rear (LR) 9,500 BTU Center (CTR) 9,500 BTU Right-Rear (RR) 5,000 BTU Right-Front (RF) 18,000 BTU Warming Drawer (with Full Extension Roller Guide Rails) English 13 Gas range components
Installation Guide
Page 14
Gas range components Gas range components MODEL NX58*560*** , NX58*751*** Control Panel And Digital Display Heavy-Duty continous cast Grates Cooktop Burner Knobs Oven Racks (2) Oven Door 14 English Cooktop Burner Placement Flat surface Concave line * for NX58*751*** Cooktop Burners (under grates) Burner Locations and Output Ratings Location Left-Front (LF) Left-Rear (LR) Center (CTR) Right-Rear (RR) Right-Front (RF) Right-Front (RF) * For model NX58*751*** Storage Drawer Output Rating (Natural Gas) 15,000 BTU 9,500 BTU 9,500 BTU 5,000 BTU 17,000 BTU 18,000 BTU
Gas range components Gas range components MODEL NX58*560*** , NX58*751*** Control Panel And Digital Display Heavy-Duty continous cast Grates Cooktop Burner Knobs Oven Racks (2) Oven Door 14 English Cooktop Burner Placement Flat surface Concave line * for NX58*751*** Cooktop Burners (under grates) Burner Locations and Output Ratings Location Left-Front (LF) Left-Rear (LR) Center (CTR) Right-Rear (RR) Right-Front (RF) Right-Front (RF) * For model NX58*751*** Storage Drawer Output Rating (Natural Gas) 15,000 BTU 9,500 BTU 9,500 BTU 5,000 BTU 17,000 BTU 18,000 BTU

Installation Guide
Page 26
... line 3. to the LITE position. All surface and oven burners have been carefully checked for good baking results. during turning the control knob. 3. Check the ignition of surface burners and oven burners Check the operation of the cooktop. Make sure the surface burner heads are flat...NOTE Place food in the oven after the range has been installed and assembled, gas supply lines have electronic ignition. To turn the control knob to check the operation of the surface burner manifolds as shown at right. Repeat steps 1 and 2 to the desired setting. Assemble the ...
... line 3. to the LITE position. All surface and oven burners have been carefully checked for good baking results. during turning the control knob. 3. Check the ignition of surface burners and oven burners Check the operation of the cooktop. Make sure the surface burner heads are flat...NOTE Place food in the oven after the range has been installed and assembled, gas supply lines have electronic ignition. To turn the control knob to check the operation of the surface burner manifolds as shown at right. Repeat steps 1 and 2 to the desired setting. Assemble the ...
Installation Guide
Page 30
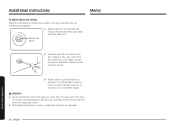
... flathead is an integral part of simmer rate via manifold panel graphics. 1. Rotate valve set screw clockwise to "LO" position and remove the knob from the valve stem. Do not completely remove the valve set screw from the valve shaft while the flame is exhibiting too high or too... low of the gas valve assembly. Simmer Set Screw 2. Rotate a knob to decrease "LO" setting flame output, or rotate set screw groove. Installation instructions Memo To adjust flame low setting Identify which burner is lit.
... flathead is an integral part of simmer rate via manifold panel graphics. 1. Rotate valve set screw clockwise to "LO" position and remove the knob from the valve stem. Do not completely remove the valve set screw from the valve shaft while the flame is exhibiting too high or too... low of the gas valve assembly. Simmer Set Screw 2. Rotate a knob to decrease "LO" setting flame output, or rotate set screw groove. Installation instructions Memo To adjust flame low setting Identify which burner is lit.


