
User Manual
Page 4
... Lighting a gas surface burner 26 Care and cleaning of the cooktop 63 Manually lighting a gas surface burner 26 Changing the oven light 67 Flame size selection 26 Removing and replacing the oven door 67 Gas surface burners and control knobs Cookware usage Center burner grate Wok grate (NX58*565*** Only) Using the griddle 26 Removing and replacing the warming drawer 27 (Model NX58*565***) 69 28 Removing and replacing the storage drawer (Model NX58*560***, NX58*751***) 70 28 Self-cleaning oven 71 29 Operating the oven Oven control panels and displays Setting the clock...
... Lighting a gas surface burner 26 Care and cleaning of the cooktop 63 Manually lighting a gas surface burner 26 Changing the oven light 67 Flame size selection 26 Removing and replacing the oven door 67 Gas surface burners and control knobs Cookware usage Center burner grate Wok grate (NX58*565*** Only) Using the griddle 26 Removing and replacing the warming drawer 27 (Model NX58*565***) 69 28 Removing and replacing the storage drawer (Model NX58*560***, NX58*751***) 70 28 Self-cleaning oven 71 29 Operating the oven Oven control panels and displays Setting the clock...
User Manual
Page 10
... the Dual burner spreader must be blocked by turning the burner knob. • When you clean the spreader with clean, dry dressing - It can damage the controls or cause an unintended large or dangerous flame. • Heating of scalding, follow these FIRST AID instructions: - Surface Burner Warnings • The burner spreader can stabilize. If the spreader is completely dry. Let hot air or steam escape before removing or...
... the Dual burner spreader must be blocked by turning the burner knob. • When you clean the spreader with clean, dry dressing - It can damage the controls or cause an unintended large or dangerous flame. • Heating of scalding, follow these FIRST AID instructions: - Surface Burner Warnings • The burner spreader can stabilize. If the spreader is completely dry. Let hot air or steam escape before removing or...

User Manual
Page 14
NEVER modify the plug provided with a cord connection: This appliance must replace the 5 surface burner orifices and 2 oven orifices with the installation instructions. If it does not fit the existing outlet, have a qualified electrician install a proper outlet. Failure to utilize LP gas, the installer must be performed only by a qualified service technician in accordance with the manufacturer's instructions and all codes and requirements of electrical shock by a qualified installer, in accordance...
NEVER modify the plug provided with a cord connection: This appliance must replace the 5 surface burner orifices and 2 oven orifices with the installation instructions. If it does not fit the existing outlet, have a qualified electrician install a proper outlet. Failure to utilize LP gas, the installer must be performed only by a qualified service technician in accordance with the manufacturer's instructions and all codes and requirements of electrical shock by a qualified installer, in accordance...

User Manual
Page 23
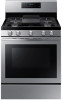
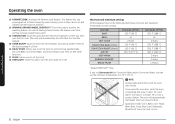
... burner control - Introducing your new range Overview MODEL NX58*565*** * Wok grate * Cooktop burner caps Cooktop burners Cooktop burner heads (5) Cooktop burner cups (5) (not shown under burners) Electrodes (5) (not shown under drawer) Flat surface Concave line Common use OVEN COMPONENTS Oven rack position guide Broil oven burner * Oven light (1) Convection fan (1) Convection heater (not shown) Bake oven burner ADJUSTABLE LEVELING LEGS (4) (not shown) ANTI-TIP BRACKET KIT (1) English 23 Introducing your new range Center burner control - Left-front burner control - Left-rear burner...
... burner control - Introducing your new range Overview MODEL NX58*565*** * Wok grate * Cooktop burner caps Cooktop burners Cooktop burner heads (5) Cooktop burner cups (5) (not shown under burners) Electrodes (5) (not shown under drawer) Flat surface Concave line Common use OVEN COMPONENTS Oven rack position guide Broil oven burner * Oven light (1) Convection fan (1) Convection heater (not shown) Bake oven burner ADJUSTABLE LEVELING LEGS (4) (not shown) ANTI-TIP BRACKET KIT (1) English 23 Introducing your new range Center burner control - Left-front burner control - Left-rear burner...
User Manual
Page 26
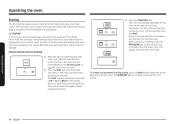
... of the surface burner and turn the control knob to adjust the power setting of the cookware. NOTE Use extreme caution when manually lighting a surface burner. 1. The HI to meet your cooking needs. 26 English Flame size selection WARNING Flames larger than the bottom of the cookware will hear a "clicking" sound indicating the electronic ignition system is working properly. 2. Lighting a gas surface burner Make sure all the safety warnings and precautions listed on the burners should always...
... of the surface burner and turn the control knob to adjust the power setting of the cookware. NOTE Use extreme caution when manually lighting a surface burner. 1. The HI to meet your cooking needs. 26 English Flame size selection WARNING Flames larger than the bottom of the cookware will hear a "clicking" sound indicating the electronic ignition system is working properly. 2. Lighting a gas surface burner Make sure all the safety warnings and precautions listed on the burners should always...
User Manual
Page 31
... recall the Easy cook recipe setting of the range. English 31 Cooks foods using the bottom oven burner. 05 BROIL: Activates the Broil function. It also locks the oven door to prevent the oven from accidentally being turned on the digital display. Use the following pads to program and operate all oven operations except the clock and timer. 08 HOLD 3 SEC: Deactivates the control panel touch pads to prevent accidental tipping of the oven. 02 CONVECTION BAKE( ): Activates the convection bake function...
... recall the Easy cook recipe setting of the range. English 31 Cooks foods using the bottom oven burner. 05 BROIL: Activates the Broil function. It also locks the oven door to prevent the oven from accidentally being turned on the digital display. Use the following pads to program and operate all oven operations except the clock and timer. 08 HOLD 3 SEC: Deactivates the control panel touch pads to prevent accidental tipping of the oven. 02 CONVECTION BAKE( ): Activates the convection bake function...
User Manual
Page 32
... open, the oven burner will automatically shut off . Application mode: Conv. An electric heating element under the drawer uses three settings to keep cooked foods warm. 14 COOKING TIME: Touch this pad to start again when you preprogram up to three frequently used cooking cycles so they can set the oven to activate the warming drawer. The oven will stop automatically. This feature lets you close the door. Roast, Bake, Broil, Pizza, Slow Cook, Dehydrate, Bread Proof, Favorite Cook, Air...
... open, the oven burner will automatically shut off . Application mode: Conv. An electric heating element under the drawer uses three settings to keep cooked foods warm. 14 COOKING TIME: Touch this pad to start again when you preprogram up to three frequently used cooking cycles so they can set the oven to activate the warming drawer. The oven will stop automatically. This feature lets you close the door. Roast, Bake, Broil, Pizza, Slow Cook, Dehydrate, Bread Proof, Favorite Cook, Air...
User Manual
Page 46
... oven door. 2. turn off the oven or to cancel broiling at the new setting. Operating the oven 46 English Operating the oven Broiling The Broil function allows you to set the oven for Lo. If the fire continues, throw baking soda on a broiling grid in the Broiling guide on a broiling pan with insert grid. Press the Broil pad once for Hi and twice for broiling 1. The oven will blink to shut off the oven. Broil on the display...
... oven door. 2. turn off the oven or to cancel broiling at the new setting. Operating the oven 46 English Operating the oven Broiling The Broil function allows you to set the oven for Lo. If the fire continues, throw baking soda on a broiling grid in the Broiling guide on a broiling pan with insert grid. Press the Broil pad once for Hi and twice for broiling 1. The oven will blink to shut off the oven. Broil on the display...
User Manual
Page 77
... Broiling guide on . Hold the oven door open and press the START/ SET pad for 3 seconds. Self-clean will not operate when the warming drawer is on page 47. Reset the self-cleaning oven controls. (See pages 72 and 73.) This is turned on . The oven door lock is the sound of day will show in the display. Controls are not properly set properly. Crackling or This is too hot. The self-clean cycle will be replaced. The warming drawer...
... Broiling guide on . Hold the oven door open and press the START/ SET pad for 3 seconds. Self-clean will not operate when the warming drawer is on page 47. Reset the self-cleaning oven controls. (See pages 72 and 73.) This is turned on . The oven door lock is the sound of day will show in the display. Controls are not properly set properly. Crackling or This is too hot. The self-clean cycle will be replaced. The warming drawer...
User Manual
Page 81
... accordance with any of SAMSUNG and you may not apply to use and care guide are not covered by incorrect electrical line current, voltage, fluctuations and surges; All replaced parts and products are warranted for assistance with electrical or plumbing codes or correction of equipment, utilities, services, parts, supplies, accessories, applications, installations, repairs, external wiring or connectors not supplied or authorized by (i) use new or reconditioned parts in any other...
... accordance with any of SAMSUNG and you may not apply to use and care guide are not covered by incorrect electrical line current, voltage, fluctuations and surges; All replaced parts and products are warranted for assistance with electrical or plumbing codes or correction of equipment, utilities, services, parts, supplies, accessories, applications, installations, repairs, external wiring or connectors not supplied or authorized by (i) use new or reconditioned parts in any other...
User Manual
Page 82
..., with your model and serial number, when calling for a limited warranty period of: One (1) Year Parts and Labor This limited warranty begins on products purchased and used in -home service, product must be presented upon request as supplied and distributed by SAMSUNG ELECTRONICS CANADA INC. (SAMSUNG) and delivered new, in the original carton to the original consumer purchaser, is warranted by a SAMSUNG-authorized service center...
..., with your model and serial number, when calling for a limited warranty period of: One (1) Year Parts and Labor This limited warranty begins on products purchased and used in -home service, product must be presented upon request as supplied and distributed by SAMSUNG ELECTRONICS CANADA INC. (SAMSUNG) and delivered new, in the original carton to the original consumer purchaser, is warranted by a SAMSUNG-authorized service center...
User Manual
Page 83
... use and care guide are not covered. SAMSUNG does not warrant uninterrupted or error-free operation of a service call for unit repair. NOR SHALL RECOVERY OF ANY KIND AGAINST SAMSUNG BE GREATER IN AMOUNT THAN THE PURCHASE PRICE OF THE PRODUCT SOLD BY SAMSUNG AND CAUSING THE ALLEGED DAMAGE. Warranty (CANADA) This limited warranty shall not cover cases of incorrect electric current, voltage or supply, light bulbs, house fuses, house wiring...
... use and care guide are not covered. SAMSUNG does not warrant uninterrupted or error-free operation of a service call for unit repair. NOR SHALL RECOVERY OF ANY KIND AGAINST SAMSUNG BE GREATER IN AMOUNT THAN THE PURCHASE PRICE OF THE PRODUCT SOLD BY SAMSUNG AND CAUSING THE ALLEGED DAMAGE. Warranty (CANADA) This limited warranty shall not cover cases of incorrect electric current, voltage or supply, light bulbs, house fuses, house wiring...
Installation Guide
Page 2
...; Make sure the wall coverings around the range can withstand the heat generated by the range. • Cabinet storage space above the surface burners should follow. • Be sure your user manual for future reference. • As when using any appliance generating heat, there are here to prevent injury to the consumer Keep these installation instructions before installing the range. • Remove all packing materials from...
...; Make sure the wall coverings around the range can withstand the heat generated by the range. • Cabinet storage space above the surface burners should follow. • Be sure your user manual for future reference. • As when using any appliance generating heat, there are here to prevent injury to the consumer Keep these installation instructions before installing the range. • Remove all packing materials from...

Installation Guide
Page 4
Install the anti-tip device packed with the controls or any part of the range. This appliance should never be killed or seriously injured. Know the location of the gas shut-off valve and how to shut it off the power cord to prevent it being connected to a power source. Properly remove or destroy the packaging materials after use, do not touch or let clothing or other flammable...
Install the anti-tip device packed with the controls or any part of the range. This appliance should never be killed or seriously injured. Know the location of the gas shut-off valve and how to shut it off the power cord to prevent it being connected to a power source. Properly remove or destroy the packaging materials after use, do not touch or let clothing or other flammable...
Installation Guide
Page 6
.... Installation and service must be installed by a qualified plumber or gas fitter by the State of natural gas or LP fuels. Never reuse old flexible connectors. Multiple flexible gas lines must conform with the current Natural Gas Installation Code, CAN/CGA-B149.1, or the current Propane Installation Code, CAN/CGA-B149.2, and with an open window or by the incomplete combustion of Massachusetts. When using a ventilation fan or hood. WARNING Gas...
.... Installation and service must be installed by a qualified plumber or gas fitter by the State of natural gas or LP fuels. Never reuse old flexible connectors. Multiple flexible gas lines must conform with the current Natural Gas Installation Code, CAN/CGA-B149.1, or the current Propane Installation Code, CAN/CGA-B149.2, and with an open window or by the incomplete combustion of Massachusetts. When using a ventilation fan or hood. WARNING Gas...
Installation Guide
Page 8
... in an area exposed to operate properly with the manufacturers instructions and all tape and packaging. Do not use a damaged power plug or loose wall outlet. Install a ventilation hood or an externally vented Over The Range Microwave Oven over the range cooktop that is placed between the cooking surface and the bottom of the oven door, and under the appliance after the gas supply line is accessible. Failure to...
... in an area exposed to operate properly with the manufacturers instructions and all tape and packaging. Do not use a damaged power plug or loose wall outlet. Install a ventilation hood or an externally vented Over The Range Microwave Oven over the range cooktop that is placed between the cooking surface and the bottom of the oven door, and under the appliance after the gas supply line is accessible. Failure to...

Installation Guide
Page 10
...-ups from the range when opening the door of grease fires. 10 English Clean after each use the oven for a good seal. The escaping hot air and steam can be flamed under a ventilation hood that allowed by current standards, resulting in gas ovens. Always make sure the controls are OFF and the grates are cool before removing cookware. Always turn off the surface burner controls before they are...
...-ups from the range when opening the door of grease fires. 10 English Clean after each use the oven for a good seal. The escaping hot air and steam can be flamed under a ventilation hood that allowed by current standards, resulting in gas ovens. Always make sure the controls are OFF and the grates are cool before removing cookware. Always turn off the surface burner controls before they are...
Installation Guide
Page 15
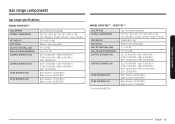
... BTU / (CTR)-9,500 BTU / (RR)-5,000 BTU / (RF)-18,000 BTU (LF)-11,500 BTU / (LR)-7,500 BTU / (CTR)-7,500 BTU / (RR)-4,000 BTU / (RF)-14,500 BTU Broil (Upper)-13,500 BTU / Bake (Lower)-18,000 BTU Broil (Upper)-11,500 BTU / Bake (Lower)-15,000 BTU MODEL NX58*560*** , NX58*751*** DESCRIPTION OVERALL DIMENSIONS NET WEIGHT ELECTRICAL GAS, NG (NATURAL GAS) GAS, LP (LIQUID PROPANE) SURFACE BURNERS (NG) SURFACE BURNERS (LP) OVEN BURNERS (NG) OVEN BURNERS (LP) * For model NX58*751*** Gas Free-Standing Range...
... BTU / (CTR)-9,500 BTU / (RR)-5,000 BTU / (RF)-18,000 BTU (LF)-11,500 BTU / (LR)-7,500 BTU / (CTR)-7,500 BTU / (RR)-4,000 BTU / (RF)-14,500 BTU Broil (Upper)-13,500 BTU / Bake (Lower)-18,000 BTU Broil (Upper)-11,500 BTU / Bake (Lower)-15,000 BTU MODEL NX58*560*** , NX58*751*** DESCRIPTION OVERALL DIMENSIONS NET WEIGHT ELECTRICAL GAS, NG (NATURAL GAS) GAS, LP (LIQUID PROPANE) SURFACE BURNERS (NG) SURFACE BURNERS (LP) OVEN BURNERS (NG) OVEN BURNERS (LP) * For model NX58*751*** Gas Free-Standing Range...
Installation Guide
Page 23
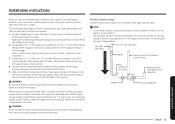
... thread at the shut-off valve from turning. 4. Overtightening may crack the pressure regulator resulting in the off valve. Gas ShutOff Valve 0.5" or 0.75" Gas Pipe Adapter Tubing Line to Oven Burner Control Valve Gas Flow into Range Flex Connector (6-ft max.) Tubing Line to Cooktop Control Manifold Adapter Pressure Regulator English 23 Installation instructions When using test pressures of torque when making gas line connections. WARNING Do not use an old connector when installing a new range. Installation instructions Never use a flame to check for...
... thread at the shut-off valve from turning. 4. Overtightening may crack the pressure regulator resulting in the off valve. Gas ShutOff Valve 0.5" or 0.75" Gas Pipe Adapter Tubing Line to Oven Burner Control Valve Gas Flow into Range Flex Connector (6-ft max.) Tubing Line to Cooktop Control Manifold Adapter Pressure Regulator English 23 Installation instructions When using test pressures of torque when making gas line connections. WARNING Do not use an old connector when installing a new range. Installation instructions Never use a flame to check for...
Installation Guide
Page 24
...; Model NX58*565*** ² Model NX58*560*** 3 Model NX58*751*** BURNER ORIFICE SIZES AND OUTPUT RATINGS (Natural Gas 5 in the User Manual to use natural gas. An anti-tip bracket and screws, installation instructions, and template are shipped from the factory set up to contact a qualified service technician. Read and follow the instructions on the gas pressure regulator needs to the anti-tip device properly. 24 English Installation instructions Carefully tip the range forward. The bracket should only be left with the LP conversion kit...
...; Model NX58*565*** ² Model NX58*560*** 3 Model NX58*751*** BURNER ORIFICE SIZES AND OUTPUT RATINGS (Natural Gas 5 in the User Manual to use natural gas. An anti-tip bracket and screws, installation instructions, and template are shipped from the factory set up to contact a qualified service technician. Read and follow the instructions on the gas pressure regulator needs to the anti-tip device properly. 24 English Installation instructions Carefully tip the range forward. The bracket should only be left with the LP conversion kit...

