
User Manual
Page 1
This manual will guide you for buying a Samsung camera. User Manual Thank you through using the camera, including capturing images, downloading images and using your new camera. ENGLISH Please read this manual carefully before using the application software.
This manual will guide you for buying a Samsung camera. User Manual Thank you through using the camera, including capturing images, downloading images and using your new camera. ENGLISH Please read this manual carefully before using the application software.

User Manual
Page 2
When transferring the images taken with the camera to using this camera in the following order. Set up the camera driver. for loss or damage of a card reader. Ś1ś Check the camera's power Check the camera's power. Check [Removable Disk] Open Windows EXPLORER and search for buying a Samsung Digital Camera. ƀ Prior to your PC. Please note that...
When transferring the images taken with the camera to using this camera in the following order. Set up the camera driver. for loss or damage of a card reader. Ś1ś Check the camera's power Check the camera's power. Check [Removable Disk] Open Windows EXPLORER and search for buying a Samsung Digital Camera. ƀ Prior to your PC. Please note that...

User Manual
Page 3
... ҟSwallowing battery or small camera accessories. You must contact your camera. the memory card slot and battery chamber. Should this be carried out by your dealer or Samsung Camera Service centre. ƅ Please do not use , do not cover the camera or Charger. Exposure to you or... your dealer or Samsung Camera Service centre. Danger DANGER indicates an imminently hazardous situation which , if ...
... ҟSwallowing battery or small camera accessories. You must contact your camera. the memory card slot and battery chamber. Should this be carried out by your dealer or Samsung Camera Service centre. ƅ Please do not use , do not cover the camera or Charger. Exposure to you or... your dealer or Samsung Camera Service centre. Danger DANGER indicates an imminently hazardous situation which , if ...
User Manual
Page 4
... the battery with hands or objects. Failure to do not insert by force. Otherwise the battery may leak corrosive electrolyte and permanently damage the camera's components. ƅ Do not fire the flash while it continuously. Contents READY ƀSystem chart 5 ƀIdentification of features Ŋ...;ŊŊŊŊ6 ƅFront & Top 6 ƅBack & Bottom 7 ƅBottom 8 ƅCradle (Optional 8 ƅSelf-timer lamp 9 ƅCamera Status Lamp ŊŊŊŊŊ9 ƅMode dial 9 ƅMode icon 10 ƀConnecting to a Power Source Ŋ10 ƅHow to charge...
... the battery with hands or objects. Failure to do not insert by force. Otherwise the battery may leak corrosive electrolyte and permanently damage the camera's components. ƅ Do not fire the flash while it continuously. Contents READY ƀSystem chart 5 ƀIdentification of features Ŋ...;ŊŊŊŊ6 ƅFront & Top 6 ƅBack & Bottom 7 ƅBottom 8 ƅCradle (Optional 8 ƅSelf-timer lamp 9 ƅCamera Status Lamp ŊŊŊŊŊ9 ƅMode dial 9 ƅMode icon 10 ƀConnecting to a Power Source Ŋ10 ƅHow to charge...

User Manual
Page 5
...330;38 ƅShutter Speed 39 ƅAperture Value 39 Ś4ś ƅPhoto Gallery modeŊŊŊŊŊŊ40 ƅOPS(Optical Picture Stabilisation : Optical Picture Stabilisation) 42 PLAY ƀStarting play mode 43 ƅPlaying back a still image ŊŊŊ43 &#...330;44 ƅPlaying back a recorded voice memo 44 ƀLCD monitor indicator ŊŊŊŊŊ45 ƀUsing the camera buttons to adjust the camera 45 ƅPlay mode button 45 ƅBACK button 45 ƅThumbnail / Enlargement button Ŋ46 ƅStarting the slide show &#...
...330;38 ƅShutter Speed 39 ƅAperture Value 39 Ś4ś ƅPhoto Gallery modeŊŊŊŊŊŊ40 ƅOPS(Optical Picture Stabilisation : Optical Picture Stabilisation) 42 PLAY ƀStarting play mode 43 ƅPlaying back a still image ŊŊŊ43 &#...330;44 ƅPlaying back a recorded voice memo 44 ƀLCD monitor indicator ŊŊŊŊŊ45 ƀUsing the camera buttons to adjust the camera 45 ƅPlay mode button 45 ƅBACK button 45 ƅThumbnail / Enlargement button Ŋ46 ƅStarting the slide show &#...

User Manual
Page 6
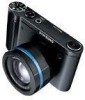
To buy the optional equipment, contact your nearest Samsung dealer or Samsung service centre. < Included items > Camera case User manual, Product warranty Camera strap Software CD (see p.68) Computer (see p.71) PictBridge compatible printer (see p.52) 7.2 MEGA PIXELS VAR DPOF compatible printer (see p.48) SD memory card/ MMC (...
To buy the optional equipment, contact your nearest Samsung dealer or Samsung service centre. < Included items > Camera case User manual, Product warranty Camera strap Software CD (see p.68) Computer (see p.71) PictBridge compatible printer (see p.52) 7.2 MEGA PIXELS VAR DPOF compatible printer (see p.48) SD memory card/ MMC (...

User Manual
Page 7
The flash opens automatically when you are not using it to prevent breakage. Ś6ś IO PLAN ZOOM 6.3-44.7 m m 7.2 MEGA PIXELS Shutter button Power button Built-in flash - It may break the camera. - Identification of features Front & Top Mode dial Self-timer lamp Remote control sensor R VA ż Instructions for the Built-in flash Auto focus lamp Lens/ Lens cover Do not open the flash by force. Close the flash when you press the shutter button down half way. -
The flash opens automatically when you are not using it to prevent breakage. Ś6ś IO PLAN ZOOM 6.3-44.7 m m 7.2 MEGA PIXELS Shutter button Power button Built-in flash - It may break the camera. - Identification of features Front & Top Mode dial Self-timer lamp Remote control sensor R VA ż Instructions for the Built-in flash Auto focus lamp Lens/ Lens cover Do not open the flash by force. Close the flash when you press the shutter button down half way. -

User Manual
Page 8
Identification of features Back & Bottom Camera status lamp LCD monitor Smart button Smart button Tripod socket Zoom W button (Thumbnail) Zoom T button (Digital zoom) Eyelet for camera strap BACK button / OPS button Play mode button USB / AV connection terminal Cradle connector Ś7ś
Identification of features Back & Bottom Camera status lamp LCD monitor Smart button Smart button Tripod socket Zoom W button (Thumbnail) Zoom T button (Digital zoom) Eyelet for camera strap BACK button / OPS button Play mode button USB / AV connection terminal Cradle connector Ś7ś

User Manual
Page 9
Identification of features Bottom Battery chamber cover Battery chamber Battery holder Memory card slot Battery cover lever Cradle (Optional) ƅ You can recharge your rechargeable battery, transfer a captured image to print, and download images with the cradle. (Refer to p.12, p.52, p.72) ƀ Top Camera connection terminal ƀ Back ż To open the battery chamber cover, slide it in the direction shown above. Ś8ś USB port DC connection terminal AV connection terminal
Identification of features Bottom Battery chamber cover Battery chamber Battery holder Memory card slot Battery cover lever Cradle (Optional) ƅ You can recharge your rechargeable battery, transfer a captured image to print, and download images with the cradle. (Refer to p.12, p.52, p.72) ƀ Top Camera connection terminal ƀ Back ż To open the battery chamber cover, slide it in the direction shown above. Ś8ś USB port DC connection terminal AV connection terminal

User Manual
Page 10
...mode by using the mode dial located on the top of features ƅ Self-timer lamp Icon Status Description - second intervals. This mode will reduce camera shake and help you get a clearer image. Ś9ś For the first 7 seconds, the lamp blinks at 0.25- Identification of the...; AUTO mode Select this mode for quick and easy picture taking with minimal user interaction. ƀ PROGRAM mode Selecting the program mode will configure the camera with a PC The lamp turns on (LCD monitor turns off) When the USB cable is not in focus) The lamp blinks (The subject is ...
...mode by using the mode dial located on the top of features ƅ Self-timer lamp Icon Status Description - second intervals. This mode will reduce camera shake and help you get a clearer image. Ś9ś For the first 7 seconds, the lamp blinks at 0.25- Identification of the...; AUTO mode Select this mode for quick and easy picture taking with minimal user interaction. ƀ PROGRAM mode Selecting the program mode will configure the camera with a PC The lamp turns on (LCD monitor turns off) When the USB cable is not in focus) The lamp blinks (The subject is ...

User Manual
Page 11
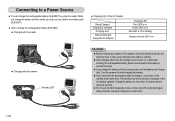
... Icon MODE TEXT SUNSET DAWN BACKLIGHT FIREWORKS BEACH&SNOW Icon Connecting to your images by using the camera. ƅ SLB-0837 rechargeable battery Specification Model Type Capacity Voltage Charging time (When the camera is possible to add special effects to a Power Source ƅ You should use the rechargeable battery... (SLB-0837) supplied with the camera. Identification of the memory capacity allows. ƀ PHOTO GALLERY mode The saved images can be recorded for as long as the ...
... Icon MODE TEXT SUNSET DAWN BACKLIGHT FIREWORKS BEACH&SNOW Icon Connecting to your images by using the camera. ƅ SLB-0837 rechargeable battery Specification Model Type Capacity Voltage Charging time (When the camera is possible to add special effects to a Power Source ƅ You should use the rechargeable battery... (SLB-0837) supplied with the camera. Identification of the memory capacity allows. ƀ PHOTO GALLERY mode The saved images can be recorded for as long as the ...

User Manual
Page 12
... When using a USB hub. INFORMATION Important information about battery usage. ƀ When the camera is connected to the PC. When the AC adapter and the USB cable are measured under Samsung's standard conditions and shooting conditions and may become warm. You can affect the performance of the...; Battery will not be charged. Ś11ś When the AC adapter is perfectly normal. ƅ You can be affected by using the OPS function. ż These figures are assembled, it can be used for 1 minute. ż The specified shooting capacity can charge the rechargeable battery ...
... When using a USB hub. INFORMATION Important information about battery usage. ƀ When the camera is connected to the PC. When the AC adapter and the USB cable are measured under Samsung's standard conditions and shooting conditions and may become warm. You can affect the performance of the...; Battery will not be charged. Ś11ś When the AC adapter is perfectly normal. ƅ You can be affected by using the OPS function. ż These figures are assembled, it can be used for 1 minute. ż The specified shooting capacity can charge the rechargeable battery ...
User Manual
Page 13
... LED Red LED is on Green LED is on Red LED is off while charging the battery. ƀ If you charge the battery with the camera Charging LED m CAUTION ƀ Before inserting any cables or AC adapter, check the directions and do not turn on or blink after inserting the rechargeable... battery is on 7.2 MEGA PIXELS R VA IO PLAN ZOOM 6.3-44.1m ƀ Charging with the camera power on the camera at the same time. The camera may cause damage to charge it, do not insert by using the camera. ƀ Do not use Lithium Ion battery pack (SLB-0837). ƅ How to charge the...
... LED Red LED is on Green LED is on Red LED is off while charging the battery. ƀ If you charge the battery with the camera Charging LED m CAUTION ƀ Before inserting any cables or AC adapter, check the directions and do not turn on or blink after inserting the rechargeable... battery is on 7.2 MEGA PIXELS R VA IO PLAN ZOOM 6.3-44.1m ƀ Charging with the camera power on the camera at the same time. The camera may cause damage to charge it, do not insert by using the camera. ƀ Do not use Lithium Ion battery pack (SLB-0837). ƅ How to charge the...

User Manual
Page 14
...memory card the wrong way round. aConnecting to come into contact with any heavy impact. ƀ Do not store the memory card in another digital camera or memory card reader. Ś13ś Have the front of the memory card facing toward the back of the... battery, please check whether the battery is not covered by another digital camera. Wear and tear on after periods of extended use of the camera (Lens). - near loudspeakers or TV receivers. ƀ Please do not use a memory card formatted by the Samsung warranty. ƀ The memory card is used in an environment ...
...memory card the wrong way round. aConnecting to come into contact with any heavy impact. ƀ Do not store the memory card in another digital camera or memory card reader. Ś13ś Have the front of the memory card facing toward the back of the... battery, please check whether the battery is not covered by another digital camera. Wear and tear on after periods of extended use of the camera (Lens). - near loudspeakers or TV receivers. ƀ Please do not use a memory card formatted by the Samsung warranty. ƀ The memory card is used in an environment ...

User Manual
Page 15
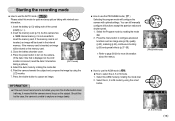
...or the memory card is removed while recording, deleting (formatting) or reading. ƀ Samsung cannot be protected. By sliding the switch towards the bottom of the following, the recorded ...is blinking as this may become corrupted : - Card pins Write protect switch Label [SD (Secure Digital) memory card] The SD memory card has a write protect switch that prevents image files from being...14ś INFORMATION ƀ Don't remove the memory card when the camera status lamp is advisable to data in the camera, replace the memory card or delete unnecessary images stored on using MMC...
...or the memory card is removed while recording, deleting (formatting) or reading. ƀ Samsung cannot be protected. By sliding the switch towards the bottom of the following, the recorded ...is blinking as this may become corrupted : - Card pins Write protect switch Label [SD (Secure Digital) memory card] The SD memory card has a write protect switch that prevents image files from being...14ś INFORMATION ƀ Don't remove the memory card when the camera status lamp is advisable to data in the camera, replace the memory card or delete unnecessary images stored on using MMC...

User Manual
Page 16
R IOPLAN ZOOM 6.3-44. Ś15ś When Using the Camera for the First Time : Attaching the lens cap ƅ When you donœt use the camera, attach the lens cap. ƀYou can attach the lens cap as shown below. 7.2 MEGA PIXELS 7.2 MEGA PIXELS 1m m 1 m m VA VA R IOPLAN ZOOM 6.3-44.
R IOPLAN ZOOM 6.3-44. Ś15ś When Using the Camera for the First Time : Attaching the lens cap ƅ When you donœt use the camera, attach the lens cap. ƀYou can attach the lens cap as shown below. 7.2 MEGA PIXELS 7.2 MEGA PIXELS 1m m 1 m m VA VA R IOPLAN ZOOM 6.3-44.

User Manual
Page 17
When Using the Camera for the First Time : Smart button ƅ This button is used for shifting the menu cursor to select or for confirming the selected menu. ƅ ...
When Using the Camera for the First Time : Smart button ƅ This button is used for shifting the menu cursor to select or for confirming the selected menu. ƅ ...

User Manual
Page 18
...Chinese, T.Chinese, Japanese, Russian, Portuguese, Dutch, Danish, Swedish, Finnish, Thai, BAHASA (MALAY / INDONESIAN), Arabic, Polish, Hungarian, Czech and Turkish. ƀ Even if the camera is turned on for the first time, a menu will be maintained. Ś17ś Set up the date, time and language before using this...the date, time and date type 1. Press the [Date&Time] menu button. 2. When Using the Camera for the First Time : Setting up the Date / Time and Language ƅ When the camera is restarted, the language setting will be displayed in the LCD monitor to set date, time and ...
...Chinese, T.Chinese, Japanese, Russian, Portuguese, Dutch, Danish, Swedish, Finnish, Thai, BAHASA (MALAY / INDONESIAN), Arabic, Polish, Hungarian, Czech and Turkish. ƀ Even if the camera is turned on for the first time, a menu will be maintained. Ś17ś Set up the date, time and language before using this...the date, time and date type 1. Press the [Date&Time] menu button. 2. When Using the Camera for the First Time : Setting up the Date / Time and Language ƅ When the camera is restarted, the language setting will be displayed in the LCD monitor to set date, time and ...
User Manual
Page 20
...26-39 for quick and easy picture taking note of the correct polarity (+ / -). 2. Select the ASM mode by using the smart button. As this camera has a 19MB internal memory, it means that is displayed on the memory card. 3. If the memory card is not essential to insert the memory card.... 1. Select the Program mode by rotating the mode dial. 6. Select the Auto mode by rotating the mode dial. 2. Should this be the case, the camera is unable to capture an image clearly. ƅ How to use the PROGRAM mode ( ) Selecting the program mode will be stored on the LCD 7 monitor...
...26-39 for quick and easy picture taking note of the correct polarity (+ / -). 2. Select the ASM mode by using the smart button. As this camera has a 19MB internal memory, it means that is displayed on the memory card. 3. If the memory card is not essential to insert the memory card.... 1. Select the Program mode by rotating the mode dial. 6. Select the Auto mode by rotating the mode dial. 2. Should this be the case, the camera is unable to capture an image clearly. ƅ How to use the PROGRAM mode ( ) Selecting the program mode will be stored on the LCD 7 monitor...

User Manual
Page 21
... Select the ASM mode by rotating the mode dial. 2. Select the SHUTTER PRIORITY mode ( S ) by using the smart button. (p.39) 4. Point the camera towards the subject and compose the image by using the smart button. 3. Low Shutter speeds can 'freeze' a moving object as if it was not moving...values make both the aperture value and the shutter speed. 1. Select the desired shutter speed and aperture value by automatic shutter speed setting in the camera. 1. Set the desired aperture value by using the smart button. (p.39) 4. Press the shutter button to capture an image. ż ...
... Select the ASM mode by rotating the mode dial. 2. Select the SHUTTER PRIORITY mode ( S ) by using the smart button. (p.39) 4. Point the camera towards the subject and compose the image by using the smart button. 3. Low Shutter speeds can 'freeze' a moving object as if it was not moving...values make both the aperture value and the shutter speed. 1. Select the desired shutter speed and aperture value by automatic shutter speed setting in the camera. 1. Set the desired aperture value by using the smart button. (p.39) 4. Press the shutter button to capture an image. ż ...


